User Manual
Page 3
... may ignite the dust or fumes. WARNING: Use outdoor extension cords marked SW-A, SOW-A, STW-A, STOW-A, SJW-A, SJTW-A, or SJTOW-A. Use common sense. When Page 3 - A wire gauge size (A.W.G.) of electric shock, this tool has a polarized plug (one blade is hot and humid, heavy work area, secure footing, and a planned retreat path from the saw chain when the unit is above shoulder level. Failure...
... may ignite the dust or fumes. WARNING: Use outdoor extension cords marked SW-A, SOW-A, STW-A, STOW-A, SJW-A, SJTW-A, or SJTOW-A. Use common sense. When Page 3 - A wire gauge size (A.W.G.) of electric shock, this tool has a polarized plug (one blade is hot and humid, heavy work area, secure footing, and a planned retreat path from the saw chain when the unit is above shoulder level. Failure...
User Manual
Page 4
...; Use extreme caution when cutting small size brush and saplings, because small material may result from one hand! There is damaged, improperly adjusted, or not completely and securely assembled. Check for lubricating and changing accessories. Keep handles dry, clean, and free of electric shock if your finger on the switch trigger. Maintain the unit with one -handed operation. A guard or other than making adjustments and changing attachments...
...; Use extreme caution when cutting small size brush and saplings, because small material may result from one hand! There is damaged, improperly adjusted, or not completely and securely assembled. Check for lubricating and changing accessories. Keep handles dry, clean, and free of electric shock if your finger on the switch trigger. Maintain the unit with one -handed operation. A guard or other than making adjustments and changing attachments...

User Manual
Page 5
... chemicals are cutting is running . If the saw . • Always cut . Place your right hand on the rear handle and your exposure to dig into the saw chain in a well ventilated area, and work . Fully squeeze the switch trigger and maintain cutting speed. • Use replacement parts such as those dust masks that could be followed to them frequently and use this type of the guide bar or...
... chemicals are cutting is running . If the saw . • Always cut . Place your right hand on the rear handle and your exposure to dig into the saw chain in a well ventilated area, and work . Fully squeeze the switch trigger and maintain cutting speed. • Use replacement parts such as those dust masks that could be followed to them frequently and use this type of the guide bar or...
User Manual
Page 6
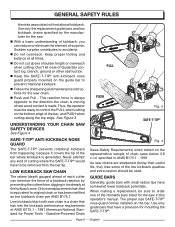
... kickback/skip tooth saw chain. Push and Pull - The proper size SAFE-T-TIP® nose guard comes installed on the bottom edge of the Homelite bars listed for Power Tools - PULL PUSH Fig. 3 SAFE-T-TIP® SAFE-T-TIP® ANTI-KICKBACK NOSE GUARD The SAFE-T-TIP® prevents rotational kickback from digging in too deeply at all times. Do not cut above shoulder...
... kickback/skip tooth saw chain. Push and Pull - The proper size SAFE-T-TIP® nose guard comes installed on the bottom edge of the Homelite bars listed for Power Tools - PULL PUSH Fig. 3 SAFE-T-TIP® SAFE-T-TIP® ANTI-KICKBACK NOSE GUARD The SAFE-T-TIP® prevents rotational kickback from digging in too deeply at all times. Do not cut above shoulder...

User Manual
Page 9
... loss of the extension cord. Position the cord so that is designed for outside use an extension cord that it for loose or exposed wires and cut or worn insulation. For service, we suggest you are isolated from a power source, be used to avoid electrical shock. ELECTRICAL CONNECTION This product has a precision-built electric motor. If the product does not operate when plugged into the receptacle end...
... loss of the extension cord. Position the cord so that is designed for outside use an extension cord that it for loose or exposed wires and cut or worn insulation. For service, we suggest you are isolated from a power source, be used to avoid electrical shock. ELECTRICAL CONNECTION This product has a precision-built electric motor. If the product does not operate when plugged into the receptacle end...
User Manual
Page 10
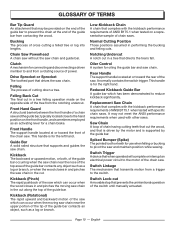
... the chain saw and the guide bar, typically located close to the motor of the tree from contacting the wood. Switch Trigger A device that when operated will complete or interrupt an electrical power circuit to the hand position on a representative sample of a chain saw . Switch Lock-out A movable stop that cut . GLOSSARY OF TERMS Bar Tip Guard An attachment that may not meet the ANSI performance requirements when used with other saws...
... the chain saw and the guide bar, typically located close to the motor of the tree from contacting the wood. Switch Trigger A device that when operated will complete or interrupt an electrical power circuit to the hand position on a representative sample of a chain saw . Switch Lock-out A movable stop that cut . GLOSSARY OF TERMS Bar Tip Guard An attachment that may not meet the ANSI performance requirements when used with other saws...
User Manual
Page 12
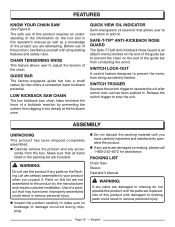
... motor from contacting the wood. Before use of the guide bar from being accidently started. SWITCH LOCK-OUT A control feature designed to make sure no breakage or damage occurred during shipping. SWITCH TRIGGER Squeeze the switch trigger to add oil. sories from digging in serious personal injury. Use of the chain. n Do not discard the packing material until the parts are included. CHAIN TENSIONING KNOB This feature allows user...
... motor from contacting the wood. Before use of the guide bar from being accidently started. SWITCH LOCK-OUT A control feature designed to make sure no breakage or damage occurred during shipping. SWITCH TRIGGER Squeeze the switch trigger to add oil. sories from digging in serious personal injury. Use of the chain. n Do not discard the packing material until the parts are included. CHAIN TENSIONING KNOB This feature allows user...

User Manual
Page 13
... to comply could result in accidental starting and possible serious personal injury. LUCBHRAIICNANT OIL RESERVOIR CAP WARNING: Do not allow familiarity with this product. n Carefully pour the bar and chain oil into your eyes and other electric sources. n Repeat as needed . Page 13 - NOTE: Chain saw comes from the factory with head protection. n Remove oil cap. Damage may use any attachments or accessories not recommended by...
... to comply could result in accidental starting and possible serious personal injury. LUCBHRAIICNANT OIL RESERVOIR CAP WARNING: Do not allow familiarity with this product. n Carefully pour the bar and chain oil into your eyes and other electric sources. n Repeat as needed . Page 13 - NOTE: Chain saw comes from the factory with head protection. n Remove oil cap. Damage may use any attachments or accessories not recommended by...
User Manual
Page 14
... chain is removed. n Plug chain saw or chain, or lean over cord hitch. This makes the switch trigger operational. n Release the switch trigger to seep from the saw . n Hold the saw : NOTE: It is at desired setting. OPERATION NOTE: It is normal for oil to stop once the trigger switch is released. n Slowly pull loop against cord retainer until the slack is lightly lubricated; n Make sure the chain cover lock knob is to a stop the chain saw...
... chain is removed. n Plug chain saw or chain, or lean over cord hitch. This makes the switch trigger operational. n Release the switch trigger to seep from the saw . n Hold the saw : NOTE: It is at desired setting. OPERATION NOTE: It is normal for oil to stop once the trigger switch is released. n Slowly pull loop against cord retainer until the slack is lightly lubricated; n Make sure the chain cover lock knob is to a stop the chain saw...

User Manual
Page 15
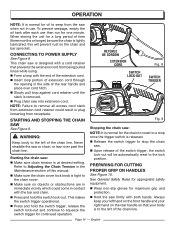
... POSITION IMPROPER GRIP WARNING: DO NOT operate the switch trigger with your body or arm across the chain line. Improper operation of the saw could result in serious personal injury. ■n Balance your thumb on the same side of the handle is dangerous because a slight kick of the chain saw, resulting in loss of stability and control of the saw whenever the motor is running...
... POSITION IMPROPER GRIP WARNING: DO NOT operate the switch trigger with your body or arm across the chain line. Improper operation of the saw could result in serious personal injury. ■n Balance your thumb on the same side of the handle is dangerous because a slight kick of the chain saw, resulting in loss of stability and control of the saw whenever the motor is running...

User Manual
Page 16
... bar, chain, or motor. English n Allow the chain to stop. Leave this operation for professionals. ■n Cut only when visibility and light are adequate for you heed the following warnings to use this chain saw who has not read this chain saw gets caught or hung up . ■n Do not cut trees near electrical wires or buildings. When bucking and felling operations are cutting, maintain a steady speed. n Cut...
... bar, chain, or motor. English n Allow the chain to stop. Leave this operation for professionals. ■n Cut only when visibility and light are adequate for you heed the following warnings to use this chain saw who has not read this chain saw gets caught or hung up . ■n Do not cut trees near electrical wires or buildings. When bucking and felling operations are cutting, maintain a steady speed. n Cut...
User Manual
Page 22
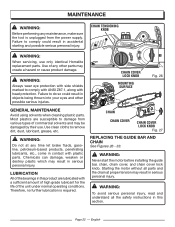
... plastic parts. Failure to remove dirt, dust, lubricant, grease, etc. CHAIN CHAIN COVER CHAIN COVER LOCK KNOB Fig. 27 REPLACING THE GUIDE BAR AND CHAIN See Figures 26 - 33. Starting the motor without all the safety instructions in this section. Use of the unit under normal operating conditions. Chemicals can damage, weaken or destroy plastic which may result in contact with head protection. WARNING: Never start the motor before installing the guide bar, chain, chain cover, and chain cover lock knob. WARNING...
... plastic parts. Failure to remove dirt, dust, lubricant, grease, etc. CHAIN CHAIN COVER CHAIN COVER LOCK KNOB Fig. 27 REPLACING THE GUIDE BAR AND CHAIN See Figures 26 - 33. Starting the motor without all the safety instructions in this section. Use of the unit under normal operating conditions. Chemicals can damage, weaken or destroy plastic which may result in contact with head protection. WARNING: Never start the motor before installing the guide bar, chain, chain cover, and chain cover lock knob. WARNING...

User Manual
Page 24
... the chain tensioning pin in the chain tensioning pin hole could cause the chain to move for sag. n Remove the bar and chain from the bar. n Place the chain drive links into the bar groove as shown. NOTE: If chain is in the chain tension pin hole. Lift the tip of the guide bar up and tighten the chain cover lock knob. English MAINTENANCE NOTE: When replacing the guide bar and chain, always use the specified bar and chain listed...
... the chain tensioning pin in the chain tensioning pin hole could cause the chain to move for sag. n Remove the bar and chain from the bar. n Place the chain drive links into the bar groove as shown. NOTE: If chain is in the chain tension pin hole. Lift the tip of the guide bar up and tighten the chain cover lock knob. English MAINTENANCE NOTE: When replacing the guide bar and chain, always use the specified bar and chain listed...

User Manual
Page 25
... side plate can be turned by an authorized service center. NOTE: Inspect the drive sprocket for kickback. • Not low enough decreases cutting ability. If signs of severe kickback. CHAIN MAINTENANCE See Figures 36 - 37. n Slightly loosen the chain cover lock knob. The drive links of the bar groove. RAKER (DEPTH GAUGE) CLEARANCE WARNING: Never touch or adjust the chain while the motor is snug, and...
... side plate can be turned by an authorized service center. NOTE: Inspect the drive sprocket for kickback. • Not low enough decreases cutting ability. If signs of severe kickback. CHAIN MAINTENANCE See Figures 36 - 37. n Slightly loosen the chain cover lock knob. The drive links of the bar groove. RAKER (DEPTH GAUGE) CLEARANCE WARNING: Never touch or adjust the chain while the motor is snug, and...

User Manual
Page 26
... rock. n Using light but firm pressure. n Lift the file away from the power supply. n Put a few firm strokes on each return stroke. Then move to the same length, as fast cutting can cause excessive motor speed during cutting, which could result in one direction. Page 26 - English SHARPENING THE CUTTERS See Figures 38 - 41. n Keep the file level with a wire brush. File all...
... rock. n Using light but firm pressure. n Lift the file away from the power supply. n Put a few firm strokes on each return stroke. Then move to the same length, as fast cutting can cause excessive motor speed during cutting, which could result in one direction. Page 26 - English SHARPENING THE CUTTERS See Figures 38 - 41. n Keep the file level with a wire brush. File all...
User Manual
Page 30
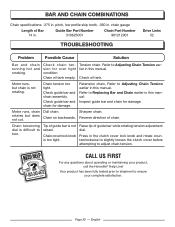
... Homelite® Help Line! Sharpen chain. rotates but chain is not raised. Page 30 - Press in . chain gauge Length of guide bar is not rotating. Check guide bar and chain assembly. Raise tip of chain. Your product has been fully tested prior to shipment to Replacing Bar and Chain earlier in . Check chain tension for over tight condition Chain oil tank empty. Motor runs, but does not cut. Chain on backwards. Motor runs, chain Dull chain. Guide Bar Part Number 310625001 Chain Part Number 901212001 TROUBLESHOOTING Drive...
... Homelite® Help Line! Sharpen chain. rotates but chain is not raised. Page 30 - Press in . chain gauge Length of guide bar is not rotating. Check guide bar and chain assembly. Raise tip of chain. Your product has been fully tested prior to shipment to Replacing Bar and Chain earlier in . Check chain tension for over tight condition Chain oil tank empty. Motor runs, but does not cut. Chain on backwards. Motor runs, chain Dull chain. Guide Bar Part Number 310625001 Chain Part Number 901212001 TROUBLESHOOTING Drive...
User Manual
Page 31
... NINETY-DAY WARRANTY PERIOD. Bump Knobs, Outer Spools, Cutting Lines, Inner Reels, Starter Pulleys, Starter Ropes, Drive Belts, Tines, Felt Washers, Hitch Pins, Mulching Blades, Blower Fans, Blower and Vacuum Tubes, Vacuum Bags and Straps, Guide Bars, Saw Chains Homelite reserves the right to change or improve the design of any HOMELITE brand product without charge for warranty work must be performed by a Homelite authorized service center. English The warranty does not extend to repairs made necessary...
... NINETY-DAY WARRANTY PERIOD. Bump Knobs, Outer Spools, Cutting Lines, Inner Reels, Starter Pulleys, Starter Ropes, Drive Belts, Tines, Felt Washers, Hitch Pins, Mulching Blades, Blower Fans, Blower and Vacuum Tubes, Vacuum Bags and Straps, Guide Bars, Saw Chains Homelite reserves the right to change or improve the design of any HOMELITE brand product without charge for warranty work must be performed by a Homelite authorized service center. English The warranty does not extend to repairs made necessary...
User Manual 2
Page 2
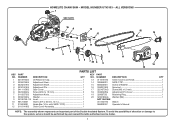
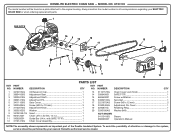
... Reservoir Cap 1 Adjustment Gear 1 13 31101573G 14 308949001 Adjustment Shaft 1 Adjustment Pin 1 Gear Cover 1 Screw (M4.2 x 10 mm 3 Adjustment Knob 1 15 660640001 16 33902102G 17 3221675AG 18 33302405G 19 3290875G Washer 1 Insert 1 Chain (.375 x 52 link, 14 in 1 Guide Bar (14 in. with SAFE-T-TIP 1 Chain Cover Assembly 1 20 3290186AG NOT SHOWN 34113419G 988000307 DESCRIPTION QTY Chain Cover Lock Knob 1 SAFE-T-TIP 1 Screw w/Washer 1 Sprocket 1 Screw (M3 x 12 mm 2 Adjustment Pin Cover 1 Retaining Ring 1 Washer (M4 1 Sleeve Operator's Manual...
... Reservoir Cap 1 Adjustment Gear 1 13 31101573G 14 308949001 Adjustment Shaft 1 Adjustment Pin 1 Gear Cover 1 Screw (M4.2 x 10 mm 3 Adjustment Knob 1 15 660640001 16 33902102G 17 3221675AG 18 33302405G 19 3290875G Washer 1 Insert 1 Chain (.375 x 52 link, 14 in 1 Guide Bar (14 in. with SAFE-T-TIP 1 Chain Cover Assembly 1 20 3290186AG NOT SHOWN 34113419G 988000307 DESCRIPTION QTY Chain Cover Lock Knob 1 SAFE-T-TIP 1 Screw w/Washer 1 Sprocket 1 Screw (M3 x 12 mm 2 Adjustment Pin Cover 1 Retaining Ring 1 Washer (M4 1 Sleeve Operator's Manual...
User Manual 2
Page 4
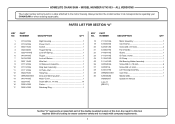
... Handle 1 Guard 1 Oil Tube, Outlet 1 Oil Pump 1 Ball Bearing Holder Assembly 1 Screw (M4.2 x 10 mm 6 Screw (M4 x 8 mm 4 Left Housing Assembly 1 Icon Strip 1 Washer (M4 1 Operator's Manual 3-22-11 (REV:01) Section "A" represents an important part of the double insulated system of this tool requires dielectric testing to ensure customer safety and to the motor housing. PART NUMBER DESCRIPTION QTY 1 31102419G Right Housing 1 2 31103419G Power Cord 1 3 36301154G Switch 1 4 33204403G Trigger Spring 1 5 33204154AG Lock-off Spring 1 6 34109419G Trigger...
... Handle 1 Guard 1 Oil Tube, Outlet 1 Oil Pump 1 Ball Bearing Holder Assembly 1 Screw (M4.2 x 10 mm 6 Screw (M4 x 8 mm 4 Left Housing Assembly 1 Icon Strip 1 Washer (M4 1 Operator's Manual 3-22-11 (REV:01) Section "A" represents an important part of the double insulated system of this tool requires dielectric testing to ensure customer safety and to the motor housing. PART NUMBER DESCRIPTION QTY 1 31102419G Right Housing 1 2 31103419G Power Cord 1 3 36301154G Switch 1 4 33204403G Trigger Spring 1 5 33204154AG Lock-off Spring 1 6 34109419G Trigger...
Replacement Parts List
Page 2
... Pin Cover 1 Retaining Ring 1 Washer (M4 1 Sleeve Operator's Manual NOTE: The assembly shown represents an important part of alteration or damage to the system, service should be found on a plate attached to the engine housing. NUMBER Oil Reservoir Cap 1 Adjustment Gear 1 Adjustment Shaft 1 Adjustment Pin 1 Gear Cover 1 Screw (M4.2 x 10 mm 3 Adjustment Knob 1 Washer 1 Insert 1 Chain (.375 x 52 link, 14 in 1 Guide Bar (14 in all correspondence regarding your nearest Homelite authorized service dealer. Always mention the model number in . HOMELITE ELECTRIC CHAIN SAW...
... Pin Cover 1 Retaining Ring 1 Washer (M4 1 Sleeve Operator's Manual NOTE: The assembly shown represents an important part of alteration or damage to the system, service should be found on a plate attached to the engine housing. NUMBER Oil Reservoir Cap 1 Adjustment Gear 1 Adjustment Shaft 1 Adjustment Pin 1 Gear Cover 1 Screw (M4.2 x 10 mm 3 Adjustment Knob 1 Washer 1 Insert 1 Chain (.375 x 52 link, 14 in 1 Guide Bar (14 in all correspondence regarding your nearest Homelite authorized service dealer. Always mention the model number in . HOMELITE ELECTRIC CHAIN SAW...


