
User Manual
Page 3
...cutting machine is not alert to operate the product without proper instruction. Keep the area clear of all times. Operate the lawn mower only in loss of power and overheating. WARNING: Use outdoor extension cords marked SW-A, SOW-A, STW-A, STOW-A, SJW-A, SJTW-A, or ...may result in serious personal injury. Keep machine in good condition. Damaged cords increase the risk of electric shock. If in moving parts. Children are doing, and use and reduce the risk of electric shock. Make sure your extension cord is dusty. ...
...cutting machine is not alert to operate the product without proper instruction. Keep the area clear of all times. Operate the lawn mower only in loss of power and overheating. WARNING: Use outdoor extension cords marked SW-A, SOW-A, STW-A, STOW-A, SJW-A, SJTW-A, or ...may result in serious personal injury. Keep machine in good condition. Damaged cords increase the risk of electric shock. If in moving parts. Children are doing, and use and reduce the risk of electric shock. Make sure your extension cord is dusty. ...
User Manual
Page 4
... to the product. Use only identical replacement parts when servicing the product. Receptacles are sure the blade has stopped rotating. Disconnect the plug from power source before each mowing. If the lawn mower strikes a foreign object, follow these instructions. SPECIFIC SAFETY... Objects struck by the manufacturer. Clear the work area before making any adjustments, changing accessories, or storing the lawn mower. Service or maintenance performed by the blade. Keep handles dry, clean, and free from a wall or obstruction, first look down . ...
... to the product. Use only identical replacement parts when servicing the product. Receptacles are sure the blade has stopped rotating. Disconnect the plug from power source before each mowing. If the lawn mower strikes a foreign object, follow these instructions. SPECIFIC SAFETY... Objects struck by the manufacturer. Clear the work area before making any adjustments, changing accessories, or storing the lawn mower. Service or maintenance performed by the blade. Keep handles dry, clean, and free from a wall or obstruction, first look down . ...
User Manual
Page 9
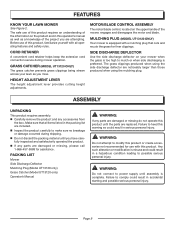
...61522;BLY UNPACKING This product requires assembly. Carefully remove the product and any parts are attempting. MULCHING PLUG (MODEL UT13120 ONLY) Your mower is equipped with this product until assembly is misuse and could result in a hazardous condition leading to...those produced when using the side discharge deflector are replaced. PACKING LIST Mower Side Discharge Deflector Mulching Plug (Model UT13120 only) Grass Catcher (Model UT13120 only) Operator's Manual WARNING: If any parts are damaged or missing do not operate this product. Failure to ...
...61522;BLY UNPACKING This product requires assembly. Carefully remove the product and any parts are attempting. MULCHING PLUG (MODEL UT13120 ONLY) Your mower is equipped with this product until assembly is misuse and could result in a hazardous condition leading to...those produced when using the side discharge deflector are replaced. PACKING LIST Mower Side Discharge Deflector Mulching Plug (Model UT13120 only) Grass Catcher (Model UT13120 only) Operator's Manual WARNING: If any parts are damaged or missing do not operate this product. Failure to ...
User Manual
Page 14
...time let brake fluids, gasoline, petroleumbased products, penetrating oils, etc., come to a complete stop. Turn the mower on removing the blade. Most plastics are lubricated with rags and other parts may result in serious personal injury. WARNING: Do not at any maintenance, make sure the... mower is dusty, also wear a dust mask. Periodically check all nuts and bolts for instructions on its side. &#...
...time let brake fluids, gasoline, petroleumbased products, penetrating oils, etc., come to a complete stop. Turn the mower on removing the blade. Most plastics are lubricated with rags and other parts may result in serious personal injury. WARNING: Do not at any maintenance, make sure the... mower is dusty, also wear a dust mask. Periodically check all nuts and bolts for instructions on its side. &#...
User Manual
Page 15
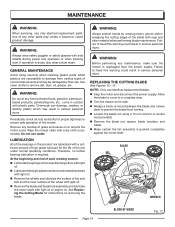
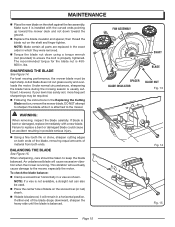
NOTE: Make certain all parts are replaced in the exact order in possible serious injury. �... To check the blade balance: Clamp a screwdriver horizontally in the Replacing the Cutting Blade section, remove the mower blade. lbs. DO NOT attempt to replace a bent or damaged blade could cause an accident resulting in which they ... blade will eventually cause damage to keep the blade balanced. This vibration will cause excessive vibration when the mower is bent or damaged, replace immediately with the curved ends pointing up toward the ground. Replace...
NOTE: Make certain all parts are replaced in the exact order in possible serious injury. �... To check the blade balance: Clamp a screwdriver horizontally in the Replacing the Cutting Blade section, remove the mower blade. lbs. DO NOT attempt to replace a bent or damaged blade could cause an accident resulting in which they ... blade will eventually cause damage to keep the blade balanced. This vibration will cause excessive vibration when the mower is bent or damaged, replace immediately with the curved ends pointing up toward the ground. Replace...
User Manual
Page 16
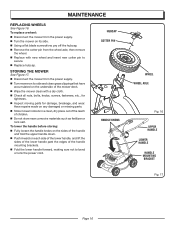
... Figure 17. Disconnect the mower from the wheel axle, then remove the wheel. Replace with a dry cloth. � Check all nuts, bolts, knobs, screws, fasteners, etc., for tightness. � Inspect moving parts for damage, breakage, and wear. HUBCAP COTTER PIN HANDLE KNOBS WHEEL ...the handle knobs on the sides of the handle and fold the upper handle down. Push inward on any damaged or missing parts. Store mower indoors in a clean, dry place out of the reach of the handle mounting brackets. Fold the lower handle forward, making...
... Figure 17. Disconnect the mower from the wheel axle, then remove the wheel. Replace with a dry cloth. � Check all nuts, bolts, knobs, screws, fasteners, etc., for tightness. � Inspect moving parts for damage, breakage, and wear. HUBCAP COTTER PIN HANDLE KNOBS WHEEL ...the handle knobs on the sides of the handle and fold the upper handle down. Push inward on any damaged or missing parts. Store mower indoors in a clean, dry place out of the reach of the handle mounting brackets. Fold the lower handle forward, making...
User Manual
Page 18
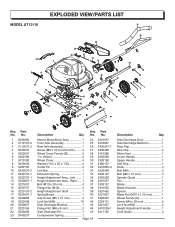
...-1 13 3330837-1 14 3221637 15 3220737 16 3220137-2 17 3330437-1 18 3220608 19 3220439 20 3330637 21 3220136 22 3320338 23 3340237 Description Key Part Qty. No. Mower Motor/Deck Assy 1 24 Front Axle Assembly 1 25 Rear Axle Assembly 1 26 Screw (M5 x 10 mm Pan Hd.)......... 4 27 Wheel Cover ...3420237-1 3330490 3410390 3330290 3330190 3490137 3410835-3 3220436 3220137 3320238 3410237 3330137 3410535 3331435 3221037 3320337 3220131 3221237 3410239-1 3411135 Description Qty. EXPLODED VIEW49/PARTS LIST MODEL UT13118 31 28 1 25 24 20 22 23 13 4 11 10 12 14 2 5 37 34 38 40 35 21 ...
...-1 13 3330837-1 14 3221637 15 3220737 16 3220137-2 17 3330437-1 18 3220608 19 3220439 20 3330637 21 3220136 22 3320338 23 3340237 Description Key Part Qty. No. Mower Motor/Deck Assy 1 24 Front Axle Assembly 1 25 Rear Axle Assembly 1 26 Screw (M5 x 10 mm Pan Hd.)......... 4 27 Wheel Cover ...3420237-1 3330490 3410390 3330290 3330190 3490137 3410835-3 3220436 3220137 3320238 3410237 3330137 3410535 3331435 3221037 3320337 3220131 3221237 3410239-1 3411135 Description Qty. EXPLODED VIEW49/PARTS LIST MODEL UT13118 31 28 1 25 24 20 22 23 13 4 11 10 12 14 2 5 37 34 38 40 35 21 ...
User Manual
Page 19
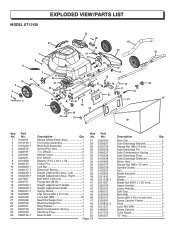
Wheel 2 31 Wheel Cover 4 32 8 in . No. Mower Motor/Deck Assy 1 27 Front Axle Assembly 1 28 Rear Axle Assembly 1 29 Screw (... Washer 2 49 Rear Compression Spring 1 50 Mulching Plug 1 51 Rear Shield 1 52 Page 19 Part No. 3330490 3330637 3220136 3320338 3340237 3410338 3410438 3410490 3220137 3320238 3410237 3410535 3331435 3331238-1 3221037 3330190 3330191... 3490137 3220436 3220131 3330291 3410835-3 3221237 3490291 3411135 3320237 Description Qty. EXPLODED VIEW/PARTS LIST MODEL UT13120 34 11 10 5 6 8 9 1 4 2 35 52 36 37 40 15 14 7 38...
Wheel 2 31 Wheel Cover 4 32 8 in . No. Mower Motor/Deck Assy 1 27 Front Axle Assembly 1 28 Rear Axle Assembly 1 29 Screw (... Washer 2 49 Rear Compression Spring 1 50 Mulching Plug 1 51 Rear Shield 1 52 Page 19 Part No. 3330490 3330637 3220136 3320338 3340237 3410338 3410438 3410490 3220137 3320238 3410237 3410535 3331435 3331238-1 3221037 3330190 3330191... 3490137 3220436 3220131 3330291 3410835-3 3221237 3490291 3411135 3320237 Description Qty. EXPLODED VIEW/PARTS LIST MODEL UT13120 34 11 10 5 6 8 9 1 4 2 35 52 36 37 40 15 14 7 38...

User Manual
Page 20
... normal use. Cosmetic defects that each new product and service part is manufactured for the Great States Corporation lawn mower company under this warranty any defective product or part from customer to homelite@reelin.com. Call us first with tool functionality. Freight costs... from the original date of products or parts determined not to you. ...
... normal use. Cosmetic defects that each new product and service part is manufactured for the Great States Corporation lawn mower company under this warranty any defective product or part from customer to homelite@reelin.com. Call us first with tool functionality. Freight costs... from the original date of products or parts determined not to you. ...

User Manual
Page 22
... attached to provide all relevant information when you , please call or visit. Be sure to the housing. OPERATOR'S MANUAL ELECTRIC LAWN MOWER 18 in the space provided below. UT13118 20 in. - UT13120 SERVICE For parts or service, contact your nearest Homelite authorized service dealer. MODEL NUMBER SERIAL NUMBER 987000-034 11-8-06 (REV:00...
... attached to provide all relevant information when you , please call or visit. Be sure to the housing. OPERATOR'S MANUAL ELECTRIC LAWN MOWER 18 in the space provided below. UT13118 20 in. - UT13120 SERVICE For parts or service, contact your nearest Homelite authorized service dealer. MODEL NUMBER SERIAL NUMBER 987000-034 11-8-06 (REV:00...


