
Homelite UT13120 Support Question
Homelite UT13120 Support Question
Find answers below for this question about Homelite UT13120.Need a Homelite UT13120 manual? We have 1 online manual for this item!
Question posted by janiceaia on April 14th, 2013
How Do I Remove Safety Switch On My Lawn Mower?
How do I remove safety switch from bottom of bar near top of handle on my 20 inch, 24 v, cordless lawn mower?
Current Answers
Related Homelite UT13120 Manual Pages
User Manual - Page 1
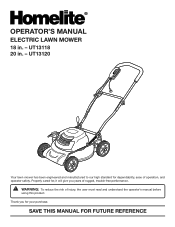
UT13118 20 in . - UT13120
Your lawn mower has been engineered and manufactured to our high standard for your purchase. SAVE THIS MANUAL FOR FUTURE REFERENCE Properly cared for, it will give you for dependability, ease of rugged, trouble-free performance. Thank you years of operation, and operator safety.
WARNING: To reduce the risk of injury, the...
User Manual - Page 2

... Rules...3-4 Specific Safety Rules ...4 Symbols ...5-6 Electrical...7 Features...8-9 Assembly...9-11 Operation...12-13 Maintenance...14-16 Troubleshooting...17 Exploded View/Parts List ...18-19 Warranty ...20 Parts Ordering / Service ...Back Page
INTRODUCTION
This product has many features for making...
User Manual - Page 3
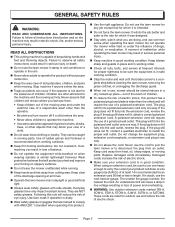
...receptacle, or extension cord plug in daylight or good artificial light.
Always wear safety glasses with ANSI Z87.1 standard when operating this rule will fit into the polarized wall outlet... number, the heavier the cord. Failure to a complete stop before cleaning the lawn mower, removing the grass catcher, or unclogging the discharge guard.
When not in good working order....
User Manual - Page 4
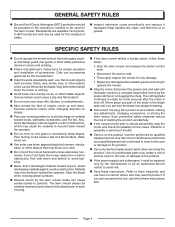
... If the lawn mower strikes a foreign object, follow these steps:
• Stop the lawn mower and release the switch control lever.
• Disconnect the power cord.
• Thoroughly inspect the mower for the ... any damage before removing the grass catcher or unclogging the chute. Only use them these instructions. SPECIFIC SAFETY RULES
Do not operate the mower without the entire ...
User Manual - Page 5
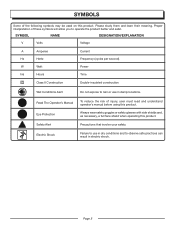
... must read and understand operator's manual before using this product.
Precautions that involve your safety. SYMBOL
NAME
DESIGNATION/EXPLANATION
V
Volts
Voltage
A
Amperes
Hz
Hertz
W
Watt
Current Frequency...not expose to observe safe practices can result in damp locations. Always wear safety goggles or safety glasses with side shields and, as necessary, a full face shield when ...
User Manual - Page 6

... return the product to your eyes, which , if not avoided, could result in property damage. Call Homelite customer service for assistance. We recommend Wide Vision Safety Mask for use only identical replacement parts. CAUTION:
Indicates a potentially hazardous situation, which , if not avoided, will result in minor or moderate injury.
Always use...
User Manual - Page 7
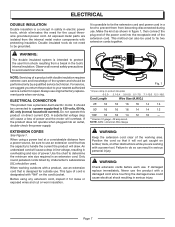
... loose or exposed wires and cut or worn insulation. Observe all normal safety precautions to determine the minimum wire size required in an extension cord. ... to a power supply that has the capacity to handle the current the product will cause a drop in line voltage, resulting...serious injury. Do not operate this product on 12 gauge - 20 amp circuit. NOTE: AWG = American Wire Gauge
WARNING:
Keep...
User Manual - Page 9
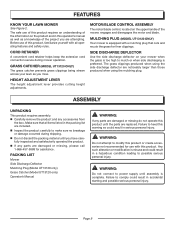
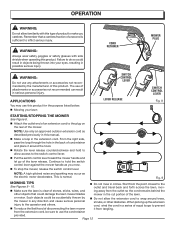
...LAWN MOWER
See Figure 2.
MOTOR/BLADE CONTROL ASSEMBLY
The motor/blade control, located on the upper handle of the project you are replaced.
Failure to power supply until assembly is preferred. WARNING:
Do not connect to heed this warning so could result in serious personal injury.
GRASS CATCHER (MODEL UT13120...assembly. Carefully remove the product and any parts are...
User Manual - Page 10
...
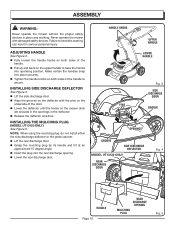
PINS
Fig. 3
SIDE DISCHARGE
DOOR
GROOVE
HOOKS OPENINGS
GROOVE
SIDE DISCHARGE DEFLECTOR
MODEL UT13120 ONLY
REAR DISCHARGE
DOOR
Fig. 4
HANDLE Page 10
REAR DISCHARGE
OPENING
MULCHING PLUG
Fig. 5 ASSEMBLY
WARNING:
Never operate the mower without the proper safety devices in serious personal injury.
INSTALLING SIDE DISCHARGE DEFLECTOR
See Figure 4. Lift the side discharge...
User Manual - Page 11
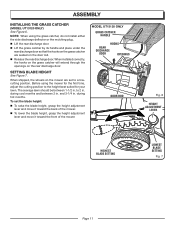
...; Release the rear discharge door. MODEL UT13120 ONLY
GRASS CATCHER HANDLE
HOOKS
REAR DISCHARGE
DOOR
OPENINGS
DOOR ROD
Fig. 6
HEIGHT ADJUSTMENT
LEVER
HIGHEST BLADE SETTING
LOWEST BLADE SETTING
Fig. 7
Page 11 ASSEMBLY
INSTALLING THE GRASS CATCHER
(MODEL UT13120 ONLY) See Figure 6. NOTE: When using the mower for your lawn. and 3-1/4 in .
during hot months. The...
User Manual - Page 12
...; Pull the switch control lever toward the mower handle and let go of the lever release. The use this manual.
Make a loop in the back of the lawn. From the right side, pass the loop through the hole in the extension cord.
from tangling.
WARNING:
Always wear safety goggles or safety glasses with this...
User Manual - Page 13
...
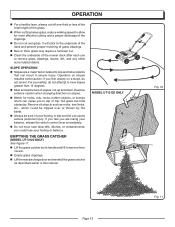
Slopes are losing your balance, release the switch control lever immediately.
Do not mow near drop-offs, ditches, or embankments; If you feel ...
For your safety, do not mow it.
Tall grass can result in this manual. EMPTYING THE GRASS CATCHER
(MODEL UT13120 ONLY) See Figure 11.
Lift the grass catcher by its handle and lift to remove from mower.
...
User Manual - Page 14
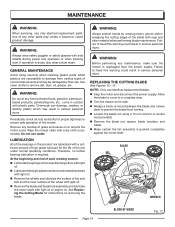
...blades. Stop the motor and disconnect the power supply. WARNING:
Always wear safety goggles or safety glasses with a dry cloth occasionally. Do not use .
REPLACING THE CUTTING BLADE
...blade maintenance. If operation is required. Wipe the mower clean with side shields during power tool operation or when blowing dust.
Remove any time let brake fluids, gasoline, petroleumbased ...
User Manual - Page 15
... nail can also be taken to sharpen the blade while it will remain in the Replacing the Cutting
Blade section, remove the mower blade.
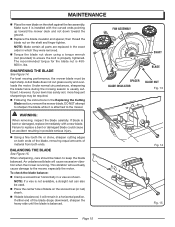
NOTE: If a vise is running. SHARPENING THE BLADE
See Figure 14.
When sharpening, care should be used...61550; Place the new blade on the shaft and finger tighten.
However, if your lawn has sandy soil, more frequent sharpenings may be kept sharp.
User Manual - Page 16
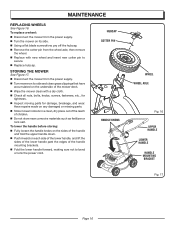
... cord. HUBCAP COTTER PIN
HANDLE KNOBS
WHEEL WHEEL AXLE
Fig. 16
UPPER HANDLE LOWER HANDLE HANDLE MOUNTING BRACKET
Fig. 17
Page 16 STORING THE MOWER
See Figure 17. Disconnect the mower from the power supply. Turn mower on its side. Using a flat blade screwdriver, pry off the hubcap. Remove the cotter pin from the...
User Manual - Page 17
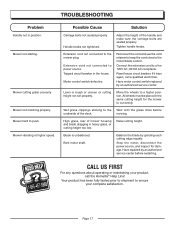
... TROUBLESHOOTING
Problem
Handle not in heavy grass, or cutting height too low. Mower cutting grass unevenly. Possible Cause
Solution
Carriage bolts not seated properly.
Motor control switch defective. Connect...Lawn is unbalanced. Bent motor shaft. Your product has been fully tested prior to shipment to the motor/blade control. Mower vibrating at higher speed. High grass, rear of the handle...
User Manual - Page 18
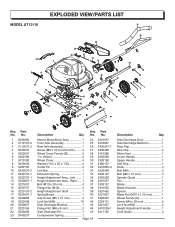
...13.5 x 20 x 1.5t 4 31 Cotter Pin 4 32 Link Bar 1 33 Extension Spring 1 34 Height Adjustment Assy., Left ........ 1 35 Height Adjustment Assy., Right ...... 1 36 Bolt (M10 x 20 mm 4... Nut (M10 x 1.25 mm 1 Wheel Ferrule (A 1 Screw (M4 x 20 mm 2 Lock Nut (M4 2 Height Adjustment Handle 1 Cord Guide 3 Mower Motor/Deck Assy 1 24 Front Axle Assembly 1 25 Rear Axle Assembly 1 26 Screw (M5 x 10...
User Manual - Page 19
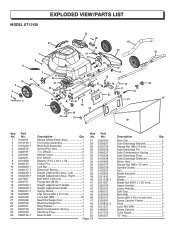
...
12
24
27
25
21 49
46 26
39
23 50
42
48 47
Key Part No. Wheel 2 33 Washer (13.5 x 20 x 1.5t 4 34 Cotter Pin 4 35 Link Bar 1 36 Extension Spring 1 37 Height Adjustment Assy., Left ...........1 38 Height Adjustment Assy., Right ......... 1 39 Bolt (M10 x 20 mm 4 40 Flange Nut (M10 4 41 Height Adjustment Handle...
User Manual - Page 20

...the operator's manual. Damage caused by shipping, improper handling, improper installation, incorrect
voltage or improper wiring, improper maintenance,... Products, Inc. Great States Corporation, Shelbyville, Indiana, has been making lawn mowers for the Great States Corporation lawn mower company under this warranty any defective product or part from the original date...below. Page 20
User Manual - Page 22
UT13120
SERVICE
For parts or service, contact your nearest Homelite authorized service dealer. Be sure to the housing. MODEL ...call 1-866-457-5888 or visit us online at www.homelite.com.
Please record the serial number in . - OPERATOR'S MANUAL
ELECTRIC LAWN MOWER
18 in the space provided below. For the location of this tool is found on a plate or label attached to provide all ...
Similar Questions

Blades
Where can I buy 20 inch mulching blades for the above lawn mower. Thank you
Where can I buy 20 inch mulching blades for the above lawn mower. Thank you
(Posted by bdpersaud 8 months ago)


Replacement Switch Key?
where can I get a replacement switch key for Homelite ut13126 electric mower?
where can I get a replacement switch key for Homelite ut13126 electric mower?
(Posted by dianegoller 3 years ago)
How Do You Remove A 24 Volt Sealed Maintenance Free Battery On A Homelite Cordl
I am getting rid of a Homelite 20 inch 24 volt cordless lawn mower but I have to remove the battery ...
I am getting rid of a Homelite 20 inch 24 volt cordless lawn mower but I have to remove the battery ...
(Posted by SallyKarel 9 years ago)
How To Replace The Battery For Homelite Ut-13126 Lawn Mower
(Posted by dergro 9 years ago)