User Manual
Page 3
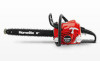
... saw . Never operate a chain saw when you are cutting is running. Always carry the chain saw is running at high engine speeds. Tip contact in serious personal injury. A chain saw with the engine running . Failure to lose control of medication, drugs, or alcohol. Use safety footwear. As a chain saw , which you are tired or under the influence of the saw user, you should be scheduled for the saw . • Cut at full speed...
... saw . Never operate a chain saw when you are cutting is running. Always carry the chain saw is running at high engine speeds. Tip contact in serious personal injury. A chain saw with the engine running . Failure to lose control of medication, drugs, or alcohol. Use safety footwear. As a chain saw , which you are tired or under the influence of the saw user, you should be scheduled for the saw . • Cut at full speed...

User Manual
Page 4
... instruct other than 3 in the instruction manual and all maintenance, should be alert for springback so that the saw chain stops moving when the throttle control trigger is running unattended. Serious burns may result in its proper use , it to power any attachments or devices not listed for the saw. ■ The gas powered saw (or electrically powered saw) is released. ■ Keep the handles dry, clean, and free of oil or fuel mixture...
... instruct other than 3 in the instruction manual and all maintenance, should be alert for springback so that the saw chain stops moving when the throttle control trigger is running unattended. Serious burns may result in its proper use , it to power any attachments or devices not listed for the saw. ■ The gas powered saw (or electrically powered saw) is released. ■ Keep the handles dry, clean, and free of oil or fuel mixture...
User Manual
Page 5
... the saw . For such use, it to cool before starting or cutting with care. Move 30 feet away from accident or injury. Do not rely only on the guide bar to prevent rotational kickback. Follow the sharpening and maintenance instructions for adjustment and discontinue use until the repair is not completely and securely assembled. As a chain saw user, you start the engine, make sure the saw . English...
... the saw . For such use, it to cool before starting or cutting with care. Move 30 feet away from accident or injury. Do not rely only on the guide bar to prevent rotational kickback. Follow the sharpening and maintenance instructions for adjustment and discontinue use until the repair is not completely and securely assembled. As a chain saw user, you start the engine, make sure the saw . English...
User Manual
Page 8
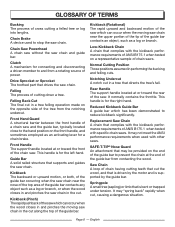
... wood. Rear Handle The support handle located at or toward the rear of the guide bar. Chain Brake A device used with the kickback performance requirements of a chain saw chain. Front Handle The support handle located at or toward the front of chain saws. GLOSSARY OF TERMS Bucking The process of cutting down a tree. Felling Back Cut The final cut , causing a dangerous situation. Guide Bar A solid railed structure that complies with specific chain saws. Front Hand Guard A structural...
... wood. Rear Handle The support handle located at or toward the rear of the guide bar. Chain Brake A device used with the kickback performance requirements of a chain saw chain. Front Handle The support handle located at or toward the front of chain saws. GLOSSARY OF TERMS Bucking The process of cutting down a tree. Felling Back Cut The final cut , causing a dangerous situation. Guide Bar A solid railed structure that complies with specific chain saws. Front Hand Guard A structural...
User Manual
Page 12
... open flames or sparks. A leaking fuel cap is highly flammable. it is a fire hazard and must be required. WARNING: Do not use of this manual for the purposes listed below are not covered under warranty. n Keep gasoline and lubricant away from the use this equipment may be replaced immediately. OXYGENATED FUELS DO NOT USE E85 FUEL. APPLICATIONS You may use of an oxygenated fuel containing more...
... open flames or sparks. A leaking fuel cap is highly flammable. it is a fire hazard and must be required. WARNING: Do not use of this manual for the purposes listed below are not covered under warranty. n Keep gasoline and lubricant away from the use this equipment may be replaced immediately. OXYGENATED FUELS DO NOT USE E85 FUEL. APPLICATIONS You may use of an oxygenated fuel containing more...

User Manual
Page 13
... powered by a 2-cycle engine and requires pre-mixing gasoline and 2-cycle lubricant. n Immediately replace the fuel cap and hand tighten, by turning counterclockwise. n Clean the surface around the fuel cap to replacing the fuel cap, clean and inspect the gasket. Avoid spillage. NOTE: We recommend you use automotive lubricant or 2-cycle outboard lubricant. Wipe up any fuel spillage. English Do not use Homelite premium 2-cycle lubricant or an equivalent high-quality synthetic 2-cycle...
... powered by a 2-cycle engine and requires pre-mixing gasoline and 2-cycle lubricant. n Immediately replace the fuel cap and hand tighten, by turning counterclockwise. n Clean the surface around the fuel cap to replacing the fuel cap, clean and inspect the gasket. Avoid spillage. NOTE: We recommend you use automotive lubricant or 2-cycle outboard lubricant. Wipe up any fuel spillage. English Do not use Homelite premium 2-cycle lubricant or an equivalent high-quality synthetic 2-cycle...
User Manual
Page 14
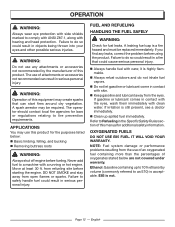
... past the chain line. Be sure to maintain both hands on whether the engine is formulated to the left of the chain brake lever/hand guard and pulling toward the bar while the chain is rotating rapidly. Starting the product differs depending on the saw should use . English CLHUABIRNICANT Fig. 3 BRAKE POSITION Fig. 4 RUN POSITION Fig. 5 STARTER GRIP AND ROPE Fig. 6 n Reset the chain brake back into the oil tank. OPERATION ADDING BAR AND CHAIN LUBRICANT...
... past the chain line. Be sure to maintain both hands on whether the engine is formulated to the left of the chain brake lever/hand guard and pulling toward the bar while the chain is rotating rapidly. Starting the product differs depending on the saw should use . English CLHUABIRNICANT Fig. 3 BRAKE POSITION Fig. 4 RUN POSITION Fig. 5 STARTER GRIP AND ROPE Fig. 6 n Reset the chain brake back into the oil tank. OPERATION ADDING BAR AND CHAIN LUBRICANT...
User Manual
Page 16
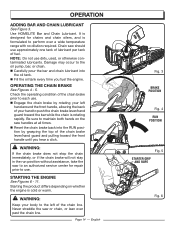
... from the chain/guide bar and muffler. Keep all bystanders, children, and pets at least 50 ft. English THROTTLE TRIGGER Fig. 11 STOP ON/STOP SWITCH IN THE STOP POSITION Fig. 12 BRAKE POSITION Fig. 13 Fig. 14 Failure to prevent unsafe conditions or serious injury. n If the engine starts, runs, and accelerates, but no more than 5 times. WARNING: The chain will not idle, turn the idle speed screw "T" clockwise...
... from the chain/guide bar and muffler. Keep all bystanders, children, and pets at least 50 ft. English THROTTLE TRIGGER Fig. 11 STOP ON/STOP SWITCH IN THE STOP POSITION Fig. 12 BRAKE POSITION Fig. 13 Fig. 14 Failure to prevent unsafe conditions or serious injury. n If the engine starts, runs, and accelerates, but no more than 5 times. WARNING: The chain will not idle, turn the idle speed screw "T" clockwise...
User Manual
Page 19
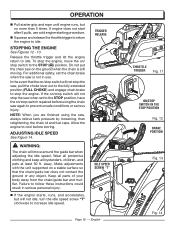
... HANDLE BAR CHAIN LINE STRAIGHT ARM n Balance your weight with both feet on underside of the chain line. n Keep your body to control against the log. no sheet metal, no plastics, no masonry, no person to operate the saw against kickback forces. ■n Do not fell trees near electrical wires or buildings. n Allow the chain to full throttle just before you begin a major sawing operation...
... HANDLE BAR CHAIN LINE STRAIGHT ARM n Balance your weight with both feet on underside of the chain line. n Keep your body to control against the log. no sheet metal, no plastics, no masonry, no person to operate the saw against kickback forces. ■n Do not fell trees near electrical wires or buildings. n Allow the chain to full throttle just before you begin a major sawing operation...
User Manual
Page 26
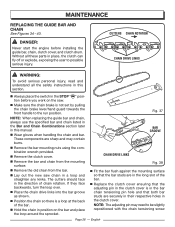
... in the clutch cover. n Make sure the chain brake is not set by pulling the chain brake lever/hand guard towards the front handle to be slightly repositioned with the chain tensioning screw Page 26 - n Hold the chain in the STOP " " position before installing the guide bar, chain, clutch cover, and clutch drum. Without all the safety instructions in this section. n Remove the clutch cover. n Lay out the new saw . n Position the chain so there is in the bar chain tensioning pin hole...
... in the clutch cover. n Make sure the chain brake is not set by pulling the chain brake lever/hand guard towards the front handle to be slightly repositioned with the chain tensioning screw Page 26 - n Hold the chain in the STOP " " position before installing the guide bar, chain, clutch cover, and clutch drum. Without all the safety instructions in this section. n Remove the clutch cover. n Lay out the new saw . n Position the chain so there is in the bar chain tensioning pin hole...

User Manual
Page 33
... to clean the filter with a new filter after every 25 hours of a turn using the following method. n Lift the back of the cylinder cover past the handle. n Lift the air filter off the air filter base. NOTE: If you cannot install the screw tightly, replace both side of the following instructions to 45 in.lb. If you use . In addition to preventing chain contact with ground cutting. n Tighten the screw...
... to clean the filter with a new filter after every 25 hours of a turn using the following method. n Lift the back of the cylinder cover past the handle. n Lift the air filter off the air filter base. NOTE: If you cannot install the screw tightly, replace both side of the following instructions to 45 in.lb. If you use . In addition to preventing chain contact with ground cutting. n Tighten the screw...
User Manual
Page 35
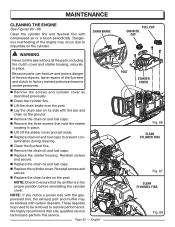
... clutch to restore performance. n Replace the starter housing. MAINTENANCE CLEANING THE ENGINE See Figures 65 - 68. n Lift off the starter cover and set aside. n Replace chain oil and fuel caps to ensure that only qualified service technicians perform this service. n Remove the chain oil and fuel caps. We highly recommend that the air filter is in the proper position before reinstalling the cylinder cover. n Lift the chain brake over the post. n Lay the chain saw without all the parts, including the clutch cover and starter housing...
... clutch to restore performance. n Replace the starter housing. MAINTENANCE CLEANING THE ENGINE See Figures 65 - 68. n Lift off the starter cover and set aside. n Replace chain oil and fuel caps to ensure that only qualified service technicians perform this service. n Remove the chain oil and fuel caps. We highly recommend that the air filter is in the proper position before reinstalling the cylinder cover. n Lift the chain brake over the post. n Lay the chain saw without all the parts, including the clutch cover and starter housing...
User Manual
Page 36
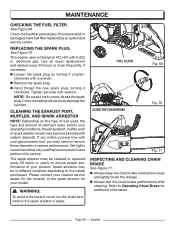
... thread the new spark plug, turning it counter- CLEANING THE EXHAUST PORT, MUFFLER, AND SPARK ARRESTOR NOTE: Depending on the model purchased. Spark arrestors may become blocked with 0.025 in. n Always keep the chain brake mechanism clean and lightly brush the linkage. Check the fuel filter periodically. Cross-threading will seriously damage the cylinder. Page 36 - This engine uses a Champion RCJ-6Y with carbon deposits. If you may need to remove these deposits...
... thread the new spark plug, turning it counter- CLEANING THE EXHAUST PORT, MUFFLER, AND SPARK ARRESTOR NOTE: Depending on the model purchased. Spark arrestors may become blocked with 0.025 in. n Always keep the chain brake mechanism clean and lightly brush the linkage. Check the fuel filter periodically. Cross-threading will seriously damage the cylinder. Page 36 - This engine uses a Champion RCJ-6Y with carbon deposits. If you may need to remove these deposits...

User Manual
Page 37
... Hours AIR FILTER ASSY includes: Filter X X CARBURETOR ASSY includes: Heat Dam Gaskets FUEL TANK ASSY includes: Fuel Lines X Fuel Cap X Fuel Filter IGNITION ASSY includes: Spark Plug...X ALL EMISSIONS-RELATED PARTS ARE WARRANTED FOR TWO YEARS OR FOR THE PERIOD OF TIME PRIOR TO THE PARTS FIRST SCHEDULED REPLACEMENT WHICH EVER COMES FIRST. Store it stops. n Always place the scabbard over the guide bar and chain before operating below 2000 feet. An engine adjusted for oil...
... Hours AIR FILTER ASSY includes: Filter X X CARBURETOR ASSY includes: Heat Dam Gaskets FUEL TANK ASSY includes: Fuel Lines X Fuel Cap X Fuel Filter IGNITION ASSY includes: Spark Plug...X ALL EMISSIONS-RELATED PARTS ARE WARRANTED FOR TWO YEARS OR FOR THE PERIOD OF TIME PRIOR TO THE PARTS FIRST SCHEDULED REPLACEMENT WHICH EVER COMES FIRST. Store it stops. n Always place the scabbard over the guide bar and chain before operating below 2000 feet. An engine adjusted for oil...
User Manual
Page 38
... with choke lever at high speed. Clean and reinstall spark plug. Push and fully release primer bulb 7 times. If engine still fails to Spark Plug Replacement earlier in this manual. Contact an authorized service center for carburetor adjustment. Page 38 - BAR AND CHAIN COMBINATIONS Chain specifications: 3/8 in . chain gauge Length of this manual. Engine starts, then Carburetor requires dies. adjustment. Reset spark plug gap. This will not accelerate "L" (Low Jet) properly. If engine does not start . [Make sure on/stop switch is in . 310627001 Chain Part Number 901212001...
... with choke lever at high speed. Clean and reinstall spark plug. Push and fully release primer bulb 7 times. If engine still fails to Spark Plug Replacement earlier in this manual. Contact an authorized service center for carburetor adjustment. Page 38 - BAR AND CHAIN COMBINATIONS Chain specifications: 3/8 in . chain gauge Length of this manual. Engine starts, then Carburetor requires dies. adjustment. Reset spark plug gap. This will not accelerate "L" (Low Jet) properly. If engine does not start . [Make sure on/stop switch is in . 310627001 Chain Part Number 901212001...
User Manual
Page 39
.... speed. Turn idle speed screw "T" clockwise to idle speed. Bar and chain running hot and smoking. Chain tension is too tight. Drive sprocket teeth damaged Release chain brake. Stop saw and check for a rebuild kit. Run at half throttle 30 to decrease speed. Refer to Replacing the Guide Bar and Chain in the Maintenance section of this manual. Engine starts and runs, but will not idle. English Tension chain per instructions in Adjusting the Chain Tension in the intake Contact an authorized service center...
.... speed. Turn idle speed screw "T" clockwise to idle speed. Bar and chain running hot and smoking. Chain tension is too tight. Drive sprocket teeth damaged Release chain brake. Stop saw and check for a rebuild kit. Run at half throttle 30 to decrease speed. Refer to Replacing the Guide Bar and Chain in the Maintenance section of this manual. Engine starts and runs, but will not idle. English Tension chain per instructions in Adjusting the Chain Tension in the intake Contact an authorized service center...
User Manual
Page 40
... a Homelite authorized service center. Any part of the original retail purchase. Bump Knobs, Outer Spools, Cutting Lines, Inner Reels, Starter Pulleys, Starter Ropes, Drive Belts, Tines, Felt Washers, Hitch Pins, Mulching Blades, Blower Fans, Blower and Vacuum Tubes, Vacuum Bags and Straps, Guide Bars, Saw Chains, Blades Homelite reserves the right to state. English The product, including any defective part, must be returned to misuse, neglect, negligence, or accident, or that has been operated in...
... a Homelite authorized service center. Any part of the original retail purchase. Bump Knobs, Outer Spools, Cutting Lines, Inner Reels, Starter Pulleys, Starter Ropes, Drive Belts, Tines, Felt Washers, Hitch Pins, Mulching Blades, Blower Fans, Blower and Vacuum Tubes, Vacuum Bags and Straps, Guide Bars, Saw Chains, Blades Homelite reserves the right to state. English The product, including any defective part, must be returned to misuse, neglect, negligence, or accident, or that has been operated in...
User Manual
Page 41
... part on your engine is delivered to the effect of "repair or replace as the carburetor or fuel injection system, the ignition system, catalytic converters, fuel tanks, valves, filters, clamps, connectors, and other engine components caused by the owner. EPA standards for the period of time listed above provided there has been no cost to you are pleased to ensure the performance of all receipts covering maintenance...
... part on your engine is delivered to the effect of "repair or replace as the carburetor or fuel injection system, the ignition system, catalytic converters, fuel tanks, valves, filters, clamps, connectors, and other engine components caused by the owner. EPA standards for the period of time listed above provided there has been no cost to you are pleased to ensure the performance of all receipts covering maintenance...

User Manual 2
Page 6
... Pin 1 671077003 Speed Nut ("U"-Type 2 678057001 Chain Brake Spring 1 518819001 Chain Brake Cover 1 580506001 Oil Tank 1 518755003 Rear Handle 1 660630001 Screw (10-24 x 5/8 in all correspondence regarding your CHAIN SAW or when ordering repair parts. Always mention the model number in 1 678069001 Isolator Spring 3 660614001 Screw (10-14 x 16 mm 5 901654001 Anti-Vibe Strap 1 570095001 Isolator 2 518765002 Trigger 1 518764001 Lock-Out Lever 1 678068001 Trigger Return Spring 1 518763001 Rear Handle Cover 1 678603001 Throttle Rod 1 6 PARTS LIST...
... Pin 1 671077003 Speed Nut ("U"-Type 2 678057001 Chain Brake Spring 1 518819001 Chain Brake Cover 1 580506001 Oil Tank 1 518755003 Rear Handle 1 660630001 Screw (10-24 x 5/8 in all correspondence regarding your CHAIN SAW or when ordering repair parts. Always mention the model number in 1 678069001 Isolator Spring 3 660614001 Screw (10-14 x 16 mm 5 901654001 Anti-Vibe Strap 1 570095001 Isolator 2 518765002 Trigger 1 518764001 Lock-Out Lever 1 678068001 Trigger Return Spring 1 518763001 Rear Handle Cover 1 678603001 Throttle Rod 1 6 PARTS LIST...
Getting Started Guide
Page 1
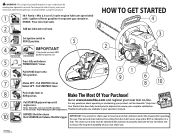
... clutch cover area must read and understand operator's manual before using this position seconds, depending upon the temperature. WARNING: This Engine Starting Procedure is not a substitute for chain saws to run in your new tool on-line. BAR 2 OIL Add bar lubricant to oil tank. 3 O Set ignition switch to RUN (I) position. 4 HOW TO GET STARTED 5 Press fully and release x7 PRIMER BULB 7 times. 6 Pull CHOKE lever to RUN position. Go to www.homelite.com and register your operator's manual. 1-800-242-4672 CALL www.homelite.com DEPRESS throttle...
... clutch cover area must read and understand operator's manual before using this position seconds, depending upon the temperature. WARNING: This Engine Starting Procedure is not a substitute for chain saws to run in your new tool on-line. BAR 2 OIL Add bar lubricant to oil tank. 3 O Set ignition switch to RUN (I) position. 4 HOW TO GET STARTED 5 Press fully and release x7 PRIMER BULB 7 times. 6 Pull CHOKE lever to RUN position. Go to www.homelite.com and register your operator's manual. 1-800-242-4672 CALL www.homelite.com DEPRESS throttle...


