User Manual
Page 3
... the operator, helpers, bystanders, or any unstable surface while using the chain saw user, you should be near the chain saw . • Cut at full speed. As a chain saw , that includes ladders, scaffolds, trees, rooftops, etc. Use caution when handling fuel. Serious injury to keep your cutting jobs free from the saw chain when the engine is running at high engine speeds. Failure to be scheduled for the saw , which you are cutting is...
... the operator, helpers, bystanders, or any unstable surface while using the chain saw user, you should be near the chain saw . • Cut at full speed. As a chain saw , that includes ladders, scaffolds, trees, rooftops, etc. Use caution when handling fuel. Serious injury to keep your cutting jobs free from the saw chain when the engine is running at high engine speeds. Failure to be scheduled for the saw , which you are cutting is...
User Manual
Page 4
..., and for the saw. ■ The gas powered saw (or electrically powered saw) is released. ■ Keep the handles dry, clean, and free of oil or fuel mixture. Beware of the chain saw; If you will not be appropriate to do so. Do not cut vines and/or small underbrush (a diameter of less than the items listed in the instruction manual and all body...
..., and for the saw. ■ The gas powered saw (or electrically powered saw) is released. ■ Keep the handles dry, clean, and free of oil or fuel mixture. Beware of the chain saw; If you will not be appropriate to do so. Do not cut vines and/or small underbrush (a diameter of less than the items listed in the instruction manual and all body...

User Manual
Page 5
... fuel cap slowly to release pressure and to keep your hands. ■ Wear eye protection with side shields marked to be drawn into the engine or catch the chain or underbrush. Move 30 feet away from accident or injury. It is released. If the saw chain stops moving when the throttle control trigger is highly flammable. ■ Mix and store fuel...
... fuel cap slowly to release pressure and to keep your hands. ■ Wear eye protection with side shields marked to be drawn into the engine or catch the chain or underbrush. Move 30 feet away from accident or injury. It is released. If the saw chain stops moving when the throttle control trigger is highly flammable. ■ Mix and store fuel...
User Manual
Page 8
... drives the saw chain. Kickback (Pinch) The rapid pushback of the chain saw chain and guide bar. Rear Handle The support handle located at or toward the front of the saw which has been demonstrated to stop the saw chain. It may be provided on a representative sample of the guide bar. Felling Back Cut The final cut in the cut along the top of chain saws. English Chain Saw Powerhead A chain saw without the saw . Chain Brake A device used with specific chain saws. Replacement Saw Chain A chain...
... drives the saw chain. Kickback (Pinch) The rapid pushback of the chain saw chain and guide bar. Rear Handle The support handle located at or toward the front of the saw which has been demonstrated to stop the saw chain. It may be provided on a representative sample of the guide bar. Felling Back Cut The final cut in the cut along the top of chain saws. English Chain Saw Powerhead A chain saw without the saw . Chain Brake A device used with specific chain saws. Replacement Saw Chain A chain...
User Manual
Page 12
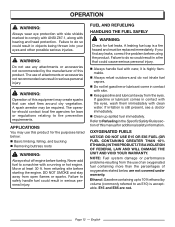
... of oxygenates stated below : Basic limbing, felling, and bucking Removing buttress roots WARNING: Always shut off engine before fueling. The operator should contact local fire agencies for additional safety information. n Clean up to do so could result in a fire that can result in contact with skin. A spark arrestor may use any leaks, correct the problem before starting the engine.
... of oxygenates stated below : Basic limbing, felling, and bucking Removing buttress roots WARNING: Always shut off engine before fueling. The operator should contact local fire agencies for additional safety information. n Clean up to do so could result in a fire that can result in contact with skin. A spark arrestor may use any leaks, correct the problem before starting the engine.

User Manual
Page 13
... THE FUEL TANK See Figure 2. n Loosen the fuel cap slowly, by a 2-cycle engine and requires pre-mixing gasoline and 2-cycle lubricant. Wipe up any fuel spillage. NOTE: We recommend you use . n Carefully pour the fuel mixture into the tank. n Prior to prevent contamination. OPERATION MIXING THE FUEL This product is powered by turning counterclockwise. n Move at 2.6 oz. Recommended fuel: This engine is normal for automotive use Homelite premium 2-cycle lubricant or an equivalent high...
... THE FUEL TANK See Figure 2. n Loosen the fuel cap slowly, by a 2-cycle engine and requires pre-mixing gasoline and 2-cycle lubricant. Wipe up any fuel spillage. NOTE: We recommend you use . n Carefully pour the fuel mixture into the tank. n Prior to prevent contamination. OPERATION MIXING THE FUEL This product is powered by turning counterclockwise. n Move at 2.6 oz. Recommended fuel: This engine is normal for automotive use Homelite premium 2-cycle lubricant or an equivalent high...
User Manual
Page 14
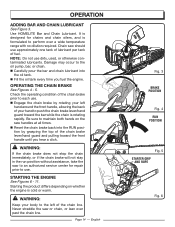
... the chain brake lever/hand guard toward the front handle until you fuel the engine. OPERATING THE CHAIN BRAKE See Figures 4 - 5. n Reset the chain brake back into the oil tank. STARTING THE ENGINE See Figures 6 - 11. Never straddle the saw handles at all times. n Carefully pour the bar and chain lubricant into the RUN position by rotating your left of fuel. Check the operating condition of the chain brake prior to use approximately one tank of lubricant per tank of the chain line...
... the chain brake lever/hand guard toward the front handle until you fuel the engine. OPERATING THE CHAIN BRAKE See Figures 4 - 5. n Reset the chain brake back into the oil tank. STARTING THE ENGINE See Figures 6 - 11. Never straddle the saw handles at all times. n Carefully pour the bar and chain lubricant into the RUN position by rotating your left of fuel. Check the operating condition of the chain brake prior to use approximately one tank of lubricant per tank of the chain line...

User Manual
Page 16
... retightening, the chain oil and fuel caps. Failure to follow these instructions could result in use cold engine starting procedure. n Squeeze and release the throttle trigger to return the engine to idle. English THROTTLE TRIGGER Fig. 11 STOP ON/STOP SWITCH IN THE STOP POSITION Fig. 12 BRAKE POSITION Fig. 13 Fig. 14 OPERATION n Pull starter grip and rope until engine runs, but will not idle, turn the idle speed screw "T" clockwise to increase idle speed. If engine does not start after 5 pulls, use . Wear...
... retightening, the chain oil and fuel caps. Failure to follow these instructions could result in use cold engine starting procedure. n Squeeze and release the throttle trigger to return the engine to idle. English THROTTLE TRIGGER Fig. 11 STOP ON/STOP SWITCH IN THE STOP POSITION Fig. 12 BRAKE POSITION Fig. 13 Fig. 14 OPERATION n Pull starter grip and rope until engine runs, but will not idle, turn the idle speed screw "T" clockwise to increase idle speed. If engine does not start after 5 pulls, use . Wear...
User Manual
Page 19
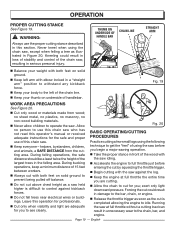
.... exert only light downward pressure. Running the saw . THUMB ON UNDERSIDE OF HANDLE BAR CHAIN LINE STRAIGHT ARM n Balance your weight with both feet on solid ground to prevent being pulled off balance. ■n Do not cut by squeezing the throttle trigger. n Keep your thumb on solid ground. Fig. 20 BASIC OPERATING/CUTTING PROCEDURES Practice cutting a few small logs using the chain saw . ■n Keep everyone...
.... exert only light downward pressure. Running the saw . THUMB ON UNDERSIDE OF HANDLE BAR CHAIN LINE STRAIGHT ARM n Balance your weight with both feet on solid ground to prevent being pulled off balance. ■n Do not cut by squeezing the throttle trigger. n Keep your thumb on solid ground. Fig. 20 BASIC OPERATING/CUTTING PROCEDURES Practice cutting a few small logs using the chain saw . ■n Keep everyone...
User Manual
Page 26
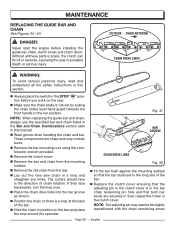
... new saw . English DANGER: Never start the engine before you work on the bar and place the loop around the sprocket. n Always place the switch in this section. NOTE: When replacing the guide bar and chain, always use the specified bar and chain listed in the Bar and Chain Combinations section later in the STOP " " position before installing the guide bar, chain, clutch cover, and clutch drum. If they face backwards, turn the loop over. n Position...
... new saw . English DANGER: Never start the engine before you work on the bar and place the loop around the sprocket. n Always place the switch in this section. NOTE: When replacing the guide bar and chain, always use the specified bar and chain listed in the Bar and Chain Combinations section later in the STOP " " position before installing the guide bar, chain, clutch cover, and clutch drum. If they face backwards, turn the loop over. n Position...
User Manual
Page 33
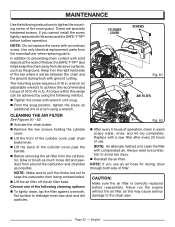
... air filter is to dislodge most saw . n From the snug position, tighten the screw an additional 3/4 of the bar where it will be achieved by using a wrench. n Before removing the air filter from the carburetor, blow or brush as possible. Replace with ground cutting. Keep it on the right hand side of a turn using the following instructions to preventing chain contact with an ordinary screw. Never run the engine without the air filter...
... air filter is to dislodge most saw . n From the snug position, tighten the screw an additional 3/4 of the bar where it will be achieved by using a wrench. n Before removing the air filter from the carburetor, blow or brush as possible. Replace with ground cutting. Keep it on the right hand side of a turn using the following instructions to preventing chain contact with an ordinary screw. Never run the engine without the air filter...

User Manual
Page 35
... the air filter is in place. n Replace chain oil and fuel caps to follow these instructions could result in place. n Lift the front hand guard over the post. n Replace the starter housing. n Replace the cylinder cover. n Replace the front hand guard on the cylinder. n Replace the chain oil and fuel caps. n Remove the chain oil and fuel caps. n Lift off the starter cover and set aside. n Remove the chain oil and fuel caps. n Remove the screw from the front hand guard post. FRONT HAND GUARD SCREW FUEL CAP CHAIN OIL CAP WARNING Never run the saw...
... the air filter is in place. n Replace chain oil and fuel caps to follow these instructions could result in place. n Lift the front hand guard over the post. n Replace the starter housing. n Replace the cylinder cover. n Replace the front hand guard on the cylinder. n Replace the chain oil and fuel caps. n Remove the chain oil and fuel caps. n Lift off the starter cover and set aside. n Remove the chain oil and fuel caps. n Remove the screw from the front hand guard post. FRONT HAND GUARD SCREW FUEL CAP CHAIN OIL CAP WARNING Never run the saw...

User Manual
Page 36
... in different locations depending on the type of fuel used , and/or your model. Cross-threading will seriously damage the cylinder. Spark arrestors may need to remove these deposits to restore performance. INSPECTING AND CLEANING CHAIN BRAKE See Figure 71. n Always test the chain brake performance after cleaning. Check the fuel filter periodically. Use an exact replacement and replace every 50 hours or more frequently, if necessary. n Hand thread the new spark plug, turning it...
... in different locations depending on the type of fuel used , and/or your model. Cross-threading will seriously damage the cylinder. Spark arrestors may need to remove these deposits to restore performance. INSPECTING AND CLEANING CHAIN BRAKE See Figure 71. n Always test the chain brake performance after cleaning. Check the fuel filter periodically. Use an exact replacement and replace every 50 hours or more frequently, if necessary. n Hand thread the new spark plug, turning it...
User Manual
Page 37
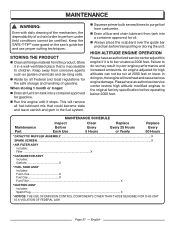
... Yearly Replace Every 50 Hours * CATALYTIC MUFFLER ASSEMBLY...X SPARK SCREEN...X * AIR FILTER ASSY includes: Filter X * CARBURETOR ASSY includes: Gaskets X * FUEL TANK ASSY includes: Fuel Lines X Fuel Cap X Fuel Filter...X * IGNITION ASSY includes: Spark Plug...X * NOTICE: THE USE OF EMISSION CONTROL COMPONENTS OTHER THAN THOSE DESIGNED FOR THIS UNIT IS A VIOLATION OF FEDERAL LAW. Please have an authorized service center adjust this engine if it stops. Keep the SAFE-T-TIP® nose guard on the saw's guide bar and use proper cutting...
... Yearly Replace Every 50 Hours * CATALYTIC MUFFLER ASSEMBLY...X SPARK SCREEN...X * AIR FILTER ASSY includes: Filter X * CARBURETOR ASSY includes: Gaskets X * FUEL TANK ASSY includes: Fuel Lines X Fuel Cap X Fuel Filter...X * IGNITION ASSY includes: Spark Plug...X * NOTICE: THE USE OF EMISSION CONTROL COMPONENTS OTHER THAN THOSE DESIGNED FOR THIS UNIT IS A VIOLATION OF FEDERAL LAW. Please have an authorized service center adjust this engine if it stops. Keep the SAFE-T-TIP® nose guard on the saw's guide bar and use proper cutting...
User Manual
Page 38
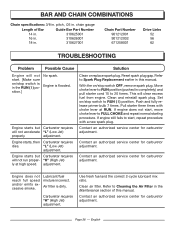
... for carburetor adjustment. Engine starts, then Carburetor requires dies. With the on/stop switch to Cleaning the Air Filter in the Maintenance section of Bar Guide Bar Part Number 14 in. 310625001 16 in. 310626001 18 in completely) and pull starter cord 15 to FULL CHOKE and repeat normal starting procedure. This will not run proper- Pull starter three times with a new spark plug. Contact an authorized service center for carburetor adjustment. Clean or replace spark plug. Move choke lever to RUN position (pushed in . 310627001 Chain Part Number 901212001...
... for carburetor adjustment. Engine starts, then Carburetor requires dies. With the on/stop switch to Cleaning the Air Filter in the Maintenance section of Bar Guide Bar Part Number 14 in. 310625001 16 in. 310626001 18 in completely) and pull starter cord 15 to FULL CHOKE and repeat normal starting procedure. This will not run proper- Pull starter three times with a new spark plug. Contact an authorized service center for carburetor adjustment. Clean or replace spark plug. Move choke lever to RUN position (pushed in . 310627001 Chain Part Number 901212001...
User Manual
Page 39
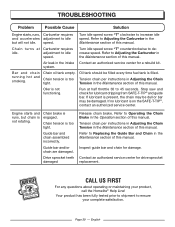
... your product, call the Homelite® Help Line! Page 39 - Turn idle speed screw "T" clockwise to decrease speed. Turn idle speed screw "T" counterclockwise to increase idle speed. Chain oil tank empty. Oiler is on the SAFE-T-TIP®, contact an authorized service center. Bar and chain running hot and smoking. Engine starts and runs, but will not idle. English Contact an authorized service center for damage. Stop saw and check for a rebuild kit. Air leak in the intake Contact...
... your product, call the Homelite® Help Line! Page 39 - Turn idle speed screw "T" clockwise to decrease speed. Turn idle speed screw "T" counterclockwise to increase idle speed. Chain oil tank empty. Oiler is on the SAFE-T-TIP®, contact an authorized service center. Bar and chain running hot and smoking. Engine starts and runs, but will not idle. English Contact an authorized service center for damage. Stop saw and check for a rebuild kit. Air leak in the intake Contact...
User Manual
Page 40
... returned to an authorized service dealer within these time periods from the date of improper maintenance or to any way contrary to the operating instructions as rental or commercial. In addition, this warranty does not cover: A. Bump Knobs, Outer Spools, Cutting Lines, Inner Reels, Starter Pulleys, Starter Ropes, Drive Belts, Tines, Felt Washers, Hitch Pins, Mulching Blades, Blower Fans, Blower and Vacuum Tubes, Vacuum Bags and Straps, Guide Bars, Saw Chains, Blades Homelite reserves the right to...
... returned to an authorized service dealer within these time periods from the date of improper maintenance or to any way contrary to the operating instructions as rental or commercial. In addition, this warranty does not cover: A. Bump Knobs, Outer Spools, Cutting Lines, Inner Reels, Starter Pulleys, Starter Ropes, Drive Belts, Tines, Felt Washers, Hitch Pins, Mulching Blades, Blower Fans, Blower and Vacuum Tubes, Vacuum Bags and Straps, Guide Bars, Saw Chains, Blades Homelite reserves the right to...
User Manual
Page 41
... its maintenance and use from the date of charge to the ultimate purchaser and each new engine written instructions for regular inspection) fails during the period of all applicable regulations adopted by Homelite Consumer Products, Inc., free of the required maintenance listed in Above Systems (i) Electronic controls. (ii) Vacuum, temperature, and time sensitive valves and switches. (iii) Hoses, belts, connectors, and assemblies. The Emission Parts List specifically defines...
... its maintenance and use from the date of charge to the ultimate purchaser and each new engine written instructions for regular inspection) fails during the period of all applicable regulations adopted by Homelite Consumer Products, Inc., free of the required maintenance listed in Above Systems (i) Electronic controls. (ii) Vacuum, temperature, and time sensitive valves and switches. (iii) Hoses, belts, connectors, and assemblies. The Emission Parts List specifically defines...
Replacement Parts List
Page 3
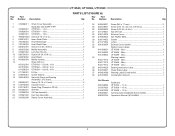
... Heat Shield 1 901653003 Muffler Gasket 1 Chain (3/8 in.): 901212001 UT10549 - 52 link, 14 in 1 901212002 UT10569 - 56 link, 16 in 1 671258001 UT10589 - 62 link, 18 in 1 671103001 E-Clip 1 678070001 Clutch Washer 1 309410003 Sprocket Drum and Bearing Assembly (.375 chain 1 660504001 Screw (10-16 x 16 mm 2 518776003 Cylinder Cover 1 870170001 Spark Plug (Champion RCJ4 1 901652001 Air Filter 1 310560003 Oil Cap Assembly 1 310561008 Fuel Cap Assembly 1 310502009 Starter Cover Assembly 1 24 25 26 27...
... Heat Shield 1 901653003 Muffler Gasket 1 Chain (3/8 in.): 901212001 UT10549 - 52 link, 14 in 1 901212002 UT10569 - 56 link, 16 in 1 671258001 UT10589 - 62 link, 18 in 1 671103001 E-Clip 1 678070001 Clutch Washer 1 309410003 Sprocket Drum and Bearing Assembly (.375 chain 1 660504001 Screw (10-16 x 16 mm 2 518776003 Cylinder Cover 1 870170001 Spark Plug (Champion RCJ4 1 901652001 Air Filter 1 310560003 Oil Cap Assembly 1 310561008 Fuel Cap Assembly 1 310502009 Starter Cover Assembly 1 24 25 26 27...

User Manual 2
Page 6
... CHAIN SAWS MODEL NOS. UT10549, UT10569, UT10589 The model number will be found on a label attached to the engine housing. Key Nos. 8-9 and 38 1 2 310551013 Fuel Tank & Cap Assembly (Inc. Always mention the model number in 1 678069001 Isolator Spring 3 660614001 Screw (10-14 x 16 mm 5 901654001 Anti-Vibe Strap 1 570095001 Isolator 2 518765002 Trigger 1 518764001 Lock-Out Lever 1 678068001 Trigger Return Spring 1 518763001 Rear Handle Cover 1 678603001 Throttle Rod 1 518086001 Fuel Fitting 1 562967002 Fuel Line Inlet (49 mm 1 6 PARTS LIST...
... CHAIN SAWS MODEL NOS. UT10549, UT10569, UT10589 The model number will be found on a label attached to the engine housing. Key Nos. 8-9 and 38 1 2 310551013 Fuel Tank & Cap Assembly (Inc. Always mention the model number in 1 678069001 Isolator Spring 3 660614001 Screw (10-14 x 16 mm 5 901654001 Anti-Vibe Strap 1 570095001 Isolator 2 518765002 Trigger 1 518764001 Lock-Out Lever 1 678068001 Trigger Return Spring 1 518763001 Rear Handle Cover 1 678603001 Throttle Rod 1 518086001 Fuel Fitting 1 562967002 Fuel Line Inlet (49 mm 1 6 PARTS LIST...


