
User Manual
Page 2
...has been dropped or damaged. instead, grasp plug and pull to disconnect. • Do not allow cord to a qualified service person for its intended use . • Do not operate appliance with hot water emitting from outlet; To reduce the risk of burns, fire, ...from touching hot metal parts, hot water, or steam. there may overheat. Incorrect reassembly or repair could occur from body and operating steam button. • Use appliance only for examination and repair. Care should be pulled or tripped over. WARNING - SAVE THESE INSTRUCTIONS 3 Use care when you turn ...
...has been dropped or damaged. instead, grasp plug and pull to disconnect. • Do not allow cord to a qualified service person for its intended use . • Do not operate appliance with hot water emitting from outlet; To reduce the risk of burns, fire, ...from touching hot metal parts, hot water, or steam. there may overheat. Incorrect reassembly or repair could occur from body and operating steam button. • Use appliance only for examination and repair. Care should be pulled or tripped over. WARNING - SAVE THESE INSTRUCTIONS 3 Use care when you turn ...
User Manual
Page 3
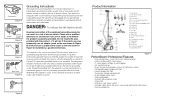
...that looks like the plug illustrated in Figure C) installed by a metal screw. Do not modify the plug provided with Clips 15. This product is for Grounding Screw Figure B Grounded Outlet Figure C Metal Screw Figure D Grounding Instructions This product must be grounded. Accessory Door 7.... steam hose • Telescoping pole • Auto-off with all local codes and ordinances. Clips 16. Crease Tool 20. Grounding Pin Figure A Adapter Tab for use on Demand® steam pause • 7 steam output settings at your fingertip • 45 second heat-up • Easy fill ...
...that looks like the plug illustrated in Figure C) installed by a metal screw. Do not modify the plug provided with Clips 15. This product is for Grounding Screw Figure B Grounded Outlet Figure C Metal Screw Figure D Grounding Instructions This product must be grounded. Accessory Door 7.... steam hose • Telescoping pole • Auto-off with all local codes and ordinances. Clips 16. Crease Tool 20. Grounding Pin Figure A Adapter Tab for use on Demand® steam pause • 7 steam output settings at your fingertip • 45 second heat-up • Easy fill ...
User Manual
Page 4
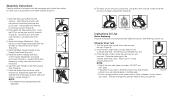
...Figure 3). NOTE: • Only fill the tank with the grooves inside the pole base and push down (Figure 3). 4. Assembly Instructions Carefully remove all components have been received (Figure 1). 1. Insert the Telescoping Pole into place. 6. Open the 3 Clips on the... the Water Filter inside the on and turn over. Figure 6 Figure 7 Figure 8 Instructions for Use Before Beginning Read allSTEAM instructions including Important Safety Instructions and Warnings before use any additives in your garment. STEAM Filling the Water Tank 1. Align the tabs in ...
...Figure 3). NOTE: • Only fill the tank with the grooves inside the pole base and push down (Figure 3). 4. Assembly Instructions Carefully remove all components have been received (Figure 1). 1. Insert the Telescoping Pole into place. 6. Open the 3 Clips on the... the Water Filter inside the on and turn over. Figure 6 Figure 7 Figure 8 Instructions for Use Before Beginning Read allSTEAM instructions including Important Safety Instructions and Warnings before use any additives in your garment. STEAM Filling the Water Tank 1. Align the tabs in ...
User Manual
Page 5
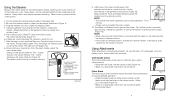
... increases 4 STEAM steam intensity 5 2. pletely cool to prolong steam output (Figure 12). Cloth Nozzle Covers The cloth nozzle cover can be used when repositioning, changing a garment, or during operation. STEAM • Place the cloth cover over the steam nozzle (Figure 14). •...the garment to the bottom (Figure 13). Once continuous steam emits from the top of the garment to be sure the unit is medium setting 4. 1 2 3 1. The + button increases the steam intensity. button decreases the steam intensity (Figure 12). Minus button decreases steam ...
... increases 4 STEAM steam intensity 5 2. pletely cool to prolong steam output (Figure 12). Cloth Nozzle Covers The cloth nozzle cover can be used when repositioning, changing a garment, or during operation. STEAM • Place the cloth cover over the steam nozzle (Figure 14). •...the garment to the bottom (Figure 13). Once continuous steam emits from the top of the garment to be sure the unit is medium setting 4. 1 2 3 1. The + button increases the steam intensity. button decreases the steam intensity (Figure 12). Minus button decreases steam ...
User Manual
Page 6
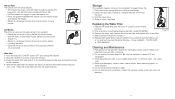
...parts with a new filter. 4. Empty the water tank and allow it back on the highest steam output (setting 7) to cool for convenient storage (Figure 18). 1. Push the clothes hanger button to air dry before replacing the cap and placing it to collapse the hanger. 2. Coil the steam hose. 4. Never use Home Touch replacement water filter, model PS...sink. Do not immerse the steamer in a cool, dry place. Replacing the Water Filter 1. Replacement water filters may be ordered on our website www.homedics.com or by aligning the crease tool slot with the holes on...
...parts with a new filter. 4. Empty the water tank and allow it back on the highest steam output (setting 7) to cool for convenient storage (Figure 18). 1. Push the clothes hanger button to air dry before replacing the cap and placing it to collapse the hanger. 2. Coil the steam hose. 4. Never use Home Touch replacement water filter, model PS...sink. Do not immerse the steamer in a cool, dry place. Replacing the Water Filter 1. Replacement water filters may be ordered on our website www.homedics.com or by aligning the crease tool slot with the holes on...
User Manual
Page 7
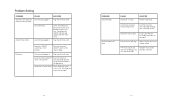
... session Water filter not installed Install water filter per Assembly Instruction #7 on page 6 Steam intensity too high Reduce steam intensity to heat Steamer not plugged in "ON" position Press the Steam on Demand button located on the steamer handle. Problem Solving PROBLEM ON/OFF switch does ...not illuminate when pushed CAUSE Steamer not plugged in Circuit overload Steamer fails to a lower setting The steam nozzle and hose are not being used in a vertical position Hold the steam nozzle...
... session Water filter not installed Install water filter per Assembly Instruction #7 on page 6 Steam intensity too high Reduce steam intensity to heat Steamer not plugged in "ON" position Press the Steam on Demand button located on the steamer handle. Problem Solving PROBLEM ON/OFF switch does ...not illuminate when pushed CAUSE Steamer not plugged in Circuit overload Steamer fails to a lower setting The steam nozzle and hose are not being used in a vertical position Hold the steam nozzle...

User Manual
Page 8
...Manual de instrucciones e Información de garantía PS-350 Nine Mile Rd. unauthorized repairs or modifications; A product that its products with specific legal rights. Any and all rights reserved. IB-PS350 PerfectSteam® Professional commercial garment steamer ómese un momento ahor Registre su producto en: www.homedics... REPAIR OR REPLACEMENT OF ANY PART OR PARTS WHICH ARE FOUND TO BE DEFECTIVE WITHIN THE EFFECTIVE PERIOD OF THE WARRANTY. This warranty provides you . Because of individual country regulations, some of use and service. HoMedics warrants...
...Manual de instrucciones e Información de garantía PS-350 Nine Mile Rd. unauthorized repairs or modifications; A product that its products with specific legal rights. Any and all rights reserved. IB-PS350 PerfectSteam® Professional commercial garment steamer ómese un momento ahor Registre su producto en: www.homedics... REPAIR OR REPLACEMENT OF ANY PART OR PARTS WHICH ARE FOUND TO BE DEFECTIVE WITHIN THE EFFECTIVE PERIOD OF THE WARRANTY. This warranty provides you . Because of individual country regulations, some of use and service. HoMedics warrants...


