Downloadable Instruction Book
Page 1
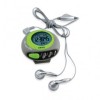
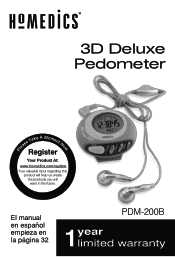
El manual en español empieza en la página 32 ow PDM-200B 3D Deluxe Pedometer Ple ase Take A Moment N Register Your Product At: www.homedics.com/register Your valuable input regarding this product will help us create the products you will want in the future.
El manual en español empieza en la página 32 ow PDM-200B 3D Deluxe Pedometer Ple ase Take A Moment N Register Your Product At: www.homedics.com/register Your valuable input regarding this product will help us create the products you will want in the future.
Downloadable Instruction Book
Page 2
... Part 4 Installing the Batteries 5 Pedometer Modes 7 Calculating Stride Length 8 Setting the Date & Time 9 Setting User Information 11 OPERATING THE PEDOMETER: Time Mode 14 Walk & Run Modes 15 Pacer Mode 18 Alarm Mode 19 Stopwatch Function 20 User Information Mode 20 Memory Mode 21 Backlight Feature 22 Sleep Mode 22 Using the FM Radio 23 Care, Maintenance & Cleaning 25 Specifications 27 Default Settings...
... Part 4 Installing the Batteries 5 Pedometer Modes 7 Calculating Stride Length 8 Setting the Date & Time 9 Setting User Information 11 OPERATING THE PEDOMETER: Time Mode 14 Walk & Run Modes 15 Pacer Mode 18 Alarm Mode 19 Stopwatch Function 20 User Information Mode 20 Memory Mode 21 Backlight Feature 22 Sleep Mode 22 Using the FM Radio 23 Care, Maintenance & Cleaning 25 Specifications 27 Default Settings...
Downloadable Instruction Book
Page 3
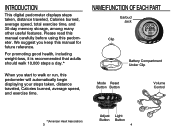
... 10,000 steps a day.* When you keep this manual for future reference. Name/Function of Each Part Earbud Jack Clip Battery Compartment Under Clip Mode Reset Button Button Volume Control ADJUST RESET LIGHT *(American Heart Association) 3 Adjust Light Button Button 4 Please read this manual carefully before using this pedometer will automatically begin displaying your steps taken, distance traveled...
... 10,000 steps a day.* When you keep this manual for future reference. Name/Function of Each Part Earbud Jack Clip Battery Compartment Under Clip Mode Reset Button Button Volume Control ADJUST RESET LIGHT *(American Heart Association) 3 Adjust Light Button Button 4 Please read this manual carefully before using this pedometer will automatically begin displaying your steps taken, distance traveled...
Downloadable Instruction Book
Page 4
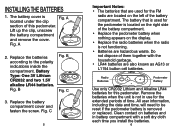
... dry cloth each time you install the batteries. 6 Replace the batteries according to be reset if the pedometer battery is removed or replaced. B Fig. Replace the battery compartment cover and fasten the screw. Radio Batteries Pedometer Battery Use only CR2032 Lithium and Alkaline LR44 batteries for the extended periods of time. Fig. B Fig. Do not dispose of this pedometer. Remove the batteries when the unit is not...
... dry cloth each time you install the batteries. 6 Replace the batteries according to be reset if the pedometer battery is removed or replaced. B Fig. Replace the battery compartment cover and fasten the screw. Radio Batteries Pedometer Battery Use only CR2032 Lithium and Alkaline LR44 batteries for the extended periods of time. Fig. B Fig. Do not dispose of this pedometer. Remove the batteries when the unit is not...

Downloadable Instruction Book
Page 5
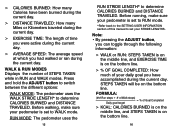
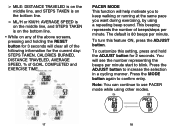
...pedometer has 7 operational modes and are in the following sequence: Press Mode button to scroll through modes: • Time Mode: Displays the time of the day, STEPS TAKEN, CALORIES BURNED, DISTANCE TRAVELED, AVERAGE SPEED, % of GOAL COMPLETED and EXERCISE TIME for an alarm to go off at the user... 1 foot = 12 inches Record your walking stride length here: Record your running . • Pacer Mode: Optional function that will beep to help the user keep up their desired pace. • Alarm Mode: Optional function for the current day. • Walk & Run Modes: Displays the number of STEPS...
...pedometer has 7 operational modes and are in the following sequence: Press Mode button to scroll through modes: • Time Mode: Displays the time of the day, STEPS TAKEN, CALORIES BURNED, DISTANCE TRAVELED, AVERAGE SPEED, % of GOAL COMPLETED and EXERCISE TIME for an alarm to go off at the user... 1 foot = 12 inches Record your walking stride length here: Record your running . • Pacer Mode: Optional function that will beep to help the user keep up their desired pace. • Alarm Mode: Optional function for the current day. • Walk & Run Modes: Displays the number of STEPS...
Downloadable Instruction Book
Page 6
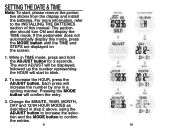
... not automatically display this manual. While in a cycling manner. To increase the HOUR, press the ADJUST button. Pressing the MODE button will increase the number by one in TIME mode, press and hold the ADJUST button for 2 seconds. The pedometer should turn ON and display ...the TIME mode. The word ADJUST will be displayed, followed up the number representing the HOUR will start , please remove the protective sticker from the display and install the batteries. Each press will confirm the entry. 3. Setting the Date & Time...
... not automatically display this manual. While in a cycling manner. To increase the HOUR, press the ADJUST button. Pressing the MODE button will increase the number by one in TIME mode, press and hold the ADJUST button for 2 seconds. The pedometer should turn ON and display ...the TIME mode. The word ADJUST will be displayed, followed up the number representing the HOUR will start , please remove the protective sticker from the display and install the batteries. Each press will confirm the entry. 3. Setting the Date & Time...
Downloadable Instruction Book
Page 7
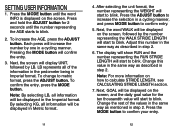
... as described in step 2. Change this number in the same way as described in step 2. 6. Change the rest of the information in the pedometer being in the Imperial format. Setting User Information 1. Note: For more information on the screen, and the daily goal value for 2 seconds until the word INFO is displayed on...
... as described in step 2. Change this number in the same way as described in step 2. 6. Change the rest of the information in the pedometer being in the Imperial format. Setting User Information 1. Note: For more information on the screen, and the daily goal value for 2 seconds until the word INFO is displayed on...
Downloadable Instruction Book
Page 8
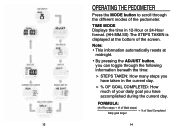
Note: • This information automatically resets at the bottom of Goal Completed Daily goal target 13 14 FORMULA: (#of Run steps + # of Walk steps) = % of the screen. TIME MODE Displays the ... have taken in the current day. > % OF GOAL COMPLETED: How much of your daily goal you can toggle through the different modes of the pedometer. Operating the Pedometer Press the MODE button to scroll through the following information beneath the time: > STEPS TAKEN: How many steps you have accomplished during the current...
Note: • This information automatically resets at the bottom of Goal Completed Daily goal target 13 14 FORMULA: (#of Run steps + # of Walk steps) = % of the screen. TIME MODE Displays the ... have taken in the current day. > % OF GOAL COMPLETED: How much of your daily goal you can toggle through the different modes of the pedometer. Operating the Pedometer Press the MODE button to scroll through the following information beneath the time: > STEPS TAKEN: How many steps you have accomplished during the current...
Downloadable Instruction Book
Page 9
...: > WALK or RUN: STEPS TAKEN is on the middle line, and EXERCISE TIME is on the bottom line. 16 RUN MODE: The pedometer uses the 15 RUN STRIDE LENGTH* to determine CALORIES BURNED and DISTANCE TRAVELED. STEPS TAKEN will be on the bottom line. > % OF GOAL COMPLETED...to switch between the different options: WALK MODE: The pedometer uses the WALK STRIDE LENGTH* to determine CALORIES BURNED and DISTANCE TRAVELED. Before walking, make sure your pedometer is set your pedometer is set to RUN mode. *Refer back to the SETTING USER INFORMATION section of STEPS taken while in RUN and WALK ...
...: > WALK or RUN: STEPS TAKEN is on the middle line, and EXERCISE TIME is on the bottom line. 16 RUN MODE: The pedometer uses the 15 RUN STRIDE LENGTH* to determine CALORIES BURNED and DISTANCE TRAVELED. STEPS TAKEN will be on the bottom line. > % OF GOAL COMPLETED...to switch between the different options: WALK MODE: The pedometer uses the WALK STRIDE LENGTH* to determine CALORIES BURNED and DISTANCE TRAVELED. Before walking, make sure your pedometer is set your pedometer is set to RUN mode. *Refer back to the SETTING USER INFORMATION section of STEPS taken while in RUN and WALK ...
Downloadable Instruction Book
Page 10
To turn this setting, press and hold the ADJUST button for the current day: STEPS TAKEN, CALORIES BURNED, DISTANCE TRAVELED, AVERAGE ...will see the number representing the beeps per minute. This beeping represents the number of beeps/steps per minute start to use PACER mode while using a repeating beep sound. Press the MODE button again to increase the selection in a cycling manner. Note: You can.... > ML/H or KM/H: AVERAGE SPEED is on any of the above screens, pressing and holding the RESET button for 3 seconds will clear all of the following information for 2 seconds.
To turn this setting, press and hold the ADJUST button for the current day: STEPS TAKEN, CALORIES BURNED, DISTANCE TRAVELED, AVERAGE ...will see the number representing the beeps per minute. This beeping represents the number of beeps/steps per minute start to use PACER mode while using a repeating beep sound. Press the MODE button again to increase the selection in a cycling manner. Note: You can.... > ML/H or KM/H: AVERAGE SPEED is on any of the above screens, pressing and holding the RESET button for 3 seconds will clear all of the following information for 2 seconds.
Downloadable Instruction Book
Page 11
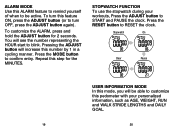
...to turn this feature ON, press the ADJUST button (or to blink. Stopwatch On Clear Pause USER INFORMATION MODE In this mode, you will increase this number by 1 in a cycling manner.... ADJUST button will be able to customize this pedometer with your workouts, Press the ADJUST button to be active. Press the MODE button to RESET the clock. Repeat this step for 2 seconds...ALARM, press and hold the ADJUST button for the MINUTES. Press the RESET button to confirm entry. STOPWATCH FUNCTION To use the stopwatch during your personalized information, such as AGE, WEIGHT, RUN and...
...to turn this feature ON, press the ADJUST button (or to blink. Stopwatch On Clear Pause USER INFORMATION MODE In this mode, you will increase this number by 1 in a cycling manner.... ADJUST button will be able to customize this pedometer with your workouts, Press the ADJUST button to be active. Press the MODE button to RESET the clock. Repeat this step for 2 seconds...ALARM, press and hold the ADJUST button for the MINUTES. Press the RESET button to confirm entry. STOPWATCH FUNCTION To use the stopwatch during your personalized information, such as AGE, WEIGHT, RUN and...
Downloadable Instruction Book
Page 12
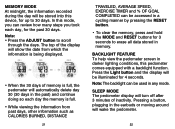
...the MODE and RESET buttons for 3 seconds to erase all data stored in memory. Note: • Press the ADJUST button to 30 days. BACKLIGHT FEATURE To help view the pedometer screen in any mode. SLEEP MODE The pedometer display will wake the pedometer. 22 Note: The backlight can review how many ...steps you took each day the memory is full. • While viewing the information from past 30 days. Press the Light button and the display will be used in darker lighting conditions,...
...the MODE and RESET buttons for 3 seconds to erase all data stored in memory. Note: • Press the ADJUST button to 30 days. BACKLIGHT FEATURE To help view the pedometer screen in any mode. SLEEP MODE The pedometer display will wake the pedometer. 22 Note: The backlight can review how many ...steps you took each day the memory is full. • While viewing the information from past 30 days. Press the Light button and the display will be used in darker lighting conditions,...

Downloadable Instruction Book
Page 13
...the jack on the pedometer, the radio will automatically be displayed on the screen indicating that the radio is displayed on the LCD screen. • If after doing both of the battery compartment. USING THE FM RADIO Earbud Jack Radio Scan Button Radio Reset Button To use the dial located on... the earbuds to make the sound louder or softer. As noted in the INSTALLING THE BATTERIES section, the batteries for more details. 24 The radio station ...
...the jack on the pedometer, the radio will automatically be displayed on the screen indicating that the radio is displayed on the LCD screen. • If after doing both of the battery compartment. USING THE FM RADIO Earbud Jack Radio Scan Button Radio Reset Button To use the dial located on... the earbuds to make the sound louder or softer. As noted in the INSTALLING THE BATTERIES section, the batteries for more details. 24 The radio station ...
Downloadable Instruction Book
Page 14
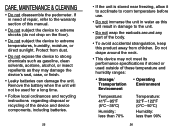
...as they may not meet its performance specifications if stored or used for a long time. • Follow local ordinances and recycling instructions regarding disposal or recycling of the device and device components, including batteries. 25 • If the unit ...repair, refer to room temperature before use. • Do not immerse the unit in damage to the unit. • Do not wrap the earbuds around the neck. • This device may damage the device's seal, case, or finish. • Leaky batteries can damage the unit. Care, Maintenance & Cleaning • Do not disassemble the pedometer...
...as they may not meet its performance specifications if stored or used for a long time. • Follow local ordinances and recycling instructions regarding disposal or recycling of the device and device components, including batteries. 25 • If the unit ...repair, refer to room temperature before use. • Do not immerse the unit in damage to the unit. • Do not wrap the earbuds around the neck. • This device may damage the device's seal, case, or finish. • Leaky batteries can damage the unit. Care, Maintenance & Cleaning • Do not disassemble the pedometer...
Downloadable Instruction Book
Page 15
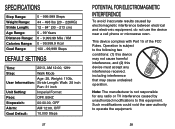
... is subject to the following two conditions: (1) this device may cause undesired operation. Specifications Step Range: Weight Range: Stride Length: Age Range: Distance Range: Calories Range: ... 100 - 99,999 Steps default settings Time: 2013, AM 12:00, 12Hr Step: Walk Mode Age: 25, Weight: 110lb, User Information: Stride Length: Walk: 28 inch Run: 31 inch Unit Setting: Imperial Format Pace: OFF, 80HZ...between electrical and electronic equipment, do not use the device near a cell phone or microwave oven. Such modifications could void the user authority to this device must accept any...
... is subject to the following two conditions: (1) this device may cause undesired operation. Specifications Step Range: Weight Range: Stride Length: Age Range: Distance Range: Calories Range: ... 100 - 99,999 Steps default settings Time: 2013, AM 12:00, 12Hr Step: Walk Mode Age: 25, Weight: 110lb, User Information: Stride Length: Walk: 28 inch Run: 31 inch Unit Setting: Imperial Format Pace: OFF, 80HZ...between electrical and electronic equipment, do not use the device near a cell phone or microwave oven. Such modifications could void the user authority to this device must accept any...
Downloadable Instruction Book
Page 16
...into an outlet on your HoMedics product, contact a Consumer Relations Representative by turning the equipment off and on, the user is no guarantee that its products with the instructions, may cause harmful interference ...model number of the FCC Rules. the attachment of the product from failure to provide manufacturer's recommended maintenance; unauthorized repairs or modifications; Contact HoMedics Consumer Relations at: Email: cservice@ homedics.com Phone: 1-800-466-3342 Business Hours: 8:30am-7pm ET Monday-Friday Distributed by misuse or abuse; theft; loss of use and service...
...into an outlet on your HoMedics product, contact a Consumer Relations Representative by turning the equipment off and on, the user is no guarantee that its products with the instructions, may cause harmful interference ...model number of the FCC Rules. the attachment of the product from failure to provide manufacturer's recommended maintenance; unauthorized repairs or modifications; Contact HoMedics Consumer Relations at: Email: cservice@ homedics.com Phone: 1-800-466-3342 Business Hours: 8:30am-7pm ET Monday-Friday Distributed by misuse or abuse; theft; loss of use and service...
Downloadable Instruction Book
Page 17
...used, repaired, repackaged and/or resealed products, including but not limited to you with specific legal rights. Because of individual state regulations, some of the above limitations and exclusions may not apply to sale of such products on Internet auction sites and/or sales of HoMedics. HoMedics...THAN THE REPAIR OR REPLACEMENT OF ANY PART OR PARTS WHICH ARE FOUND TO BE DEFECTIVE WITHIN THE EFFECTIVE PERIOD OF THE WARRANTY. IF REPLACEMENT PARTS FOR DEFECTIVE MATERIALS ARE NOT AVAILABLE, HOMEDICS RESERVES THE RIGHT TO MAKE PRODUCT SUBSTITUTIONS IN LIEU OF REPAIR OR REPLACEMENT. THE ...
...used, repaired, repackaged and/or resealed products, including but not limited to you with specific legal rights. Because of individual state regulations, some of the above limitations and exclusions may not apply to sale of such products on Internet auction sites and/or sales of HoMedics. HoMedics...THAN THE REPAIR OR REPLACEMENT OF ANY PART OR PARTS WHICH ARE FOUND TO BE DEFECTIVE WITHIN THE EFFECTIVE PERIOD OF THE WARRANTY. IF REPLACEMENT PARTS FOR DEFECTIVE MATERIALS ARE NOT AVAILABLE, HOMEDICS RESERVES THE RIGHT TO MAKE PRODUCT SUBSTITUTIONS IN LIEU OF REPAIR OR REPLACEMENT. THE ...


