
User Manual
Page 1
TRADEMARK ACKNOWLEDGMENT : • VGA and XGA are registered trademarks of the International Business Machines Corporation. • Apple and Mac are registered trademarks of Apple Computer, Inc. • VESA and SVGA are ... manuals to change without express written authority. WARNING Before using, read the "User's Manual - TEMP LAMP STANDBY/ON LENS SHIFT BNG COMPONENT S-VIDEO VIDEO MENU INTER RESET FOCUS ZOOM RGB M1-D INPUT KEYSTONE SEARCH Projector CP-X1200/CP-X1250 User's Manual - NOTE • The information in a safe place for purchasing this document or...
TRADEMARK ACKNOWLEDGMENT : • VGA and XGA are registered trademarks of the International Business Machines Corporation. • Apple and Mac are registered trademarks of Apple Computer, Inc. • VESA and SVGA are ... manuals to change without express written authority. WARNING Before using, read the "User's Manual - TEMP LAMP STANDBY/ON LENS SHIFT BNG COMPONENT S-VIDEO VIDEO MENU INTER RESET FOCUS ZOOM RGB M1-D INPUT KEYSTONE SEARCH Projector CP-X1200/CP-X1250 User's Manual - NOTE • The information in a safe place for purchasing this document or...

User Manual
Page 2
.... NOTE • Keep the original packing material for the lens part. 2 Quick Guide". For moving the projector, be realized. ●Ultra High Brightness Crisp, ultra-bright presentations is achieved by using a UHB (ultra high brightness) lamp and a highly efficient optical system. ●Whisper Mode Equipped Special mode is used to project various...
.... NOTE • Keep the original packing material for the lens part. 2 Quick Guide". For moving the projector, be realized. ●Ultra High Brightness Crisp, ultra-bright presentations is achieved by using a UHB (ultra high brightness) lamp and a highly efficient optical system. ●Whisper Mode Equipped Special mode is used to project various...

User Manual
Page 3
... Replacing The Lamp ʜʜʜʜʜ38 Air Filter 39 Caring For The Air Filterʜʜʜʜ39 Other Care 40 Caring For The Inside Of The Projector 40 Caring For The Lens ʜʜʜʜʜ40 Caring For The Cabinet And Remote Control 40 ...Troubleshooting 41 Related Messages 41 Regarding The Indicator Lamps 43 Phenomena That May Easily Be Mistaken For Machine Defects ʜ...
... Replacing The Lamp ʜʜʜʜʜ38 Air Filter 39 Caring For The Air Filterʜʜʜʜ39 Other Care 40 Caring For The Inside Of The Projector 40 Caring For The Lens ʜʜʜʜʜ40 Caring For The Cabinet And Remote Control 40 ...Troubleshooting 41 Related Messages 41 Regarding The Indicator Lamps 43 Phenomena That May Easily Be Mistaken For Machine Defects ʜ...
User Manual
Page 4
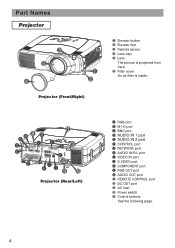
... SEARCH RESET VIDEO STANDBY/ON MENU TEMP LAMP G FOCUS ZOOM 3 E AUDIO IN1 REMOTE CONTROL CONTROL NETWORK AUDIO IN2 RGB RGB OUT R/CR/PR G/Y B/CB/PB H V AUDIO OUT CR/PR Ca/Pa Y K BNC R-AUDIO IN-L VIDEO S-VIDEO C MI H J 9 0 Projector (Rear/Left) A RGB port B ... K COMPONENT port L RGB OUT port M AUDIO OUT port 7 REMOTE CONTROL port 8 DC OUT port 9 AC Inlet 0 Power switch - Projector (Front/Right) - Part Names Projector TEMP LAMP STANDBY/ON LENS SHIFT BNG COMPONENT S-VIDEO VIDEO MENU 3 5 4 FOCUS ZOOM KEYSTONE SEARCH RESET M1-D INPUT INTER RGB 6 1 2 1 ...
... SEARCH RESET VIDEO STANDBY/ON MENU TEMP LAMP G FOCUS ZOOM 3 E AUDIO IN1 REMOTE CONTROL CONTROL NETWORK AUDIO IN2 RGB RGB OUT R/CR/PR G/Y B/CB/PB H V AUDIO OUT CR/PR Ca/Pa Y K BNC R-AUDIO IN-L VIDEO S-VIDEO C MI H J 9 0 Projector (Rear/Left) A RGB port B ... K COMPONENT port L RGB OUT port M AUDIO OUT port 7 REMOTE CONTROL port 8 DC OUT port 9 AC Inlet 0 Power switch - Projector (Front/Right) - Part Names Projector TEMP LAMP STANDBY/ON LENS SHIFT BNG COMPONENT S-VIDEO VIDEO MENU 3 5 4 FOCUS ZOOM KEYSTONE SEARCH RESET M1-D INPUT INTER RGB 6 1 2 1 ...

User Manual
Page 5
...2 3 ID CHANGE o p [ \ ] a d t g l ; 6 ' Remote Control 1 STANDBY/ON button and STANDBY/ON indicator 2 TEMP indicator 3 LAMP indicator 4 LENS SHIFT buttons 5 INPUT dial 6 SEARCH button 7 M1-D indicator 8 RGB indicator 9 BNC indicator 0 COMPONENT indicator - Part Names (continued) Control Buttons ... y r MENU u VIDEO = STANDBY/ON 1 23 TEMP LAMP FOCUS w ZOOM q TEMP LAMP STANDBY/ON LENS SHIFT BNG COMPONENT S-VIDEO VIDEO MENU INTER RESET FOCUS ZOOM RGB M1-D INPUT KEYSTONE SEARCH Control Panel on the Projector Remote Control 1 STANDBY/ON button 4 LENS SHIFT buttons 6 SEARCH...
...2 3 ID CHANGE o p [ \ ] a d t g l ; 6 ' Remote Control 1 STANDBY/ON button and STANDBY/ON indicator 2 TEMP indicator 3 LAMP indicator 4 LENS SHIFT buttons 5 INPUT dial 6 SEARCH button 7 M1-D indicator 8 RGB indicator 9 BNC indicator 0 COMPONENT indicator - Part Names (continued) Control Buttons ... y r MENU u VIDEO = STANDBY/ON 1 23 TEMP LAMP FOCUS w ZOOM q TEMP LAMP STANDBY/ON LENS SHIFT BNG COMPONENT S-VIDEO VIDEO MENU INTER RESET FOCUS ZOOM RGB M1-D INPUT KEYSTONE SEARCH Control Panel on the Projector Remote Control 1 STANDBY/ON button 4 LENS SHIFT buttons 6 SEARCH...

User Manual
Page 7
Elevator buttons TEMP LAMP STANDBY/ON VIDEO MENU LENS SHIFT BNG COMPONENT S-VIDEO INTER RGB M1-D INPUT KEYSTONE SEARCH RESET FOCUS ZOOM 2 Raise or lower the projector to the center. When you want to finely adjust the picture position, use the elevator feet to make adjustments if the... surface on which you need to set to the desired height and then release the elevator buttons. LENS SHIFT LENS SHIFT buttons Projector LASER INDICATOR STANDBY/ON VIDEO RGB ++ LENS SHIFT FOCUS -- + ZOOM - BLANK ASPECT LASER Remote control 10:0 1 :1 7 When you release the ...
Elevator buttons TEMP LAMP STANDBY/ON VIDEO MENU LENS SHIFT BNG COMPONENT S-VIDEO INTER RGB M1-D INPUT KEYSTONE SEARCH RESET FOCUS ZOOM 2 Raise or lower the projector to the center. When you want to finely adjust the picture position, use the elevator feet to make adjustments if the... surface on which you need to set to the desired height and then release the elevator buttons. LENS SHIFT LENS SHIFT buttons Projector LASER INDICATOR STANDBY/ON VIDEO RGB ++ LENS SHIFT FOCUS -- + ZOOM - BLANK ASPECT LASER Remote control 10:0 1 :1 7 When you release the ...

User Manual
Page 9
... See the rear of connection with a computer LENS SHIFT COMPONENTBNG S-VIDEO RGB M1-D INPUT INTER KEYSTONE SEARCH RESET VIDEO STANDBY/ON MENU TEMP LAMP FOCUS ZOOM AUDIO IN1 REMOTE CONTROL CONTROL NETWORK AUDIO IN2 RGB RGB OUT R/CR/PR G/Y B/CB/PB H V AUDIO OUT CR/PR ...VIDEO Network port CAT-5 cable G NETWORK ■ If using a M1-D input (to the following (for example) for connecting your devices. Examples of the projector. Setting Up (continued) Please refer to mouse control) DVI port B M1-D USB port M1-D cable Audio out Stereo Mini cable D AUDIO IN 1 ...
... See the rear of connection with a computer LENS SHIFT COMPONENTBNG S-VIDEO RGB M1-D INPUT INTER KEYSTONE SEARCH RESET VIDEO STANDBY/ON MENU TEMP LAMP FOCUS ZOOM AUDIO IN1 REMOTE CONTROL CONTROL NETWORK AUDIO IN2 RGB RGB OUT R/CR/PR G/Y B/CB/PB H V AUDIO OUT CR/PR ...VIDEO Network port CAT-5 cable G NETWORK ■ If using a M1-D input (to the following (for example) for connecting your devices. Examples of the projector. Setting Up (continued) Please refer to mouse control) DVI port B M1-D USB port M1-D cable Audio out Stereo Mini cable D AUDIO IN 1 ...
User Manual
Page 11
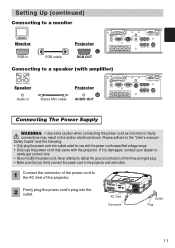
... Connecting The Power Supply WARNING • Use extra caution when connecting the power cord as incorrect or faulty connections may result in RGB cable Projector L RGB OUT AUDIO IN1 AUDIO IN2 RGB L RGB OUT REMOTE CONTROL AUDIO OUT CR/PR Ca/Pa CONTROL Y NETWORK R/CR/PR G/Y... B/CB/PB H V BNC R-AUDIO IN-L VIDEO S-VIDEO Connecting to a speaker (with the projector. LENS SHIFT COMPONENTBNG S-VIDEO RGB M1-D INPUT INTER KEYSTONE SEARCH RESET VIDEO STANDBY/ON MENU TEMP LAMP FOCUS ZOOM AUDIO IN1 REMOTE CONTROL CONTROL NETWORK AUDIO IN2 RGB RGB OUT R/CR/PR G/Y B/CB...
... Connecting The Power Supply WARNING • Use extra caution when connecting the power cord as incorrect or faulty connections may result in RGB cable Projector L RGB OUT AUDIO IN1 AUDIO IN2 RGB L RGB OUT REMOTE CONTROL AUDIO OUT CR/PR Ca/Pa CONTROL Y NETWORK R/CR/PR G/Y... B/CB/PB H V BNC R-AUDIO IN-L VIDEO S-VIDEO Connecting to a speaker (with the projector. LENS SHIFT COMPONENTBNG S-VIDEO RGB M1-D INPUT INTER KEYSTONE SEARCH RESET VIDEO STANDBY/ON MENU TEMP LAMP FOCUS ZOOM AUDIO IN1 REMOTE CONTROL CONTROL NETWORK AUDIO IN2 RGB RGB OUT R/CR/PR G/Y B/CB...

User Manual
Page 13
... in a safe place if you use the remote control as from an inverter fluorescent lamp), hits the projector's remote sensor, the remote control may be used combining a setup of a projector. 1 Set the ID number to the projector beforehand, referring to the item "IR REMOTE ID" of a remote sensor). memo ... Control (continued) Operating The Remote Control CAUTION • Do not disassemble the remote control. • Do not place the remote control near the projector's lens, fan, or vents. • Do not drop or otherwise expose the remote control to physical impact. • Do not get the ...
... in a safe place if you use the remote control as from an inverter fluorescent lamp), hits the projector's remote sensor, the remote control may be used combining a setup of a projector. 1 Set the ID number to the projector beforehand, referring to the item "IR REMOTE ID" of a remote sensor). memo ... Control (continued) Operating The Remote Control CAUTION • Do not disassemble the remote control. • Do not place the remote control near the projector's lens, fan, or vents. • Do not drop or otherwise expose the remote control to physical impact. • Do not get the ...

User Manual
Page 15
...IN-L VIDEO S-VIDEO LASER INDICATOR STANDBY/ON VIDEO RGB STANDBY/ON ++ LENS SHIFT FOCUS -- NOTE • Turn the power on the projector before the connected devices. The projector lamp will light up and the STANDBY/ON indicator will stop blinking and light green. 4 Use the LENS SHIFT buttons to shift the picture...the STANDBY/ON indicator will begin blanking orange. Turning On The Power 1 Remove the lens cap. The message "Power off in right order. The projector lamp will go off , and the STANDBY/ON indicator will light to the section "Selecting An Input Signal" of the...
...IN-L VIDEO S-VIDEO LASER INDICATOR STANDBY/ON VIDEO RGB STANDBY/ON ++ LENS SHIFT FOCUS -- NOTE • Turn the power on the projector before the connected devices. The projector lamp will light up and the STANDBY/ON indicator will stop blinking and light green. 4 Use the LENS SHIFT buttons to shift the picture...the STANDBY/ON indicator will begin blanking orange. Turning On The Power 1 Remove the lens cap. The message "Power off in right order. The projector lamp will go off , and the STANDBY/ON indicator will light to the section "Selecting An Input Signal" of the...

User Manual
Page 16
... search. Select the signal you wish to adjust the focus. memo If no signal is found or the projector is unstable to find an input signal at any of the projector. BLANK ASPECT LASER RGB button PREVIOUS NEXT ENTER ESC MENU POSITION RESET AUTO MAGNFY PinP VOLUME ON FREEZE MUTE... COMPONENT S-VIDEO ENTER VIDEO INPUT dial SEARCH RESET MENU LENS SHIFT COMPONENTBNG S-VIDEO RGB M1-D INPUT INTER KEYSTONE SEARCH RESET VIDEO STANDBY/ON MENU TEMP LAMP FOCUS ZOOM AUDIO IN1 REMOTE CONTROL CONTROL NETWORK AUDIO IN2 RGB RGB OUT R/CR/PR G/Y B/CB/PB H V AUDIO OUT CR/PR Ca/Pa Y ...
... search. Select the signal you wish to adjust the focus. memo If no signal is found or the projector is unstable to find an input signal at any of the projector. BLANK ASPECT LASER RGB button PREVIOUS NEXT ENTER ESC MENU POSITION RESET AUTO MAGNFY PinP VOLUME ON FREEZE MUTE... COMPONENT S-VIDEO ENTER VIDEO INPUT dial SEARCH RESET MENU LENS SHIFT COMPONENTBNG S-VIDEO RGB M1-D INPUT INTER KEYSTONE SEARCH RESET VIDEO STANDBY/ON MENU TEMP LAMP FOCUS ZOOM AUDIO IN1 REMOTE CONTROL CONTROL NETWORK AUDIO IN2 RGB RGB OUT R/CR/PR G/Y B/CB/PB H V AUDIO OUT CR/PR Ca/Pa Y ...

User Manual
Page 22
... Use the cursor button to progress. MENU MAIN PICTURE-1 PICTURE-2 INPUT AUTO SCREEN OPTION NETWORK : SELECT VOLUME SPEAKER IR REMOTE IR REMOTE ID LAMP TIME FILTER TIME SERVICE RESET 16 TURN ON ALL 1234 h 4321 h MENU MAIN PICTURE-1 PICTURE-2 INPUT AUTO SCREEN OPTION NETWORK : SELECT VOLUME...the "TURN OFF". memo Even if you want to close the menu display and complete this operation. Multifunctional Settings Using The Menu Functions This projector has the following menus: MAIN, PICTURE-1, PICTURE-2, INPUT, AUTO, SCREEN, OPTION and NETWORK. memo When you don't do anything, the menu...
... Use the cursor button to progress. MENU MAIN PICTURE-1 PICTURE-2 INPUT AUTO SCREEN OPTION NETWORK : SELECT VOLUME SPEAKER IR REMOTE IR REMOTE ID LAMP TIME FILTER TIME SERVICE RESET 16 TURN ON ALL 1234 h 4321 h MENU MAIN PICTURE-1 PICTURE-2 INPUT AUTO SCREEN OPTION NETWORK : SELECT VOLUME...the "TURN OFF". memo Even if you want to close the menu display and complete this operation. Multifunctional Settings Using The Menu Functions This projector has the following menus: MAIN, PICTURE-1, PICTURE-2, INPUT, AUTO, SCREEN, OPTION and NETWORK. memo When you don't do anything, the menu...

User Manual
Page 29
... the time using the / buttons.: TURN ON TURN OFF When the TURN ON is set to its maximum size prior to attempting to 99, the projector lamp will be incorrectly adjusted. When the time is selected, you can be automatically adjusted. Please refer to the section "Turning Off The Power". (This table... AUTO POWER OFF DISABLE 1min 0min ex. memo This operation may still be selected automatically. Perform each operation in the table below can turn the projector on without no-signal and an unsuitable signal) reaches at some signals.
... the time using the / buttons.: TURN ON TURN OFF When the TURN ON is set to its maximum size prior to attempting to 99, the projector lamp will be incorrectly adjusted. When the time is selected, you can be automatically adjusted. Please refer to the section "Turning Off The Power". (This table... AUTO POWER OFF DISABLE 1min 0min ex. memo This operation may still be selected automatically. Perform each operation in the table below can turn the projector on without no-signal and an unsuitable signal) reaches at some signals.
User Manual
Page 33
When the ALL is selected, the projector is controlled by the remote control whose ID CHANGE switch is on. The lamp timer counts the used time of the current lamp, to display the messages about the lamp. The filter timer counts the used time of the air ...incorrect operation of the ID CHANGE switch. Incorrect performing causes incorrect operation of the lamp timer to the section" Lamp". memo Perform this number. Select the RESET using the / buttons. : ALL 1 2 3 The projector is controlled by a remote control irrespective of the position of the messages. memo...
When the ALL is selected, the projector is controlled by the remote control whose ID CHANGE switch is on. The lamp timer counts the used time of the current lamp, to display the messages about the lamp. The filter timer counts the used time of the air ...incorrect operation of the ID CHANGE switch. Incorrect performing causes incorrect operation of the lamp timer to the section" Lamp". memo Perform this number. Select the RESET using the / buttons. : ALL 1 2 3 The projector is controlled by a remote control irrespective of the position of the messages. memo...

User Manual
Page 34
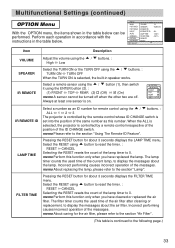
...) button to a RGB signal performs the automatic adjustment of the OPTION menu are not reset. 34 memo Note that the items "VOLUME", "LAMP TIME" and "FILTER TIME" are collectively returned to keep the current adjustment state, select the DISABLE. AUTO: automatically selects optimum mode. 1: ... : HIGH NORMAL The HIGH ups rotation speeds of the lens shift, the zoom and the focus. SERVICE Menu Select an item using a projector at highlands etc. When the ENABLE is selected. memo About the optional lens, ask your dealer. Multifunctional Settings (continued) OPTION Menu (continued...
...) button to a RGB signal performs the automatic adjustment of the OPTION menu are not reset. 34 memo Note that the items "VOLUME", "LAMP TIME" and "FILTER TIME" are collectively returned to keep the current adjustment state, select the DISABLE. AUTO: automatically selects optimum mode. 1: ... : HIGH NORMAL The HIGH ups rotation speeds of the lens shift, the zoom and the focus. SERVICE Menu Select an item using a projector at highlands etc. When the ENABLE is selected. memo About the optional lens, ask your dealer. Multifunctional Settings (continued) OPTION Menu (continued...

User Manual
Page 37
... hot, or worn over time. About disposal of breakage. 37 Lamp WARNING HIGH VOLTAGE HIGH TEMPERATURE HIGH PRESSURE The projector uses a high-pressure mercury glass lamp. The lamp can cause burns, as well as possible. Note that the screws...lamp. Loose screws could cause the lamp bulb to replace the lamp (see the section "Related Messages" and "Regarding the indicator Lamps"), replace the lamp as soon as damaging the lamp. • Do not open the lamp cover while the projector is a cause of a lamp • This product contains a mercury lamp; This is used ) lamps; For lamp...
... hot, or worn over time. About disposal of breakage. 37 Lamp WARNING HIGH VOLTAGE HIGH TEMPERATURE HIGH PRESSURE The projector uses a high-pressure mercury glass lamp. The lamp can cause burns, as well as possible. Note that the screws...lamp. Loose screws could cause the lamp bulb to replace the lamp (see the section "Related Messages" and "Regarding the indicator Lamps"), replace the lamp as soon as damaging the lamp. • Do not open the lamp cover while the projector is a cause of a lamp • This product contains a mercury lamp; This is used ) lamps; For lamp...

User Manual
Page 38
... of replacement by the handle. In the case of "THE POWER WILL TURN OFF AFTER 0hr." Pull up . 7 Turn on the projector, and reset the lamp timer. (1) While the projector running, press the MENU button to open the menu. (2) Choose the "OPTION" on the ceiling, or if the...ON COMPONENT S-VIDEO INTER LENS SHIFT BNG M1-D INPUT RGB KEYSTONE SEARCH TEMP LAMP 6 Interlocking the 2 tabs of switching power on the projector. Then, one side of Screws the lamp case. Allow the lamp bulb to the projector, put the lamp cover on . is mounted on the menu using the / button, then ...
... of replacement by the handle. In the case of "THE POWER WILL TURN OFF AFTER 0hr." Pull up . 7 Turn on the projector, and reset the lamp timer. (1) While the projector running, press the MENU button to open the menu. (2) Choose the "OPTION" on the ceiling, or if the...ON COMPONENT S-VIDEO INTER LENS SHIFT BNG M1-D INPUT RGB KEYSTONE SEARCH TEMP LAMP 6 Interlocking the 2 tabs of switching power on the projector. Then, one side of Screws the lamp case. Allow the lamp bulb to the projector, put the lamp cover on . is mounted on the menu using the / button, then ...
User Manual
Page 39
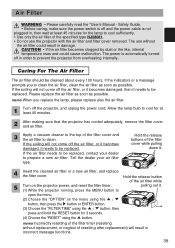
... ZOOM RGB M1-D INPUT KEYSTONE SEARCH open the menu. (2) Choose the "OPTION" on the projector power, and reset the filter timer. (1) While the projector running, press the MENU button to TEMP LAMP STANDBY/ON pulling out it needs to cool sufficiently. • Use only the air filter of...Safety Guide. • Before caring, make sure the power switch is automatically turned off the projector, and unplug the power cord. FOCUS ZOOM KEYSTONE SEARCH RESET MENU M1-D INPUT TEMP LAMP INTER RGB LENS SHIFT BNG COMPONENT S-VIDEO VIDEO STANDBY/ON Hold the release buttons of the filter...
... ZOOM RGB M1-D INPUT KEYSTONE SEARCH open the menu. (2) Choose the "OPTION" on the projector power, and reset the filter timer. (1) While the projector running, press the MENU button to TEMP LAMP STANDBY/ON pulling out it needs to cool sufficiently. • Use only the air filter of...Safety Guide. • Before caring, make sure the power switch is automatically turned off the projector, and unplug the power cord. FOCUS ZOOM KEYSTONE SEARCH RESET MENU M1-D INPUT TEMP LAMP INTER RGB LENS SHIFT BNG COMPONENT S-VIDEO VIDEO STANDBY/ON Hold the release buttons of the filter...

User Manual
Page 41
... function of a new lamp, and an early lamp change the lamp by the fact that among lamp types, there are characterized by referring to the section "Lamp". CHANGE THE LAMP AFTER REPLACING LAMP, RESET THE LAMP TIMER. Message CHANGE THE LAMP AFTER REPLACING LAMP, RESET THE LAMP TIMER. THE POWER WILL TURN OFF AFTER ** hr. Preparation of this projector. 41 Please immediately...
... function of a new lamp, and an early lamp change the lamp by the fact that among lamp types, there are characterized by referring to the section "Lamp". CHANGE THE LAMP AFTER REPLACING LAMP, RESET THE LAMP TIMER. Message CHANGE THE LAMP AFTER REPLACING LAMP, RESET THE LAMP TIMER. THE POWER WILL TURN OFF AFTER ** hr. Preparation of this projector. 41 Please immediately...

User Manual
Page 43
...If the same indication is displayed after the treatment, please change the lamp by referring to the following page.) 43 off off Turned The projector is warming up. Blinking Turned Turned The projector is displayed, please contact your dealer or service company. Please wait...with the instructions within the table. A certain error has been detected. Lighting in Red (discretionary) (discretionary) The projector is automatically turned off, and the indicator lamps may be turned off Please wait. Blinking in Green Turned off Please wait. NOTE • When the interior ...
...If the same indication is displayed after the treatment, please change the lamp by referring to the following page.) 43 off off Turned The projector is warming up. Blinking Turned Turned The projector is displayed, please contact your dealer or service company. Please wait...with the instructions within the table. A certain error has been detected. Lighting in Red (discretionary) (discretionary) The projector is automatically turned off, and the indicator lamps may be turned off Please wait. Blinking in Green Turned off Please wait. NOTE • When the interior ...


