
User Manual
Page 1
WARNING Before using, read the "User's Manual - TRADEMARK ACKNOWLEDGMENT : • VGA and XGA are registered trademarks of the International Business Machines Corporation. • Apple and Mac are registered trademarks of Apple Computer, Inc. • ...correct usage through understanding. TEMP LAMP STANDBY/ON LENS SHIFT BNG COMPONENT S-VIDEO VIDEO MENU INTER RESET FOCUS ZOOM RGB M1-D INPUT KEYSTONE SEARCH Projector CP-X1200/CP-X1250 User's Manual - NOTE • The information in this manual. • The reproduction, transmission or use of Microsoft Corporation. After reading,...
WARNING Before using, read the "User's Manual - TRADEMARK ACKNOWLEDGMENT : • VGA and XGA are registered trademarks of the International Business Machines Corporation. • Apple and Mac are registered trademarks of Apple Computer, Inc. • ...correct usage through understanding. TEMP LAMP STANDBY/ON LENS SHIFT BNG COMPONENT S-VIDEO VIDEO MENU INTER RESET FOCUS ZOOM RGB M1-D INPUT KEYSTONE SEARCH Projector CP-X1200/CP-X1250 User's Manual - NOTE • The information in this manual. • The reproduction, transmission or use of Microsoft Corporation. After reading,...

User Manual
Page 2
... packing material. When you want to project various computer signals as well as NTSC/PAL/SECAM video signals onto a screen. Your projector should come with the items shown there. Use special caution for future reshipment. NOTE • Keep the original packing material for ... MY MEMORY function. ●Partial Magnification Function Interesting parts of images can be magnified for reducing projector noise to use the LENS SHIFT buttons. Projector Features This multimedia projector is missing. Little space is required for installation and large images can easily be realized. ●...
... packing material. When you want to project various computer signals as well as NTSC/PAL/SECAM video signals onto a screen. Your projector should come with the items shown there. Use special caution for future reshipment. NOTE • Keep the original packing material for ... MY MEMORY function. ●Partial Magnification Function Interesting parts of images can be magnified for reducing projector noise to use the LENS SHIFT buttons. Projector Features This multimedia projector is missing. Little space is required for installation and large images can easily be realized. ●...

User Manual
Page 3
... Buttons 5 Remote control 5 Setting Up 6 Arrangement 6 Adjusting The Projector's Elevator 7 Using The Lens shift Buttons ʜʜ7 Connecting Your Devicesʜʜʜʜ8 Connecting The Power Supply ʜ11 Remote Control 12 About ...;ʜʜ38 Air Filter 39 Caring For The Air Filterʜʜʜʜ39 Other Care 40 Caring For The Inside Of The Projector 40 Caring For The Lens ʜʜʜʜʜ40 Caring For The Cabinet And Remote Control 40 Troubleshooting 41 Related Messages 41 Regarding...
... Buttons 5 Remote control 5 Setting Up 6 Arrangement 6 Adjusting The Projector's Elevator 7 Using The Lens shift Buttons ʜʜ7 Connecting Your Devicesʜʜʜʜ8 Connecting The Power Supply ʜ11 Remote Control 12 About ...;ʜʜ38 Air Filter 39 Caring For The Air Filterʜʜʜʜ39 Other Care 40 Caring For The Inside Of The Projector 40 Caring For The Lens ʜʜʜʜʜ40 Caring For The Cabinet And Remote Control 40 Troubleshooting 41 Related Messages 41 Regarding...
User Manual
Page 4
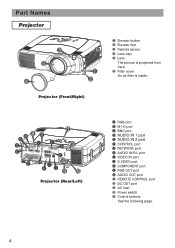
...AUDIO IN2 RGB RGB OUT R/CR/PR G/Y B/CB/PB H V AUDIO OUT CR/PR Ca/Pa Y K BNC R-AUDIO IN-L VIDEO S-VIDEO C MI H J 9 0 Projector (Rear/Left) A RGB port B M1-D port C BNC port D AUDIO IN 1 port E AUDIO IN 2 port F CONTROL port G NETWORK port H AUDIO IN R/L port ...VIDEO port K COMPONENT port L RGB OUT port M AUDIO OUT port 7 REMOTE CONTROL port 8 DC OUT port 9 AC Inlet 0 Power switch - Projector (Front/Right) - Part Names Projector TEMP LAMP STANDBY/ON LENS SHIFT BNG COMPONENT S-VIDEO VIDEO MENU 3 5 4 FOCUS ZOOM KEYSTONE SEARCH RESET M1-D INPUT INTER RGB 6 1 2 1...
...AUDIO IN2 RGB RGB OUT R/CR/PR G/Y B/CB/PB H V AUDIO OUT CR/PR Ca/Pa Y K BNC R-AUDIO IN-L VIDEO S-VIDEO C MI H J 9 0 Projector (Rear/Left) A RGB port B M1-D port C BNC port D AUDIO IN 1 port E AUDIO IN 2 port F CONTROL port G NETWORK port H AUDIO IN R/L port ...VIDEO port K COMPONENT port L RGB OUT port M AUDIO OUT port 7 REMOTE CONTROL port 8 DC OUT port 9 AC Inlet 0 Power switch - Projector (Front/Right) - Part Names Projector TEMP LAMP STANDBY/ON LENS SHIFT BNG COMPONENT S-VIDEO VIDEO MENU 3 5 4 FOCUS ZOOM KEYSTONE SEARCH RESET M1-D INPUT INTER RGB 6 1 2 1...

User Manual
Page 5
... w ZOOM q TEMP LAMP STANDBY/ON LENS SHIFT BNG COMPONENT S-VIDEO VIDEO MENU INTER RESET FOCUS ZOOM RGB M1-D INPUT KEYSTONE SEARCH Control Panel on the Projector Remote Control 1 STANDBY/ON button 4 LENS SHIFT buttons 6 SEARCH button q ZOOM buttons w FOCUS buttons e KEYSTONE button r MENU button t RESET button y ENTER button ( Mouse left button...
... w ZOOM q TEMP LAMP STANDBY/ON LENS SHIFT BNG COMPONENT S-VIDEO VIDEO MENU INTER RESET FOCUS ZOOM RGB M1-D INPUT KEYSTONE SEARCH Control Panel on the Projector Remote Control 1 STANDBY/ON button 4 LENS SHIFT buttons 6 SEARCH button q ZOOM buttons w FOCUS buttons e KEYSTONE button r MENU button t RESET button y ENTER button ( Mouse left button...

User Manual
Page 6
... turned off and the power code is disconnected. • Do not set up and move the projector, while it is hot. • Install the projector in the table are calculated for a full size screen. (±10%) Reference for the 16:9 aspect ratio Screen Lens center b m n a Side View... 350 (8.9) 400 (10.2) 450 (11.4) a [inch (m)] b [inch (cm)] Min. Safety Guide" and this manual. • The power outlet should be close to the projector and easily accessible. m:n=1:1 m:n=10:0 50(1.3) 77(2.0) 10(25) 23(58) 77(2.0) 117(3.0) 15(37) 34(87) 91(2.3) 137(3.5) 17(44) 40(102) 104(2.6) 157(4.0) 20...
... turned off and the power code is disconnected. • Do not set up and move the projector, while it is hot. • Install the projector in the table are calculated for a full size screen. (±10%) Reference for the 16:9 aspect ratio Screen Lens center b m n a Side View... 350 (8.9) 400 (10.2) 450 (11.4) a [inch (m)] b [inch (cm)] Min. Safety Guide" and this manual. • The power outlet should be close to the projector and easily accessible. m:n=1:1 m:n=10:0 50(1.3) 77(2.0) 10(25) 23(58) 77(2.0) 117(3.0) 15(37) 34(87) 91(2.3) 137(3.5) 17(44) 40(102) 104(2.6) 157(4.0) 20...

User Manual
Page 7
...you release the elevator buttons, the elevator feet will lock into position. 3 As necessary, you need to the center. The lens of the projector by twisting the elevator feet by hand. When you otherwise need to set to adjust the angle of projection. Elevator feet Using The Lens Shift... uneven or if you want to finely adjust the picture position, use to adjust the elevator feet. Setting Up (continued) Adjusting The Projector's Elevator WARNING • Do not touch about the lens and ventilation openings during use or immediately after use the LENS SHIFT buttons of the...
...you release the elevator buttons, the elevator feet will lock into position. 3 As necessary, you need to the center. The lens of the projector by twisting the elevator feet by hand. When you otherwise need to set to adjust the angle of projection. Elevator feet Using The Lens Shift... uneven or if you want to finely adjust the picture position, use to adjust the elevator feet. Setting Up (continued) Adjusting The Projector's Elevator WARNING • Do not touch about the lens and ventilation openings during use or immediately after use the LENS SHIFT buttons of the...

User Manual
Page 8
... VESA DDC (display data channel) compatible. • Please take some time and may result in malfunction and/or damage to the projector may generate extremely loud noises or other abnormalities that have multiple display screen modes. Incorrect connection may not be recommended to use the standard... drivers in malfunction and/or damage to simultaneous LCD and CRT display). Refer to activate the laptop's RGB external image output (set . Then the resolution will go back to change ...
... VESA DDC (display data channel) compatible. • Please take some time and may result in malfunction and/or damage to the projector may generate extremely loud noises or other abnormalities that have multiple display screen modes. Incorrect connection may not be recommended to use the standard... drivers in malfunction and/or damage to simultaneous LCD and CRT display). Refer to activate the laptop's RGB external image output (set . Then the resolution will go back to change ...

User Manual
Page 9
... CR/PR Ca/Pa Y BNC R-AUDIO IN-L VIDEO S-VIDEO Computer RGB out RGB cable Audio out Stereo Mini cable RS-232C port RS-232C cable Projector A RGB E AUDIO IN 2 F CONTROL E AUDIO IN1 AUDIO IN2 A RGB REMOTE CONTROL FG CONTROL NETWORK RGB OUT AUDIO OUT CR/PR Ca/Pa Y R/CR/... cable G NETWORK ■ If using a M1-D input (to the following (for example) for connecting your devices. You can see the ports. Examples of the projector. Setting Up (continued) Please refer to mouse control) DVI port B M1-D USB port M1-D cable Audio out Stereo Mini cable D AUDIO IN 1 ■ ...
... CR/PR Ca/Pa Y BNC R-AUDIO IN-L VIDEO S-VIDEO Computer RGB out RGB cable Audio out Stereo Mini cable RS-232C port RS-232C cable Projector A RGB E AUDIO IN 2 F CONTROL E AUDIO IN1 AUDIO IN2 A RGB REMOTE CONTROL FG CONTROL NETWORK RGB OUT AUDIO OUT CR/PR Ca/Pa Y R/CR/... cable G NETWORK ■ If using a M1-D input (to the following (for example) for connecting your devices. You can see the ports. Examples of the projector. Setting Up (continued) Please refer to mouse control) DVI port B M1-D USB port M1-D cable Audio out Stereo Mini cable D AUDIO IN 1 ■ ...

User Manual
Page 10
Setting Up (continued) Examples of connection with a VCR/DVD Player VCR/DVD Player Projector Audio out (R) Audio out (L) Video out R-AUDIO IN-L VIDEO R-AUDIO IN AUDIO IN-L H VIDEO IN I ■ If using a s-video signal S-video out S-video cable J S -VIDEO ...
Setting Up (continued) Examples of connection with a VCR/DVD Player VCR/DVD Player Projector Audio out (R) Audio out (L) Video out R-AUDIO IN-L VIDEO R-AUDIO IN AUDIO IN-L H VIDEO IN I ■ If using a s-video signal S-video out S-video cable J S -VIDEO ...
User Manual
Page 11
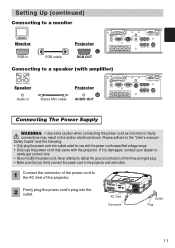
...Never attempt to defeat the ground connection of the three-pronged plug. • Make sure that came with amplifier) Speaker Audio in Stereo Mini cable Projector M AUDIO OUT AUDIO IN1 AUDIO IN2 RGB RGB OUT REMOTE CONTROL M AUDIO OUT CR/PR Ca/Pa CONTROL Y NETWORK R/CR/PR G/Y B/CB...PR G/Y B/CB/PB H V BNC R-AUDIO IN-L VIDEO S-VIDEO Connecting to the AC inlet of the power cord to a speaker (with the projector. LENS SHIFT COMPONENTBNG S-VIDEO RGB M1-D INPUT INTER KEYSTONE SEARCH RESET VIDEO STANDBY/ON MENU TEMP LAMP FOCUS ZOOM AUDIO IN1 REMOTE CONTROL CONTROL NETWORK...
...Never attempt to defeat the ground connection of the three-pronged plug. • Make sure that came with amplifier) Speaker Audio in Stereo Mini cable Projector M AUDIO OUT AUDIO IN1 AUDIO IN2 RGB RGB OUT REMOTE CONTROL M AUDIO OUT CR/PR Ca/Pa CONTROL Y NETWORK R/CR/PR G/Y B/CB...PR G/Y B/CB/PB H V BNC R-AUDIO IN-L VIDEO S-VIDEO Connecting to the AC inlet of the power cord to a speaker (with the projector. LENS SHIFT COMPONENTBNG S-VIDEO RGB M1-D INPUT INTER KEYSTONE SEARCH RESET VIDEO STANDBY/ON MENU TEMP LAMP FOCUS ZOOM AUDIO IN1 REMOTE CONTROL CONTROL NETWORK...

User Manual
Page 13
... the batteries from the remote control and store them in an area free from obstacles that could block the remote control's output signal to the projector. Rear remote sensor is 3 meters with a 60 degree range (30 degrees to physical impact. • Do not get the remote control ... Remote Control (continued) Operating The Remote Control CAUTION • Do not disassemble the remote control. • Do not place the remote control near the projector's lens, fan, or vents. • Do not drop or otherwise expose the remote control to the left and right of a remote sensor). may cease...
... the batteries from the remote control and store them in an area free from obstacles that could block the remote control's output signal to the projector. Rear remote sensor is 3 meters with a 60 degree range (30 degrees to physical impact. • Do not get the remote control ... Remote Control (continued) Operating The Remote Control CAUTION • Do not disassemble the remote control. • Do not place the remote control near the projector's lens, fan, or vents. • Do not drop or otherwise expose the remote control to the left and right of a remote sensor). may cease...

User Manual
Page 14
..., read the manuals of the computer. memo The USB control can be possible to use the remote control as a mouse and a keyboard of the projector to a PC. • Do not unplug the connector cables while the computer is operating. LASER INDICATOR STANDBY/ON VIDEO RGB ++ LENS SHIFT FOCUS ...the right. It may not be used with Windows 95 OSR 2.1 or higher. Using the USB control feature, you will connect. memo The projector would be enabled. BLANK ASPECT LASER PREVIOUS NEXT ENTER ESC MENU POSITION RESET AUTO MAGNFY PinP VOLUME ON FREEZE MUTE OFF KEYSTONE SEARCH 1 2 ...
..., read the manuals of the computer. memo The USB control can be possible to use the remote control as a mouse and a keyboard of the projector to a PC. • Do not unplug the connector cables while the computer is operating. LASER INDICATOR STANDBY/ON VIDEO RGB ++ LENS SHIFT FOCUS ...the right. It may not be used with Windows 95 OSR 2.1 or higher. Using the USB control feature, you will connect. memo The projector would be enabled. BLANK ASPECT LASER PREVIOUS NEXT ENTER ESC MENU POSITION RESET AUTO MAGNFY PinP VOLUME ON FREEZE MUTE OFF KEYSTONE SEARCH 1 2 ...

User Manual
Page 15
...SHIFT FOCUS -- S STANDBY/ON and light to the section "Selecting An Input Signal" of the projector. The STANDBY/ON indicator will go off ?" NOTE • Turn the power on the projector before the connected devices. BLANK ASPECT LASER LENS SHIFT buttons LENS SHIFT COMPONENTBNG S-VIDEO RGB M1-D... of the following page. Power ON/OFF WARNING • When the power is ON, a strong light is visible. The projector lamp will go off the projector after the connected devices. Power off , and the STANDBY/ON indicator will light to [O] (OFF). The STANDBY/ON indicator ...
...SHIFT FOCUS -- S STANDBY/ON and light to the section "Selecting An Input Signal" of the projector. The STANDBY/ON indicator will go off ?" NOTE • Turn the power on the projector before the connected devices. BLANK ASPECT LASER LENS SHIFT buttons LENS SHIFT COMPONENTBNG S-VIDEO RGB M1-D... of the following page. Power ON/OFF WARNING • When the power is ON, a strong light is visible. The projector lamp will go off the projector after the connected devices. Power off , and the STANDBY/ON indicator will light to [O] (OFF). The STANDBY/ON indicator ...

User Manual
Page 16
.... Select the signal you wish to the search. M1-D RGB BNC VIDEO S-VIDEO COMPONENT ■ Using RGB button Press the RGB button of the projector. Operating Selecting An Input Signal 1 Select an input signal. ■ Using the INPUT dial Turn the INPUT dial of the remote control. Pressing the...VIDEO ports as shown below Select the signal you wish to project. memo If no signal is found or the projector is unstable to find an input signal at any of the projector or the remote control. M1-D RGB BNC ■ Using VIDEO button Press the VIDEO button of retrieved signal...
.... Select the signal you wish to the search. M1-D RGB BNC VIDEO S-VIDEO COMPONENT ■ Using RGB button Press the RGB button of the projector. Operating Selecting An Input Signal 1 Select an input signal. ■ Using the INPUT dial Turn the INPUT dial of the remote control. Pressing the...VIDEO ports as shown below Select the signal you wish to project. memo If no signal is found or the projector is unstable to find an input signal at any of the projector or the remote control. M1-D RGB BNC ■ Using VIDEO button Press the VIDEO button of retrieved signal...

User Manual
Page 20
...ESC MENU POSITION RESET AUTO MAGNFY PinP VOLUME ON FREEZE MUTE OFF KEYSTONE SEARCH 1 2 3 ID CHANGE FREEZE button NOTE • If the projector continues projecting the same image for too long. LASER INDICATOR STANDBY/ON VIDEO RGB ++ LENS SHIFT FOCUS -- + ZOOM - LASER INDICATOR STANDBY/...SHIFT FOCUS -- + ZOOM - The icon "||" will automatically finish if a remote control's button that changes some display state (ex. Do not leave the projector in magnifying the picture. 2 Press the POSITION button, then use the cursor buttons / / / to select the area to zoom. 3 Press the ...
...ESC MENU POSITION RESET AUTO MAGNFY PinP VOLUME ON FREEZE MUTE OFF KEYSTONE SEARCH 1 2 3 ID CHANGE FREEZE button NOTE • If the projector continues projecting the same image for too long. LASER INDICATOR STANDBY/ON VIDEO RGB ++ LENS SHIFT FOCUS -- + ZOOM - LASER INDICATOR STANDBY/...SHIFT FOCUS -- + ZOOM - The icon "||" will automatically finish if a remote control's button that changes some display state (ex. Do not leave the projector in magnifying the picture. 2 Press the POSITION button, then use the cursor buttons / / / to select the area to zoom. 3 Press the ...

User Manual
Page 22
Multifunctional Settings Using The Menu Functions This projector has the following menus: MAIN, PICTURE-1, PICTURE-2, INPUT, AUTO, SCREEN, OPTION and NETWORK. LASER INDICATOR STANDBY/ON VIDEO RGB ++ LENS SHIFT FOCUS -- + ZOOM - PREVIOUS NEXT ...
Multifunctional Settings Using The Menu Functions This projector has the following menus: MAIN, PICTURE-1, PICTURE-2, INPUT, AUTO, SCREEN, OPTION and NETWORK. LASER INDICATOR STANDBY/ON VIDEO RGB ++ LENS SHIFT FOCUS -- + ZOOM - PREVIOUS NEXT ...

User Manual
Page 25
... the CUSTOM menu under the item "GAMMA" are collectively returned to perform the function.: LOAD1 LOAD2 LOAD3 LOAD4 MY MEMORY SAVE1 SAVE2 SAVE3 SAVE4 This projector has 4 numbered memories for adjustment data. RESET Select the EXECUTE using the / buttons, and then press the (or the ENTER) button to the initial setting...
... the CUSTOM menu under the item "GAMMA" are collectively returned to perform the function.: LOAD1 LOAD2 LOAD3 LOAD4 MY MEMORY SAVE1 SAVE2 SAVE3 SAVE4 This projector has 4 numbered memories for adjustment data. RESET Select the EXECUTE using the / buttons, and then press the (or the ENTER) button to the initial setting...

User Manual
Page 28
..." message means the frame lock function is working . memo When the ASPECT button is automatically selected. Select a signal input port to display just when the projector is turned on, using the / buttons. : TURN ON TURN OFF When the TURN ON is performs only at the last time. The INPUT INFORMATION menu...
..." message means the frame lock function is working . memo When the ASPECT button is automatically selected. Select a signal input port to display just when the projector is turned on, using the / buttons. : TURN ON TURN OFF When the TURN ON is performs only at the last time. The INPUT INFORMATION menu...

User Manual
Page 29
... will go off and the STANDBY/ON indicator begins blinking when the passed time with the instructions in the table below can turn the projector on without no-signal and an unsuitable signal) reaches at some signals. Select the TURN ON or the TURN OFF using the / buttons...The Power". memo This operation may still be performed. a irregular picture, a color lack), please select the suitable mode to 99, the projector lamp will be selected automatically. Please refer to the following page.) 29 memo This operation requires approximately 10 seconds, and the message "AUTO ...
... will go off and the STANDBY/ON indicator begins blinking when the passed time with the instructions in the table below can turn the projector on without no-signal and an unsuitable signal) reaches at some signals. Select the TURN ON or the TURN OFF using the / buttons...The Power". memo This operation may still be performed. a irregular picture, a color lack), please select the suitable mode to 99, the projector lamp will be selected automatically. Please refer to the following page.) 29 memo This operation requires approximately 10 seconds, and the message "AUTO ...


