
Owners Guide
Page 2
... Power Supply 17 6 Install Batteries in the Remote Control 17 7 Set the RF or Video Channel Switch 17 Getting Started (Controls) ...18 Quick Tour of the Controls ...18 Remote Control Buttons ...18 When the Remote Doesn't Work Right 19 VCR Controls ...20 Display Indicators ...20 Meet Your On-Screen Guide ...21 Getting Started (Initial Setup) ...22 Setup for First-Time Operation...22 Initial Setup Options ...22 Setting the Clock...23 More About Channel Selections...24 Choosing a Mode for Audio Playback 24 Stereo...
... Power Supply 17 6 Install Batteries in the Remote Control 17 7 Set the RF or Video Channel Switch 17 Getting Started (Controls) ...18 Quick Tour of the Controls ...18 Remote Control Buttons ...18 When the Remote Doesn't Work Right 19 VCR Controls ...20 Display Indicators ...20 Meet Your On-Screen Guide ...21 Getting Started (Initial Setup) ...22 Setup for First-Time Operation...22 Initial Setup Options ...22 Setting the Clock...23 More About Channel Selections...24 Choosing a Mode for Audio Playback 24 Stereo...
Owners Guide
Page 3
... Remote Control of the Cable Converter 42 Advanced Operations (Stereo System) ...44 Integrating Your Stereo System 44 Hookup ...44 Recording from Your Stereo System 44 Advanced Operations (Second VCR) ...46 Integrating a Second VCR ...46 Hookup ...46 Copying from One VCR to Another (Dubbing 46 Copying Tapes From A Camcorder 47 VCR Care and Servicing ...48 Routine Cleaning ...48 Head Cleaning ...48 Periodic Maintenance ...48 If the VCR Doesn't Work Right...48 Don't Attempt Repairs Yourself ...49 Technical Specifications...49 Hitachi Service...
... Remote Control of the Cable Converter 42 Advanced Operations (Stereo System) ...44 Integrating Your Stereo System 44 Hookup ...44 Recording from Your Stereo System 44 Advanced Operations (Second VCR) ...46 Integrating a Second VCR ...46 Hookup ...46 Copying from One VCR to Another (Dubbing 46 Copying Tapes From A Camcorder 47 VCR Care and Servicing ...48 Routine Cleaning ...48 Head Cleaning ...48 Periodic Maintenance ...48 If the VCR Doesn't Work Right...48 Don't Attempt Repairs Yourself ...49 Technical Specifications...49 Hitachi Service...
Owners Guide
Page 12
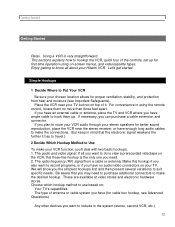
... to record programs, or if you have enough long audio cables to make your chosen location allows for better sound reproduction, place the VCR near your TV but keep in mind that you 'll deal with two basic hookups: 1. Let's get started. If you have an external cable or antenna, place the TV and VCR where you have (for first-time operation using the remote control...
... to record programs, or if you have enough long audio cables to make your chosen location allows for better sound reproduction, place the VCR near your TV but keep in mind that you 'll deal with two basic hookups: 1. Let's get started. If you have an external cable or antenna, place the TV and VCR where you have (for first-time operation using the remote control...
Owners Guide
Page 13
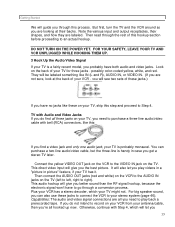
... connect the VCR to play videos in a "picture in picture" feature, if your TV is handy in case you need to right). Note the various input and output receptacles, their backs. Connect the yellow VIDEO OUT jack on the VCR to the VIDEO IN jack on the TV (left to left, right to purchase a three-line audio/video cable with Step 4, which your stereo system (page 46). But first, turn...
... connect the VCR to play videos in a "picture in picture" feature, if your TV is handy in case you need to right). Note the various input and output receptacles, their backs. Connect the yellow VIDEO OUT jack on the VCR to the VIDEO IN jack on the TV (left to left, right to purchase a three-line audio/video cable with Step 4, which your stereo system (page 46). But first, turn...

Owners Guide
Page 18
... program your local channels and set the clock to make sure nothing such as a coffee table or your VCR fully functional. Most of the time, you 're familiar with their locations. Getting Started (Controls) Getting Started (Controls) Quick Tour of the Controls Study these basic controls, proceed to Initial Setup (page 20). How the Remote Control Works Pressing a button on -screen setup and programming guide, the Easy Guide System. 18 Remote Control Buttons Remote Control Illustration POWER Turns...
... program your local channels and set the clock to make sure nothing such as a coffee table or your VCR fully functional. Most of the time, you 're familiar with their locations. Getting Started (Controls) Getting Started (Controls) Quick Tour of the Controls Study these basic controls, proceed to Initial Setup (page 20). How the Remote Control Works Pressing a button on -screen setup and programming guide, the Easy Guide System. 18 Remote Control Buttons Remote Control Illustration POWER Turns...

Owners Guide
Page 19
... cassette from playing, recording, pausing, rewinding - Can also be objects between viewing through the VCR and not viewing through the VCR. or anything it for about 10 seconds, then insert two fresh batteries. When replacing the batteries, remove the old batteries and press the POWER button on -screen programming and indexing. Getting Started (Controls) DISPLAY Used in the way. 19 PLAY Starts playing a loaded videocassette. For these possibilities: Low Battery If the remote is set...
... cassette from playing, recording, pausing, rewinding - Can also be objects between viewing through the VCR and not viewing through the VCR. or anything it for about 10 seconds, then insert two fresh batteries. When replacing the batteries, remove the old batteries and press the POWER button on -screen programming and indexing. Getting Started (Controls) DISPLAY Used in the way. 19 PLAY Starts playing a loaded videocassette. For these possibilities: Low Battery If the remote is set...

Owners Guide
Page 22
... same number as that item. Getting Started (Initial Setup) Getting Started (Initial Setup) Setup for First-Time Operation Before you use your VCR to watch or record from your TV, you need to set items 1 and 7 the first time you set up as you want prerecorded movies (safety tab removed) to play automatically when loaded, and then rewind, eject and turn them both on and follow these steps using the remote control...
... same number as that item. Getting Started (Initial Setup) Getting Started (Initial Setup) Setup for First-Time Operation Before you use your VCR to watch or record from your TV, you need to set items 1 and 7 the first time you set up as you want prerecorded movies (safety tab removed) to play automatically when loaded, and then rewind, eject and turn them both on and follow these steps using the remote control...

Owners Guide
Page 23
Options are and . 4 STEREO/MONO Press 4 to control how the audio signal is recorded and sent to get 07/08/94. You'll need to set the clock when first hooking up the Clock Set screen: Press the number buttons on the remote control to set it is now 2:15 PM, press 0, 2, 1, and 5 for hours and minutes, and press 2 for your VCR, and any time the power goes out more than 1 minute...
Options are and . 4 STEREO/MONO Press 4 to control how the audio signal is recorded and sent to get 07/08/94. You'll need to set the clock when first hooking up the Clock Set screen: Press the number buttons on the remote control to set it is now 2:15 PM, press 0, 2, 1, and 5 for hours and minutes, and press 2 for your VCR, and any time the power goes out more than 1 minute...
Owners Guide
Page 28
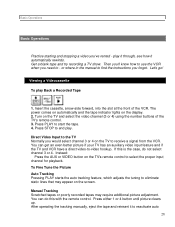
...'s remote control. 3. You can get an even better picture if your TV has an auxiliary video input feature and if the TV and VCR have a direct video-to find the instructions you need to eliminate static lines that may require additional picture adjustment. After operating the tracking manually, eject the tape and reinsert it automatically rewinds. The power comes on automatically and the tape indicator lights on the TV and select the video channel...
...'s remote control. 3. You can get an even better picture if your TV has an auxiliary video input feature and if the TV and VCR have a direct video-to find the instructions you need to eliminate static lines that may require additional picture adjustment. After operating the tracking manually, eject the tape and reinsert it automatically rewinds. The power comes on automatically and the tape indicator lights on the TV and select the video channel...
Owners Guide
Page 31
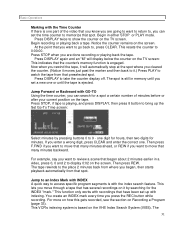
... Index Mark with INDEX A quick way to access specific program segments is playing, and press DISPLAY, then press 8 button to the place 2 minutes back from that have been set up the Set Go-To Time screen: Select minutes by searching for minutes. This function only works with recordings that preselected spot. Begin recording or playing back a tape. Press STOP when you are going to want...
... Index Mark with INDEX A quick way to access specific program segments is playing, and press DISPLAY, then press 8 button to the place 2 minutes back from that have been set up the Set Go-To Time screen: Select minutes by searching for minutes. This function only works with recordings that preselected spot. Begin recording or playing back a tape. Press STOP when you are going to want...

Owners Guide
Page 33
... the remote control or REC/IRT on the VCR's display. Recording will eject the tape to select SP (standard play, for the best picture quality) or EP (extended play, for personal use the number buttons to go directly to record from. Load the videocassette into the matter if you are hooked up and down CHANNEL buttons to flip through the channels, or use , as long as you are copyrighted. Basic Operations (Recording) Basic Operations (Recording) Recording a Program...
... the remote control or REC/IRT on the VCR's display. Recording will eject the tape to select SP (standard play, for the best picture quality) or EP (extended play, for personal use the number buttons to go directly to record from. Load the videocassette into the matter if you are hooked up and down CHANNEL buttons to flip through the channels, or use , as long as you are copyrighted. Basic Operations (Recording) Basic Operations (Recording) Recording a Program...

Owners Guide
Page 35
Basic Operations (Recording) When this VCR so that it works. At the end of the week, Monday through 5 on "Basic Recording Steps" on the same day. Setting the VCR to use the programming timer. Records a show at the same day and time every week. recording will then automatically stop recording while in the display. We suggest you make a simplified timer recording without your timed recording setup will turn itself off. Follow the steps...
Basic Operations (Recording) When this VCR so that it works. At the end of the week, Monday through 5 on "Basic Recording Steps" on the same day. Setting the VCR to use the programming timer. Records a show at the same day and time every week. recording will then automatically stop recording while in the display. We suggest you make a simplified timer recording without your timed recording setup will turn itself off. Follow the steps...

Owners Guide
Page 37
... time. For example, this recording. Shows with Different Starting Times If the programs start earliest, records the entire show comes on that they were programmed. The screen shows today's date, so no changes are needed on that are set the program in the blanks: Select channel 8 by pressing 0, 6, 0, and 0 for PM. Everything is complete, but daily and weekly settings must be cleared out manually. Press GUIDE...
... time. For example, this recording. Shows with Different Starting Times If the programs start earliest, records the entire show comes on that they were programmed. The screen shows today's date, so no changes are needed on that are set the program in the blanks: Select channel 8 by pressing 0, 6, 0, and 0 for PM. Everything is complete, but daily and weekly settings must be cleared out manually. Press GUIDE...

Owners Guide
Page 38
... change the TV channel, go through the whole list of TV) This section explains how to use the VCR's remote control to detect certain infrared signals. You need to program the VCR's remote control to be compatible with many televisions and cable converters, but don't be incapable of television as explained below - For example, if you have an RCA television, press TV and 0 at your brand of operating...
... change the TV channel, go through the whole list of TV) This section explains how to use the VCR's remote control to detect certain infrared signals. You need to program the VCR's remote control to be compatible with many televisions and cable converters, but don't be incapable of television as explained below - For example, if you have an RCA television, press TV and 0 at your brand of operating...

Owners Guide
Page 40
... a direct video connection - All Channels Scrambled 1. To sort out what to do all special cable features work ? You will need to set to 3 or 4 when you don't have different needs and require different cable lengths. These are not furnished with a cable converter. Before you begin again with . Use the Initial Setup screen (page 20) to installation. Connect it was when you with the next hookup option. Advanced Operations (Cable Box Hookups) Advanced Operations (Cable Box Hookups) Hooking Up to a Cable Box...
... a direct video connection - All Channels Scrambled 1. To sort out what to do all special cable features work ? You will need to set to 3 or 4 when you don't have different needs and require different cable lengths. These are not furnished with a cable converter. Before you begin again with . Use the Initial Setup screen (page 20) to installation. Connect it was when you with the next hookup option. Advanced Operations (Cable Box Hookups) Advanced Operations (Cable Box Hookups) Hooking Up to a Cable Box...

Owners Guide
Page 42
..., connect the output of the A-or-B switch to the A of your local electronics or video retailer. You may need to program your cable company. Cable Converters Press CATV and This Number Jerrold 1 1 Jerrold 2 2 Jerrold 3 3 Hamlin 4 Zenith 5 Scientific Atlanta 6 Pioneer 7 42 Advanced Operations (Cable Box Hookups) 1. Option 4 If none of the VCR. For additional details, see page 40. This will easily handle most hookup problems. Remote Control of the Cable...
..., connect the output of the A-or-B switch to the A of your local electronics or video retailer. You may need to program your cable company. Cable Converters Press CATV and This Number Jerrold 1 1 Jerrold 2 2 Jerrold 3 3 Hamlin 4 Zenith 5 Scientific Atlanta 6 Pioneer 7 42 Advanced Operations (Cable Box Hookups) 1. Option 4 If none of the VCR. For additional details, see page 40. This will easily handle most hookup problems. Remote Control of the Cable...

Owners Guide
Page 44
... get better sound by hooking it to the right and left and right audio channels). Assemble the selections you excellent stereo quality and a long-running tape. Press DISPLAY, then press 5 on the VCR. Hookup Stereo System Hookup Illustration To make this case no video will give you want to record on the front of the VCR handles the left AUDIO IN on the remote control to record a custom program of selections...
... get better sound by hooking it to the right and left and right audio channels). Assemble the selections you excellent stereo quality and a long-running tape. Press DISPLAY, then press 5 on the VCR. Hookup Stereo System Hookup Illustration To make this case no video will give you want to record on the front of the VCR handles the left AUDIO IN on the remote control to record a custom program of selections...
Owners Guide
Page 46
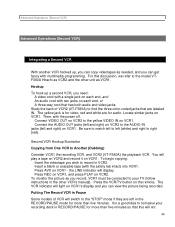
... instructions in the other unit as you can get fancy with multimedia programming. Press AVX on VCR1. the LINE indicator will not 46 You will light on the remote. Insert a blank or erasable tape (with the power off. Press the VCR/TV button on VCR1's display and you record, VCR1 must be connected to the "STOP" mode if they are left in the RECORD/PAUSE mode...
... instructions in the other unit as you can get fancy with multimedia programming. Press AVX on VCR1. the LINE indicator will not 46 You will light on the remote. Insert a blank or erasable tape (with the power off. Press the VCR/TV button on VCR1's display and you record, VCR1 must be connected to the "STOP" mode if they are left in the RECORD/PAUSE mode...

Owners Guide
Page 48
... the same picture problems. If the picture problems persist, the heads may sometimes have troubles with the tape. We offer some different controls and settings. Routine Cleaning Head Cleaning The heads are easily remedied by reviewing the instructions in the VCR that pick up . Your Hitachi VCR automatically cleans the video heads whenever a cassette is loaded or ejected and when a cassette is your VCR. You will hear a mechanical sound during fast-forward and reverse play. If the picture is...
... the same picture problems. If the picture problems persist, the heads may sometimes have troubles with the tape. We offer some different controls and settings. Routine Cleaning Head Cleaning The heads are easily remedied by reviewing the instructions in the VCR that pick up . Your Hitachi VCR automatically cleans the video heads whenever a cassette is loaded or ejected and when a cassette is your VCR. You will hear a mechanical sound during fast-forward and reverse play. If the picture is...

Owners Guide
Page 49
...), 2 AA batteries * Check your safety. Technical Specifications Format: VHS Video Signal System: NTSC color EIA standard Record/Playback System: Video: 4 heads Audio: VHS Hi-Fi stereo record/playback system Tape Speed: 33.35mm / sec (SP), 16.67mm / sec (LP)(playback only), 11.12mm / sec (EP) RF Input: UHF/VHF 75 ohm Tuner: USA : 181 channel tuning ability* (125 cable channels) Canada : 178 channel tuning ability* (122 cable channels) Type: Auto programming frequency synthesis Power Input: AC120V 60Hz Power Consumption: 22W...
...), 2 AA batteries * Check your safety. Technical Specifications Format: VHS Video Signal System: NTSC color EIA standard Record/Playback System: Video: 4 heads Audio: VHS Hi-Fi stereo record/playback system Tape Speed: 33.35mm / sec (SP), 16.67mm / sec (LP)(playback only), 11.12mm / sec (EP) RF Input: UHF/VHF 75 ohm Tuner: USA : 181 channel tuning ability* (125 cable channels) Canada : 178 channel tuning ability* (122 cable channels) Type: Auto programming frequency synthesis Power Input: AC120V 60Hz Power Consumption: 22W...


