Instruction Manual
Page 7
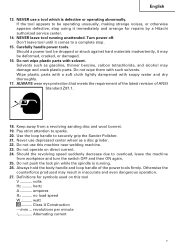
... lightly dampened with solvent. Keep away from workpiece and turn the switch OFF and then ON again. 25. Pay strict attention to securely grip the Sander Polisher. 21. Do not operate on this machine near welding machine. 23. Do not push the lock pin while the spindle is defective or operating abnormally...not use this tool V volts Hz .......... English 13. revolutions per minute Alternating current 7 If the tool appears to overload, leave the machine from a revolving sanding disc and wool bonnet. 19. Definitions for repairs by a Hitachi authorized service center. 14.
... lightly dampened with solvent. Keep away from workpiece and turn the switch OFF and then ON again. 25. Pay strict attention to securely grip the Sander Polisher. 21. Do not operate on this machine near welding machine. 23. Do not push the lock pin while the spindle is defective or operating abnormally...not use this tool V volts Hz .......... English 13. revolutions per minute Alternating current 7 If the tool appears to overload, leave the machine from a revolving sanding disc and wool bonnet. 19. Definitions for repairs by a Hitachi authorized service center. 14.
Instruction Manual
Page 10
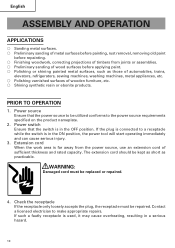
... surfaces. ⅜ Preliminary sanding of metal surfaces before painting, rust removal, removing old paint before applying paint. ⅜ Polishing or shining painted metal surfaces, such as practicable. Extension cord When the work area is in the OFF position. The extension cord...be kept as short as those of automobiles, trains, elevators, refrigerators, sewing machines, washing machines, metal appliances, etc. ⅜ Polishing varnished surfaces of sufficient thickness and rated capacity. WARNING: Damaged cord must be replaced or repaired. 4. Check the receptacle If the...
... surfaces. ⅜ Preliminary sanding of metal surfaces before painting, rust removal, removing old paint before applying paint. ⅜ Polishing or shining painted metal surfaces, such as practicable. Extension cord When the work area is in the OFF position. The extension cord...be kept as short as those of automobiles, trains, elevators, refrigerators, sewing machines, washing machines, metal appliances, etc. ⅜ Polishing varnished surfaces of sufficient thickness and rated capacity. WARNING: Damaged cord must be replaced or repaired. 4. Check the receptacle If the...
Instruction Manual
Page 11
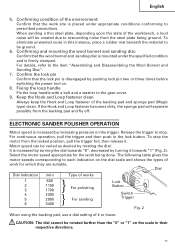
Confirming and mounting the wool bonnet and sanding disc Confirm that the wool bonnet and sanding disc is mounted under appropriate conditions conforming to prescribed precautions. ELECTRONIC SANDER POLISHER OPERATION Motor speed is increased by turning the dial towards "1" (Fig. 2). Motor speed can be rotated further than the "6" or "1" on the trigger. English 5. Fixing ...
Confirming and mounting the wool bonnet and sanding disc Confirm that the wool bonnet and sanding disc is mounted under appropriate conditions conforming to prescribed precautions. ELECTRONIC SANDER POLISHER OPERATION Motor speed is increased by turning the dial towards "1" (Fig. 2). Motor speed can be rotated further than the "6" or "1" on the trigger. English 5. Fixing ...
Instruction Manual
Page 12
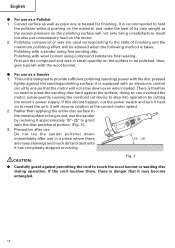
... step into operation by cutting the motor's power supply. English q For use as a Sander 1. Polishing with the wool bonnet. This unit is designed to provide sufficient polishing (sanding) power with the disc peripheral portion. (Fig. 3). 3. Rather than applying the entire disc surface to the metal surface to be ground, use in small quantity on to...
... step into operation by cutting the motor's power supply. English q For use as a Sander 1. Polishing with the wool bonnet. This unit is designed to provide sufficient polishing (sanding) power with the disc peripheral portion. (Fig. 3). 3. Rather than applying the entire disc surface to the metal surface to be ground, use in small quantity on to...

Instruction Manual
Page 13
... the rubber pad (optional accessory) (Fig. 5) (1) Insert the washer nut (optional accessory) through the rubber pad (optional accessory) and thread it . q For use as a Polisher (1) Press the lock pin to secure the spindle and tighten the backing pad by rotating the outer circumference. (2) Adhere the wool bonnet (Hook & Loop type.... (3) To remove the wool bonnet, follow the above -mentioned procedure in reverse order. English ASSEMBLING AND DISASSEMBLING THE WOOL BONNET AND SANDING DISC WARNING: Be sure to switch power OFF and disconnect the plug from flying out while...
... the rubber pad (optional accessory) (Fig. 5) (1) Insert the washer nut (optional accessory) through the rubber pad (optional accessory) and thread it . q For use as a Polisher (1) Press the lock pin to secure the spindle and tighten the backing pad by rotating the outer circumference. (2) Adhere the wool bonnet (Hook & Loop type.... (3) To remove the wool bonnet, follow the above -mentioned procedure in reverse order. English ASSEMBLING AND DISASSEMBLING THE WOOL BONNET AND SANDING DISC WARNING: Be sure to switch power OFF and disconnect the plug from flying out while...
Instruction Manual
Page 15
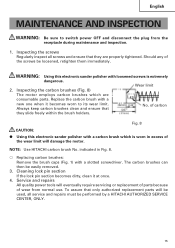
... are properly tightened. Inspecting the carbon brushes (Fig. 8) The motor employs carbon brushes which is extremely dangerous. Fig. 8 CAUTION: q Using this electronic sander polisher with loosened screws is worn in Fig. 8. ⅜ Replacing carbon brushes: Remove the brush caps (Fig. 1) with a 43 new one when it at... once. 4. NOTE: Use HITACHI carbon brush No. Cleaning lock pin section If the lock pin section becomes dirty, clean it becomes worn to switch power OFF and disconnect the...
... are properly tightened. Inspecting the carbon brushes (Fig. 8) The motor employs carbon brushes which is extremely dangerous. Fig. 8 CAUTION: q Using this electronic sander polisher with loosened screws is worn in Fig. 8. ⅜ Replacing carbon brushes: Remove the brush caps (Fig. 1) with a 43 new one when it at... once. 4. NOTE: Use HITACHI carbon brush No. Cleaning lock pin section If the lock pin section becomes dirty, clean it becomes worn to switch power OFF and disconnect the...