
Parts List
Page 1
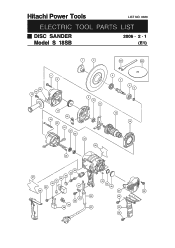
Hitachi Power Tools LIST NO. 0360 ELECTRIC TOOL PARTS LIST DISC SANDER Model S 18SB 2006 • 2 • 1 (E1) 1 2 501 502 7 8 16 15 14 17 19 20 18 21 22 23 9 10 11 24 25 26 3 4 5 6 12 13 35 34 33 27 32 31 30 37 29 44 45 46 28 47 48 42 48 41 40 39 38 43 49 48
Hitachi Power Tools LIST NO. 0360 ELECTRIC TOOL PARTS LIST DISC SANDER Model S 18SB 2006 • 2 • 1 (E1) 1 2 501 502 7 8 16 15 14 17 19 20 18 21 22 23 9 10 11 24 25 26 3 4 5 6 12 13 35 34 33 27 32 31 30 37 29 44 45 46 28 47 48 42 48 41 40 39 38 43 49 48
Parts List
Page 2
...-631 953-327 BRUSH CAP CARBON BRUSH (1 PAIR) BRUSH HOLDER TERMINAL NOISE SUPPRESSOR PILLAR TERMINAL TAPPING SCREW (W/FLANGE) D4X16 CORD CLIP CORD ARMOR D8.8 2 2 2 1 FOR CORD 1 FOR EUROPE, CHN 1 FOR EUROPE, MAL, CHN 2 1 1 --- 2 --- * ALTERNATIVE PARTS S 18SB 2 -- 06 CODE NO. DESCRIPTION * 1 953-381 WASHER NUT NO. USED 1 REMARKS * 1 953-246Z WASHER NUT M14 1 FOR EUROPE * 1 953-254P WASHER NUT 5/8"-11UNC 1 FOR USA, CAN * 2 953-255 RUBBER PAD (D16 HOLE) 1 * 2 953...
...-631 953-327 BRUSH CAP CARBON BRUSH (1 PAIR) BRUSH HOLDER TERMINAL NOISE SUPPRESSOR PILLAR TERMINAL TAPPING SCREW (W/FLANGE) D4X16 CORD CLIP CORD ARMOR D8.8 2 2 2 1 FOR CORD 1 FOR EUROPE, CHN 1 FOR EUROPE, MAL, CHN 2 1 1 --- 2 --- * ALTERNATIVE PARTS S 18SB 2 -- 06 CODE NO. DESCRIPTION * 1 953-381 WASHER NUT NO. USED 1 REMARKS * 1 953-246Z WASHER NUT M14 1 FOR EUROPE * 1 953-254P WASHER NUT 5/8"-11UNC 1 FOR USA, CAN * 2 953-255 RUBBER PAD (D16 HOLE) 1 * 2 953...
Parts List
Page 3
SOCKET SET SCREW M5X8 2 45 995-662 RUBBER RING 1 46 315-069 BEARING BUSHING 1 47 325-494 TAIL COVER 1 48 301-653 TAPPING SCREW (W/FLANGE) D4X20 (BLACK) 7 49 325-490 GRIP COVER 1 S 18SB 2 -- 06 * ALTERNATIVE PARTS --- 3 --- USED REMARKS 1 (CORD ARMOR D8.8) * 43 500-240Z CORD 1 (CORD ARMOR D8.8) FOR USA, CAN * 43 500-468Z CORD 1 (CORD ARMOR D8.8) FOR CHN * 43 500-423Z CORD 1 (CORD ARMOR D8.8) MAL, SIN 44 938-477 HEX. PARTS ITEM NO. CODE NO. * 43 500-409Z CORD DESCRIPTION NO.
SOCKET SET SCREW M5X8 2 45 995-662 RUBBER RING 1 46 315-069 BEARING BUSHING 1 47 325-494 TAIL COVER 1 48 301-653 TAPPING SCREW (W/FLANGE) D4X20 (BLACK) 7 49 325-490 GRIP COVER 1 S 18SB 2 -- 06 * ALTERNATIVE PARTS --- 3 --- USED REMARKS 1 (CORD ARMOR D8.8) * 43 500-240Z CORD 1 (CORD ARMOR D8.8) FOR USA, CAN * 43 500-468Z CORD 1 (CORD ARMOR D8.8) FOR CHN * 43 500-423Z CORD 1 (CORD ARMOR D8.8) MAL, SIN 44 938-477 HEX. PARTS ITEM NO. CODE NO. * 43 500-409Z CORD DESCRIPTION NO.
Parts List
Page 4
...-092 SANDING DISCS 180MM C-P80 (10 PCS.) 1 610 314-093 SANDING DISCS 180MM C-P100 (10 PCS.) 1 611 314-094 SANDING DISCS 180MM C-P120 (10 PCS.) 1 REMARKS --- 4 --- * ALTERNATIVE PARTS Printed in Japan 2 -- 06 (060201N) CODE NO. DESCRIPTION 501 325-491 WRENCH * 502 314-090 SANDING DISCS 180MM C-P50 (10 PCS.) * 502 314-084 SANDING DISCS 180MM C-P16 (10 PCS.) NO. DESCRIPTION NO. CODE NO. STANDARD ACCESSORIES...
...-092 SANDING DISCS 180MM C-P80 (10 PCS.) 1 610 314-093 SANDING DISCS 180MM C-P100 (10 PCS.) 1 611 314-094 SANDING DISCS 180MM C-P120 (10 PCS.) 1 REMARKS --- 4 --- * ALTERNATIVE PARTS Printed in Japan 2 -- 06 (060201N) CODE NO. DESCRIPTION 501 325-491 WRENCH * 502 314-090 SANDING DISCS 180MM C-P50 (10 PCS.) * 502 314-084 SANDING DISCS 180MM C-P16 (10 PCS.) NO. DESCRIPTION NO. CODE NO. STANDARD ACCESSORIES...
Instruction Manual
Page 3
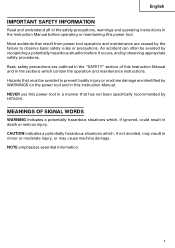
... has not been specifically recommended by HITACHI. NEVER use this power tool. CAUTION indicates a potentially hazardous situations which , if ignored, could result in a manner that result from power tool operation and maintenance are caused by the failure to prevent bodily injury or machine damage are outlined in the "SAFETY" section of the safety precautions, warnings and operating instructions in the Instruction Manual before it occurs...
... has not been specifically recommended by HITACHI. NEVER use this power tool. CAUTION indicates a potentially hazardous situations which , if ignored, could result in a manner that result from power tool operation and maintenance are caused by the failure to prevent bodily injury or machine damage are outlined in the "SAFETY" section of the safety precautions, warnings and operating instructions in the Instruction Manual before it occurs...

Instruction Manual
Page 4
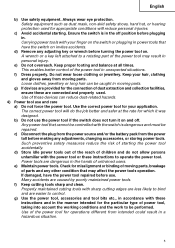
... cord away from heat, oil, sharp edges or moving parts. Cluttered or dark areas invite accidents. English SAFETY GENERAL SAFETY RULES WARNING: Read all instructions Failure to follow all of the warnings listed below may result in electric shock, fire and/or serious injury. SAVE THESE INSTRUCTIONS 1) Work area safety a) Keep work area clean and well lit. b) Do not operate power tools in serious personal injury. 4 Power tools...
... cord away from heat, oil, sharp edges or moving parts. Cluttered or dark areas invite accidents. English SAFETY GENERAL SAFETY RULES WARNING: Read all instructions Failure to follow all of the warnings listed below may result in electric shock, fire and/or serious injury. SAVE THESE INSTRUCTIONS 1) Work area safety a) Keep work area clean and well lit. b) Do not operate power tools in serious personal injury. 4 Power tools...
Instruction Manual
Page 5
... of parts and any adjusting key or wrench before use and care a) Do not force the power tool. f) Keep cutting tools sharp and clean. Safety equipment such as dust mask, non-skid safety shoes, hard hat, or hearing protection used . d) Store idle power tools out of the reach of power tool, taking into account the working conditions and the work to bind and are provided for the particular type of...
... of parts and any adjusting key or wrench before use and care a) Do not force the power tool. f) Keep cutting tools sharp and clean. Safety equipment such as dust mask, non-skid safety shoes, hard hat, or hearing protection used . d) Store idle power tools out of the reach of power tool, taking into account the working conditions and the work to bind and are provided for the particular type of...
Instruction Manual
Page 6
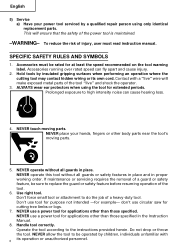
... cord. NEVER operate without all guards in proper working order. Don't force small tool or attachment to the instructions provided herein. NEVER touch moving parts. 5. NEVER operate this tool without all guards or safety features in place and in place. Don't use circular saw for extended periods. NEVER use a power tool for applications other than those specified in the Instruction Manual. 8. Operate the tool according to do the job of injury, user...
... cord. NEVER operate without all guards in proper working order. Don't force small tool or attachment to the instructions provided herein. NEVER touch moving parts. 5. NEVER operate this tool without all guards or safety features in place and in place. Don't use circular saw for extended periods. NEVER use a power tool for applications other than those specified in the Instruction Manual. 8. Operate the tool according to do the job of injury, user...
Instruction Manual
Page 7
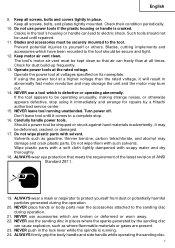
... by a Hitachi authorized service center. 15. If the tool appears to electric shock. Wipe plastic parts with a soft cloth lightly dampened with soapy water and dry thoroughly. 18. ALWAYS firmly grip the body handle and side handle while operating the sanding disc. 7 Blades, cutting implements and accessories which is cracked. Operate power tools at voltages specified on its nameplate. NEVER use a tool which have been mounted to the tool should not...
... by a Hitachi authorized service center. 15. If the tool appears to electric shock. Wipe plastic parts with a soft cloth lightly dampened with soapy water and dry thoroughly. 18. ALWAYS firmly grip the body handle and side handle while operating the sanding disc. 7 Blades, cutting implements and accessories which is cracked. Operate power tools at voltages specified on its nameplate. NEVER use a tool which have been mounted to the tool should not...

Instruction Manual
Page 8
... effective, follow the instructions contained in wet environments. no load speed W watt ........... Either the symbol " " or the words "Double insulation" appear on the power tool or on the floor. 27. ALWAYS follow these precautions: ⅜ Only HITACHI AUTHORIZED SERVICE CENTER should be installed. ⅜ Clean the exterior of this tool V volts Hz .......... Class II Construction ---/min ... Never use it as a disc grinder. 28.
... effective, follow the instructions contained in wet environments. no load speed W watt ........... Either the symbol " " or the words "Double insulation" appear on the power tool or on the floor. 27. ALWAYS follow these precautions: ⅜ Only HITACHI AUTHORIZED SERVICE CENTER should be installed. ⅜ Clean the exterior of this tool V volts Hz .......... Class II Construction ---/min ... Never use it as a disc grinder. 28.
Instruction Manual
Page 9
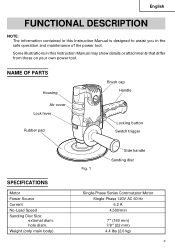
Some illustrations in the safe operation and maintenance of the power tool. hole diam. NAME OF PARTS Housing Air cover Lock lever Rubber pad Brush cap Handle Locking button Switch trigger SPECIFICATIONS Motor Power Source Current No-Load Speed Sanding Disc Size: external diam. Weight (only main body) Fig. 1 Side handle Sanding disc Single-Phase Series Commutator Motor Single-Phase 120V AC 60 Hz 6.2 A 4,500/min 7" (180 mm) 7/8" (22 mm) 4.4 lbs (2.0 kg) 9 English FUNCTIONAL DESCRIPTION NOTE: The information...
Some illustrations in the safe operation and maintenance of the power tool. hole diam. NAME OF PARTS Housing Air cover Lock lever Rubber pad Brush cap Handle Locking button Switch trigger SPECIFICATIONS Motor Power Source Current No-Load Speed Sanding Disc Size: external diam. Weight (only main body) Fig. 1 Side handle Sanding disc Single-Phase Series Commutator Motor Single-Phase 120V AC 60 Hz 6.2 A 4,500/min 7" (180 mm) 7/8" (22 mm) 4.4 lbs (2.0 kg) 9 English FUNCTIONAL DESCRIPTION NOTE: The information...
Instruction Manual
Page 10
... turning on the product nameplate. 2. Check the receptacle. Fixing the side handle. Check the lock lever. If such a fautly receptacle is disengaged by electrical noise. ⅜ Clear the area of children or unauthorized personnel. 6. Check mounting of the sanding disc. Power source Ensure that sanding disc is mounted under the workpiece. ⅜ Take appropriate noise preventive measures to be replaced or repaired. 4. Extension cord When the work...
... turning on the product nameplate. 2. Check the receptacle. Fixing the side handle. Check the lock lever. If such a fautly receptacle is disengaged by electrical noise. ⅜ Clear the area of children or unauthorized personnel. 6. Check mounting of the sanding disc. Power source Ensure that sanding disc is mounted under the workpiece. ⅜ Take appropriate noise preventive measures to be replaced or repaired. 4. Extension cord When the work...
Instruction Manual
Page 11
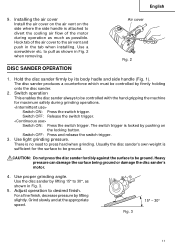
.... Switch OFF: Press and release the switch trigger. 3. There is sufficient for the surface to be controlled with the hand gripping the machine for maximum safety during operation as much as shown in Fig. 2 when removing. Usually the disc sander's own weight is no need to divert the cooling air flow of the air cover to pull as shown in Fig. 3. 5. Use proper grinding angle.
.... Switch OFF: Press and release the switch trigger. 3. There is sufficient for the surface to be controlled with the hand gripping the machine for maximum safety during operation as much as shown in Fig. 2 when removing. Usually the disc sander's own weight is no need to divert the cooling air flow of the air cover to pull as shown in Fig. 3. 5. Use proper grinding angle.
Instruction Manual
Page 12
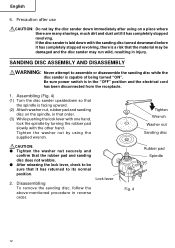
... washer nut securely and confirm that the rubber pad and sanding disc does not wobble. ⅷ After releasing the lock lever, check to be damaged and the disc sander may be sure that order. (3) While pushing the lock lever with one hand, lock the spindle by using on the spindle, in the "OFF" position and the electrical cord has been disconnected from the receptacle. 1. Lock lever Rubber pad Spindle Fig. 4 12 Assembling (Fig. 4) (1) Turn the disc sander...
... washer nut securely and confirm that the rubber pad and sanding disc does not wobble. ⅷ After releasing the lock lever, check to be damaged and the disc sander may be sure that order. (3) While pushing the lock lever with one hand, lock the spindle by using on the spindle, in the "OFF" position and the electrical cord has been disconnected from the receptacle. 1. Lock lever Rubber pad Spindle Fig. 4 12 Assembling (Fig. 4) (1) Turn the disc sander...
Instruction Manual
Page 13
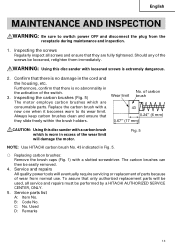
... in the cord and the housing, etc. Service and repairs All quality power tools will eventually require servicing or replacement of parts because of the switch. 3. Inspecting the screws Regularly inspect all service and repairs must be easily removed. 4. Furthermore, confirm that there is extremely dangerous. 2. of carbon Wear limit brush 43 0.24" (6 mm) 0.67" (17 mm) CAUTION: Using this disc sander with a slotted screwdriver. Fig. 5 NOTE: Use HITACHI carbon brush No. 43...
... in the cord and the housing, etc. Service and repairs All quality power tools will eventually require servicing or replacement of parts because of the switch. 3. Inspecting the screws Regularly inspect all service and repairs must be easily removed. 4. Furthermore, confirm that there is extremely dangerous. 2. of carbon Wear limit brush 43 0.24" (6 mm) 0.67" (17 mm) CAUTION: Using this disc sander with a slotted screwdriver. Fig. 5 NOTE: Use HITACHI carbon brush No. 43...
Instruction Manual
Page 14
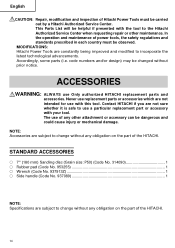
...) Sanding disc (Grain size: P50) (Code No. 314090 1 ⅜ Rubber pad (Code No. 953255 1 ⅜ Wrench (Code No. 937913Z 1 ⅜ Side handle (Code No. 937089 1 NOTE: Specifications are constantly being improved and modified to the Hitachi Authorized Service Center when requesting repair or other attachment or accessory can be changed without any other maintenance. ACCESSORIES WARNING: ALWAYS use of any obligation on the part of the HITACHI. In the operation and maintenance of power tools...
...) Sanding disc (Grain size: P50) (Code No. 314090 1 ⅜ Rubber pad (Code No. 953255 1 ⅜ Wrench (Code No. 937913Z 1 ⅜ Side handle (Code No. 937089 1 NOTE: Specifications are constantly being improved and modified to the Hitachi Authorized Service Center when requesting repair or other attachment or accessory can be changed without any other maintenance. ACCESSORIES WARNING: ALWAYS use of any obligation on the part of the HITACHI. In the operation and maintenance of power tools...

