Owners Guide
Page 10
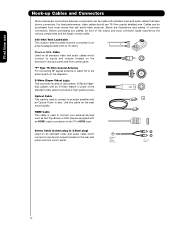
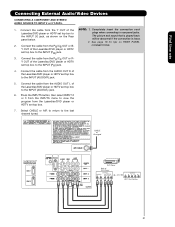
...an antenna adapter (300-Ohm to 75-Ohm). Below are illustrations and names of the standard video cable to inputs and outputs located on camcorders, VCRs and laserdisc players with an Optical Audio In jack. S-Video (Super Video)...3.8mm STEREO MINI-PLUG 2 RCA TYPE PLUGS 10 Before purchasing any cables, be sure of the output and input connector types required by the various components and the length of each cable. 300-Ohm Twin Lead Cable This ... Used on all standard video and audio cable which connect to the TV's HDMI input. Cables can be made with an HDMI output connection to...
...an antenna adapter (300-Ohm to 75-Ohm). Below are illustrations and names of the standard video cable to inputs and outputs located on camcorders, VCRs and laserdisc players with an Optical Audio In jack. S-Video (Super Video)...3.8mm STEREO MINI-PLUG 2 RCA TYPE PLUGS 10 Before purchasing any cables, be sure of the output and input connector types required by the various components and the length of each cable. 300-Ohm Twin Lead Cable This ... Used on all standard video and audio cable which connect to the TV's HDMI input. Cables can be made with an HDMI output connection to...
Owners Guide
Page 11
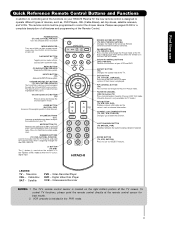
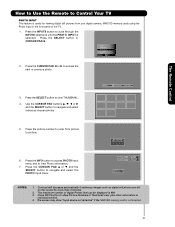
... Cable Box SAT - POWER BUTTON (TV, DVD, SAT/CBL,PVR/VCR) Turns the selected device on your HITACHI Plasma TV, the new remote control is designed to operate different types of devices, such as channel information. MUTE BUTTON (TV) Reduces the audio level to 50% if pressed once, and to control...) mode or when the TV uses a digital input. NUMERIC BUTTONS (TV, DVD, SAT/CBL, PVR/VCR) Used to pause other devices. ASPECT BUTTON (TV) Changes the aspect ratio of your TV. VCR precode is used to manually enter the TV channel, and used for TV mode.) INFO BUTTON (TV, STB, CBL, PVR)...
... Cable Box SAT - POWER BUTTON (TV, DVD, SAT/CBL,PVR/VCR) Turns the selected device on your HITACHI Plasma TV, the new remote control is designed to operate different types of devices, such as channel information. MUTE BUTTON (TV) Reduces the audio level to 50% if pressed once, and to control...) mode or when the TV uses a digital input. NUMERIC BUTTONS (TV, DVD, SAT/CBL, PVR/VCR) Used to pause other devices. ASPECT BUTTON (TV) Changes the aspect ratio of your TV. VCR precode is used to manually enter the TV channel, and used for TV mode.) INFO BUTTON (TV, STB, CBL, PVR)...
Owners Guide
Page 12
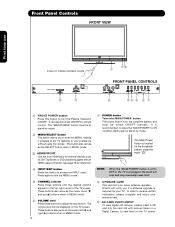
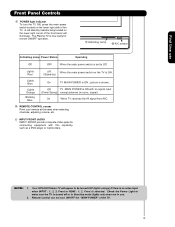
... level Press these buttons until the desired channel appears in the top right corner of the TV screen. Hitachi will notify you to enter the MENU, making it possible to set to OFF or the TV is unplugged, the clock will be turned ON/OFF by mode. ባ MENU/SELECT ...;ቫ ቨ FRONT PANEL CONTROLS ቭ ቢ FRONT POWER button Press this button to access the INPUT menu. It is required for reference). ብ INPUT/EXIT button Press this button to turn the Plasma Television ON/OFF. NOTE: When the "MAIN POWER" button is for stand-by mode. These buttons also ...
... level Press these buttons until the desired channel appears in the top right corner of the TV screen. Hitachi will notify you to enter the MENU, making it possible to set to OFF or the TV is unplugged, the clock will be turned ON/OFF by mode. ባ MENU/SELECT ...;ቫ ቨ FRONT PANEL CONTROLS ቭ ቢ FRONT POWER button Press this button to access the INPUT menu. It is required for reference). ብ INPUT/EXIT button Press this button to turn the Plasma Television ON/OFF. NOTE: When the "MAIN POWER" button is for stand-by mode. These buttons also ...
Owners Guide
Page 13
... ON. (Stand-by) Lights Blue Lights Orange Blinking Blue On TV MAIN POWER is selected. signal). Your HITACHI Plasma TV will illuminate. Remote Control can not turn the TV ON, press the main power switch located on the lower right corner of the front bezel will appear to be.... First time use . 2. When the main power switch is ON with this area when selecting channels, adjusting volume, etc. ቭ INPUT-FRONT JACKS INPUT-FRONT provide composite Video jacks for remote ON/OFF operation. ቪ Indicating Lamp ቫ R/C sensor Indicating Lamp Power Status Operating Off OFF...
... ON. (Stand-by) Lights Blue Lights Orange Blinking Blue On TV MAIN POWER is selected. signal). Your HITACHI Plasma TV will illuminate. Remote Control can not turn the TV ON, press the main power switch located on the lower right corner of the front bezel will appear to be.... First time use . 2. When the main power switch is ON with this area when selecting channels, adjusting volume, etc. ቭ INPUT-FRONT JACKS INPUT-FRONT provide composite Video jacks for remote ON/OFF operation. ቪ Indicating Lamp ቫ R/C sensor Indicating Lamp Power Status Operating Off OFF...
Owners Guide
Page 14
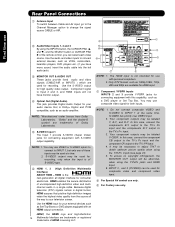
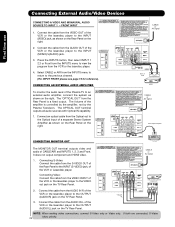
...S-VIDEO type. ቧ HDMI 1, 2 (High Definition Multimedia Interface) ABOUT HDMI - S-VIDEO has priority over VIDEO input. 2. In this case, connect the components B-Y output to the TV's PB input and the components R-Y output to change the signal source CABLE or AIR. Your component outputs may be labeled Y-CBCR...Top-Boxes or DVD players equipped with this case, connect the component CB output to the TV's PB input and the component CR output to INPUT 1 at a time. 2. Use the HDMI input for connecting equipment with an HDMI output connection. HDMI, the HDMI logo and High-Definition 14...
...S-VIDEO type. ቧ HDMI 1, 2 (High Definition Multimedia Interface) ABOUT HDMI - S-VIDEO has priority over VIDEO input. 2. In this case, connect the components B-Y output to the TV's PB input and the components R-Y output to change the signal source CABLE or AIR. Your component outputs may be labeled Y-CBCR...Top-Boxes or DVD players equipped with this case, connect the component CB output to the TV's PB input and the component CR output to INPUT 1 at a time. 2. Use the HDMI input for connecting equipment with an HDMI output connection. HDMI, the HDMI logo and High-Definition 14...
Owners Guide
Page 15
... EJECT DVI to HDMI Cable DIGITAL OUTPUT OUTPUT L R Note : Special device cables will be according to the own device specifications. FRONT INPUT PANEL PHOTO INPUT PUSH EJECT First time use HDMI DIGITAL OUTPUT CAPABILITY DVD , Set Top Box, Video Game Console. Back of HDTV Set-Top-Box or DVD Player ... jacks are provided as shown in the following examples (When connecting DVI signal it will need to connect the audio output into the Front Audio Input jacks) : A) Connecting HDMI signal.
... EJECT DVI to HDMI Cable DIGITAL OUTPUT OUTPUT L R Note : Special device cables will be according to the own device specifications. FRONT INPUT PANEL PHOTO INPUT PUSH EJECT First time use HDMI DIGITAL OUTPUT CAPABILITY DVD , Set Top Box, Video Game Console. Back of HDTV Set-Top-Box or DVD Player ... jacks are provided as shown in the following examples (When connecting DVI signal it will need to connect the audio output into the Front Audio Input jacks) : A) Connecting HDMI signal.
Owners Guide
Page 16
...VCR as shown in the following examples: FRONT INPUT PANEL PHOTO INPUT PUSH EJECT Note : For Monoaural devices, please connect Audio signal cable into L/Mono input jack . Note : Special device cables will be abnormal. If you to accommodate your Plasma TV is dependent on the model and features of ...each component for the location of video and audio inputs and outputs. Check the owner's manual of...
...VCR as shown in the following examples: FRONT INPUT PANEL PHOTO INPUT PUSH EJECT Note : For Monoaural devices, please connect Audio signal cable into L/Mono input jack . Note : Special device cables will be abnormal. If you to accommodate your Plasma TV is dependent on the model and features of ...each component for the location of video and audio inputs and outputs. Check the owner's manual of...
Owners Guide
Page 17
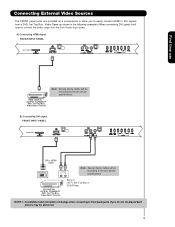
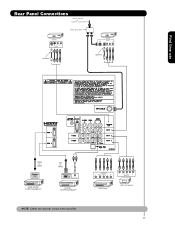
First time use Rear Panel Connections Outside Antenna or Cable TV coaxial cable 2-Way signal splitter VCR #2 S-VIDEO V L R INPUT Optional VCR #1 ANT OUTPUT IN S-VIDEO V L R Optional HDMI to HDMI HDMI OUTPUT HDMI DIGITAL OUTPUT CAPABILITY DVI to HDMI DIGITAL OUTPUT AUDIO OUT DIGITAL OUTPUT CAPABILITY NOTE: Cables are optional, except when specified. OUTPUT Y PB/CB PR/CR L R Y PB PR L R OUTPUT DVD Player HDTV Set-Top Box 17
First time use Rear Panel Connections Outside Antenna or Cable TV coaxial cable 2-Way signal splitter VCR #2 S-VIDEO V L R INPUT Optional VCR #1 ANT OUTPUT IN S-VIDEO V L R Optional HDMI to HDMI HDMI OUTPUT HDMI DIGITAL OUTPUT CAPABILITY DVI to HDMI DIGITAL OUTPUT AUDIO OUT DIGITAL OUTPUT CAPABILITY NOTE: Cables are optional, except when specified. OUTPUT Y PB/CB PR/CR L R Y PB PR L R OUTPUT DVD Player HDTV Set-Top Box 17
Owners Guide
Page 18
Use these connections in place of the standard video connection if your device has this case, connect the components B-Y output to the TV's PB input and the components R-Y output to the TV's PR input. • Your component outputs may be labeled Y-CBCR. In this feature. • Your component outputs may be labeled Y,...should be less than 5 meters. In this feature. that have this case, connect the components CB output to the TV's PB input and the components CR output to the TV's PR input. • It may be necessary to adjust TINT to obtain optimum picture quality when using the Y-PBPR...
Use these connections in place of the standard video connection if your device has this case, connect the components B-Y output to the TV's PB input and the components R-Y output to the TV's PR input. • Your component outputs may be labeled Y-CBCR. In this feature. • Your component outputs may be labeled Y,...should be less than 5 meters. In this feature. that have this case, connect the components CB output to the TV's PB input and the components CR output to the TV's PR input. • It may be necessary to adjust TINT to obtain optimum picture quality when using the Y-PBPR...
Owners Guide
Page 19
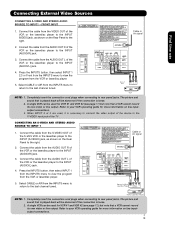
..., then select INPUT 1 from the INPUTS menu to the right. 2. When INPUT 2 or 3 are used for VCR #1 and VCR #2 (see page 17) but note that is played back will be abnormal if the connection is loose. 2. Connect the cable from the AUDIO OUT L of the TV . Connect the cable from the S-...VIDEO OUT of VCR or Laserdisc Player S-VIDEO Video L OUTPUT R VCR or Laserdisc Player NOTE: 1. Cable or Air signal Back of the S-VHS VCR or the laserdisc player to the INPUT (AUDIO/R) jack. 3. Connect the cable from...
..., then select INPUT 1 from the INPUTS menu to the right. 2. When INPUT 2 or 3 are used for VCR #1 and VCR #2 (see page 17) but note that is played back will be abnormal if the connection is loose. 2. Connect the cable from the AUDIO OUT L of the TV . Connect the cable from the S-...VIDEO OUT of VCR or Laserdisc Player S-VIDEO Video L OUTPUT R VCR or Laserdisc Player NOTE: 1. Cable or Air signal Back of the S-VHS VCR or the laserdisc player to the INPUT (AUDIO/R) jack. 3. Connect the cable from...
Owners Guide
Page 20
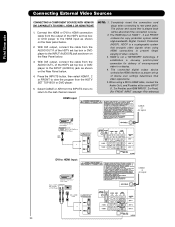
... of the HDTV set -up of uncompressed video to HDMI cable, connect the Audio Out L and R cables at the same INPUT (1 , 2 or Front) as shown on the Rear Panel below . 2. With DVI output, connect the cable from the...device controls the HDMI interface so proper set top box or DVD player to view the program from the INPUTS menu to return to HDMI Cable or CABLE or Air signal or Select CABLE or AIR from the HDTV... SET TOP BOX or DVD player. 5. HDMI input CABLE or Air signal HDTV Set-Top-Box or DVD Player DIGITAL OUTPUT Back of HDTV Set-Top...
... of the HDTV set -up of uncompressed video to HDMI cable, connect the Audio Out L and R cables at the same INPUT (1 , 2 or Front) as shown on the Rear Panel below . 2. With DVI output, connect the cable from the...device controls the HDMI interface so proper set top box or DVD player to view the program from the INPUTS menu to return to HDMI Cable or CABLE or Air signal or Select CABLE or AIR from the HDTV... SET TOP BOX or DVD player. 5. HDMI input CABLE or Air signal HDTV Set-Top-Box or DVD Player DIGITAL OUTPUT Back of HDTV Set-Top...
Owners Guide
Page 21
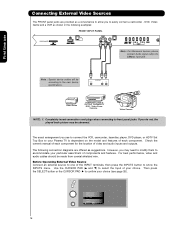
...HDTV set top box to the INPUT (PR) jack. 4. See page 18 for tips on the Rear panel below. 2. Press the INPUTS button, then select INPUT 2 or 3 from the INPUTS menu to the INPUT (AUDIO/R) jack. CABLE or... time use Connecting External Audio/Video Devices CONNECTING A COMPONENT AND STEREO AUDIO SOURCE TO INPUT 2 or 3:Y-PBPR. 1. Connect the cable from the AUDIO OUT L of the Laserdisc/DVD player or ... from the PB/CB OUT or BY OUT of the Laserdisc/DVD player or HDTV set top box to the INPUT (AUDIO/L) jack. 6. Connect the cable from the Y OUT of DVD Player OUTPUT AUDIO RL VIDEO PR/CR...
...HDTV set top box to the INPUT (PR) jack. 4. See page 18 for tips on the Rear panel below. 2. Press the INPUTS button, then select INPUT 2 or 3 from the INPUTS menu to the INPUT (AUDIO/R) jack. CABLE or... time use Connecting External Audio/Video Devices CONNECTING A COMPONENT AND STEREO AUDIO SOURCE TO INPUT 2 or 3:Y-PBPR. 1. Connect the cable from the AUDIO OUT L of the Laserdisc/DVD player or ... from the PB/CB OUT or BY OUT of the Laserdisc/DVD player or HDTV set top box to the INPUT (AUDIO/L) jack. 6. Connect the cable from the Y OUT of DVD Player OUTPUT AUDIO RL VIDEO PR/CR...
Owners Guide
Page 22
... to return to view the program from the Optical out to the Optical input of the Plasma TV to an external audio amplifier, connect the system as shown on the Rear Panel on the right. Connect an optical cable from the VCR or ... Video only. Connect the cable from the Rear Panel is controlled by the amplifier, not by the Plasma Television. CABLE or Air signal 1. Optional VCR or other external components R L V S-VIDEO INPUT 3. Press the INPUTS button, then select INPUT 1 2,3 or Front from the S-VIDEO OUT of the Rear Panel to the OUTPUT (AUDIO/R) jack on...
... to return to view the program from the Optical out to the Optical input of the Plasma TV to an external audio amplifier, connect the system as shown on the Rear Panel on the right. Connect an optical cable from the VCR or ... Video only. Connect the cable from the Rear Panel is controlled by the amplifier, not by the Plasma Television. CABLE or Air signal 1. Optional VCR or other external components R L V S-VIDEO INPUT 3. Press the INPUTS button, then select INPUT 1 2,3 or Front from the S-VIDEO OUT of the Rear Panel to the OUTPUT (AUDIO/R) jack on...
Owners Guide
Page 25
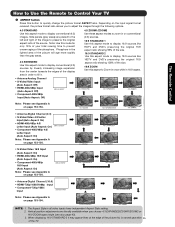
... aspect ratio of the source. Depending on page 153-154. The Remote Control How to Use the Remote to Control Your TV ² ASPECT button Press this aspect mode to display conventional (4:3) sources by linearly increasing image expansion from the center towards ... Appendix A on page 153-154. • Antenna-Digital Channel (16:9) • HDMI-720p/1080i/1080p Input • Component-720p/1080i Input IMA G E INPUT 1 2 Note: Please see Appendix A on the input signal format received, the picture format ratio allows you choose 4:3 EXPANDED/ZOOM1/ZOOM2 or 16:9 ZOOM aspect style...
... aspect ratio of the source. Depending on page 153-154. The Remote Control How to Use the Remote to Control Your TV ² ASPECT button Press this aspect mode to display conventional (4:3) sources by linearly increasing image expansion from the center towards ... Appendix A on page 153-154. • Antenna-Digital Channel (16:9) • HDMI-720p/1080i/1080p Input • Component-720p/1080i Input IMA G E INPUT 1 2 Note: Please see Appendix A on the input signal format received, the picture format ratio allows you choose 4:3 EXPANDED/ZOOM1/ZOOM2 or 16:9 ZOOM aspect style...
Owners Guide
Page 26
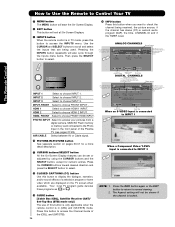
...DIGITAL CHANNELS Digital Closed Caption This icon will exit all On-Screen Displays. ¾ INPUTS button When the remote control is in TV mode, press this button to display the dialogue, narration, and/or sound effects of the Plasma TV (see pages 27-28). The Aspect setting will also cycle through the... Inputs menu items. Then press the SELECT button to select. ƹ INFO button Press this button is only applicable when the remote...
...DIGITAL CHANNELS Digital Closed Caption This icon will exit all On-Screen Displays. ¾ INPUTS button When the remote control is in TV mode, press this button to display the dialogue, narration, and/or sound effects of the Plasma TV (see pages 27-28). The Aspect setting will also cycle through the... Inputs menu items. Then press the SELECT button to select. ƹ INFO button Press this button is only applicable when the remote...
Owners Guide
Page 27
...CURSOR PAD ̇ or ̈ to navigate and select the PHOTO Input menu. Next SEL Thumbnail [0-9] Jump The Remote Control 5. Picture No. The maximum number of the TV. 1. Press INFO button to show "Input device not detected" if the MMC/SD memory card is not inserted...Number -- Date Resolution File Name NNoo. .0022/0/088 0066/1/133/0/055 22004488xx11553366 DDSSCC0000446677 Rotate Slideshow NOTES: 1. HDMI 1 HDMI-Front Photo Input Air / Cable Input 1 Move SEL Sel. 2. The screen may show Picture Numbers in Thumbnail view, plus other information in the front panel of digital...
...CURSOR PAD ̇ or ̈ to navigate and select the PHOTO Input menu. Next SEL Thumbnail [0-9] Jump The Remote Control 5. Picture No. The maximum number of the TV. 1. Press INFO button to show "Input device not detected" if the MMC/SD memory card is not inserted...Number -- Date Resolution File Name NNoo. .0022/0/088 0066/1/133/0/055 22004488xx11553366 DDSSCC0000446677 Rotate Slideshow NOTES: 1. HDMI 1 HDMI-Front Photo Input Air / Cable Input 1 Move SEL Sel. 2. The screen may show Picture Numbers in Thumbnail view, plus other information in the front panel of digital...

Owners Guide
Page 30
...picture, use the CURSOR PAD button the remote. Picture-In-Picture (PIP) Your HITACHI Plasma TV incorporates one Tuner technology designed for PIP availability. Use connection at the same time.You can watch a TV program while viewing other programs from any of the CURSOR PAD buttons. CABLE or ... Yes Yes Yes Yes Yes - - - - - - Yes Yes Yes Yes Yes Yes Yes - - - - - - Yes Yes Yes Yes Yes Yes - - - - - -- (*) HDMI Input only NOTE: 1. The Green highlighted channel display will appear if the PIP feature is convenient when you to view VCR program as a sub picture while...
...picture, use the CURSOR PAD button the remote. Picture-In-Picture (PIP) Your HITACHI Plasma TV incorporates one Tuner technology designed for PIP availability. Use connection at the same time.You can watch a TV program while viewing other programs from any of the CURSOR PAD buttons. CABLE or ... Yes Yes Yes Yes Yes - - - - - - Yes Yes Yes Yes Yes Yes Yes - - - - - - Yes Yes Yes Yes Yes Yes - - - - - -- (*) HDMI Input only NOTE: 1. The Green highlighted channel display will appear if the PIP feature is convenient when you to view VCR program as a sub picture while...
Owners Guide
Page 32
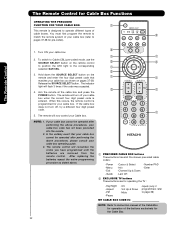
... precoded cable codes : -Power -Menu -Exit -Guide -Cursor & Select -Info -Channel Up & Down -Last CH -Number PAD -Enter ባ EXCLUSIVE TV buttons These buttons are removed from the remote control. NOTE: 1. The remote control will turn off your cable box. The remote will remember the codes... you have programmed until the batteries are for operating the TV : -Day/Night -Aspect -PIP -Pause -CC -Inputs (only if -Vol Up & Down programmed, refer -Mute to page 36) MY CABLE BOX CODE IS: NOTE: ...
... precoded cable codes : -Power -Menu -Exit -Guide -Cursor & Select -Info -Channel Up & Down -Last CH -Number PAD -Enter ባ EXCLUSIVE TV buttons These buttons are removed from the remote control. NOTE: 1. The remote control will turn off your cable box. The remote will remember the codes... you have programmed until the batteries are for operating the TV : -Day/Night -Aspect -PIP -Pause -CC -Inputs (only if -Vol Up & Down programmed, refer -Mute to page 36) MY CABLE BOX CODE IS: NOTE: ...
Owners Guide
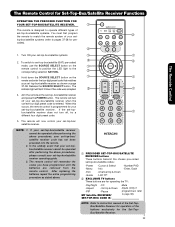
Page 33
... remember the codes you have programmed until the batteries are for operating the TV : -Day/Night -Aspect -PIP -CC -Vol Up & Down -Pause MY Satellite RECEIVER/ SET-TOP-BOX CODE IS: -Mute -Inputs (Only if programmed, refer to instruction manual of the Set-TopBox/Satellite Receiver... codes : -Power -Cursor & Select -Number PAD -Menu -Exit -Info -Enter, Dash -Channel Up & Down -Guide -Last CH ባ EXCLUSIVE TV buttons These buttons are removed from the remote control. After replacing the batteries repeat the entire programming procedure as shown on the ቢ remote control...
... remember the codes you have programmed until the batteries are for operating the TV : -Day/Night -Aspect -PIP -CC -Vol Up & Down -Pause MY Satellite RECEIVER/ SET-TOP-BOX CODE IS: -Mute -Inputs (Only if programmed, refer to instruction manual of the Set-TopBox/Satellite Receiver... codes : -Power -Cursor & Select -Number PAD -Menu -Exit -Info -Enter, Dash -Channel Up & Down -Guide -Last CH ባ EXCLUSIVE TV buttons These buttons are removed from the remote control. After replacing the batteries repeat the entire programming procedure as shown on the ቢ remote control...

Owners Guide
Page 34
...chosen precoded DVD codes : -Power -Number PAD -Menu -Play, Stop, Pause, -Info RWD, FWD, Skip RWD, -Cursor & Select Skip FWD. ባ EXCLUSIVE TV Buttons These buttons are removed from the remote control. Aim the remote at the DVD player and press the POWER button. If your DVD player.... Release the SOURCE SELECT button. The indicator light will remember the codes you have programmed until the batteries are for operating the TV : -Day/Night -Aspect -PIP -Exit -CC -Inputs (Only if -Vol Up & Down programmed, refer -Mute to page 36) MY DVD PLAYER CODE IS: NOTE: Refer to &#...
...chosen precoded DVD codes : -Power -Number PAD -Menu -Play, Stop, Pause, -Info RWD, FWD, Skip RWD, -Cursor & Select Skip FWD. ባ EXCLUSIVE TV Buttons These buttons are removed from the remote control. Aim the remote at the DVD player and press the POWER button. If your DVD player.... Release the SOURCE SELECT button. The indicator light will remember the codes you have programmed until the batteries are for operating the TV : -Day/Night -Aspect -PIP -Exit -CC -Inputs (Only if -Vol Up & Down programmed, refer -Mute to page 36) MY DVD PLAYER CODE IS: NOTE: Refer to &#...


