Owners Guide
Page 3
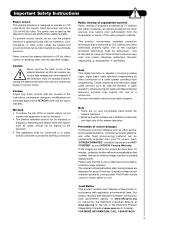
...lead. Never connect the plasma television to minimize image retention on 120 volts 60 Hz, AC current. Caution Adjust only those controls that contrast reduces to 50 Hz, direct current, or... or owner of the plasma television. If still images are displayed for more information call your local cable company. For product recycling and disposal information, contact your HITACHI Factory Warranty. Use of... the back cover of a set-top box. Original contrast can be restored quickly by TV stations and cable companies, as well as vases, should not be exposed to dripping or...
...lead. Never connect the plasma television to minimize image retention on 120 volts 60 Hz, AC current. Caution Adjust only those controls that contrast reduces to 50 Hz, direct current, or... or owner of the plasma television. If still images are displayed for more information call your local cable company. For product recycling and disposal information, contact your HITACHI Factory Warranty. Use of... the back cover of a set-top box. Original contrast can be restored quickly by TV stations and cable companies, as well as vases, should not be exposed to dripping or...
Owners Guide
Page 4
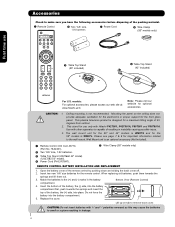
...· Two "AA" size, 1.5V batteries ¿ Power Cord ´ Wire Clamp (50" models only) First time use only with Hitachi P42T501, P42T501A, P50T501 and P50T501A. This stand for use » Table Top Stand (50" included) » Table Top Stand (42" included) For U.S. Use with other apparatus is.../tv Note: Please visit our website for the remote control. Insert two new "AA" size batteries for optional accessories. Mounting the panel on tab to the wall mount. This plasma television product is capable of the remote control by pushing down and sliding the back cover off. 2....
...· Two "AA" size, 1.5V batteries ¿ Power Cord ´ Wire Clamp (50" models only) First time use only with Hitachi P42T501, P42T501A, P50T501 and P50T501A. This stand for use » Table Top Stand (50" included) » Table Top Stand (42" included) For U.S. Use with other apparatus is.../tv Note: Please visit our website for the remote control. Insert two new "AA" size batteries for optional accessories. Mounting the panel on tab to the wall mount. This plasma television product is capable of the remote control by pushing down and sliding the back cover off. 2....
Owners Guide
Page 5
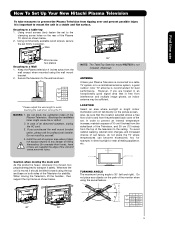
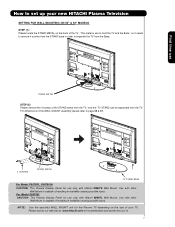
... when using the wall mount bracket. 2. LOCATION Select an area where sunlight or bright indoor illumination will not fall directly on the path of the Plasma TV stand as shown below . 55" NOTE: The TableTop Stand for example, in . 10 cm * Please adjust the wire length to avoid touching the wall when...° (left and right). How To Set Up Your New Hitachi Plasma Television To take measures to prevent the Plasma Television from the wall except when mounted using the swivel feature. 42" 50" C C D D 42" 10.59 in. 13.93 in. 27 cm 36 cm 50" 15 in. 16. 85 in. 38. 1 cm 42.8 cm 55...
... when using the wall mount bracket. 2. LOCATION Select an area where sunlight or bright indoor illumination will not fall directly on the path of the Plasma TV stand as shown below . 55" NOTE: The TableTop Stand for example, in . 10 cm * Please adjust the wire length to avoid touching the wall when...° (left and right). How To Set Up Your New Hitachi Plasma Television To take measures to prevent the Plasma Television from the wall except when mounted using the swivel feature. 42" 50" C C D D 42" 10.59 in. 13.93 in. 27 cm 36 cm 50" 15 in. 16. 85 in. 38. 1 cm 42.8 cm 55...
Owners Guide
Page 6
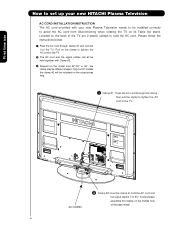
... clamp to hold the AC cord. Pull on the clamp to tighten the AC cord to the TV. · The AC cord and the signal cables can all be held together with your new HITACHI Plasma Television AC CORD INSTALLATION INSTRUCTION The AC cord provided with Clamp #2. » Depend on the model size... be included on the accessories bag. ³ Clamp #1 : Pass the AC cord through Clamp #1 and connect it to the TV. For 50 " model please assemble this Clamp on the middle hole of the TV are 2 plastic clamps to hold the AC cord and the signal cables. Located on the back of the base...
... clamp to hold the AC cord. Pull on the clamp to tighten the AC cord to the TV. · The AC cord and the signal cables can all be held together with your new HITACHI Plasma Television AC CORD INSTALLATION INSTRUCTION The AC cord provided with Clamp #2. » Depend on the model size... be included on the accessories bag. ³ Clamp #1 : Pass the AC cord through Clamp #1 and connect it to the TV. For 50 " model please assemble this Clamp on the middle hole of the TV are 2 plastic clamps to hold the AC cord and the signal cables. Located on the back of the base...
Owners Guide
Page 7
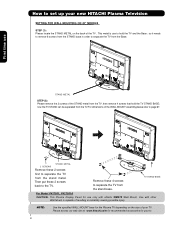
...TV STAND BASE For Model P50T501, P50T501A CAUTION- This metal is capable of the STAND metal from the TV, now the TV STAND can be separated from the TV. For Model P55T551 CAUTION- This Plasma Display Panel for your TV. so it needs to remove 4 screws from the STAND base in order to set up your new HITACHI Plasma... Television SETTING FOR WALL MOUNTING ON 50" & 55" ...
...TV STAND BASE For Model P50T501, P50T501A CAUTION- This metal is capable of the STAND metal from the TV, now the TV STAND can be separated from the TV. For Model P55T551 CAUTION- This Plasma Display Panel for your TV. so it needs to remove 4 screws from the STAND base in order to set up your new HITACHI Plasma... Television SETTING FOR WALL MOUNTING ON 50" & 55" ...
Owners Guide
Page 8
... metal from the Base. Remove these 2 screws back to set up your TV. This Plasma Display Panel for your tv. 8 NOTE: Use the specified WALL MOUNT base for the Plasma TV depending on the size of your new HITACHI Plasma Television SETTING FOR WALL MOUNTING ON 42" MODELS STEP (1) : Please locate ...the STAND METAL on the back of resulting in order to separate the TV from the stand metal. Then put these ...
... metal from the Base. Remove these 2 screws back to set up your TV. This Plasma Display Panel for your tv. 8 NOTE: Use the specified WALL MOUNT base for the Plasma TV depending on the size of your new HITACHI Plasma Television SETTING FOR WALL MOUNTING ON 42" MODELS STEP (1) : Please locate ...the STAND METAL on the back of resulting in order to separate the TV from the stand metal. Then put these ...
Owners Guide
Page 9
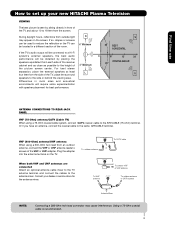
... so, drapes or screens can be used to reduce the reflection or the TV can be located in room sizes and acoustical environments will be connected to the AIR/CABLE (75-Ohm) terminal. Consult your new HITACHI Plasma Television VIEWING The best picture is recommended. 9 Or if you have an... experimentation with speaker placement for the antenna mixer. When both VHF and UHF antennas are connected Attach an optional antenna cable mixer to the TV antenna terminal, and connect the cables to the height of the picture screen center. Plug the adapter into the antenna terminal on the screen...
... so, drapes or screens can be used to reduce the reflection or the TV can be located in room sizes and acoustical environments will be connected to the AIR/CABLE (75-Ohm) terminal. Consult your new HITACHI Plasma Television VIEWING The best picture is recommended. 9 Or if you have an... experimentation with speaker placement for the antenna mixer. When both VHF and UHF antennas are connected Attach an optional antenna cable mixer to the TV antenna terminal, and connect the cables to the height of the picture screen center. Plug the adapter into the antenna terminal on the screen...
Owners Guide
Page 10
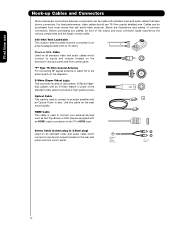
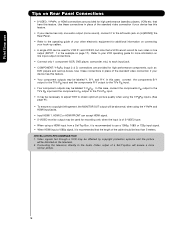
... connect to an audio amplifier with an S-Video feature in place of the standard video cable to the TV's HDMI input. "F" Type 75-Ohm Coaxial Antenna For connecting RF signals (antenna or cable TV) to inputs and outputs located on the rear jack panel and front control panel. Optical Cable This cable...
... connect to an audio amplifier with an S-Video feature in place of the standard video cable to the TV's HDMI input. "F" Type 75-Ohm Coaxial Antenna For connecting RF signals (antenna or cable TV) to inputs and outputs located on the rear jack panel and front control panel. Optical Cable This cable...
Owners Guide
Page 11
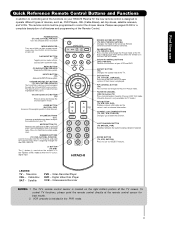
.... GUIDE BUTTON (SAT/CBL, PVR) Accesses the program guide of the TV. VOLUME BUTTONS (TV ) Increase up or down to adjust the audio level of the Remote Control. MUTE BUTTON (TV) Reduces the audio level to 50% if pressed once, and to pause other devices. Also used when the...are pressed. EXIT BUTTON (TV, SAT/CBL, PVR/VCR) Exits out of your TV. PIP CONTROL BUTTON (TV) Press to restore audio level. POWER BUTTON (TV, DVD, SAT/CBL,PVR/VCR) Turns the selected device on your HITACHI Plasma TV, the new remote control is used for TV mode.) INFO BUTTON (TV, STB, CBL, PVR)...
.... GUIDE BUTTON (SAT/CBL, PVR) Accesses the program guide of the TV. VOLUME BUTTONS (TV ) Increase up or down to adjust the audio level of the Remote Control. MUTE BUTTON (TV) Reduces the audio level to 50% if pressed once, and to pause other devices. Also used when the...are pressed. EXIT BUTTON (TV, SAT/CBL, PVR/VCR) Exits out of your TV. PIP CONTROL BUTTON (TV) Press to restore audio level. POWER BUTTON (TV, DVD, SAT/CBL,PVR/VCR) Turns the selected device on your HITACHI Plasma TV, the new remote control is used for TV mode.) INFO BUTTON (TV, STB, CBL, PVR)...
Owners Guide
Page 12
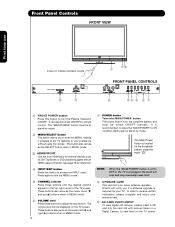
... these buttons to adjust the sound level. The Main Power button is located on the TV screen. It is required for your TV. Hitachi will notify you to enter the MENU, making it possible to set TV features to your warranty card. ቩ SD CARD PHOTO INPUT To view digital still pictures... or DVD players equipped with pictures taken on a Digital Camera, to ON condition (lights red) for future software upgrades. In order to turn the Plasma Television ON/OFF. These buttons also serve as the cursor left (̇) and right (̈) buttons when in MENU mode. ቤ HDMI-FRONT ...
... these buttons to adjust the sound level. The Main Power button is located on the TV screen. It is required for your TV. Hitachi will notify you to enter the MENU, making it possible to set TV features to your warranty card. ቩ SD CARD PHOTO INPUT To view digital still pictures... or DVD players equipped with pictures taken on a Digital Camera, to ON condition (lights red) for future software upgrades. In order to turn the Plasma Television ON/OFF. These buttons also serve as the cursor left (̇) and right (̈) buttons when in MENU mode. ቤ HDMI-FRONT ...
Owners Guide
Page 13
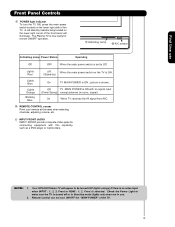
... ON/OFF the "MAIN POWER" of the front bezel will appear to be turned OFF (lights orange) if there is no sync. NOTES: 1. Your HITACHI Plasma TV will illuminate. Off TV MAIN POWER is now ready for connecting equipment with no signal input (Power Saving) except antenna (no video input when INPUT : 1, 2, 3, Front or...
... ON/OFF the "MAIN POWER" of the front bezel will appear to be turned OFF (lights orange) if there is no sync. NOTES: 1. Your HITACHI Plasma TV will illuminate. Off TV MAIN POWER is now ready for connecting equipment with no signal input (Power Saving) except antenna (no video input when INPUT : 1, 2, 3, Front or...
Owners Guide
Page 14
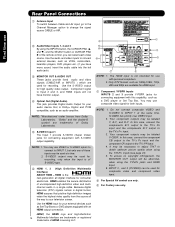
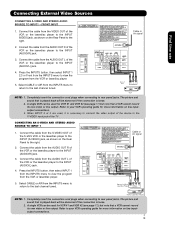
... component outputs may be abnormal, when using the Y-PBPR inputs (see page 41). 5. In this case, connect the components B-Y output to the TV's PB input and the components R-Y output to change the signal source CABLE or AIR. To ensure no copyright infringement, the MONITOR OUT output will ...may be labeled Y-CBCR. Rear Panel Connections ቢ Antenna Input To switch between Cable and Air input, go to the Channel Manager option to the TV's PR input. 3. In this capability, such as 1080p,1080i, 720p, 480i and 480p are trademarks of the remote control, you have monitor output....
... component outputs may be abnormal, when using the Y-PBPR inputs (see page 41). 5. In this case, connect the components B-Y output to the TV's PB input and the components R-Y output to change the signal source CABLE or AIR. To ensure no copyright infringement, the MONITOR OUT output will ...may be labeled Y-CBCR. Rear Panel Connections ቢ Antenna Input To switch between Cable and Air input, go to the Channel Manager option to the TV's PR input. 3. In this capability, such as 1080p,1080i, 720p, 480i and 480p are trademarks of the remote control, you have monitor output....
Owners Guide
Page 16
... back picture may need to modify them to the own device specifications. For best performance, video and audio cables should be according to accommodate your Plasma TV is dependent on the model and features of components and features. HDMI-Front Photo Input Air /Cable Input 1 Input 2 Move SEL Sel. 16 If you...
... back picture may need to modify them to the own device specifications. For best performance, video and audio cables should be according to accommodate your Plasma TV is dependent on the model and features of components and features. HDMI-Front Photo Input Air /Cable Input 1 Input 2 Move SEL Sel. 16 If you...
Owners Guide
Page 17
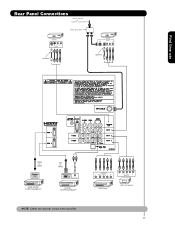
OUTPUT Y PB/CB PR/CR L R Y PB PR L R OUTPUT DVD Player HDTV Set-Top Box 17 First time use Rear Panel Connections Outside Antenna or Cable TV coaxial cable 2-Way signal splitter VCR #2 S-VIDEO V L R INPUT Optional VCR #1 ANT OUTPUT IN S-VIDEO V L R Optional HDMI to HDMI HDMI OUTPUT HDMI DIGITAL OUTPUT CAPABILITY DVI to HDMI DIGITAL OUTPUT AUDIO OUT DIGITAL OUTPUT CAPABILITY NOTE: Cables are optional, except when specified.
OUTPUT Y PB/CB PR/CR L R Y PB PR L R OUTPUT DVD Player HDTV Set-Top Box 17 First time use Rear Panel Connections Outside Antenna or Cable TV coaxial cable 2-Way signal splitter VCR #2 S-VIDEO V L R INPUT Optional VCR #1 ANT OUTPUT IN S-VIDEO V L R Optional HDMI to HDMI HDMI OUTPUT HDMI DIGITAL OUTPUT CAPABILITY DVI to HDMI DIGITAL OUTPUT AUDIO OUT DIGITAL OUTPUT CAPABILITY NOTE: Cables are optional, except when specified.
Owners Guide
Page 18
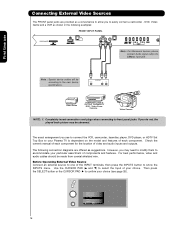
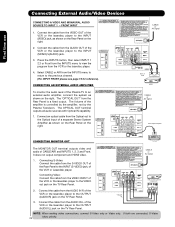
...of your other electronic equipment for additional information on connecting your device has this case, connect the components B-Y output to the TV's PB input and the components R-Y output to the TV's PR input. • Your component outputs may be affected by copyright protection systems and the picture will assure a more ... be used for VCR #1 and VCR #2, but note that have this case, connect the components CB output to the TV's PB input and the components CR output to the TV's PR input. • It may be necessary to adjust TINT to obtain optimum picture quality when using the Y-PBPR ...
...of your other electronic equipment for additional information on connecting your device has this case, connect the components B-Y output to the TV's PB input and the components R-Y output to the TV's PR input. • Your component outputs may be affected by copyright protection systems and the picture will assure a more ... be used for VCR #1 and VCR #2, but note that have this case, connect the components CB output to the TV's PB input and the components CR output to the TV's PR input. • It may be necessary to adjust TINT to obtain optimum picture quality when using the Y-PBPR ...
Owners Guide
Page 19
... the laserdisc player to the Y/VIDEO input jack of VCR Video OUTPUT VCR NOTE: 1. A single VCR can be used , it is loose. 2. Back of the TV . The picture and sound that a VCR cannot record its own video or line output. Completely insert the connection cord plugs when connecting to rear panel...
... the laserdisc player to the Y/VIDEO input jack of VCR Video OUTPUT VCR NOTE: 1. A single VCR can be used , it is loose. 2. Back of the TV . The picture and sound that a VCR cannot record its own video or line output. Completely insert the connection cord plugs when connecting to rear panel...
Owners Guide
Page 22
...Optional VCR or other external components R L V S-VIDEO INPUT 3. Connect the cable from the Optical out to the INPUT (VIDEO) jack, as shown on the TV Rear Panel. Press the INPUTS button, then select INPUT 1 2,3 or Front from the INPUTS menu to view the program from the S-VIDEO OUT of a separate...CABLE or AIR from the VIDEO INPUT of the VCR or the laserdisc player to the INPUT (S-VIDEO) jack, of the Plasma TV to the OUTPUT (AUDIO/R) jack on the TV Rear Panel. 2. CONNECTING AN EXTERNAL AUDIO AMPLIFIER To monitor the audio level of the VCR or Laserdisk player. The OPTICAL OUT...
...Optional VCR or other external components R L V S-VIDEO INPUT 3. Connect the cable from the Optical out to the INPUT (VIDEO) jack, as shown on the TV Rear Panel. Press the INPUTS button, then select INPUT 1 2,3 or Front from the INPUTS menu to view the program from the S-VIDEO OUT of a separate...CABLE or AIR from the VIDEO INPUT of the VCR or the laserdisc player to the INPUT (S-VIDEO) jack, of the Plasma TV to the OUTPUT (AUDIO/R) jack on the TV Rear Panel. 2. CONNECTING AN EXTERNAL AUDIO AMPLIFIER To monitor the audio level of the VCR or Laserdisk player. The OPTICAL OUT...

Owners Guide
Page 23
...pressing the Source button of the Source Select on the remote. To operate your VCR/PVR). To operate your Plasma TV, select TV by pressing the Source button of VCRs, CATV (Cable TV) converters, set -top-box or satellite receiver). To operate your set-top-box or satellite receiver select ... program the remote to control your cable box). The Remote Control The Remote Control In addition to controlling all the functions on your HITACHI Plasma TV, the new remote control is designed to operate different types of the Source Select on the remote. Basic operation keys are grouped together...
...pressing the Source button of the Source Select on the remote. To operate your VCR/PVR). To operate your Plasma TV, select TV by pressing the Source button of VCRs, CATV (Cable TV) converters, set -top-box or satellite receiver). To operate your set-top-box or satellite receiver select ... program the remote to control your cable box). The Remote Control The Remote Control In addition to controlling all the functions on your HITACHI Plasma TV, the new remote control is designed to operate different types of the Source Select on the remote. Basic operation keys are grouped together...

Owners Guide
Page 24
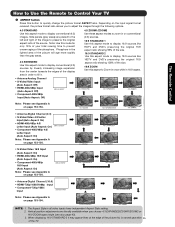
... picture to set on how to motion. The Remote Control How to Use the Remote to Control Your TV ³ POWER button Press this button to turn the TV set the remote control to TV mode). ³ · MODE Indicator · » Turns on or blinks three times to show remote control mode... ¶ º cycle through the three different freeze modes (see page 55. 24 Select NIGHT for instructions on or off when the remote is in TV mode. (See page 23 for night time viewing with room light.
... picture to set on how to motion. The Remote Control How to Use the Remote to Control Your TV ³ POWER button Press this button to turn the TV set the remote control to TV mode). ³ · MODE Indicator · » Turns on or blinks three times to show remote control mode... ¶ º cycle through the three different freeze modes (see page 55. 24 Select NIGHT for instructions on or off when the remote is in TV mode. (See page 23 for night time viewing with room light.
Owners Guide
Page 25
... 15% of your total viewing time to quickly change the picture format ASPECT ratio. The Remote Control How to Use the Remote to Control Your TV ² ASPECT button Press this button to prevent uneven aging of the phosphors. Note: Use this is normal operation 25 of the... TV. Note: Please see Appendix A on page 153-154. 1 • Antenna-Digital Channel (4:3) • S-Video/Video 4:3/Letter Input (Auto Aspect: On) • HDMI-480i/480p 4:3/ Letter ...
... 15% of your total viewing time to quickly change the picture format ASPECT ratio. The Remote Control How to Use the Remote to Control Your TV ² ASPECT button Press this button to prevent uneven aging of the phosphors. Note: Use this is normal operation 25 of the... TV. Note: Please see Appendix A on page 153-154. 1 • Antenna-Digital Channel (4:3) • S-Video/Video 4:3/Letter Input (Auto Aspect: On) • HDMI-480i/480p 4:3/ Letter ...


