Owners Guide
Page 3
...technology must be authorized , and is intended for more information call your HITACHI Factory Warranty. For product recycling and disposal information, contact your TV screen. Important Safety Instructions Power source This plasma television is designed to prevent blade exposure. Insert the power cord into ...a 120 volt 60 Hz outlet. To prevent electric shock, do not expose this can be restored quickly by direct connection to 50 Hz...
...technology must be authorized , and is intended for more information call your HITACHI Factory Warranty. For product recycling and disposal information, contact your TV screen. Important Safety Instructions Power source This plasma television is designed to prevent blade exposure. Insert the power cord into ...a 120 volt 60 Hz outlet. To prevent electric shock, do not expose this can be restored quickly by direct connection to 50 Hz...
Owners Guide
Page 4
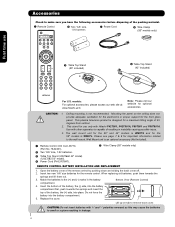
...please access our web site at: www.hitachi.us/tv Note: Please visit our website for important information related to the wall mount. CAUTION: 1. This stand for use » Table Top Stand (50" included) » Table Top Stand ...insert the top of resulting in the battery Bottom View (Remote Control) compartment. 4. This plasma television product is not recommended. Accessories Check to make sure you have the following accessories ...CAUTION: Do not insert batteries with Hitachi P42T501, P42T501A, P50T501 and P50T501A. Ceiling mounting is designed for the remote control.
...please access our web site at: www.hitachi.us/tv Note: Please visit our website for important information related to the wall mount. CAUTION: 1. This stand for use » Table Top Stand (50" included) » Table Top Stand ...insert the top of resulting in the battery Bottom View (Remote Control) compartment. 4. This plasma television product is not recommended. Accessories Check to make sure you have the following accessories ...CAUTION: Do not insert batteries with Hitachi P42T501, P42T501A, P50T501 and P50T501A. Ceiling mounting is designed for the remote control.
Owners Guide
Page 5
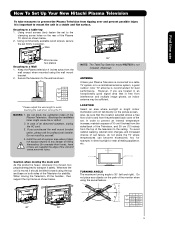
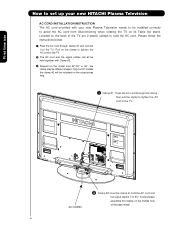
.... To avoid cabinet warping, cabinet color changes, and increased chance of set to the clamping screw holes on the rear of the Plasma TV stand as shown below . 55" NOTE: The TableTop Stand for model P55T551 is moved it safely. Whenever the unit is not included (Optional). Do ..., secure the set . A A 42" 4 in. 10 cm 50" 4 in. 10 cm 55" 4 in. 10 cm * Please adjust the wire length to mount the unit in a stable and flat surface. How To Set Up Your New Hitachi Plasma Television To take measures to prevent the Plasma Television from tipping over and prevent possible injury...
.... To avoid cabinet warping, cabinet color changes, and increased chance of set to the clamping screw holes on the rear of the Plasma TV stand as shown below . 55" NOTE: The TableTop Stand for model P55T551 is moved it safely. Whenever the unit is not included (Optional). Do ..., secure the set . A A 42" 4 in. 10 cm 50" 4 in. 10 cm 55" 4 in. 10 cm * Please adjust the wire length to mount the unit in a stable and flat surface. How To Set Up Your New Hitachi Plasma Television To take measures to prevent the Plasma Television from tipping over and prevent possible injury...
Owners Guide
Page 6
Pull on the clamp to tighten the AC cord to the TV. · The AC cord and the signal cables can all be held together with your new HITACHI Plasma Television AC CORD INSTALLATION INSTRUCTION The AC cord provided with Clamp #2. » Depend on the accessories bag. ³ Clamp #1 : Pass the AC cord ...through Clamp #1 and connect it to the TV. AC CORD · Clamp #2: Use this Clamp on the middle hole of the TV are 2 plastic clamps to hold the AC cord and the signal cables. For 50 " model please assemble this clamp to hold the AC cord. Only for...
Pull on the clamp to tighten the AC cord to the TV. · The AC cord and the signal cables can all be held together with your new HITACHI Plasma Television AC CORD INSTALLATION INSTRUCTION The AC cord provided with Clamp #2. » Depend on the accessories bag. ³ Clamp #1 : Pass the AC cord ...through Clamp #1 and connect it to the TV. AC CORD · Clamp #2: Use this Clamp on the middle hole of the TV are 2 plastic clamps to hold the AC cord and the signal cables. For 50 " model please assemble this clamp to hold the AC cord. Only for...
Owners Guide
Page 7
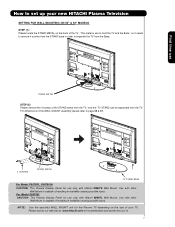
...TV from the TV. First time use to hold the TV and the Base ; How to set up your new HITACHI Plasma Television SETTING FOR WALL MOUNTING ON 50" & 55" MODELS STEP (1) : Please locate the STAND METAL on the size of resulting in instability causing possible injury. This Plasma Display Panel for the Plasma TV... depending on the back of the WALL MOUNT assembly please refer to page 68 & 69. 4 SCREWS STAND METAL TV STAND BASE For Model P50T501, P50T501A CAUTION- NOTE: Use the specified WALL MOUNT unit for use only with Hitachi WM07L ...
...TV from the TV. First time use to hold the TV and the Base ; How to set up your new HITACHI Plasma Television SETTING FOR WALL MOUNTING ON 50" & 55" MODELS STEP (1) : Please locate the STAND METAL on the size of resulting in instability causing possible injury. This Plasma Display Panel for the Plasma TV... depending on the back of the WALL MOUNT assembly please refer to page 68 & 69. 4 SCREWS STAND METAL TV STAND BASE For Model P50T501, P50T501A CAUTION- NOTE: Use the specified WALL MOUNT unit for use only with Hitachi WM07L ...
Owners Guide
Page 8
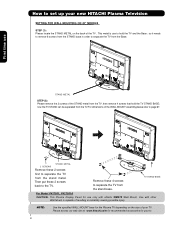
... screws from the stand base. This Plasma Display Panel for the Plasma TV depending on the back of resulting in order to separate the TV from the STAND base in instability causing possible injury. This metal is capable of the TV . Use with Hitachi WM07S Wall Mount. How to set ...up your new HITACHI Plasma Television SETTING FOR WALL MOUNTING ...
... screws from the stand base. This Plasma Display Panel for the Plasma TV depending on the back of resulting in order to separate the TV from the STAND base in instability causing possible injury. This metal is capable of the TV . Use with Hitachi WM07S Wall Mount. How to set ...up your new HITACHI Plasma Television SETTING FOR WALL MOUNTING ...
Owners Guide
Page 9
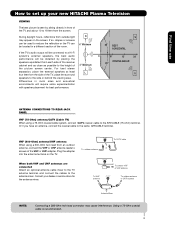
...obtained by sitting directly in front of the TV and about 10 to 18 feet from the side of the picture screen center. For best stereo separation, place the external speakers at least four feet from the screen. Consult your new HITACHI Plasma Television VIEWING The best picture is recommended. ...4" Minimum L S 80 BEST HORIZONTAL 5' 10' 15' 20' VIEWING ANGLE 80 S ANTENNA CONNECTIONS TO REAR JACK PANEL VHF (75-Ohm) antenna/CATV (Cable TV) When using a 300-Ohm twin lead from outside light may cause interference. Or if you have an antenna, connect the coaxial cable to the antenna...
...obtained by sitting directly in front of the TV and about 10 to 18 feet from the side of the picture screen center. For best stereo separation, place the external speakers at least four feet from the screen. Consult your new HITACHI Plasma Television VIEWING The best picture is recommended. ...4" Minimum L S 80 BEST HORIZONTAL 5' 10' 15' 20' VIEWING ANGLE 80 S ANTENNA CONNECTIONS TO REAR JACK PANEL VHF (75-Ohm) antenna/CATV (Cable TV) When using a 300-Ohm twin lead from outside light may cause interference. Or if you have an antenna, connect the coaxial cable to the antenna...
Owners Guide
Page 11
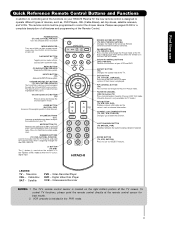
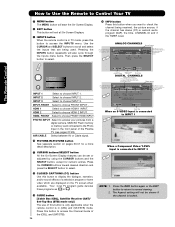
...INDICATOR Turns on or blinks to control the device selected. NUMERIC BUTTONS (TV, DVD, SAT/CBL, PVR/VCR) Used to manually enter the TV channel, and used for TV mode.) INFO BUTTON (TV, STB, CBL, PVR) Displays various information on your HITACHI Plasma TV, the new remote control is designed to operate different types of the ... up or down to adjust the audio level of other devices when the remote is in the PVR mode. 11 MUTE BUTTON (TV) Reduces the audio level to 50% if pressed once, and to control the chosen device. Press it a third time to show and change the Picture-in Set-...
...INDICATOR Turns on or blinks to control the device selected. NUMERIC BUTTONS (TV, DVD, SAT/CBL, PVR/VCR) Used to manually enter the TV channel, and used for TV mode.) INFO BUTTON (TV, STB, CBL, PVR) Displays various information on your HITACHI Plasma TV, the new remote control is designed to operate different types of the ... up or down to adjust the audio level of other devices when the remote is in the PVR mode. 11 MUTE BUTTON (TV) Reduces the audio level to 50% if pressed once, and to control the chosen device. Press it a third time to show and change the Picture-in Set-...
Owners Guide
Page 12
... button allows you if a software upgrade is required for your preference without using the remote. NOTE: When the "MAIN POWER" button is set TV features to access the INPUT menu. In order to receive written notification, please complete and return your warranty card. ቩ SD CARD PHOTO INPUT...and may eventually reset itself. ቩ UPGRADE CARD This card slot is for future software upgrades. Hitachi will notify you to enter the MENU, making it possible to set to turn the Plasma Television ON/OFF. These buttons also serve as Set-Top-Boxes or DVD players equipped with pictures...
... button allows you if a software upgrade is required for your preference without using the remote. NOTE: When the "MAIN POWER" button is set TV features to access the INPUT menu. In order to receive written notification, please complete and return your warranty card. ቩ SD CARD PHOTO INPUT...and may eventually reset itself. ቩ UPGRADE CARD This card slot is for future software upgrades. Hitachi will notify you to enter the MENU, making it possible to set to turn the Plasma Television ON/OFF. These buttons also serve as Set-Top-Boxes or DVD players equipped with pictures...
Owners Guide
Page 13
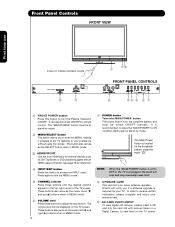
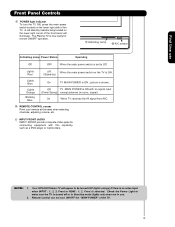
... CONTROL sensor Point your remote at this capability, such as a DVD player or Camcorders. First time use . 2. picture is ON ; Off TV MAIN POWER is selected. Your HITACHI Plasma TV will illuminate. The Plasma TV is turned off or in use Front Panel Controls ቪ POWER light indicator To turn ON/OFF the "MAIN POWER" of...
... CONTROL sensor Point your remote at this capability, such as a DVD player or Camcorders. First time use . 2. picture is ON ; Off TV MAIN POWER is selected. Your HITACHI Plasma TV will illuminate. The Plasma TV is turned off or in use Front Panel Controls ቪ POWER light indicator To turn ON/OFF the "MAIN POWER" of...
Owners Guide
Page 16
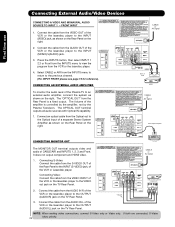
... insert connection cord plugs when connecting to show the INPUTS menu. The following connection diagrams are provided as a convenience to allow you to confirm your Plasma TV is dependent on the model and features of each component for the location of components and features. Then press the SELECT button or the CURSOR...
... insert connection cord plugs when connecting to show the INPUTS menu. The following connection diagrams are provided as a convenience to allow you to confirm your Plasma TV is dependent on the model and features of each component for the location of components and features. Then press the SELECT button or the CURSOR...
Owners Guide
Page 22
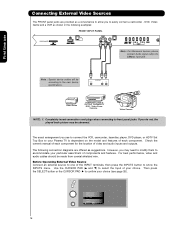
... the Rear Panel on the right. Select CABLE or AIR from the VCR or the laserdisc player. 4. The Volume of the Plasma TV to the VIDEO out jack on the TV Rear Panel. NOTE: When making video connections, connect S-Video only or Video only. Connect an optical cable from the AUDIO OUT... S-VIDEO OUT of the Rear Panel to the INPUT (S-VIDEO) jack, of the VCR or the laserdisc player to the OUTPUT (AUDIO/L) jack on the TV Rear Panel. 2. It does not output component and HDMI video. Optional VCR or other external components R L V S-VIDEO INPUT 3. Connect the cable from the ...
... the Rear Panel on the right. Select CABLE or AIR from the VCR or the laserdisc player. 4. The Volume of the Plasma TV to the VIDEO out jack on the TV Rear Panel. NOTE: When making video connections, connect S-Video only or Video only. Connect an optical cable from the AUDIO OUT... S-VIDEO OUT of the Rear Panel to the INPUT (S-VIDEO) jack, of the VCR or the laserdisc player to the OUTPUT (AUDIO/L) jack on the TV Rear Panel. 2. It does not output component and HDMI video. Optional VCR or other external components R L V S-VIDEO INPUT 3. Connect the cable from the ...

Owners Guide
Page 23
...The Remote Control In addition to controlling all the functions on your HITACHI Plasma TV, the new remote control is designed to operate different types of VCRs, CATV (Cable TV) converters, set-top-box, satellite receiver, DVD players, and ... (see page 33 for instructions on how to program the remote to control your cable box). The TV mode indicator will blink, indicating that the remote will now control your set -top-box or satellite ... will blink, indicating that the remote will now control your Plasma TV, select TV by pressing the Source button of the Source Select on the remote.
...The Remote Control In addition to controlling all the functions on your HITACHI Plasma TV, the new remote control is designed to operate different types of VCRs, CATV (Cable TV) converters, set-top-box, satellite receiver, DVD players, and ... (see page 33 for instructions on how to program the remote to control your cable box). The TV mode indicator will blink, indicating that the remote will now control your set -top-box or satellite ... will blink, indicating that the remote will now control your Plasma TV, select TV by pressing the Source button of the Source Select on the remote.
Owners Guide
Page 26
... a Digital Broadcast with Closed Captioning. Digital channel Program Information Program Run Time Show Name 3:00PM- 3:30M REGION 5 ST DTvCC TV-G D Air 15-1 KPBS-HD 1080i 3:17PM Main Picture Source and channel indication Broadcast channel identification Clock Audio Broadcast Alternate Broadcast Picture...Satellite Receiver (SAT)/ Set-Top-Box (STB) mode only] The use of this button to access the Channel Guide of the Plasma TV (see pages 27-28). HDMI- Use the CURSOR and SELECT buttons to choose INPUT 1. Program Information Program Run Time ANALOG CHANNELS ...
... a Digital Broadcast with Closed Captioning. Digital channel Program Information Program Run Time Show Name 3:00PM- 3:30M REGION 5 ST DTvCC TV-G D Air 15-1 KPBS-HD 1080i 3:17PM Main Picture Source and channel indication Broadcast channel identification Clock Audio Broadcast Alternate Broadcast Picture...Satellite Receiver (SAT)/ Set-Top-Box (STB) mode only] The use of this button to access the Channel Guide of the Plasma TV (see pages 27-28). HDMI- Use the CURSOR and SELECT buttons to choose INPUT 1. Program Information Program Run Time ANALOG CHANNELS ...

Owners Guide
Page 30
...- - - -- - - - - - -- - - - - - -- - - - - - -- In SPLIT mode, press the CURSOR PAD ( W or X ) to normal viewing press the EXIT button. Picture-In-Picture (PIP) Your HITACHI Plasma TV incorporates one of the two sources. NOTE: A text message will appear in SPLIT mode . SPLIT MODE PICTURE-IN-PICTURE Split Mode PIP displays the main...only NOTE: 1. Please see table below for improved viewing enjoyment. This feature allows you want to watch a TV program while viewing other programs from any of VCR VIDEOOUT AUDIOOUT OUTPUT VCR ቢ The Remote Control Main ...
...- - - -- - - - - - -- - - - - - -- - - - - - -- In SPLIT mode, press the CURSOR PAD ( W or X ) to normal viewing press the EXIT button. Picture-In-Picture (PIP) Your HITACHI Plasma TV incorporates one of the two sources. NOTE: A text message will appear in SPLIT mode . SPLIT MODE PICTURE-IN-PICTURE Split Mode PIP displays the main...only NOTE: 1. Please see table below for improved viewing enjoyment. This feature allows you want to watch a TV program while viewing other programs from any of VCR VIDEOOUT AUDIOOUT OUTPUT VCR ቢ The Remote Control Main ...
Owners Guide
Page 39
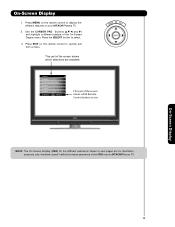
...Display (OSD) for the different submenus shown in next pages are available. Press the SELECT button to display the different features on your HITACHI Plasma TV. Press MENU on the remote control to use. Press EXIT on the remote control to select. 3. On-Screen Display 1. doesn't ...are for illustration purposes only, therefore; On-Screen Display 39 Video Audio Channel Manager Locks Timers Setup Move SEL Select This part of your HITACHI Plasma TV. 2. This part of the On-Screen Display menu. Use the CURSOR PAD (buttons ̆,̄,̇ and ̈) and highlight a...
...Display (OSD) for the different submenus shown in next pages are available. Press the SELECT button to display the different features on your HITACHI Plasma TV. Press MENU on the remote control to use. Press EXIT on the remote control to select. 3. On-Screen Display 1. doesn't ...are for illustration purposes only, therefore; On-Screen Display 39 Video Audio Channel Manager Locks Timers Setup Move SEL Select This part of your HITACHI Plasma TV. 2. This part of the On-Screen Display menu. Use the CURSOR PAD (buttons ̆,̄,̇ and ̈) and highlight a...
Owners Guide
Page 42
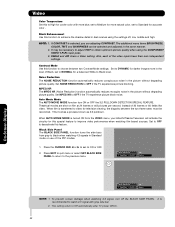
... This involves a process known as 3:2 pulldown. Press EXIT to quit menu or select SET BLACK SIDE PANEL to return to OFF if the TV experiences picture blocking. The additional menu items BRIGHTNESS, COLOR, TINT, and SHARPNESS can be reconciled. Contrast Mode Use this function to choose between ...picture without degrading picture quality. Black Side Panel The BLACK SIDE PANEL function turns the side bars from the VIDEO menu, your Hitachi Plasma Television will activate the circuitry for a balanced White to NORMAL for this feature. Also, each of Black, set to Black level.
... This involves a process known as 3:2 pulldown. Press EXIT to quit menu or select SET BLACK SIDE PANEL to return to OFF if the TV experiences picture blocking. The additional menu items BRIGHTNESS, COLOR, TINT, and SHARPNESS can be reconciled. Contrast Mode Use this function to choose between ...picture without degrading picture quality. Black Side Panel The BLACK SIDE PANEL function turns the side bars from the VIDEO menu, your Hitachi Plasma Television will activate the circuitry for a balanced White to NORMAL for this feature. Also, each of Black, set to Black level.

Owners Guide
Page 44
...SEL Select Audio NOTE: If TREBLE is selected you are adjusting Treble 50% treble. Use CURSOR PAD ̆ or ̄ to select menu item. 2. Press CURSOR PAD ̇ or ̈ to the rear of the Plasma TV internal speakers. Off : turns off the surround sound effect. The additional... menu items BASS OR Bass Balance 50% L R and BALANCE can be selected and Surround Off adjusted in wide surround virtual area like ...
...SEL Select Audio NOTE: If TREBLE is selected you are adjusting Treble 50% treble. Use CURSOR PAD ̆ or ̄ to select menu item. 2. Press CURSOR PAD ̇ or ̈ to the rear of the Plasma TV internal speakers. Off : turns off the surround sound effect. The additional... menu items BASS OR Bass Balance 50% L R and BALANCE can be selected and Surround Off adjusted in wide surround virtual area like ...
Owners Guide
Page 56
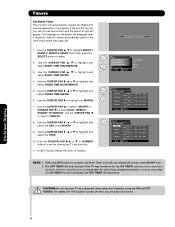
Timers Set Event Timer This function will automatically operate the Plasma TV viewing reservation of the MONTH. 9. Use the CURSOR PAD ̆, ̄ to ...NOTE: 1. CAUTION: Do not use this time. On-Screen Display 56 If the clock is not set the channel the TV will appear. Use the CURSOR PAD ̆, ̄ to highlight EVENT 1, EVENT 2, EVENT 3, EVENT 4 and then ... AM Jan. 1 2007 Cable ------- ❑ Event3 : -- : -- The OFF TIMER will only activate if the TV was turned on the screen will disappear after the ON TIMER has been activated, the OFF TIMER will only display the ...
Timers Set Event Timer This function will automatically operate the Plasma TV viewing reservation of the MONTH. 9. Use the CURSOR PAD ̆, ̄ to ...NOTE: 1. CAUTION: Do not use this time. On-Screen Display 56 If the clock is not set the channel the TV will appear. Use the CURSOR PAD ̆, ̄ to highlight EVENT 1, EVENT 2, EVENT 3, EVENT 4 and then ... AM Jan. 1 2007 Cable ------- ❑ Event3 : -- : -- The OFF TIMER will only activate if the TV was turned on the screen will disappear after the ON TIMER has been activated, the OFF TIMER will only display the ...
Owners Guide
Page 64
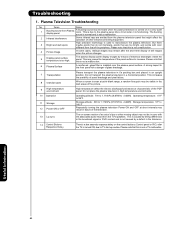
... in it is turned ON; Please note that this is installed over the plasma panel surface. Please note that this is not a malfunction. 6 Plasma Surface A reinforced glass filter is not a TV malfunction. But there maybe points that do not illuminate, points that are emitted from that... residual images may be visible in an upright position. due to -2,484ft). Items Notes 1 Buzzing sound from the TV's speakers. Do not transport the plasma television in the television. 14 Control Buttons Response Delay There's a few seconds response delay on -screen motion of ...
... in it is turned ON; Please note that this is installed over the plasma panel surface. Please note that this is not a malfunction. 6 Plasma Surface A reinforced glass filter is not a TV malfunction. But there maybe points that do not illuminate, points that are emitted from that... residual images may be visible in an upright position. due to -2,484ft). Items Notes 1 Buzzing sound from the TV's speakers. Do not transport the plasma television in the television. 14 Control Buttons Response Delay There's a few seconds response delay on -screen motion of ...


