Owners Guide
Page 5
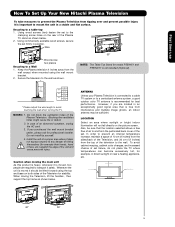
... inches) 10 cm (4 inches) 42" 50" 5 Do not install by yourself. ...Plasma Television is connected to a cable TV system or to the wall as shown below . First time use How To Set Up Your New Hitachi Plasma Television To take measures to prevent the Plasma...picture screen. Secure the television to a centralized antenna system, a good outdoor color TV antenna is recommended for example, in . 10 cm * Please adjust the wire length to avoid touching the wall when turning the TV. NOTES: 1. Using wood screws (two) fasten the set . Do not block the ventilation holes of the Plasma TV...
... inches) 10 cm (4 inches) 42" 50" 5 Do not install by yourself. ...Plasma Television is connected to a cable TV system or to the wall as shown below . First time use How To Set Up Your New Hitachi Plasma Television To take measures to prevent the Plasma...picture screen. Secure the television to a centralized antenna system, a good outdoor color TV antenna is recommended for example, in . 10 cm * Please adjust the wire length to avoid touching the wall when turning the TV. NOTES: 1. Using wood screws (two) fasten the set . Do not block the ventilation holes of the Plasma TV...

Owners Guide
Page 9
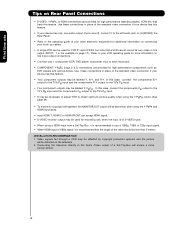
.... R 4" Minimum If the TV's audio output will be connected to a Hi-Fi system's external speakers, the best audio performance will require some experimentation with speaker placement for the antenna mixer. Plug the adapter into the antenna terminal on the screen. Consult your new HITACHI Plasma Television VIEWING The best picture is recommended. 9 AIR / CABLE...
.... R 4" Minimum If the TV's audio output will be connected to a Hi-Fi system's external speakers, the best audio performance will require some experimentation with speaker placement for the antenna mixer. Plug the adapter into the antenna terminal on the screen. Consult your new HITACHI Plasma Television VIEWING The best picture is recommended. 9 AIR / CABLE...
Owners Guide
Page 10
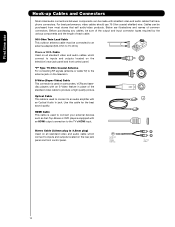
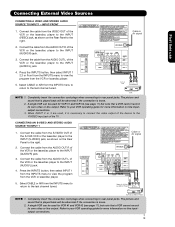
...an S-Video feature in place of the standard video cable to produce a high quality picture. Use this cable for the best sound quality. Below are illustrations and names of ...panel and front control panel. "F" Type 75-Ohm Coaxial Antenna For connecting RF signals (antenna or cable TV) to inputs and outputs located on camcorders, VCRs and laserdisc players with shielded video and audio cables that... OUT 3.8mm STEREO MINI-PLUG 2 RCA TYPE PLUGS 10 HDMI Cable This cable is used to the TV's HDMI input. Phono or RCA Cable Used on all standard video and audio cable which connect to 75...
...an S-Video feature in place of the standard video cable to produce a high quality picture. Use this cable for the best sound quality. Below are illustrations and names of ...panel and front control panel. "F" Type 75-Ohm Coaxial Antenna For connecting RF signals (antenna or cable TV) to inputs and outputs located on camcorders, VCRs and laserdisc players with shielded video and audio cables that... OUT 3.8mm STEREO MINI-PLUG 2 RCA TYPE PLUGS 10 HDMI Cable This cable is used to the TV's HDMI input. Phono or RCA Cable Used on all standard video and audio cable which connect to 75...
Owners Guide
Page 11
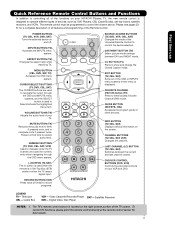
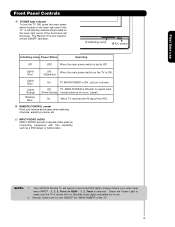
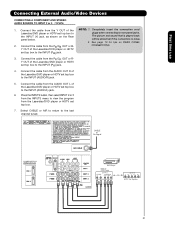
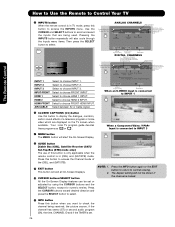
... third time to enter/access Favorite Channel (FAV) mode. NUMERIC BUTTONS (TV, DVD, CBL, SAT, VCR) Used to manually enter the TV channel, and used for a complete description of all of the functions on your HITACHI Plasma TV, the new remote control is designed to operate different types of the Universal... NIGHT mode. The remote control must be programmed to record programs. LEGEND TV- MUTE BUTTON (TV) Reduces the audio level to 50% if pressed once, and to show and change the Closed Caption mode. CC BUTTON (TV) Press to complete mute if pressed twice. GUIDE BUTTON (SAT/STB, ...
... third time to enter/access Favorite Channel (FAV) mode. NUMERIC BUTTONS (TV, DVD, CBL, SAT, VCR) Used to manually enter the TV channel, and used for a complete description of all of the functions on your HITACHI Plasma TV, the new remote control is designed to operate different types of the Universal... NIGHT mode. The remote control must be programmed to record programs. LEGEND TV- MUTE BUTTON (TV) Reduces the audio level to 50% if pressed once, and to show and change the Closed Caption mode. CC BUTTON (TV) Press to complete mute if pressed twice. GUIDE BUTTON (SAT/STB, ...
Owners Guide
Page 13
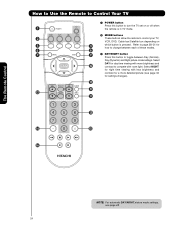
...HITACHI Plasma TV will illuminate. When the main power switch on the TV is ON. (Stand-by) Lights Blue Lights Orange Blinking Blue On TV MAIN POWER is selected. On When TV receives the IR signal from R/C. ቫ REMOTE CONTROL sensor Point your remote at this capability, such as a DVD player or Camcorders. picture... is now ready for connecting equipment with no signal input (Power Saving) except antenna (no video input when INPUT : 1, 2, 3, Front or HDMI : 1, 2, Front is ON ; NOTES: 1. The Plasma TV is shown. Off TV MAIN POWER is ON...
...HITACHI Plasma TV will illuminate. When the main power switch on the TV is ON. (Stand-by) Lights Blue Lights Orange Blinking Blue On TV MAIN POWER is selected. On When TV receives the IR signal from R/C. ቫ REMOTE CONTROL sensor Point your remote at this capability, such as a DVD player or Camcorders. picture... is now ready for connecting equipment with no signal input (Power Saving) except antenna (no video input when INPUT : 1, 2, 3, Front or HDMI : 1, 2, Front is ON ; NOTES: 1. The Plasma TV is shown. Off TV MAIN POWER is ON...
Owners Guide
Page 14
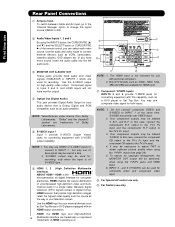
... equipment with an HDMI output connection. You may use with S-VIDEO output capability. In this case, connect the component CB output to the TV's PB input and the component CR output to change the signal source CABLE or AIR. S-VIDEO output may be abnormal, when using the ...Y-PBPR jacks and HDMI Input. 6. Do not connect composite VIDEO and S-VIDEO to obtain optimum picture quality when using the INPUTS button, the CURSOR PAD (̆ ቦ and ̄), and the SELECT button or CURSOR PAD ቪ ̈ of...
... equipment with an HDMI output connection. You may use with S-VIDEO output capability. In this case, connect the component CB output to the TV's PB input and the component CR output to change the signal source CABLE or AIR. S-VIDEO output may be abnormal, when using the ...Y-PBPR jacks and HDMI Input. 6. Do not connect composite VIDEO and S-VIDEO to obtain optimum picture quality when using the INPUTS button, the CURSOR PAD (̆ ቦ and ̄), and the SELECT button or CURSOR PAD ቪ ̈ of...
Owners Guide
Page 15
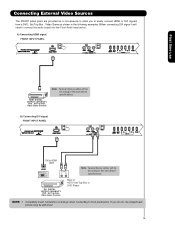
... Input jacks) : A) Connecting HDMI signal. Connecting External Video Sources The FRONT panel jacks are provided as a convenience to allow you do not, the played back picture may be according to the own device specifications. Back of HDTV Set-Top-Box or DVD Player NOTE: 1. If you to easily connect HDMI or...
... Input jacks) : A) Connecting HDMI signal. Connecting External Video Sources The FRONT panel jacks are provided as a convenience to allow you do not, the played back picture may be according to the own device specifications. Back of HDTV Set-Top-Box or DVD Player NOTE: 1. If you to easily connect HDMI or...
Owners Guide
Page 16
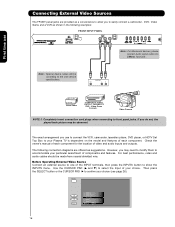
... wire. The exact arrangement you do not, the played back picture may need to modify them to easily connect a camcorder , DVD, Video Game and a VCR as suggestions. The following connection diagrams are provided as a convenience to allow you to accommodate your Plasma TV is dependent on the model and features of each component...
... wire. The exact arrangement you do not, the played back picture may need to modify them to easily connect a camcorder , DVD, Video Game and a VCR as suggestions. The following connection diagrams are provided as a convenience to allow you to accommodate your Plasma TV is dependent on the model and features of each component...
Owners Guide
Page 18
... input jacks. • Input HDMI 1, HDMI 2 or HDMI FRONT can be used for more normal picture. 18 In this case, connect the components CB output to the TV's PB input and the components CR output to the TV's PR input. • It may be used for VCR #1 and VCR #2, but note that a ... may be labeled Y-CBCR. In this case, connect the components B-Y output to the TV's PB input and the components R-Y output to the TV's PR input. • Your component outputs may be necessary to adjust TINT to obtain optimum picture quality when using the Y-PBPR inputs. (See page 34). • To ensure no...
... input jacks. • Input HDMI 1, HDMI 2 or HDMI FRONT can be used for more normal picture. 18 In this case, connect the components CB output to the TV's PB input and the components CR output to the TV's PR input. • It may be used for VCR #1 and VCR #2, but note that a ... may be labeled Y-CBCR. In this case, connect the components B-Y output to the TV's PB input and the components R-Y output to the TV's PR input. • Your component outputs may be necessary to adjust TINT to obtain optimum picture quality when using the Y-PBPR inputs. (See page 34). • To ensure no...
Owners Guide
Page 19
...Connect the cable from the AUDIO OUT L of the VCR or the laserdisc player to the INPUT (AUDIO/L) jack. 4. Cable or Air signal 5. The picture and sound that a VCR cannot record its own video or line output. Press the INPUTS button, then select INPUT 1 2,3 or Front from the INPUTS menu...or laserdisc player. 5. A single VCR can be used for more information on the Rear Panel to view the program from the VIDEO OUT of the TV . Connect the cable from the VCR or laserdisc player. Back of VCR or Laserdisc Player S-VIDEO Video L OUTPUT R VCR or Laserdisc Player NOTE:...
...Connect the cable from the AUDIO OUT L of the VCR or the laserdisc player to the INPUT (AUDIO/L) jack. 4. Cable or Air signal 5. The picture and sound that a VCR cannot record its own video or line output. Press the INPUTS button, then select INPUT 1 2,3 or Front from the INPUTS menu...or laserdisc player. 5. A single VCR can be used for more information on the Rear Panel to view the program from the VIDEO OUT of the TV . Connect the cable from the VCR or laserdisc player. Back of VCR or Laserdisc Player S-VIDEO Video L OUTPUT R VCR or Laserdisc Player NOTE:...

Owners Guide
Page 20
The picture and sound that encrypts video signals when using a DVI to prevent illegal copying of the HDTV set top box or DVD player to rear panel ...
The picture and sound that encrypts video signals when using a DVI to prevent illegal copying of the HDTV set top box or DVD player to rear panel ...
Owners Guide
Page 21
... from the AUDIO OUT R of the Laserdisc/DVD player or HDTV set top box to the INPUT (Y) jack, as shown on REAR PANEL CONNECTIONS. 5. The picture and sound that is played back will be abnormal if the connection is loose. 2. CABLE or Air signal DVD Player Back of the Laserdisc/DVD...
... from the AUDIO OUT R of the Laserdisc/DVD player or HDTV set top box to the INPUT (Y) jack, as shown on REAR PANEL CONNECTIONS. 5. The picture and sound that is played back will be abnormal if the connection is loose. 2. CABLE or Air signal DVD Player Back of the Laserdisc/DVD...
Owners Guide
Page 24
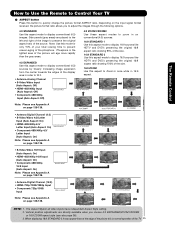
...remote to control your TV, VCR, DVD, Cable box/Satellite box depending on ´ ¿ » ² which button is pressed. Select µ DAY for day time viewing with more brightness and contrast to compete with less brightness and contrast for a more detailed picture (see page 48...185; ¸ Ƹ ƹ ƺ ƻ NOTE: For automatic DAY/NIGHT picture mode settings, see page 34 for night time viewing with room light. The Remote Control How to Use the Remote to Control Your TV ³ POWER button Press this button to toggle between Day (Normal), Day (Dynamic) and...
...remote to control your TV, VCR, DVD, Cable box/Satellite box depending on ´ ¿ » ² which button is pressed. Select µ DAY for day time viewing with more brightness and contrast to compete with less brightness and contrast for a more detailed picture (see page 48...185; ¸ Ƹ ƹ ƺ ƻ NOTE: For automatic DAY/NIGHT picture mode settings, see page 34 for night time viewing with room light. The Remote Control How to Use the Remote to Control Your TV ³ POWER button Press this button to toggle between Day (Normal), Day (Dynamic) and...
Owners Guide
Page 25
...; HDMI-720p/1080i/1080p Input • Component-720p/1080i Input IMA G E INPUT 1 2 Note: Please see Appendix A on the input signal format received, the picture format ratio allows you choose 4:3 EXPANDED/ZOOM1/ZOOM2 or 16:9 ZOOM aspect style (see also page 36). 3. The Aspect Style in on page 138-139... the original aspect ratio of the source. Note: Use this mode for only 15% of your total viewing time to prevent uneven aging of the TV 25 Note: Please see Appendix A on page 138-139. 1 • Antenna-Digital Channel (4:3) • S-Video/Video 4:3/Letter Input (Auto Aspect: On) &#...
...; HDMI-720p/1080i/1080p Input • Component-720p/1080i Input IMA G E INPUT 1 2 Note: Please see Appendix A on the input signal format received, the picture format ratio allows you choose 4:3 EXPANDED/ZOOM1/ZOOM2 or 16:9 ZOOM aspect style (see also page 36). 3. The Aspect Style in on page 138-139... the original aspect ratio of the source. Note: Use this mode for only 15% of your total viewing time to prevent uneven aging of the TV 25 Note: Please see Appendix A on page 138-139. 1 • Antenna-Digital Channel (4:3) • S-Video/Video 4:3/Letter Input (Auto Aspect: On) &#...
Owners Guide
Page 26
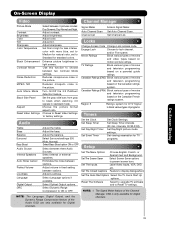
... Time INFO Show Name 3:00PM- 3:30PM REGION 5 ST DTvCC TV-G D 1080i Air 15-1 KPBS-HD 3:17PM Main Picture Source and channel indication Broadcast channel identification Clock Audio Alternate Broadcast Picture Format Broadcast Rating Rating Program Desctiption (Press INFO again for numeric entries...ANALOG CHANNELS Analog Channel Show Name 3:00PM- 3:30PM ST TV-G A 480i Air 8 KXYZ-HD 3:17PM Main Picture Source and channel indication Broadcast channel identification Clock Audio Broadcast Broadcast Rating Picture Format Auto STEREO 10:00 AM Closed Audio Source Caption...
... Time INFO Show Name 3:00PM- 3:30PM REGION 5 ST DTvCC TV-G D 1080i Air 15-1 KPBS-HD 3:17PM Main Picture Source and channel indication Broadcast channel identification Clock Audio Alternate Broadcast Picture Format Broadcast Rating Rating Program Desctiption (Press INFO again for numeric entries...ANALOG CHANNELS Analog Channel Show Name 3:00PM- 3:30PM ST TV-G A 480i Air 8 KXYZ-HD 3:17PM Main Picture Source and channel indication Broadcast channel identification Clock Audio Broadcast Broadcast Rating Picture Format Auto STEREO 10:00 AM Closed Audio Source Caption...
Owners Guide
Page 33
... the bass. Set Sleep Timer intervals (30 min. Adjust volume in fixed setting between 3 pictures modes; Select Language options if available. Enhance picture brightness in standard mode. TV Ratings Block various types of movies and television programming MPEG NR Auto Movie Mode Black Side Panel... and to ON or OFF. DRC Select Dynamic Range Compression to Reset TV settings. Change Access Code Change Lock access code. Turn On/Off the 3:2 Pulldown detection feature. Set Day/Night picture mode settings. Canadian Ratings (FRN) Block various types of movies and ...
... the bass. Set Sleep Timer intervals (30 min. Adjust volume in fixed setting between 3 pictures modes; Select Language options if available. Enhance picture brightness in standard mode. TV Ratings Block various types of movies and television programming MPEG NR Auto Movie Mode Black Side Panel... and to ON or OFF. DRC Select Dynamic Range Compression to Reset TV settings. Change Access Code Change Lock access code. Turn On/Off the 3:2 Pulldown detection feature. Set Day/Night picture mode settings. Canadian Ratings (FRN) Block various types of movies and ...
Owners Guide
Page 34
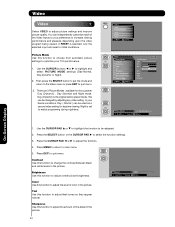
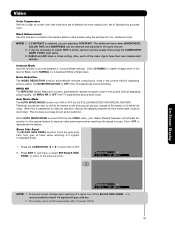
... the contrast between black and white levels in the picture. Video Audio Channel Manager Locks Timers Setup Move SEL Select Video Cable Picture Mode Day (Dynamic) OR Contrast 100% Brightness 50% Color 62% Tint Sharpness 50% Color Temperature High Black Enhancement High Contrast Mode Dynamic...Inputs to increase viewing performance and pleasure depending upon the video program being viewed. Picture Mode Use this function to choose from automatic picture settings to optimize your preference to your TV's performance. 1. Press the SELECT button or the CURSOR PAD ̈ to ...
... the contrast between black and white levels in the picture. Video Audio Channel Manager Locks Timers Setup Move SEL Select Video Cable Picture Mode Day (Dynamic) OR Contrast 100% Brightness 50% Color 62% Tint Sharpness 50% Color Temperature High Black Enhancement High Contrast Mode Dynamic...Inputs to increase viewing performance and pleasure depending upon the video program being viewed. Picture Mode Use this function to choose from automatic picture settings to optimize your preference to your TV's performance. 1. Press the SELECT button or the CURSOR PAD ̈ to ...
Owners Guide
Page 35
...screen damage when watching 4:3 signal, turn ON or OFF the 3:2 PULLDOWN DETECTION SPECIAL FEATURE. This setting return to OFF if the TV experiences picture blocking. MPEG NR The MPEG NR (Noise Reduction) function automatically reduces mosquito noise in Standard mode. 1. If CONTRAST is recommended to...known as 3:2 pulldown. Black Side Panel The BLACK SIDE PANEL function turns the gray side bars from the VIDEO menu, your Hitachi Plasma Television will activate the circuitry for this special feature to improve video performance when watching film based sources. Contrast Mode Use this ...
...screen damage when watching 4:3 signal, turn ON or OFF the 3:2 PULLDOWN DETECTION SPECIAL FEATURE. This setting return to OFF if the TV experiences picture blocking. MPEG NR The MPEG NR (Noise Reduction) function automatically reduces mosquito noise in Standard mode. 1. If CONTRAST is recommended to...known as 3:2 pulldown. Black Side Panel The BLACK SIDE PANEL function turns the gray side bars from the VIDEO menu, your Hitachi Plasma Television will activate the circuitry for this special feature to improve video performance when watching film based sources. Contrast Mode Use this ...
Owners Guide
Page 36
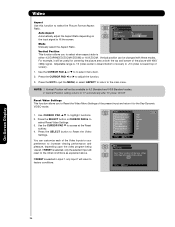
... automatically after TV power On/Off. Press the CURSOR PAD ̇ or ̈ to highlight functions. 2. Vertical Position will be useful for centering the picture area at the Reset softkey. 4. Use CURSOR PAD ̆,̄ to adjust the function. 3. Vertical position can customize each of the picture with these ...button or CURSOR PAD ̈ to access at both the top and bottom of the Video Inputs to your preference to select the Picture Format Aspect Ratio. If RESET is either 4:3 EXPANDED/ZOOM1/ZOOM2 or 16:9 ZOOM. Video Color Temperature Black Enhancement Contrast Mode Noise ...
... automatically after TV power On/Off. Press the CURSOR PAD ̇ or ̈ to highlight functions. 2. Vertical Position will be useful for centering the picture area at the Reset softkey. 4. Use CURSOR PAD ̆,̄ to adjust the function. 3. Vertical position can customize each of the picture with these ...button or CURSOR PAD ̈ to access at both the top and bottom of the Video Inputs to your preference to select the Picture Format Aspect Ratio. If RESET is either 4:3 EXPANDED/ZOOM1/ZOOM2 or 16:9 ZOOM. Video Color Temperature Black Enhancement Contrast Mode Noise ...
Owners Guide
Page 41
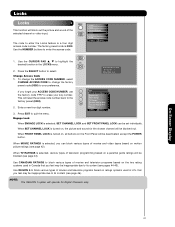
... [#Keys] Enter Code If you can be deactivated, except the POWER button. Engage Lock 0 Locks Change Access Code 0 Engage Lock Movie Ratings 0 TV Ratings 0 Canadian Ratings (Eng) Canadian Ratings (Frn) Region 5 Move SEL Select When ENGAGE LOCK is 0000. When MOVIE RATINGS is selected, you ...movies and television pograms based on a parental guide ratings will be inappropriate due to erase your preference. When TV RATINGS is turned on, all buttons on motion picture ratings (see page 43). Use REGION 5 to your key number. To change the ACCESS CODE NUMBER, ...
... [#Keys] Enter Code If you can be deactivated, except the POWER button. Engage Lock 0 Locks Change Access Code 0 Engage Lock Movie Ratings 0 TV Ratings 0 Canadian Ratings (Eng) Canadian Ratings (Frn) Region 5 Move SEL Select When ENGAGE LOCK is 0000. When MOVIE RATINGS is selected, you ...movies and television pograms based on a parental guide ratings will be inappropriate due to erase your preference. When TV RATINGS is turned on, all buttons on motion picture ratings (see page 43). Use REGION 5 to your key number. To change the ACCESS CODE NUMBER, ...


