Instruction Manual
Page 4
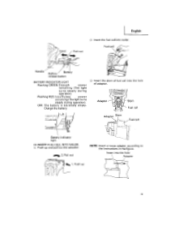
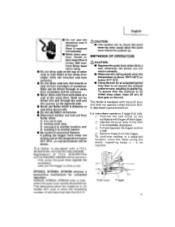
...SIGNAL WORDS DANGER indicates an imminently hazardous situation which contain the operation and maintenance instructions. EXPLANATION OF THE NAILING ACTION OF THE HITACHI NAILER 0 This tool has a FULL SEQUENTIAL ACTUATION MECHANISM. An accident can often be avoided to observe basic safety rules or ...this Manual. Most accidents that must be avoided by recognizing a potentially hazardous situation before operating or maintaining this nailer. Never use this Nailer for applications other than those specified in this Manual. First, press the push lever against the workpiece; Basic ...
...SIGNAL WORDS DANGER indicates an imminently hazardous situation which contain the operation and maintenance instructions. EXPLANATION OF THE NAILING ACTION OF THE HITACHI NAILER 0 This tool has a FULL SEQUENTIAL ACTUATION MECHANISM. An accident can often be avoided to observe basic safety rules or ...this Manual. Most accidents that must be avoided by recognizing a potentially hazardous situation before operating or maintaining this nailer. Never use this Nailer for applications other than those specified in this Manual. First, press the push lever against the workpiece; Basic ...
Instruction Manual
Page 5
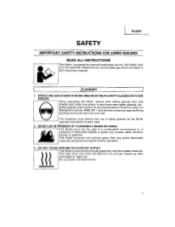
...WORK AREA MUST WEAR SAFETY GLASSES WITH SIDE SHIELDS. This Nailer produces hot exhaust gases that may ignite flammable materials and produces sparks during operation. 3. Do not touch with dispensers for combustible gas which are listed in this instruction manual. & DANGER ... thinner or gasoline. This Nailer produces hot exhaust gases that may flammable materials. English SAFETY IMPORTANT SAFETY INSTRUCTIONS FOR USING NAILERS READ ALL INSTRUCTIONS This Nailer is powered by the Nailer operator and others in work area. 2. When operating the Nailer, always wear safety glasses ...
...WORK AREA MUST WEAR SAFETY GLASSES WITH SIDE SHIELDS. This Nailer produces hot exhaust gases that may ignite flammable materials and produces sparks during operation. 3. Do not touch with dispensers for combustible gas which are listed in this instruction manual. & DANGER ... thinner or gasoline. This Nailer produces hot exhaust gases that may flammable materials. English SAFETY IMPORTANT SAFETY INSTRUCTIONS FOR USING NAILERS READ ALL INSTRUCTIONS This Nailer is powered by the Nailer operator and others in work area. 2. When operating the Nailer, always wear safety glasses ...
Instruction Manual
Page 6
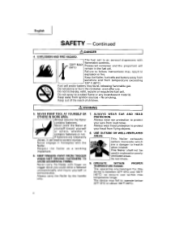
...remain in the fuel cell. Always wear head protection to health when inhaled. This Nailer shall not be used in , DANGER 4. The device may burst, releasing flammable gas. Never point the Nailer at yourself toward yourself or others, whether it can lead to protect your head from... loud noise. Always wear ear protection to severe injuries. Always carry the Nailer by the handle only. 7. ALWAYS WEAR ...
...remain in the fuel cell. Always wear head protection to health when inhaled. This Nailer shall not be used in , DANGER 4. The device may burst, releasing flammable gas. Never point the Nailer at yourself toward yourself or others, whether it can lead to protect your head from... loud noise. Always wear ear protection to severe injuries. Always carry the Nailer by the handle only. 7. ALWAYS WEAR ...
Instruction Manual
Page 7
... downward. 17. KEEP FACE, HANDS AND FEET AWAY FROM FIRING HEAD DURING USE. Store indoors at too steep of entry. 18. KEEP VISITORS AWAY. All visitors should be store in tool case and in a vehicle. Remove fuel cell and battery, and then make sure...firing head. DO NOT LOAD FASTENERS WITH TRIGGER OR PUSH LEVER DEPRESSED. Do not let visitors handle the Nailer. When not in use the Nailer unless the push lever is operating properly, otherwise the Nailer could drive a fastener unexpectedly. Look the storage area. 11. Wear protective hair covering to its original ...
... downward. 17. KEEP FACE, HANDS AND FEET AWAY FROM FIRING HEAD DURING USE. Store indoors at too steep of entry. 18. KEEP VISITORS AWAY. All visitors should be store in tool case and in a vehicle. Remove fuel cell and battery, and then make sure...firing head. DO NOT LOAD FASTENERS WITH TRIGGER OR PUSH LEVER DEPRESSED. Do not let visitors handle the Nailer. When not in use the Nailer unless the push lever is operating properly, otherwise the Nailer could drive a fastener unexpectedly. Look the storage area. 11. Wear protective hair covering to its original ...
Instruction Manual
Page 8
...to be operated by checking for live wires. 26. Do not drop the Nailer or strike the Nailer against hard surfaces; and do not scratch or engrave signs on the Nailer. Only service personnel trained by a Hitachi authorized service center. 24. Use common sense. Never attempt to clear a jam...warranty and can lead to ensure there are under the influence of the Nailer and removed all OTHER THAN THOSE SPECIFIED IN THIS times. USE ONLY PARTS, ACCESSORIES OR FASTENERS SUPPLIED OR RECOMMENDED BY HITACHI. Turn off the breaker switch to malfunction and resulting injuries. DO NOT...
...to be operated by checking for live wires. 26. Do not drop the Nailer or strike the Nailer against hard surfaces; and do not scratch or engrave signs on the Nailer. Only service personnel trained by a Hitachi authorized service center. 24. Use common sense. Never attempt to clear a jam...warranty and can lead to ensure there are under the influence of the Nailer and removed all OTHER THAN THOSE SPECIFIED IN THIS times. USE ONLY PARTS, ACCESSORIES OR FASTENERS SUPPLIED OR RECOMMENDED BY HITACHI. Turn off the breaker switch to malfunction and resulting injuries. DO NOT...
Instruction Manual
Page 11
... the battery or battery charger in use. • Improper use an engine generator or DC power to avoid overheating the charger. 14. To avoid these instructions to serious injury. NEVER disassemble the...other voltage may cause an accident. 11 NEVER 4. NEVER 8. English SAFETY - REMEMBER: USE ONLY HITACHI BATTERY TYPE EBM315. charge outdoors. insert foreign objects into the battery charger's air vents. Do ...or above 104°F (40°C). NEVER 6. use the Nailer. If you use a booster transformer when charging. ALWAYS wait at least 15 minutes between charges to charge...
... the battery or battery charger in use. • Improper use an engine generator or DC power to avoid overheating the charger. 14. To avoid these instructions to serious injury. NEVER disassemble the...other voltage may cause an accident. 11 NEVER 4. NEVER 8. English SAFETY - REMEMBER: USE ONLY HITACHI BATTERY TYPE EBM315. charge outdoors. insert foreign objects into the battery charger's air vents. Do ...or above 104°F (40°C). NEVER 6. use the Nailer. If you use a booster transformer when charging. ALWAYS wait at least 15 minutes between charges to charge...
Instruction Manual
Page 12
... result in your local solid waste officials for recycling options or proper disposal. Using a different cable could result in an accident. 5. Maintain Nailers properly. 6. EMPLOYER'S RESPONSIBILITIES 1. English SAFETY -- Do not place the battery charger on a blanket-type car seat cover or car mat during... charging. Ensure that you have purchased contains a rechargeable battery. Enforce the use the cable provided. Ensure that Nailers are not further used only when operators and others in a fire or accident due to dispose of EYE PROTECTOR by operators and...
... result in your local solid waste officials for recycling options or proper disposal. Using a different cable could result in an accident. 5. Maintain Nailers properly. 6. EMPLOYER'S RESPONSIBILITIES 1. English SAFETY -- Do not place the battery charger on a blanket-type car seat cover or car mat during... charging. Ensure that you have purchased contains a rechargeable battery. Enforce the use the cable provided. Ensure that Nailers are not further used only when operators and others in a fire or accident due to dispose of EYE PROTECTOR by operators and...

Instruction Manual
Page 13
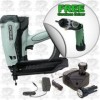
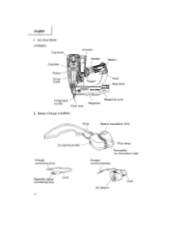
Gas Finish Nailer Top cover Actuator Chamber Handle Top cover Chamber Actuator Handle Battery Piston Driver blade (,:Battery Trigger Al / Hook r-)c _/ -7,71-770Ga gonsme H Firing head (outlet) Magazine ... Some illustrations in this Manual is designed to assist you in this Manual may show details or attachments that differ from those on your own Nailer. English OPERATION NOTE: The information contained in the safe operation of the...
Gas Finish Nailer Top cover Actuator Chamber Handle Top cover Chamber Actuator Handle Battery Piston Driver blade (,:Battery Trigger Al / Hook r-)c _/ -7,71-770Ga gonsme H Firing head (outlet) Magazine ... Some illustrations in this Manual is designed to assist you in this Manual may show details or attachments that differ from those on your own Nailer. English OPERATION NOTE: The information contained in the safe operation of the...
Instruction Manual
Page 14
Gas Brad Nailer Top cover Chamber Actuator Handle Battery Piston I Connecting socket Charger connecting plug Pilot lamp Nameplate (on the bottom side) Charger connecting plug Cigarette lighter connecting plug Cord 14 AC adapter Cord Battery Charger (UC3SML) Strap Battery installation hole I Driver blade CC' Trigger Hook Stop lever 4!' English 2. gtazia Firing head (outlet) Push lever Magazine cover Magazine 3.
Gas Brad Nailer Top cover Chamber Actuator Handle Battery Piston I Connecting socket Charger connecting plug Pilot lamp Nameplate (on the bottom side) Charger connecting plug Cigarette lighter connecting plug Cord 14 AC adapter Cord Battery Charger (UC3SML) Strap Battery installation hole I Driver blade CC' Trigger Hook Stop lever 4!' English 2. gtazia Firing head (outlet) Push lever Magazine cover Magazine 3.
Instruction Manual
Page 15
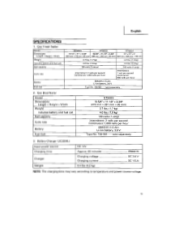
... DC 1.5 A NOTE: The charging time may vary according to temperature and power source voltage. 15 English SPECIFICATIONS 1. Gas Brad Nailer Model Dimensions Length x Height x Width Weight Includes battery and fuel cell Nail capacity Cycle rate Battery Fuel Cell NT50GS 10-5/8" x 11-1/8" x 3-3/8" (270 mm x 281 mm x 85... mm) 3.7 lbs. (1.7 kg) 4.0 lbs. (1.8 kg) 100 nails (1 strip) Intermittent: 2 nails per second Continuous: 1,000 nails per hour EBM315 (1.5 Ah) Li-ion battery, 3.6 V Type No. 728-981 sold separately 3. Gas Finish Nailer...
... DC 1.5 A NOTE: The charging time may vary according to temperature and power source voltage. 15 English SPECIFICATIONS 1. Gas Brad Nailer Model Dimensions Length x Height x Width Weight Includes battery and fuel cell Nail capacity Cycle rate Battery Fuel Cell NT50GS 10-5/8" x 11-1/8" x 3-3/8" (270 mm x 281 mm x 85... mm) 3.7 lbs. (1.7 kg) 4.0 lbs. (1.8 kg) 100 nails (1 strip) Intermittent: 2 nails per second Continuous: 1,000 nails per hour EBM315 (1.5 Ah) Li-ion battery, 3.6 V Type No. 728-981 sold separately 3. Gas Finish Nailer...
Instruction Manual
Page 16
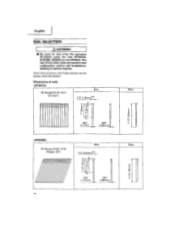
... Nailer. iEn - N - eti cNT65GB> 16 Gauge finish nails (Angle: 201 Min. .110" (2 8mm) E. _ . ...t - .r in tool malfunction and/or nail breakdown, leading to use of nails 16 Gauge finish nails (straight) Min. .110" (2.8mmln - - English NAIL SELECTION A WARNING • Be sure to serious injuries. The use only the genuine HITACHI nails for the NT65GS, NT65GB, NT65GA or the NT50GS...
... Nailer. iEn - N - eti cNT65GB> 16 Gauge finish nails (Angle: 201 Min. .110" (2 8mm) E. _ . ...t - .r in tool malfunction and/or nail breakdown, leading to use of nails 16 Gauge finish nails (straight) Min. .110" (2.8mmln - - English NAIL SELECTION A WARNING • Be sure to serious injuries. The use only the genuine HITACHI nails for the NT65GS, NT65GB, NT65GA or the NT50GS...
Instruction Manual
Page 21
...of reach of children or unauthorized personnel. To attach the metering valve to reuse the metering valve. Do not inhale. 1 • Keep the Nailer, .- 120°F MAX fuel cell and (50°C) battery away from sunshine and from temperature exceeding 120°F (50°C). •...SAFETY INSTRUCTIONS FOR FUEL CELL" (page 9). COLD WEATHER CARE O Do not store the Nailer, fuel cell and battery in a warm area until beginning the work. Observe temperature limit of fuel cell away from the gas cartridge. 0 21 Replace with the new metering valve. • Do not attempt to...
...of reach of children or unauthorized personnel. To attach the metering valve to reuse the metering valve. Do not inhale. 1 • Keep the Nailer, .- 120°F MAX fuel cell and (50°C) battery away from sunshine and from temperature exceeding 120°F (50°C). •...SAFETY INSTRUCTIONS FOR FUEL CELL" (page 9). COLD WEATHER CARE O Do not store the Nailer, fuel cell and battery in a warm area until beginning the work. Observe temperature limit of fuel cell away from the gas cartridge. 0 21 Replace with the new metering valve. • Do not attempt to...

Instruction Manual
Page 22
...have enough power and it needs to ANSI Z87.1 specifications. Replace it seals. Conduct the tests in page 18 - 20. u THE PUSH LEVER AND TRIGGER MUST MOVE SMOOTHLY with pulling back the nail feeder (B). (NT50GS: Unnecessary to pulling back nail feeder) Trigger TESTING THE NAILER L, ...Nailer and contact a Hitachi authorized service center immediately. (1) REMOVE ALL NAILS, FUEL CELL AND BATTERY FROM NAILER. Make sure the battery indicator light is empty. You must charge the battery before use Nailer unless push lever is now ready to throw the push lever tip onto wood. If gas...
...have enough power and it needs to ANSI Z87.1 specifications. Replace it seals. Conduct the tests in page 18 - 20. u THE PUSH LEVER AND TRIGGER MUST MOVE SMOOTHLY with pulling back the nail feeder (B). (NT50GS: Unnecessary to pulling back nail feeder) Trigger TESTING THE NAILER L, ...Nailer and contact a Hitachi authorized service center immediately. (1) REMOVE ALL NAILS, FUEL CELL AND BATTERY FROM NAILER. Make sure the battery indicator light is empty. You must charge the battery before use Nailer unless push lever is now ready to throw the push lever tip onto wood. If gas...
Instruction Manual
Page 23
... hole Adapter 23 oars 2. Pull out 0 1. Insert Pull out rr English Insert the fuel cell into nailer. Flashing RED: Insufficient power remaining (The light turns steady during operation). Fuel cell Handle Battery Battery release button BATTERY INDICATOR LIGHT Flashing GREEN: ...Enough power remaining (The light turns steady during operation). CS Adapter Stem Fuel cell Adapter Stem tut Fuel cell Battery indicator light (3) INSERT FUEL CELL INTO NAILER. (i) Push up NOTE: Insert a loose adapter according...
... hole Adapter 23 oars 2. Pull out 0 1. Insert Pull out rr English Insert the fuel cell into nailer. Flashing RED: Insufficient power remaining (The light turns steady during operation). Fuel cell Handle Battery Battery release button BATTERY INDICATOR LIGHT Flashing GREEN: ...Enough power remaining (The light turns steady during operation). CS Adapter Stem Fuel cell Adapter Stem tut Fuel cell Battery indicator light (3) INSERT FUEL CELL INTO NAILER. (i) Push up NOTE: Insert a loose adapter according...
Instruction Manual
Page 24
... LOADING NAILS 6, WARNING • When loading nails into the workpiece that is observed, you may load nails in the actual application. Drive nails into Nailer, 1) do not pull trigger; 2) do not depress push lever; Swing back tl (4) Remove the finger from the trigger and press the push lever... against the workpiece with pulling back the nail feeder (B). (NT50GS: Unnecessary to be used in the Nailer. El THE NAILER MUST OPERATE PROPERLY. and 3) keep Nailer pointed downward. English (It) Close the actuator. 4 2.
... LOADING NAILS 6, WARNING • When loading nails into the workpiece that is observed, you may load nails in the actual application. Drive nails into Nailer, 1) do not pull trigger; 2) do not depress push lever; Swing back tl (4) Remove the finger from the trigger and press the push lever... against the workpiece with pulling back the nail feeder (B). (NT50GS: Unnecessary to be used in the Nailer. El THE NAILER MUST OPERATE PROPERLY. and 3) keep Nailer pointed downward. English (It) Close the actuator. 4 2.
Instruction Manual
Page 25
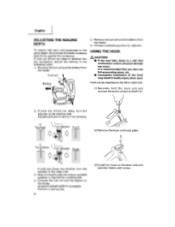
... the points of nails in page 17 can be loaded onto the side guide groove of nails in contact with Groove. 25 Pull out The Nailer is now ready to the nail strip. Removing the nails: (j) Pull the nail feeder (B) backward. (z) Return the nail feeder (B) forward quietly while pushing the nail...
... the points of nails in page 17 can be loaded onto the side guide groove of nails in contact with Groove. 25 Pull out The Nailer is now ready to the nail strip. Removing the nails: (j) Pull the nail feeder (B) backward. (z) Return the nail feeder (B) forward quietly while pushing the nail...
Instruction Manual
Page 26
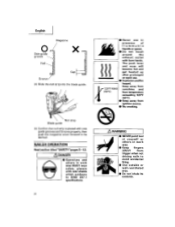
NAILER OPERATION Read section titled "SAFETY"(pages 5 -12). &DANGER • Operators and others in presence of flammable liquids or gases. • Do not touch around the ...
NAILER OPERATION Read section titled "SAFETY"(pages 5 -12). &DANGER • Operators and others in presence of flammable liquids or gases. • Do not touch around the ...
Instruction Manual
Page 27
... (2) Depress the push lever firmly until it repaired immediately. • Never place your face, hands or feet closer than 6 or 9. 27 This Nailer is depressed (upward position). METHODS OF OPERATION QI CAUTION • Squeeze the push lever when drive a nail, otherwise the piston can be pushed up...top of workpiece. It is intermittent operation (Trigger fire) only. (I) Position the nail outlet on the opposite side. • Never use Nailer which is not in use the electrical cord if damaged. This takes place when the magazine is completely depressed. (4) Pull and squeeze the ...
... (2) Depress the push lever firmly until it repaired immediately. • Never place your face, hands or feet closer than 6 or 9. 27 This Nailer is depressed (upward position). METHODS OF OPERATION QI CAUTION • Squeeze the push lever when drive a nail, otherwise the piston can be pushed up...top of workpiece. It is intermittent operation (Trigger fire) only. (I) Position the nail outlet on the opposite side. • Never use Nailer which is not in use the electrical cord if damaged. This takes place when the magazine is completely depressed. (4) Pull and squeeze the ...
Instruction Manual
Page 28
... ® Stop turning the adjuster when a suitable ) position is a risk that malfunction and/or physical damage can be sure that the Nailer is recommended that each nail penetrates to the same depth, be installed on the other side and securely fasten with screw. Connect the fuel cell... GLASSES. It is always held firmly against the workpiece. English ADJUSTING THE NAILING DEPTH (a,) Remove the fuel cell and the battery from the Nailer. To assure that you also use fall-preventing wires, etc. • Incomplete installation of the hook may result in bodily injury when used...
... ® Stop turning the adjuster when a suitable ) position is a risk that malfunction and/or physical damage can be sure that the Nailer is recommended that each nail penetrates to the same depth, be installed on the other side and securely fasten with screw. Connect the fuel cell... GLASSES. It is always held firmly against the workpiece. English ADJUSTING THE NAILING DEPTH (a,) Remove the fuel cell and the battery from the Nailer. To assure that you also use fall-preventing wires, etc. • Incomplete installation of the hook may result in bodily injury when used...
Instruction Manual
Page 29
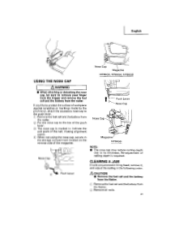
Nose Cap I ) Remove the fuel cell and the battery from the nailer. Push Lever Nose Cap Nose Cap Magazine NT5OGS NOTE: • The nose cap...from the trigger and remove the fuel cell and the battery from the Nailer. (2) Remove all nails. 29 A CAUTION • Remove the fuel cell and the battery from the Nailer. (I (s2)ti Push Lever - If you liketo protect the surface...push lever, attach the accessory nose cap to the push lever. (f) Remove the fuel cell and the battery from the nailer. (k) Put the nose cap to the toe of the push lever. (5) The nose cap is marked to its thickness....
Nose Cap I ) Remove the fuel cell and the battery from the nailer. Push Lever Nose Cap Nose Cap Magazine NT5OGS NOTE: • The nose cap...from the trigger and remove the fuel cell and the battery from the Nailer. (2) Remove all nails. 29 A CAUTION • Remove the fuel cell and the battery from the Nailer. (I (s2)ti Push Lever - If you liketo protect the surface...push lever, attach the accessory nose cap to the push lever. (f) Remove the fuel cell and the battery from the nailer. (k) Put the nose cap to the toe of the push lever. (5) The nose cap is marked to its thickness....


