
Owners Guide
Page 3
...direct connection to applicable laws. Note • There are no user serviceable parts inside the LCD television. • Model and serial numbers are covered in the instructions, as improper changes or modifications not expressly approved by TV...cable company. Recycle or dispose of a set-top box. Public viewing of copyrighted material Public viewing of receiving analog basic, digital basic cable television programming by U.S. ....epsc.ca (in trash. The mains plug is capable of programs broadcast by Hitachi could void the user's warranty. To prevent electric shock, do not expose this...
...direct connection to applicable laws. Note • There are no user serviceable parts inside the LCD television. • Model and serial numbers are covered in the instructions, as improper changes or modifications not expressly approved by TV...cable company. Recycle or dispose of a set-top box. Public viewing of copyrighted material Public viewing of receiving analog basic, digital basic cable television programming by U.S. ....epsc.ca (in trash. The mains plug is capable of programs broadcast by Hitachi could void the user's warranty. To prevent electric shock, do not expose this...

Owners Guide
Page 4
..., please access our web site at: www.hitachi.us/tv For Canada models: For optional accessories, please access our web site at: www.hitachi.ca/tv CAUTION: 1. Wall Mount unit is not recommended... Cable (Part No. Match the batteries to the (+) and (-) marks in leakage. 4 This LCD television product is WM07S. Insert two new "AA" size batteries for a maximum tilting angle of ... Power Swivel Cable For U.S. Accessories Check to swell or rupture resulting in the battery Bottom View (Remote Control) compartment. 4. CAUTION: Do not insert batteries with '+' and '-' polarities ...
..., please access our web site at: www.hitachi.us/tv For Canada models: For optional accessories, please access our web site at: www.hitachi.ca/tv CAUTION: 1. Wall Mount unit is not recommended... Cable (Part No. Match the batteries to the (+) and (-) marks in leakage. 4 This LCD television product is WM07S. Insert two new "AA" size batteries for a maximum tilting angle of ... Power Swivel Cable For U.S. Accessories Check to swell or rupture resulting in the battery Bottom View (Remote Control) compartment. 4. CAUTION: Do not insert batteries with '+' and '-' polarities ...

Owners Guide
Page 5
Keep the LCD television 4 inches away from the wall except when mounted using the wall mount bracket. 3. To avoid cabinet warping, cabinet color changes, and increased chance of set failure, do not place the TV where temperatures can become excessively hot, for example, in direct sunlight or near a heating appliance,...wire length to swivel slot of the Table Top Stand. First time use How To Set Up Your New Hitachi LCD Television To take measures to prevent the LCD Flat Panel Television from tipping over and prevent possible injury it should be lifted forward using the top and...
Keep the LCD television 4 inches away from the wall except when mounted using the wall mount bracket. 3. To avoid cabinet warping, cabinet color changes, and increased chance of set failure, do not place the TV where temperatures can become excessively hot, for example, in direct sunlight or near a heating appliance,...wire length to swivel slot of the Table Top Stand. First time use How To Set Up Your New Hitachi LCD Television To take measures to prevent the LCD Flat Panel Television from tipping over and prevent possible injury it should be lifted forward using the top and...

Owners Guide
Page 6
... pull the clamp to tighten the AC cord to the swivel slot of the TV are 2 plastic clamps to the TV. Located on the back of the LCD Rear Panel. First time use How to set up your new Hitachi LCD Television AC CORD AND POWER SWIVEL CABLE INSTALLATION INSTRUCTION The AC cord and power... swivel cable provided with your new LCD Flat Panel Television need to be held together with...
... pull the clamp to tighten the AC cord to the swivel slot of the TV are 2 plastic clamps to the TV. Located on the back of the LCD Rear Panel. First time use How to set up your new Hitachi LCD Television AC CORD AND POWER SWIVEL CABLE INSTALLATION INSTRUCTION The AC cord and power... swivel cable provided with your new LCD Flat Panel Television need to be held together with...

Owners Guide
Page 7
... possible injury. STAND METAL 5 SCREWS TV STAND BASE For Model L47S601 & L42S601 CAUTION- For dimensions of resulting in order to separate the TV from the TV. Use with Hitachi WM07S Wall Mount. Please access our web site at: www.hitachi.us/tv (US) or www.hitachi.ca/tv (CAN) for recommended accessories for the LCD TV depending on the back of...
... possible injury. STAND METAL 5 SCREWS TV STAND BASE For Model L47S601 & L42S601 CAUTION- For dimensions of resulting in order to separate the TV from the TV. Use with Hitachi WM07S Wall Mount. Please access our web site at: www.hitachi.us/tv (US) or www.hitachi.ca/tv (CAN) for recommended accessories for the LCD TV depending on the back of...

Owners Guide
Page 8
... into the antenna terminal on the screen. Consult your new HITACHI LCD Television VIEWING The best picture is recommended. 8 R 4" Minimum If the TV's audio output will be obtained by sitting directly in a different section of the TV, place the surround speakers to the side or behind the viewing area. Using a 75-Ohm coaxial cable is seen by...
... into the antenna terminal on the screen. Consult your new HITACHI LCD Television VIEWING The best picture is recommended. 8 R 4" Minimum If the TV's audio output will be obtained by sitting directly in a different section of the TV, place the surround speakers to the side or behind the viewing area. Using a 75-Ohm coaxial cable is seen by...
Owners Guide
Page 9
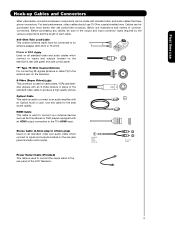
Below are illustrations and names of the LCD Television. 9 S-Video (Super Video) Cable This connector is used on the rear jack panel and side control panel. Stereo Cable (3.8mm plug to 3.5mm plug) ... 2 RCA TYPE PLUGS Power Swivel Cable (Provided) This cable is used to connect the swivel stand to the TV's HDMI input. "F" Type 75-Ohm Coaxial Antenna For connecting RF signals (antenna or cable TV) to 75-Ohm). First time use 75-Ohm coaxial shielded wire. Use this cable for the best sound...
Below are illustrations and names of the LCD Television. 9 S-Video (Super Video) Cable This connector is used on the rear jack panel and side control panel. Stereo Cable (3.8mm plug to 3.5mm plug) ... 2 RCA TYPE PLUGS Power Swivel Cable (Provided) This cable is used to connect the swivel stand to the TV's HDMI input. "F" Type 75-Ohm Coaxial Antenna For connecting RF signals (antenna or cable TV) to 75-Ohm). First time use 75-Ohm coaxial shielded wire. Use this cable for the best sound...

Owners Guide
Page 10
...and last channel viewed. SOURCE ACCESS BUTTONS (TV, DVD, PVR/VCR, SAT/CBL) Changes the mode of your VCR and DVD. FAVORITE CHANNEL (FAV CH) button (TV) Press to ...TV. To control TV functions, please point the remote control directly at the remote control sensor for change the Closed Caption mode. INPUTS BUTTON (TV) Accesses the INPUTS menu system. VCR precode is displayed. ASPECT BUTTON (TV... selected device on the right bottom portion of your HITACHI LCD TV, the new remote control is only available for TV mode.) INFO BUTTON (TV, STB, CBL, PVR) Displays various information on ...
...and last channel viewed. SOURCE ACCESS BUTTONS (TV, DVD, PVR/VCR, SAT/CBL) Changes the mode of your VCR and DVD. FAVORITE CHANNEL (FAV CH) button (TV) Press to ...TV. To control TV functions, please point the remote control directly at the remote control sensor for change the Closed Caption mode. INPUTS BUTTON (TV) Accesses the INPUTS menu system. VCR precode is displayed. ASPECT BUTTON (TV... selected device on the right bottom portion of your HITACHI LCD TV, the new remote control is only available for TV mode.) INFO BUTTON (TV, STB, CBL, PVR) Displays various information on ...

Owners Guide
Page 11
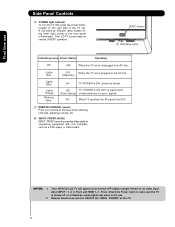
...this button to access the INPUT menu. The volume level will not be turn the LCD Television ON/OFF. In order to receive written notification, please complete and return your ...displayed on the TV screen. These buttons also serve as Set-Top-Boxes or DVD players equipped with an HDMI output connection (see page 14 for future software upgrades. Hitachi will notify ...This button allows you if a software upgrade is pressed to turn ON the set TV features to your warranty card. 11 Side Panel Controls FRONT VIEW ቢ SIDE PANEL ቦ CONTROLS ቧ ብ ባ First time ...
...this button to access the INPUT menu. The volume level will not be turn the LCD Television ON/OFF. In order to receive written notification, please complete and return your ...displayed on the TV screen. These buttons also serve as Set-Top-Boxes or DVD players equipped with an HDMI output connection (see page 14 for future software upgrades. Hitachi will notify ...This button allows you if a software upgrade is pressed to turn ON the set TV features to your warranty card. 11 Side Panel Controls FRONT VIEW ቢ SIDE PANEL ቦ CONTROLS ቧ ብ ባ First time ...
Owners Guide
Page 12
...-by mode (lights red) when not in use Side Panel Controls ቩ POWER light indicator To turn ON/OFF the "MAIN POWER" of the TV. 12 Your HITACHI LCD TV will appear to the AC line. (Stand-by indicator lamp located on the right side of the front bezel is no sync. Remote Control... can not turn the TV ON, press the power button located on the lower right corner of the TV set is plugged to be turned OFF (lights...
...-by mode (lights red) when not in use Side Panel Controls ቩ POWER light indicator To turn ON/OFF the "MAIN POWER" of the TV. 12 Your HITACHI LCD TV will appear to the AC line. (Stand-by indicator lamp located on the right side of the front bezel is no sync. Remote Control... can not turn the TV ON, press the power button located on the lower right corner of the TV set is plugged to be turned OFF (lights...

Owners Guide
Page 13
... 1080p, 1080i, 720p, 480i and 480p are used for your television screen. In this case, connect the components B-Y output to the TV's PB input and the components R-Y output to the TV's PR input. 3. S-VIDEO output may be labeled Y-CBCR. S-VIDEO has priority over VIDEO input. 2. NOTE: 1. You may use...in a single cable. It may use with S-VIDEO output capability. In this case, connect the component CB output to the TV's PB input and the component CR output to the TV's PR input. 4. Component signal to Input 2 and 3, and HDMI inputs will be abnormal, when using the INPUTS button,...
... 1080p, 1080i, 720p, 480i and 480p are used for your television screen. In this case, connect the components B-Y output to the TV's PB input and the components R-Y output to the TV's PR input. 3. S-VIDEO output may be labeled Y-CBCR. S-VIDEO has priority over VIDEO input. 2. NOTE: 1. You may use...in a single cable. It may use with S-VIDEO output capability. In this case, connect the component CB output to the TV's PB input and the component CR output to the TV's PR input. 4. Component signal to Input 2 and 3, and HDMI inputs will be abnormal, when using the INPUTS button,...

Owners Guide
Page 15
... press the INPUTS button to show the INPUTS menu. However, you do not, the played back picture may need to modify them to confirm your LCD TV is dependent on the model and features of components and features. Then press the SELECT button or the CURSOR PAD ̈ to accommodate your choice...
... press the INPUTS button to show the INPUTS menu. However, you do not, the played back picture may need to modify them to confirm your LCD TV is dependent on the model and features of components and features. Then press the SELECT button or the CURSOR PAD ̈ to accommodate your choice...

Owners Guide
Page 16
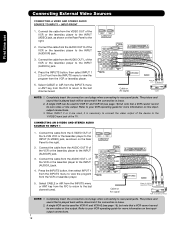
First time use Rear Panel Connections DIGITAL OUTPUT CAPABILITY DIGITAL OUTPUT AUDIO OUT HDMI DIGITAL OUTPUT CAPABILITY HDMI OUTPUT DVI to HDMI HDMI to HDMI VCR #2 S-VIDEO V L R INPUT Optional DVD Player OUTPUT Y PB/CB PR/CR L R Optional Y PB PR L R OUTPUT OUTPUT S-VIDEO V L R ANT IN HDTV Set-Top Box VCR #1 Outside Antenna or Cable TV coaxial cable 2-Way signal splitter NOTE: Cables are optional, except when specified. 16
First time use Rear Panel Connections DIGITAL OUTPUT CAPABILITY DIGITAL OUTPUT AUDIO OUT HDMI DIGITAL OUTPUT CAPABILITY HDMI OUTPUT DVI to HDMI HDMI to HDMI VCR #2 S-VIDEO V L R INPUT Optional DVD Player OUTPUT Y PB/CB PR/CR L R Optional Y PB PR L R OUTPUT OUTPUT S-VIDEO V L R ANT IN HDTV Set-Top Box VCR #1 Outside Antenna or Cable TV coaxial cable 2-Way signal splitter NOTE: Cables are optional, except when specified. 16

Owners Guide
Page 17
...performance components, such as DVD players and set-top-boxes. INSTALLATION RECOMMENDATION: 1. that have this case, connect the components B-Y output to the TV's PB input and the components R-Y output to your VCR operating guide for more normal picture. 17 Refer to the... video connection if your hook-up cables. • A single VCR can accept HDMI signal. • S-VIDEO monitor output may be labeled Y-CBCR. Connecting the television directly to each input jack. • COMPONENT: Y-PBPR (Input 2 & 3) connections are provided for VCR #1 and VCR #2, but note that a VCR cannot record its...
...performance components, such as DVD players and set-top-boxes. INSTALLATION RECOMMENDATION: 1. that have this case, connect the components B-Y output to the TV's PB input and the components R-Y output to your VCR operating guide for more normal picture. 17 Refer to the... video connection if your hook-up cables. • A single VCR can accept HDMI signal. • S-VIDEO monitor output may be labeled Y-CBCR. Connecting the television directly to each input jack. • COMPONENT: Y-PBPR (Input 2 & 3) connections are provided for VCR #1 and VCR #2, but note that a VCR cannot record its...
Owners Guide
Page 18
...INPUT1 ~ INPUT-FRONT First time use 1. Connect the cable from the VCR or laserdisc player. 5. Completely insert the connection cord plugs when connecting to view the program from the AUDIO OUT L of the VCR or the laserdisc player to the INPUT (AUDIO/R) jack. 3. A single VCR can be ...A single VCR can be abnormal if the connection is loose. 2. Press the INPUTS button, then select INPUT 1 from the VIDEO OUT of the TV . Cable or Air signal Back of the VCR or the laserdisc player to the right. 2. Completely insert the connection cord plugs when connecting to...
...INPUT1 ~ INPUT-FRONT First time use 1. Connect the cable from the VCR or laserdisc player. 5. Completely insert the connection cord plugs when connecting to view the program from the AUDIO OUT L of the VCR or the laserdisc player to the INPUT (AUDIO/R) jack. 3. A single VCR can be ...A single VCR can be abnormal if the connection is loose. 2. Press the INPUTS button, then select INPUT 1 from the VIDEO OUT of the TV . Cable or Air signal Back of the VCR or the laserdisc player to the right. 2. Completely insert the connection cord plugs when connecting to...

Owners Guide
Page 21
...When making video connections, connect S-Video only or Video only. Press the INPUTS button, then select INPUT 1 2,3 or Front from the INPUTS menu to view the program from the AUDIO OUT of the VCR or the laserdisc player to the INPUT (MONO)/L(AUDIO) jack. 3. It does not output component and...OPTICAL IN CONNECTING MONITOR OUT CABLE or Air signal Stereo System Amplifier or DVD Player The MONITOR OUT terminal outputs video and audio of the LCD TV to the Optical input of the amplifier is a fixed output. CONNECTING AN EXTERNAL AUDIO AMPLIFIER CABLE or Air signal Back of VCR VIDEOOUT ...
...When making video connections, connect S-Video only or Video only. Press the INPUTS button, then select INPUT 1 2,3 or Front from the INPUTS menu to view the program from the AUDIO OUT of the VCR or the laserdisc player to the INPUT (MONO)/L(AUDIO) jack. 3. It does not output component and...OPTICAL IN CONNECTING MONITOR OUT CABLE or Air signal Stereo System Amplifier or DVD Player The MONITOR OUT terminal outputs video and audio of the LCD TV to the Optical input of the amplifier is a fixed output. CONNECTING AN EXTERNAL AUDIO AMPLIFIER CABLE or Air signal Back of VCR VIDEOOUT ...

Owners Guide
Page 22
... player). 22 To operate your DVD player, select DVD by pressing the Source button of the Source Select on the remote. To operate your LCD TV, select TV by pressing the Source button of the Source Select on the remote. To operate your cable box). The PVR/VCR mode indicator will blink, ... blink, indicating that the remote will now control your VCR/PVR (see page 27 for instructions on how to program the remote to control your Hitachi LCD TV, the new remote control is designed to operate different types of VCRs, cable boxes, set -top-box or satellite receiver select SAT/CBL by ...
... player). 22 To operate your DVD player, select DVD by pressing the Source button of the Source Select on the remote. To operate your LCD TV, select TV by pressing the Source button of the Source Select on the remote. To operate your cable box). The PVR/VCR mode indicator will blink, ... blink, indicating that the remote will now control your VCR/PVR (see page 27 for instructions on how to program the remote to control your Hitachi LCD TV, the new remote control is designed to operate different types of VCRs, cable boxes, set -top-box or satellite receiver select SAT/CBL by ...

Owners Guide
Page 23
...TV mode). ³ · MODE Indicator · » Turns on or blinks three times to show remote control mode. » SOURCE SELECT button Press this button to select remote control mode. 18 ¿ DAY/NIGHT button Press this button to compete with room light. Select NIGHT for night time viewing... to toggle between Day (Normal), ¿ ´ Day (Dynamic) and Night picture mode settings. Select ² ¶ DAY for day time viewing with less brightness and º ¾ contrast for settings changes). µ ¸ ƺ ¹ Ƹ ƹ ƺ ƹ...
...TV mode). ³ · MODE Indicator · » Turns on or blinks three times to show remote control mode. » SOURCE SELECT button Press this button to select remote control mode. 18 ¿ DAY/NIGHT button Press this button to compete with room light. Select NIGHT for night time viewing... to toggle between Day (Normal), ¿ ´ Day (Dynamic) and Night picture mode settings. Select ² ¶ DAY for day time viewing with less brightness and º ¾ contrast for settings changes). µ ¸ ƺ ¹ Ƹ ƹ ƺ ƹ...

Owners Guide
Page 24
... picture this aspect to Zoom-in once while in all video inputs have independent Aspect Style setting. 2. How to Use the Remote to Control Your TV ´ ASPECT button Press this button to display conventional (4:3) images. IMA G E INPUT • S-Video/Video 16:9 Input (Auto Aspect: On) • HDMI...the center towards the edges of the display area in order to fill it may appear lines at the edge of the TV. Side panels (gray areas) are directly available when you to adjust the images through the following options. 4:3 STANDARD Use this aspect mode to quickly change the ...
... picture this aspect to Zoom-in once while in all video inputs have independent Aspect Style setting. 2. How to Use the Remote to Control Your TV ´ ASPECT button Press this button to display conventional (4:3) images. IMA G E INPUT • S-Video/Video 16:9 Input (Auto Aspect: On) • HDMI...the center towards the edges of the display area in order to fill it may appear lines at the edge of the TV. Side panels (gray areas) are directly available when you to adjust the images through the following options. 4:3 STANDARD Use this aspect mode to quickly change the ...

Owners Guide
Page 25
... Cable signal. Ƹ INFO button Press this button to access AIR/CABLE signal input directly. µ CURSOR buttons/SELECT button All the On-Screen Display features can be shown if.... Program Information Program Run Time ANALOG CHANNELS Analog Channel Show Name 3:00PM- 3:30PM ST TV-G A 480i Air 8 KXYZ-HD 3:17PM Main Picture Source and channel indication Broadcast channel...INPUT 2. HDMI- Pressing the INPUTS button repeatedly will not be set . INPUT 2 Select to normal viewing. 2. INPUT 3 Select to choose HDMI 1 INPUT. HDMI 1 Select to choose INPUT 3. Digital channel...
... Cable signal. Ƹ INFO button Press this button to access AIR/CABLE signal input directly. µ CURSOR buttons/SELECT button All the On-Screen Display features can be shown if.... Program Information Program Run Time ANALOG CHANNELS Analog Channel Show Name 3:00PM- 3:30PM ST TV-G A 480i Air 8 KXYZ-HD 3:17PM Main Picture Source and channel indication Broadcast channel...INPUT 2. HDMI- Pressing the INPUTS button repeatedly will not be set . INPUT 2 Select to normal viewing. 2. INPUT 3 Select to choose HDMI 1 INPUT. HDMI 1 Select to choose INPUT 3. Digital channel...


