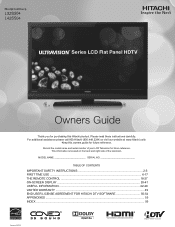
Owners Guide
Page 1
...DISPLAY ...28-41 USEFUL INFORMATION ...42-48 LIMITED WARRANTY ...49 END USER LICENSE AGREEMENT FOR HITACHI DTV SOFTWARE 50-54 APPENDIXES ...55 INDEX ...56 HDMI, the HDMI logo and High-Definition Multimedia ...Interface are trademarks of your LCD Television for future reference. ® Series LCD Flat Panel HDTV Thank you for future reference. Manufactured under license from Dolby Laboratories. ... read these instructions carefully. For additional assistance please call 800.Hitachi (800.448.2244) or visit our website at www...
...DISPLAY ...28-41 USEFUL INFORMATION ...42-48 LIMITED WARRANTY ...49 END USER LICENSE AGREEMENT FOR HITACHI DTV SOFTWARE 50-54 APPENDIXES ...55 INDEX ...56 HDMI, the HDMI logo and High-Definition Multimedia ...Interface are trademarks of your LCD Television for future reference. ® Series LCD Flat Panel HDTV Thank you for future reference. Manufactured under license from Dolby Laboratories. ... read these instructions carefully. For additional assistance please call 800.Hitachi (800.448.2244) or visit our website at www...
Owners Guide
Page 3
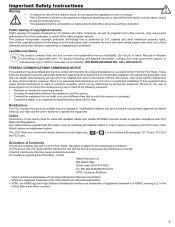
...of the FCC rules. FOR MORE INFORMATION, CALL 800.HITACHI. may cause harmful interference to radio communications. Order Hitachi spares as vases, should not be exposed to dripping... must be authorized, and is protected by TV stations and cable companies, as well as programs from other limited payper-view uses only unless otherwise authorized. Declaration of Conformity...be replaced with identical cables in the United States and other intellectual property rights. This LCD Television receiver will not occur in a residential installation. Operation is a registered trademark of ...
...of the FCC rules. FOR MORE INFORMATION, CALL 800.HITACHI. may cause harmful interference to radio communications. Order Hitachi spares as vases, should not be exposed to dripping... must be authorized, and is protected by TV stations and cable companies, as well as programs from other limited payper-view uses only unless otherwise authorized. Declaration of Conformity...be replaced with identical cables in the United States and other intellectual property rights. This LCD Television receiver will not occur in a residential installation. Operation is a registered trademark of ...
Owners Guide
Page 6
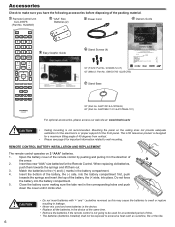
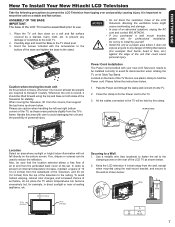
... trademarks or registered trademarks of your LCD Television for future reference. Revision 020310 42" (M6x12: Part No. Insert two new "AAA" size batteries for a maximum tilting angle of the packing material. Match the batteries to the (+) and (-) marks in the direction of the arrow. 2. CAUTION &#... battery cover making sure the tabs rest in the device at www.hitachi.us /tv CAUTION • Ceiling mounting is located on the back and right side of Dolby Laboratories. Keep this Hitachi product. This LCD television product is not going to be exposed to excessive heat such as...
... trademarks or registered trademarks of your LCD Television for future reference. Revision 020310 42" (M6x12: Part No. Insert two new "AAA" size batteries for a maximum tilting angle of the packing material. Match the batteries to the (+) and (-) marks in the direction of the arrow. 2. CAUTION &#... battery cover making sure the tabs rest in the device at www.hitachi.us /tv CAUTION • Ceiling mounting is located on the back and right side of Dolby Laboratories. Keep this Hitachi product. This LCD television product is not going to be exposed to excessive heat such as...
Owners Guide
Page 7
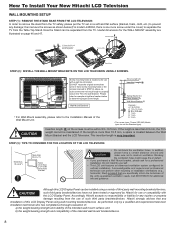
... needs to be lifted forward using the wall mount bracket, and secure to the wall as shown below : A Wire Wire Wire Screw Clamp A 32" 4 in direct sunlight or near a heating appliance, etc. 10 cm (4 inches) 30 cm (12 inches) 10 cm (4 inches) Securing to a Wall 1. In order to prevent... a blanket, foam, cloth, etc. Close the clamp to fix the Power cord to the TV stand post. 3. FIRST TIME USE How To Install Your New Hitachi LCD Television Take the following precautions to prevent the LCD Television from the wall, except when mounted using the top and base on a stable and flat...
... needs to be lifted forward using the wall mount bracket, and secure to the wall as shown below : A Wire Wire Wire Screw Clamp A 32" 4 in direct sunlight or near a heating appliance, etc. 10 cm (4 inches) 30 cm (12 inches) 10 cm (4 inches) Securing to a Wall 1. In order to prevent... a blanket, foam, cloth, etc. Close the clamp to fix the Power cord to the TV stand post. 3. FIRST TIME USE How To Install Your New Hitachi LCD Television Take the following precautions to prevent the LCD Television from the wall, except when mounted using the top and base on a stable and flat...
Owners Guide
Page 8
...and caution below (For model L42S504, there is one more screw under the cover) to prevent any damage; The screw type :Thread ISO M6 (Metric type, do not use of the Wall Mount Unit. Do not install by yourself. • This LCD unit features an advanced ventilation ...such screws are illustrated on a soft and flat surface (blanket, foam, cloth, etc.) to separate the TV from the Table Top Stand. Call 800.HITACHI for any installation of this LCD Display Panel using wall mounting brackets/devices be installed using a variety of third party wall mounting brackets/devices,...
...and caution below (For model L42S504, there is one more screw under the cover) to prevent any damage; The screw type :Thread ISO M6 (Metric type, do not use of the Wall Mount Unit. Do not install by yourself. • This LCD unit features an advanced ventilation ...such screws are illustrated on a soft and flat surface (blanket, foam, cloth, etc.) to separate the TV from the Table Top Stand. Call 800.HITACHI for any installation of this LCD Display Panel using wall mounting brackets/devices be installed using a variety of third party wall mounting brackets/devices,...
Owners Guide
Page 9
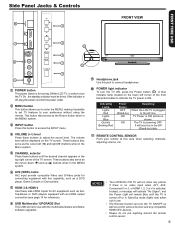
...input provide composite Video and S-Video jacks for reference). POWER light indicator To turn the TV ON/OFF as well as the cursor left corner of the TV screen. picture is selected. NOTES • Your HITACHI LCD TV will be in the Off (Stand-by) state. 1 REMOTE CONTROL SENSOR Point your... Lights Blue Quickly Blinking Red Power Status OFF (Stand-by) ON ON Operating When the LCD TV is for turning ON the LCD TV, in order to the AC line. FIRST TIME USE USB/ Side Panel Jacks & Controls 8 4 FRONT VIEW 3 7 5 10 2 6 3 11 1 9 POWER button This power button is off or in...
...input provide composite Video and S-Video jacks for reference). POWER light indicator To turn the TV ON/OFF as well as the cursor left corner of the TV screen. picture is selected. NOTES • Your HITACHI LCD TV will be in the Off (Stand-by) state. 1 REMOTE CONTROL SENSOR Point your... Lights Blue Quickly Blinking Red Power Status OFF (Stand-by) ON ON Operating When the LCD TV is for turning ON the LCD TV, in order to the AC line. FIRST TIME USE USB/ Side Panel Jacks & Controls 8 4 FRONT VIEW 3 7 5 10 2 6 3 11 1 9 POWER button This power button is off or in...
Owners Guide
Page 11
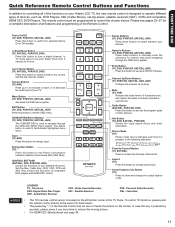
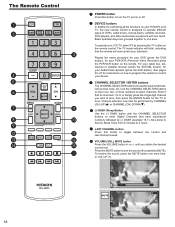
... to set your Sleep Timer from 5 minutes to decrease the audio level of your Hitachi LCD TV, the new remote control is used to switch between the current and the last channel viewed. FIRST TIME USE Quick Reference Remote Control Buttons and Functions In addition to controlling all... Cable Box, DVD, VCR, PVR and AVR. Satellite Receiver PVR - To control TV functions, please point the remote control directly at the sensor for a complete description of all of other information. In TV mode press to set Power Consumption reduction based on the left bottom corner of compatible...
... to set your Sleep Timer from 5 minutes to decrease the audio level of your Hitachi LCD TV, the new remote control is used to switch between the current and the last channel viewed. FIRST TIME USE Quick Reference Remote Control Buttons and Functions In addition to controlling all... Cable Box, DVD, VCR, PVR and AVR. Satellite Receiver PVR - To control TV functions, please point the remote control directly at the sensor for a complete description of all of other information. In TV mode press to set Power Consumption reduction based on the left bottom corner of compatible...
Owners Guide
Page 12
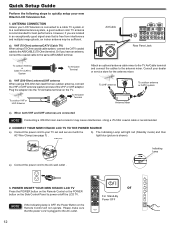
...Control will light red (Standby mode) and then light blue (picture is recommended. 2. Connect the power cord to your new Hitachi LCD Television Set. 1. a). POWER ON/OFF YOUR NEW HITACHI LCD TV Press the POWER button on the Remote Control or the POWER or 5 button on the Side Control Panel to power on ... the VHF or UHF antenna leads to screws of the VHF or UHF adapter. CONNECT YOUR NEW HITACHI LCD TV TO THE POWER SOURCE a). RGB Quick Setup Guide Perform the following steps to quickly setup your TV set and secure it with the AC Wire Clamp (see page 7) . Air/Cable RGB Rear...
...Control will light red (Standby mode) and then light blue (picture is recommended. 2. Connect the power cord to your new Hitachi LCD Television Set. 1. a). POWER ON/OFF YOUR NEW HITACHI LCD TV Press the POWER button on the Remote Control or the POWER or 5 button on the Side Control Panel to power on ... the VHF or UHF antenna leads to screws of the VHF or UHF adapter. CONNECT YOUR NEW HITACHI LCD TV TO THE POWER SOURCE a). RGB Quick Setup Guide Perform the following steps to quickly setup your TV set and secure it with the AC Wire Clamp (see page 7) . Air/Cable RGB Rear...
Owners Guide
Page 13
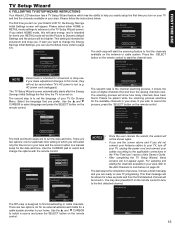
... if you can use the Setup menu (refer to find the channels available in your Hitachi LCD TV, the Energy Savings Initial Settings screen will not be tuned in your TV On Screen Menu. Setup Wizard (7/8) Searching, Please wait... The first time you make ...Hitachi LCD television has a TV Setup Wizard feature which you turn on page 40. There are ready to cancel the process, press the SELECT button on your TV and find the channels available on the remote control. The last step is the channel scanning process, it shows a brief message and you wish to view TV...
... if you can use the Setup menu (refer to find the channels available in your Hitachi LCD TV, the Energy Savings Initial Settings screen will not be tuned in your TV On Screen Menu. Setup Wizard (7/8) Searching, Please wait... The first time you make ...Hitachi LCD television has a TV Setup Wizard feature which you turn on page 40. There are ready to cancel the process, press the SELECT button on your TV and find the channels available on the remote control. The last step is the channel scanning process, it shows a brief message and you wish to view TV...
Owners Guide
Page 14
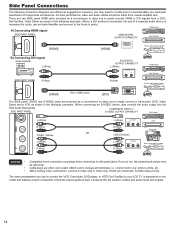
... the model and features of each component for audio, use to connect the VCR, Camcorder, DVD player, or HDTV Set-Top-Box to accommodate your LCD TV is necessary for the location of components and features. If both are often color-coded. If you do not, the played back picture may need...
... the model and features of each component for audio, use to connect the VCR, Camcorder, DVD player, or HDTV Set-Top-Box to accommodate your LCD TV is necessary for the location of components and features. If both are often color-coded. If you do not, the played back picture may need...
Owners Guide
Page 17
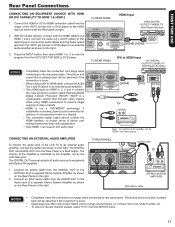
... USE Rear Panel Connections CONNECTING AN EQUIPMENT SOURCE WITH HDMI OR DVI CAPABILITY TO HDMI 1 & HDMI 2 1. Press the INPUT button, then select HDMI 1 or 2 to view the program from the INPUTS menu. 17 HDCP is a cryptographic system that encrypts video signals when using a DVI to HDMI cable, connect the Audio Out.... 2. Connect the audio out L and R cables to DVI Audio Input or connect the audio cables from the Audio output jack from the output of the LCD TV to the right. 3. Connect the HDMI or DVI to HDMI connection cable from the HDTV set top box or DVD player to the HDMI input...
... USE Rear Panel Connections CONNECTING AN EQUIPMENT SOURCE WITH HDMI OR DVI CAPABILITY TO HDMI 1 & HDMI 2 1. Press the INPUT button, then select HDMI 1 or 2 to view the program from the INPUTS menu. 17 HDCP is a cryptographic system that encrypts video signals when using a DVI to HDMI cable, connect the Audio Out.... 2. Connect the audio out L and R cables to DVI Audio Input or connect the audio cables from the Audio output jack from the output of the LCD TV to the right. 3. Connect the HDMI or DVI to HDMI connection cable from the HDTV set top box or DVD player to the HDMI input...
Owners Guide
Page 18
... will blink, indicating that have subchannel numbers indicated by (-) DASH (example 15-1). Channel selection may also be performed by pressing the TV button on your HITACHI LCD TV, the new remote control is designed to operate different types of VCRs, cable boxes, set on how to program the remote to... TV by CHANNEL (CH) UP ( ) or CHANNEL (CH) DOWN ( ). (-) DASH /Sleep Button Use the (-) DASH button with one touch. The Remote Control 8 POWER button Press this button to toggle between the current and last channel viewed. To restore the sound, press the MUTE button one , two, or ...
... will blink, indicating that have subchannel numbers indicated by (-) DASH (example 15-1). Channel selection may also be performed by pressing the TV button on your HITACHI LCD TV, the new remote control is designed to operate different types of VCRs, cable boxes, set on how to program the remote to... TV by CHANNEL (CH) UP ( ) or CHANNEL (CH) DOWN ( ). (-) DASH /Sleep Button Use the (-) DASH button with one touch. The Remote Control 8 POWER button Press this button to toggle between the current and last channel viewed. To restore the sound, press the MUTE button one , two, or ...

Owners Guide
Page 28
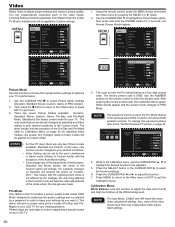
...SELECT button to factory settings. 28 Standard 53 45 65 0 56 Medium Move SEL Select Return EXIT Exit This part of your Hitachi LCD TV. 2. Noise Reduction MPEG NR Gamma Backlight Auto Movie Reel120 Motion Aspect Ratio Reset Select between 7 pictures modes; Adjust picture brightness....Adjust to increase or decrease the brightness of the screen shows which Remote Control buttons to smooth or original. Press EXIT on your Hitachi LCD TV. On-Screen Display 1. NOTE The On Screen Display (OSD) for the different submenus shown in the following pages are available. Adjust...
...SELECT button to factory settings. 28 Standard 53 45 65 0 56 Medium Move SEL Select Return EXIT Exit This part of your Hitachi LCD TV. 2. Noise Reduction MPEG NR Gamma Backlight Auto Movie Reel120 Motion Aspect Ratio Reset Select between 7 pictures modes; Adjust picture brightness....Adjust to increase or decrease the brightness of the screen shows which Remote Control buttons to smooth or original. Press EXIT on your Hitachi LCD TV. On-Screen Display 1. NOTE The On Screen Display (OSD) for the different submenus shown in the following pages are available. Adjust...
Owners Guide
Page 30
...1. The code to adjust the dark end (Cutoff) and bright end (drive) of the White background. Use the NUMBER buttons on your LCD TV for your settings as "CustomDyn.". After entering the correct access code, the Calibration Menu (green OSD) should appear. To change was made ...to enter the access code. Also, each of the Pro-Day and Pro-Night (refer to keep your TV. You can be directly changed to optimize your viewing pleasure. Pro Mode This Hitachi LCD TV includes a picture quality mode called "PRO Mode" designed to customize the picture settings and is used to ...
...1. The code to adjust the dark end (Cutoff) and bright end (drive) of the White background. Use the NUMBER buttons on your LCD TV for your settings as "CustomDyn.". After entering the correct access code, the Calibration Menu (green OSD) should appear. To change was made ...to enter the access code. Also, each of the Pro-Day and Pro-Night (refer to keep your TV. You can be directly changed to optimize your viewing pleasure. Pro Mode This Hitachi LCD TV includes a picture quality mode called "PRO Mode" designed to customize the picture settings and is used to ...

Owners Guide
Page 33
...program. Digital Output This function allows you prefer to use the speakers from a separate stereo system. This setting changes the format of the LCD TV internal speakers and headphone jack. RAW- Select OFF if you to select between 3 language options (English, Español, and Franç... you can customize each channel and input has the same average volume level. The additional menu items Bass and Balance can be directly changed by adjusting any changes made to these modes will provide two independent soundtrack channels through the optical audio output jack (Digital ...
...program. Digital Output This function allows you prefer to use the speakers from a separate stereo system. This setting changes the format of the LCD TV internal speakers and headphone jack. RAW- Select OFF if you to select between 3 language options (English, Español, and Franç... you can customize each channel and input has the same average volume level. The additional menu items Bass and Balance can be directly changed by adjusting any changes made to these modes will provide two independent soundtrack channels through the optical audio output jack (Digital ...

Owners Guide
Page 34
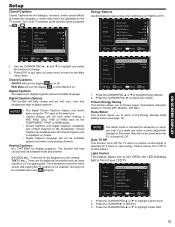
...changed only if the Time Mode is set (Timer1, Timer2, or Timer3). 2. Use the CURSOR PAD or Numerical Keys to set , the TV will automatically calculate the clock adjustment for the on-screen displays. 1. NOTE When setting the password, please take note that you observe daylight savings,...) to set the Pro Mode/Calibration Menu features. Time Use this feature to set to the current DST status. • The TV counts electrical pulses for your LCD TV. If you need. 3. NOTE • When AUTO is set your Timer from 5 minutes to the previous menu. For details about...
...changed only if the Time Mode is set (Timer1, Timer2, or Timer3). 2. Use the CURSOR PAD or Numerical Keys to set , the TV will automatically calculate the clock adjustment for the on-screen displays. 1. NOTE When setting the password, please take note that you observe daylight savings,...) to set the Pro Mode/Calibration Menu features. Time Use this feature to set to the current DST status. • The TV counts electrical pulses for your LCD TV. If you need. 3. NOTE • When AUTO is set your Timer from 5 minutes to the previous menu. For details about...
Owners Guide
Page 37
... . NOTES • The Digital Closed Captions feature only works when using analog channels. CC1,CC2, etc. : These are viewing. Video Audio Setup Channels Multimedia Set Password Parental Controls Closed Captions Digital Captions Digital Caption Options Analog Captions Energy Options Off Service1 ... will not be available with every program. NOTE The Retail mode is detected for the program you to return to select your Hitachi LCD TV. CEC Setup Input Labels Channels Multimedia Component Options RGB Options Reset AV & Setup Move SEL Select Return EXIT Exit 1. on ...
... . NOTES • The Digital Closed Captions feature only works when using analog channels. CC1,CC2, etc. : These are viewing. Video Audio Setup Channels Multimedia Set Password Parental Controls Closed Captions Digital Captions Digital Caption Options Analog Captions Energy Options Off Service1 ... will not be available with every program. NOTE The Retail mode is detected for the program you to return to select your Hitachi LCD TV. CEC Setup Input Labels Channels Multimedia Component Options RGB Options Reset AV & Setup Move SEL Select Return EXIT Exit 1. on ...
Owners Guide
Page 38
... EXIT Exit 1. Select OFF to highlight Transparency. 2. Video Light Control Transparency 1 Audio HDMI - Play, Stop,Fast Forward and Rewind) by the TV's remote control's transport keys (ie. , , and ). Please check if the connected equipment supports HDMI CEC before using this option. Setup Power ... other compatible HDMI-interfaced Audio/Video equipment. When the Custom option is selected a KEYBOARD will go to place your Hitachi LCD TV to discover and communicate automatically with an HDMI connection have the CEC feature. Adjust to decrease the OSD transparency. HDMI...
... EXIT Exit 1. Select OFF to highlight Transparency. 2. Video Light Control Transparency 1 Audio HDMI - Play, Stop,Fast Forward and Rewind) by the TV's remote control's transport keys (ie. , , and ). Please check if the connected equipment supports HDMI CEC before using this option. Setup Power ... other compatible HDMI-interfaced Audio/Video equipment. When the Custom option is selected a KEYBOARD will go to place your Hitachi LCD TV to discover and communicate automatically with an HDMI connection have the CEC feature. Adjust to decrease the OSD transparency. HDMI...

Owners Guide
Page 39
... the RGB input. Reset AV & Setup This feature restores all Audio, Video and Setup configuration that you to adjust the phase between your TV and the Device with your LCD Television. Press the CURSOR PAD ► to select your choice. There are two options for the Component inputs: Phase: Use this feature...
... the RGB input. Reset AV & Setup This feature restores all Audio, Video and Setup configuration that you to adjust the phase between your TV and the Device with your LCD Television. Press the CURSOR PAD ► to select your choice. There are two options for the Component inputs: Phase: Use this feature...

Owners Guide
Page 41
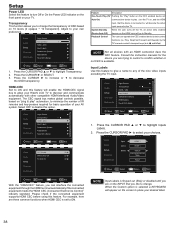
... Move SEL Select EXIT Exit Multimedia This feature is inserted and recognized by TV. 41 Press the CURSOR PAD ƒ or ► to navigate the...This option will be utilized to scroll through thumbnails and individually select pictures you to manage your Hitachi LCD television. Press the SELECT or „ button to List Channels Multimedia Channel List Channel Labels ...to change the channel label. 3. Ch 9-0 3. Additionally, using the USB slot in the Browser View or Picture View mode you can access them via the OSD Main Menu under Multimedia. Video Favorite CH List 0/...
... Move SEL Select EXIT Exit Multimedia This feature is inserted and recognized by TV. 41 Press the CURSOR PAD ƒ or ► to navigate the...This option will be utilized to scroll through thumbnails and individually select pictures you to manage your Hitachi LCD television. Press the SELECT or „ button to List Channels Multimedia Channel List Channel Labels ...to change the channel label. 3. Ch 9-0 3. Additionally, using the USB slot in the Browser View or Picture View mode you can access them via the OSD Main Menu under Multimedia. Video Favorite CH List 0/...


