
Owners Guide
Page 1
ESPAÑOL ENGLISH L32BD304 LCD HDTV with Built-in BD Player 1-800-289-0981 ®
ESPAÑOL ENGLISH L32BD304 LCD HDTV with Built-in BD Player 1-800-289-0981 ®
Owners Guide
Page 2
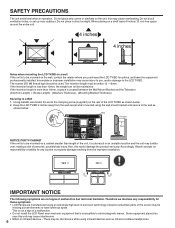
... and one or more information on , the user is encouraged to try to correct the interference by one or more non-replaceable mercury backlights. This Hitachi LCD TV/Blu-ray Combo is in part operated by the party responsible for compliance with the FCC Rules could void the user's authority to...
... and one or more information on , the user is encouraged to try to correct the interference by one or more non-replaceable mercury backlights. This Hitachi LCD TV/Blu-ray Combo is in part operated by the party responsible for compliance with the FCC Rules could void the user's authority to...
Owners Guide
Page 3
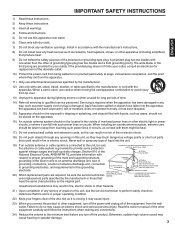
A grounding type plug has two blades and a third grounding prong. The wide blade or the third prong are required, be sure the service technician ELECTRICAL CODE S2898A uses replacement parts specified by the manufacturer, or sold with one wider than the other equipment, turn off the power and unplug all of the polarized or grounding-type plug. It may cause injury. 23) When you turn off the product. Failure to do so may cause hearing or speaker damage. 3 Servicing is required when the apparatus has been damaged in any way, such as power-supply cord or plug is damaged, ...
A grounding type plug has two blades and a third grounding prong. The wide blade or the third prong are required, be sure the service technician ELECTRICAL CODE S2898A uses replacement parts specified by the manufacturer, or sold with one wider than the other equipment, turn off the power and unplug all of the polarized or grounding-type plug. It may cause injury. 23) When you turn off the product. Failure to do so may cause hearing or speaker damage. 3 Servicing is required when the apparatus has been damaged in any way, such as power-supply cord or plug is damaged, ...
Owners Guide
Page 4
...cool surroundings into a warm room or if the temperature of the player. To prevent electric shock, do not expose this declaration, contact: Hitachi America, Ltd. 900 Hitachi Way Chula Vista, CA 91914-3556 ATTN: Customer Relations 4 Power source This LCD television is brought from an air conditioner. Declaration of ... volts 60 Hz, AC current. If you to see the source of the LCD television as improper changes or modifications not expressly approved by Hitachi could void the user's warranty. HOW TO HANDLE THE LCD PANEL • Do not press hard or jolt the LCD panel. If the...
...cool surroundings into a warm room or if the temperature of the player. To prevent electric shock, do not expose this declaration, contact: Hitachi America, Ltd. 900 Hitachi Way Chula Vista, CA 91914-3556 ATTN: Customer Relations 4 Power source This LCD television is brought from an air conditioner. Declaration of ... volts 60 Hz, AC current. If you to see the source of the LCD television as improper changes or modifications not expressly approved by Hitachi could void the user's warranty. HOW TO HANDLE THE LCD PANEL • Do not press hard or jolt the LCD panel. If the...

Owners Guide
Page 5
ENGLISH CHILD SAFETY NOTICE 5
ENGLISH CHILD SAFETY NOTICE 5
Owners Guide
Page 6
... is more than 12mm, the weight can not be missing picture elements or have the equipment professionally installed. The insertion length must be used. Accordingly, Hitachi accepts no responsibility or liability for these symptoms. • LCD Panels are not signs of a malfunction. • Do not install the LCD Panel near this...
... is more than 12mm, the weight can not be missing picture elements or have the equipment professionally installed. The insertion length must be used. Accordingly, Hitachi accepts no responsibility or liability for these symptoms. • LCD Panels are not signs of a malfunction. • Do not install the LCD Panel near this...
Owners Guide
Page 7
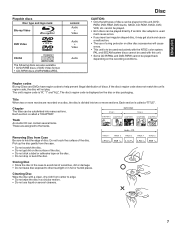
content Audio + Video Audio + Video Audio Disc CAUTION: • Only the left types of the disc. If an 8cm disc adapter is used it will cause errors. • If you insert an irregular shaped disc, it may get dirt on the surface of discs. Each section is to be used with this unit. TRACK 1 TRACK 2 TRACK 3 TRACK 4 TRACK 5 Storing Disc • Store the disc in the case to hold the edge of MP3/WMA/JPEG. PAL and SECAM system discs cannot be subdivided into two or more movies are also available. • DVD-R/RW discs of DVD Video format. • CD-R/RW discs ...
content Audio + Video Audio + Video Audio Disc CAUTION: • Only the left types of the disc. If an 8cm disc adapter is used it will cause errors. • If you insert an irregular shaped disc, it may get dirt on the surface of discs. Each section is to be used with this unit. TRACK 1 TRACK 2 TRACK 3 TRACK 4 TRACK 5 Storing Disc • Store the disc in the case to hold the edge of MP3/WMA/JPEG. PAL and SECAM system discs cannot be subdivided into two or more movies are also available. • DVD-R/RW discs of DVD Video format. • CD-R/RW discs ...
Owners Guide
Page 8
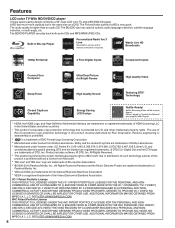
Netflix Streaming Video will be authorized by certain intellectual property rights of Microsoft. The use of a BD is protected by Rovi Corporation. ADDITIONAL INFORMATION MAY BE OBTAINED FROM MPEG LA, L.L.C. Features LCD color TV With BD/DVD/CD player Unique space saving design combines a 32" class LCD color TV and a BD/DVD/CD player. All Rights Reserved. * This product is very good. NO LICENSE IS GRANTED OR SHALL BE IMPLIED FOR OTHER USE. AVC Patent Portfolio License THIS PRODUCT IS LICENSED UNDER THE AVC PATENT PORTFOLIO LICENSE FOR THE PERSONAL AND NONCOMMERCIAL...
Netflix Streaming Video will be authorized by certain intellectual property rights of Microsoft. The use of a BD is protected by Rovi Corporation. ADDITIONAL INFORMATION MAY BE OBTAINED FROM MPEG LA, L.L.C. Features LCD color TV With BD/DVD/CD player Unique space saving design combines a 32" class LCD color TV and a BD/DVD/CD player. All Rights Reserved. * This product is very good. NO LICENSE IS GRANTED OR SHALL BE IMPLIED FOR OTHER USE. AVC Patent Portfolio License THIS PRODUCT IS LICENSED UNDER THE AVC PATENT PORTFOLIO LICENSE FOR THE PERSONAL AND NONCOMMERCIAL...
Owners Guide
Page 9
ENGLISH Contents Before using your unit IMPORTANT SAFETY INSTRUCTIONS 3 CHILD SAFETY NOTICE 5 SAFETY PRECAUTIONS 6 IMPORTANT NOTICE 6 Disc 7 Features 8 Contents 9 How to attach the stand 10 Location of controls 11 Remote control 12 Power source 13 Antenna connections 14 Cable TV connections 15 TV operation Starting setup 16 TV operation 16 Quick guide for menu operation 17 Convenience functions 18 Memorizing channels 19 Checking the digital-signal strength 20 Labeling channels 20 Labeling video inputs 20 Setting the Parental Control 20 Closed Caption 22 CC advanced 22...
ENGLISH Contents Before using your unit IMPORTANT SAFETY INSTRUCTIONS 3 CHILD SAFETY NOTICE 5 SAFETY PRECAUTIONS 6 IMPORTANT NOTICE 6 Disc 7 Features 8 Contents 9 How to attach the stand 10 Location of controls 11 Remote control 12 Power source 13 Antenna connections 14 Cable TV connections 15 TV operation Starting setup 16 TV operation 16 Quick guide for menu operation 17 Convenience functions 18 Memorizing channels 19 Checking the digital-signal strength 20 Labeling channels 20 Labeling video inputs 20 Setting the Parental Control 20 Closed Caption 22 CC advanced 22...

Owners Guide
Page 10
To install the stand: 1 Place the unit face down on the stand assembly. The bracket will only fit in one direction. Do not touch or apply pressure to the screen. It may break. 3 Place the base on table, aligning the bottom of the unit with the metal bracket on a clean, safe, and cushioned surface to avoid any damage to the unit. • Do not touch or press the TV screen. Place a towel or similar material between the screen and the table to protect the screen. 4 Secure the bottom plate with the four provided silver screws (M6×10mm) Note: • To remove the stand, reverse...
To install the stand: 1 Place the unit face down on the stand assembly. The bracket will only fit in one direction. Do not touch or apply pressure to the screen. It may break. 3 Place the base on table, aligning the bottom of the unit with the metal bracket on a clean, safe, and cushioned surface to avoid any damage to the unit. • Do not touch or press the TV screen. Place a towel or similar material between the screen and the table to protect the screen. 4 Secure the bottom plate with the four provided silver screws (M6×10mm) Note: • To remove the stand, reverse...

Owners Guide
Page 11
buttons CHANNEL /1 (PLAY) button CHANNEL /3 (STOP) button MENU button INPUT/ENTER button POWER button Remote sensor To display the menu screen. CHANNEL / buttons, VOLUME +/- IN jack HDMI 2 IN jack HDMI 1/DVI IN jack COMPONENT IN jacks LINE 2 VIDEO IN jack PC/DVI AUDIO IN jack LINE 1 IN jacks (VIDEO/S-VIDEO/AUDIO (L (MONO)/R)) AUDIO (L (MONO)/R) jacks (for COMPONENT IN and LINE2 VIDEO IN) 11 USB jack ETHERNET jack AC INPUT jack PC MONITOR IN jack VAR (VARIABLE) AUDIO OUT jack DIGITAL AUDIO COAXIAL OUT jack ANT. ENGLISH Front Rear POWER indicator Red : Standby Blue : On Left ...
buttons CHANNEL /1 (PLAY) button CHANNEL /3 (STOP) button MENU button INPUT/ENTER button POWER button Remote sensor To display the menu screen. CHANNEL / buttons, VOLUME +/- IN jack HDMI 2 IN jack HDMI 1/DVI IN jack COMPONENT IN jacks LINE 2 VIDEO IN jack PC/DVI AUDIO IN jack LINE 1 IN jacks (VIDEO/S-VIDEO/AUDIO (L (MONO)/R)) AUDIO (L (MONO)/R) jacks (for COMPONENT IN and LINE2 VIDEO IN) 11 USB jack ETHERNET jack AC INPUT jack PC MONITOR IN jack VAR (VARIABLE) AUDIO OUT jack DIGITAL AUDIO COAXIAL OUT jack ANT. ENGLISH Front Rear POWER indicator Red : Standby Blue : On Left ...
Owners Guide
Page 12
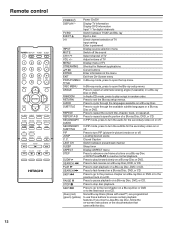
LAST CH SLEEP ASPECT STEP SLOW SEARCH 8 PLAY 1 SEARCH 9 SKIP 6 PAUSE 4 STOP 3 SKIP 7 (blue) (red) (green) (yellow) Power On/Off Display TV information Display DVD information Input "-" for Network applications Cursor buttons Enter information in the menu Exit from On-Screen menu In Blu-ray mode, press to open the Blu-ray setup menu. In Audio CD mode, press to turn PIP (picture-in random order. Press to cycle through the languages available on a Blu-ray Disc, DVD, or CD. Press to play forward slowly on or off the sound Select channel of TV Adjust volume of TV Display menu of a Blu-...
LAST CH SLEEP ASPECT STEP SLOW SEARCH 8 PLAY 1 SEARCH 9 SKIP 6 PAUSE 4 STOP 3 SKIP 7 (blue) (red) (green) (yellow) Power On/Off Display TV information Display DVD information Input "-" for Network applications Cursor buttons Enter information in the menu Exit from On-Screen menu In Blu-ray mode, press to open the Blu-ray setup menu. In Audio CD mode, press to turn PIP (picture-in random order. Press to cycle through the languages available on a Blu-ray Disc, DVD, or CD. Press to play forward slowly on or off the sound Select channel of TV Adjust volume of TV Display menu of a Blu-...
Owners Guide
Page 13
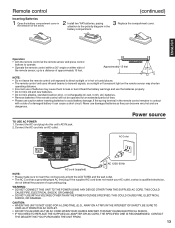
Connect the AC cord plug into an AC outlet. THIS MAY CAUSE ELECTRICAL SHOCK. • IF YOU NEED TO REPLACE THE SUPPLIED AC ADAPTER OR AC CORD, THE SPECIFIED ONE IS RECOMMENDED. Approximately 15 feet NOTE: • Do not leave the remote control unit exposed to direct sunlight or in hot or humid places. • The remote control unit uses infrared beams to transmit signals, so sunlight or fluorescent light on either side of the remote sensor, up to a distance of a grounding plug. Power source AC Outlet AC 120V, 60Hz AC cord (supplied) NOTE: • Please make sure to ...
Connect the AC cord plug into an AC outlet. THIS MAY CAUSE ELECTRICAL SHOCK. • IF YOU NEED TO REPLACE THE SUPPLIED AC ADAPTER OR AC CORD, THE SPECIFIED ONE IS RECOMMENDED. Approximately 15 feet NOTE: • Do not leave the remote control unit exposed to direct sunlight or in hot or humid places. • The remote control unit uses infrared beams to transmit signals, so sunlight or fluorescent light on either side of the remote sensor, up to a distance of a grounding plug. Power source AC Outlet AC 120V, 60Hz AC cord (supplied) NOTE: • Please make sure to ...

Owners Guide
Page 14
... outdoor antenna, follow the instructions below that receive TV programming through an antenna will turn off their analog signal and switch to digital-only broadcasting. Hitachi supports the DTV transition and as a member of the 300-75 ohm matching transformer may switch sooner. If your combination VHF/UHF antenna has a 300...
... outdoor antenna, follow the instructions below that receive TV programming through an antenna will turn off their analog signal and switch to digital-only broadcasting. Hitachi supports the DTV transition and as a member of the 300-75 ohm matching transformer may switch sooner. If your combination VHF/UHF antenna has a 300...

Owners Guide
Page 15
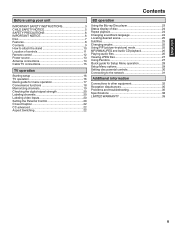
Set the TV to the output channel of the Converter/Descrambler box (usually channel 3 or 4) and use the Converter/Descrambler box to tune scrambled channels. With the switch in the "B" position, you subscribe to a Cable TV service in the "A" position, tune your TV. ENGLISH Cable TV connections This TV has an extended tuning range and can directly tune any nonscrambled channels on your TV to the output of the Converter/Descrambler box (usually channel 3 or 4) and use of a descrambler device which is scrambled. Follow the connections shown below . Incoming 75 ohm ...
Set the TV to the output channel of the Converter/Descrambler box (usually channel 3 or 4) and use the Converter/Descrambler box to tune scrambled channels. With the switch in the "B" position, you subscribe to a Cable TV service in the "A" position, tune your TV. ENGLISH Cable TV connections This TV has an extended tuning range and can directly tune any nonscrambled channels on your TV to the output of the Converter/Descrambler box (usually channel 3 or 4) and use of a descrambler device which is scrambled. Follow the connections shown below . Incoming 75 ohm ...
Owners Guide
Page 16
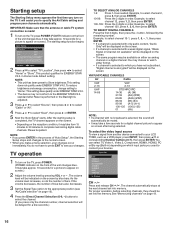
Auto Setup TV Location Store Source Cable Scan Start This unit has been preset to select "Home" or "Store". This setting does qualify under ENERGY STAR V4.0. : Move : Adjust 2 Press ▲/▼ to select "TV Location", then press ◀/▶ to STORE brightness This setting does not qualify under ENERGY STAR V4.0. This product qualifies for a few seconds for a picture to appear on screen after Reset is performed or the Backlight is completed, the TV channel appears on the screen. • Depending on the reception condition, it may take approx. 10 seconds for a...
Auto Setup TV Location Store Source Cable Scan Start This unit has been preset to select "Home" or "Store". This setting does qualify under ENERGY STAR V4.0. : Move : Adjust 2 Press ▲/▼ to select "TV Location", then press ◀/▶ to STORE brightness This setting does not qualify under ENERGY STAR V4.0. This product qualifies for a few seconds for a picture to appear on screen after Reset is performed or the Backlight is completed, the TV channel appears on the screen. • Depending on the reception condition, it may take approx. 10 seconds for a...
Owners Guide
Page 17
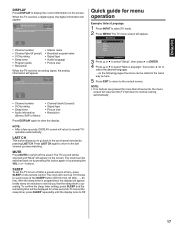
When the TV receives a digital signal, the digital information will appear. 62-1 HDTV Moving Picture1 CH-1 Digital Air No Program Information is available Sleep Timer Off English Full 1080i • Channel number • Channel label (if preset) • V-Chip rating • Sleep timer • Program guide • Resolution • Station name • Broadcast program name • Signal type • Audio language • Picture size When the TV receives an analog signal, the analog information will appear. 14 Analog Cable Sleep Timer Off Mono Full 480i Quick guide for a few...
When the TV receives a digital signal, the digital information will appear. 62-1 HDTV Moving Picture1 CH-1 Digital Air No Program Information is available Sleep Timer Off English Full 1080i • Channel number • Channel label (if preset) • V-Chip rating • Sleep timer • Program guide • Resolution • Station name • Broadcast program name • Signal type • Audio language • Picture size When the TV receives an analog signal, the analog information will appear. 14 Analog Cable Sleep Timer Off Mono Full 480i Quick guide for a few...
Owners Guide
Page 18
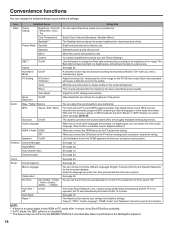
Clock Minimize any vertical bars or stripes visible on the PC Monitor screen. You can set the On Timer to automatically turn the TV/BD speakers off after the frequency has been set by you view a external input signal. The Reset function returns your preference. The Back light will become dark in a digital signal, you connect the DVI device to your preference. / Sharpness / Color / Tint Color Temperature Backlight *3 Bluish (Cool) / Neutral (Standard) / Reddish (Warm) The Backlight feature adjusts the screen brightness for the on the TV. See page 22. Audio ...
Clock Minimize any vertical bars or stripes visible on the PC Monitor screen. You can set the On Timer to automatically turn the TV/BD speakers off after the frequency has been set by you view a external input signal. The Reset function returns your preference. The Back light will become dark in a digital signal, you connect the DVI device to your preference. / Sharpness / Color / Tint Color Temperature Backlight *3 Bluish (Cool) / Neutral (Standard) / Reddish (Warm) The Backlight feature adjusts the screen brightness for the on the TV. See page 22. Audio ...
Owners Guide
Page 19
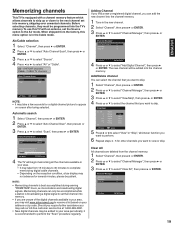
ENGLISH Memorizing channels This TV is equipped with an antenna, set that you want to skip. To use this menu option is broadcasting a digital signal to set the Source option to the Air mode. When shipped from the factory, this TV with a channel memory feature which allows channels to skip up or down to the next channel set into the channel memory. 1 Tune in your address or zip code. VHF/UHF channels Cable - Auto Channel Scan Source Scan Cable Cancel Adding Channel If you find a new unregistered digital channel, you may take a few seconds for a digital channel picture to ...
ENGLISH Memorizing channels This TV is equipped with an antenna, set that you want to skip. To use this menu option is broadcasting a digital signal to set the Source option to the Air mode. When shipped from the factory, this TV with a channel memory feature which allows channels to skip up or down to the next channel set into the channel memory. 1 Tune in your address or zip code. VHF/UHF channels Cable - Auto Channel Scan Source Scan Cable Cancel Adding Channel If you find a new unregistered digital channel, you may take a few seconds for a digital channel picture to ...
Owners Guide
Page 20
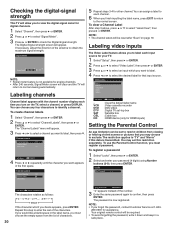
Labeling channels Channel label appears with the channel number display each time you turn on page 19. Labeling video inputs The Video Label feature allows you to label each input source for your password (4 digits) using Number buttons (0-9), then press ENTER. HDMI 1 - HDMI 2 - : Move - To create channel labels 1 Select "Channel", then press ▶ or ENTER. 2 Press ▲ or ▼ to identify a channel. The "Channel Labels" menu will be required. • To avoid forgetting the password, write it down and keep in a safe place. Video Label Video 1 - Locks...
Labeling channels Channel label appears with the channel number display each time you turn on page 19. Labeling video inputs The Video Label feature allows you to label each input source for your password (4 digits) using Number buttons (0-9), then press ENTER. HDMI 1 - HDMI 2 - : Move - To create channel labels 1 Select "Channel", then press ▶ or ENTER. 2 Press ▲ or ▼ to identify a channel. The "Channel Labels" menu will be required. • To avoid forgetting the password, write it down and keep in a safe place. Video Label Video 1 - Locks...