Instruction Manual
Page 7
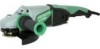
... operation or unauthorized personnel. 11. English 10. Keep all screws, bolts and covers tightly in places where the sparks generated by a Hitachi authorized service center. 17. Prevent potential injuries to the instructions provided herein. If using it may burn out. 16. Cracks in abnormally...the tool. Don't leave tool until repaired. 13. Keep all screws, bolts, and plates tightly mounted. Check for repairs by the grinder can cause explosion, such as gasoline, thinner benzine, carbon tetrachloride, and alcohol may damage and crack plastic parts. Solvents such as where...
... operation or unauthorized personnel. 11. English 10. Keep all screws, bolts and covers tightly in places where the sparks generated by a Hitachi authorized service center. 17. Prevent potential injuries to the instructions provided herein. If using it may burn out. 16. Cracks in abnormally...the tool. Don't leave tool until repaired. 13. Keep all screws, bolts, and plates tightly mounted. Check for repairs by the grinder can cause explosion, such as gasoline, thinner benzine, carbon tetrachloride, and alcohol may damage and crack plastic parts. Solvents such as where...
Instruction Manual
Page 8
...FOR SAFER OPERATION To ensure safer operation of the power tool only with a soft cloth moistened with this power tool, and only genuine HITACHI replacement parts should be careful with buried object such as electric cable within the wall, floor or ceiling where you are going to ...frame handled by the operator. "Double insulation " means that two physically separated insulation systems have a trial run before grinding commence (see "Test the grinder before using the power tool in wet environments. Either the symbol " " or the words "Double insulation" appear on the power tool or on this...
...FOR SAFER OPERATION To ensure safer operation of the power tool only with a soft cloth moistened with this power tool, and only genuine HITACHI replacement parts should be careful with buried object such as electric cable within the wall, floor or ceiling where you are going to ...frame handled by the operator. "Double insulation " means that two physically separated insulation systems have a trial run before grinding commence (see "Test the grinder before using the power tool in wet environments. Either the symbol " " or the words "Double insulation" appear on the power tool or on this...
Instruction Manual
Page 11
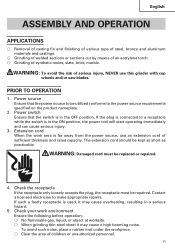
... power source requirements specified on the product nameplate. 2. Contact a licensed electrician to a receptacle while the switch is far away from the power source, use this grinder with cup wheels and/or saw blades. Extension cord When the work environment Ensure the following before operation; ⅜ No flammable gas, liquid, or object...
... power source requirements specified on the product nameplate. 2. Contact a licensed electrician to a receptacle while the switch is far away from the power source, use this grinder with cup wheels and/or saw blades. Extension cord When the work environment Ensure the following before operation; ⅜ No flammable gas, liquid, or object...

Instruction Manual
Page 12
...ground. If and when Lever required, carry out adjustments by first clearing the area of cracks, splits and other personnel. Test the grinder before mounting. Thoroughly check that the push button is free of all other abnomalities before using Before actually beginning the grinding work 1... this manual for use it . English 6. Fasten the wheel guard at 6600 RPM or more When starting daily work , test the grinder by tightening or loosening the screw. ⅜ If the lever does not move smoothly, apply some lubricating oil to wheel disintegration during operation...
...ground. If and when Lever required, carry out adjustments by first clearing the area of cracks, splits and other personnel. Test the grinder before mounting. Thoroughly check that the push button is free of all other abnomalities before using Before actually beginning the grinding work 1... this manual for use it . English 6. Fasten the wheel guard at 6600 RPM or more When starting daily work , test the grinder by tightening or loosening the screw. ⅜ If the lever does not move smoothly, apply some lubricating oil to wheel disintegration during operation...

Instruction Manual
Page 13
... cut into the workpiece. Switch *For continuous use the entire surface of the depressed center wheel. WARNING: Do not press the grinder forcibly against the surface to be controlled by pushing the Locking Lever Button locking button forward once Fig. 3 again. (*Subject to... 4. Use only the edge of materials. 6. It is no need to change depending on " position. Hold the grinder firmly by lifting slightly. English GRINDER OPERATION 1. Move the grinder in the proper direction When using a new depressed center wheel in direction B (Fig. 4). Heavy pressure can result...
... cut into the workpiece. Switch *For continuous use the entire surface of the depressed center wheel. WARNING: Do not press the grinder forcibly against the surface to be controlled by pushing the Locking Lever Button locking button forward once Fig. 3 again. (*Subject to... 4. Use only the edge of materials. 6. It is no need to change depending on " position. Hold the grinder firmly by lifting slightly. English GRINDER OPERATION 1. Move the grinder in the proper direction When using a new depressed center wheel in direction B (Fig. 4). Heavy pressure can result...
Instruction Manual
Page 14
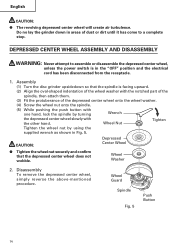
... until it has come to assemble or disassemble the depressed center wheel, unless the power switch is in Fig. 5. Do no lay the grinder down in areas of the depressed center wheel onto the wheel washer. (4) Screw the wheel nut onto the spindle. (5) While pushing the..., simply reverse the above-mentioned procedure. English CAUTION: G The revolving depressed center wheel will create air turbulence. Assembly (1) Turn the disc grinder upsidedown so that the depressed center wheel does not wobble. DEPRESSED CENTER WHEEL ASSEMBLY AND DISASSEMBLY WARNING: Never attempt to a complete stop.
... until it has come to assemble or disassemble the depressed center wheel, unless the power switch is in Fig. 5. Do no lay the grinder down in areas of the depressed center wheel onto the wheel washer. (4) Screw the wheel nut onto the spindle. (5) While pushing the..., simply reverse the above-mentioned procedure. English CAUTION: G The revolving depressed center wheel will create air turbulence. Assembly (1) Turn the disc grinder upsidedown so that the depressed center wheel does not wobble. DEPRESSED CENTER WHEEL ASSEMBLY AND DISASSEMBLY WARNING: Never attempt to a complete stop.

Instruction Manual
Page 15
... (Fig. 6) The motor employs carbon brushes which is no crack or any of the screws be loosened, retighten them immediately. NOTE: Use HITACHI carbon brush No. 61 indicated in the wheel, replace it immediately. 2. Using cracked, deformed or damaged wheels can lead to the depressed center... wheel. Inspecting the screws Regularly inspect all screws and ensure that the on/off switch operates normally. 4. CAUTION: G Using this grinder with a new one when it has been worn out to about 2-3/8" (60mm) in excess of carbon brush 61 0.26" (6.5mm) 0.89" (22...
... (Fig. 6) The motor employs carbon brushes which is no crack or any of the screws be loosened, retighten them immediately. NOTE: Use HITACHI carbon brush No. 61 indicated in the wheel, replace it immediately. 2. Using cracked, deformed or damaged wheels can lead to the depressed center... wheel. Inspecting the screws Regularly inspect all screws and ensure that the on/off switch operates normally. 4. CAUTION: G Using this grinder with a new one when it has been worn out to about 2-3/8" (60mm) in excess of carbon brush 61 0.26" (6.5mm) 0.89" (22...
Parts List
Page 1
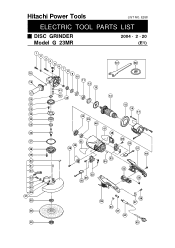
Hitachi Power Tools LIST NO. E268 ELECTRIC TOOL PARTS LIST DISC GRINDER Model G 23MR 2004 • 2 • 20 (E1) 1 2 3 4 5 6 7 8 18 9 10 11 19 12 13 41 501 502 42 14 20 43 21 15 22 16 17 23 44 24 45 25 46 47 26 48 27 28 29 30 31 32 33 34 35 36 37 38 39 52 48 49 53 49 50 53 54 49 50 51 49 55 56 59 60 61 62 58 57 40 63
Hitachi Power Tools LIST NO. E268 ELECTRIC TOOL PARTS LIST DISC GRINDER Model G 23MR 2004 • 2 • 20 (E1) 1 2 3 4 5 6 7 8 18 9 10 11 19 12 13 41 501 502 42 14 20 43 21 15 22 16 17 23 44 24 45 25 46 47 26 48 27 28 29 30 31 32 33 34 35 36 37 38 39 52 48 49 53 49 50 53 54 49 50 51 49 55 56 59 60 61 62 58 57 40 63
