Instruction Manual
Page 3
... 3 The term "power tool" in all of the warnings listed below may result in serious personal your mains-operated (corded) power tool or battery-operated (cordless) power tool. or moving parts. the risk of electric shock. reduce risk of electric shock. CAUTION indicates a potentially hazardous situations which , if ... instructions listed below refers to lose control. of electric shock. Most accidents that has not been specifically recommended by HITACHI. Do not use Unmodified plugs and matching outlets will increase the Cluttered or dark areas invite accidents.
... 3 The term "power tool" in all of the warnings listed below may result in serious personal your mains-operated (corded) power tool or battery-operated (cordless) power tool. or moving parts. the risk of electric shock. reduce risk of electric shock. CAUTION indicates a potentially hazardous situations which , if ... instructions listed below refers to lose control. of electric shock. Most accidents that has not been specifically recommended by HITACHI. Do not use Unmodified plugs and matching outlets will increase the Cluttered or dark areas invite accidents.
Instruction Manual
Page 4
...for one terminal to be d) Remove any adjustments, changing 6) Service accessories, or storing power tools. easier to a rotating from the battery, avoid contact. This enables better control of injury and fire. Keep your power tool serviced by or jewellery. gloves away from moving parts... cutting tools sharp and clean. Do not wear loose clothing b) Recharge only with specifically dust extraction and collection facilities, designated battery packs. from one type of fire when caught in the off position before balance at the rate for the particular switch or...
...for one terminal to be d) Remove any adjustments, changing 6) Service accessories, or storing power tools. easier to a rotating from the battery, avoid contact. This enables better control of injury and fire. Keep your power tool serviced by or jewellery. gloves away from moving parts... cutting tools sharp and clean. Do not wear loose clothing b) Recharge only with specifically dust extraction and collection facilities, designated battery packs. from one type of fire when caught in the off position before balance at the rate for the particular switch or...
Instruction Manual
Page 6
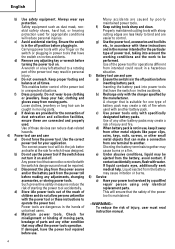
...be stepped on, tripped over, or otherwise subjected to or greater than but less than AWG Size of Cord Length of injury, charge HITACHI rechargeable battery type EB7, EB9, EB12, EB14, EB18 series, and EBM1830. NEVER use a depressed center wheel which is large enough for AC ...Table 1. ALWAYS be used unless absolutely necessary. Use of fire, electric shock, or injury to protect yourself from improper or unsafe use the grinder in good electrical condition; ALWAYS have a trial run before grinding commence. (see the MAINTENANCE AND INSPECTION section on this tool V volts ...
...be stepped on, tripped over, or otherwise subjected to or greater than but less than AWG Size of Cord Length of injury, charge HITACHI rechargeable battery type EB7, EB9, EB12, EB14, EB18 series, and EBM1830. NEVER use a depressed center wheel which is large enough for AC ...Table 1. ALWAYS be used unless absolutely necessary. Use of fire, electric shock, or injury to protect yourself from improper or unsafe use the grinder in good electrical condition; ALWAYS have a trial run before grinding commence. (see the MAINTENANCE AND INSPECTION section on this tool V volts ...
Instruction Manual
Page 7
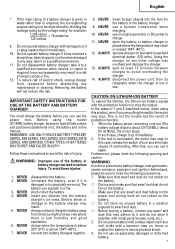
...voltios 9. Do not operate battery charger if it , the battery and in this product, even if you are pulling the switch, the motor may adhere to about 12V (G18DL) / about 8V (G14DL...wait at least 15 minutes between charges to the battery charger may stop the output. CAUTION ON LITHIUM-ION BATTERY To extend the lifetime, the lithium-ion battery equips with metal parts (screws, nails, etc.). ...USE ONLY HITACHI BATTERY TYPES EB7 SERIES, EB9 SERIES, EB12 SERIES, EB14 SERIES, EB18 SERIES, AND EBM1830. charge when the temperature is below , when using the model UC18YRL battery charger, be...
...voltios 9. Do not operate battery charger if it , the battery and in this product, even if you are pulling the switch, the motor may adhere to about 12V (G18DL) / about 8V (G14DL...wait at least 15 minutes between charges to the battery charger may stop the output. CAUTION ON LITHIUM-ION BATTERY To extend the lifetime, the lithium-ion battery equips with metal parts (screws, nails, etc.). ...USE ONLY HITACHI BATTERY TYPES EB7 SERIES, EB9 SERIES, EB12 SERIES, EB14 SERIES, EB18 SERIES, AND EBM1830. charge when the temperature is below , when using the model UC18YRL battery charger, be...

Instruction Manual
Page 8
...such as tap water immediately. SAVE THESE INSTRUCTIONS AND MAKE THEM AVAILABLE TO OTHER USERS AND OWNERS OF THIS TOOL! 8 If the battery charging fails to high temperatures or high pressure such as tap water and contact a doctor immediately. Do not use and return it... from the equipment or battery charger, and stop further recharging. 8. If you find rust, foul odor, overheating, discolor, deformation, and/or other than those specified. 7. CAUTION...
...such as tap water immediately. SAVE THESE INSTRUCTIONS AND MAKE THEM AVAILABLE TO OTHER USERS AND OWNERS OF THIS TOOL! 8 If the battery charging fails to high temperatures or high pressure such as tap water and contact a doctor immediately. Do not use and return it... from the equipment or battery charger, and stop further recharging. 8. If you find rust, foul odor, overheating, discolor, deformation, and/or other than those specified. 7. CAUTION...

Instruction Manual
Page 9
Cordless Disc Grinder (G14DL / G18DL) Nameplate Switch Push button Brush cap Gear cover Depressed center wheel Packing gland ⅜ Battery Terminal hole Housing Wheel guard Side handle Battery Terminal hole Latch Nameplate (BCL1430) Latch Nameplate (EBM1830) Fig.1 9 English FUNCTIONAL DESCRIPTION NOTE: The information contained in this manual. NEVER operate, or attempt any maintenance ...
Cordless Disc Grinder (G14DL / G18DL) Nameplate Switch Push button Brush cap Gear cover Depressed center wheel Packing gland ⅜ Battery Terminal hole Housing Wheel guard Side handle Battery Terminal hole Latch Nameplate (BCL1430) Latch Nameplate (EBM1830) Fig.1 9 English FUNCTIONAL DESCRIPTION NOTE: The information contained in this manual. NEVER operate, or attempt any maintenance ...

Instruction Manual
Page 10
... Size: external diam. ion battery DC 14.4V DC 18V 3 Ah 4.0 lbs (1.8 kg) 4.2 lbs (1.9 kg) 2. Battery Charger Model Input power source... Charging time Charging voltage Charging current Weight UC18YRL Single phase: AC120V 60Hz Approx. 45 min (At a temperture of 68°F (20°C)) DC 7.2 - 18V... DC 3.5A 1.3 lbs. (0.6 kg) NOTE: The charging time may vary according to ambient temperature and power source voltage. 10 Model Battery Type Voltage Capacity Weight G14DL 9,300/min DC motor G18DL...
... Size: external diam. ion battery DC 14.4V DC 18V 3 Ah 4.0 lbs (1.8 kg) 4.2 lbs (1.9 kg) 2. Battery Charger Model Input power source... Charging time Charging voltage Charging current Weight UC18YRL Single phase: AC120V 60Hz Approx. 45 min (At a temperture of 68°F (20°C)) DC 7.2 - 18V... DC 3.5A 1.3 lbs. (0.6 kg) NOTE: The charging time may vary according to ambient temperature and power source voltage. 10 Model Battery Type Voltage Capacity Weight G14DL 9,300/min DC motor G18DL...

Instruction Manual
Page 11
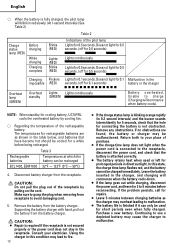
...damaged. REMOVAL AND INSTALLATION METHOD OF BATTERY WARNING: Do not charge at voltage higher than indicated on the nameplate, the charger will light in red. (See Table 2) NOTE: If the pilot lamp flikers in red. (At 1-second intervals) WARNING: Do not use this grinder with cup wheels and/or saw ...blades. Have it into the battery charger as shown in place with the groove in tool handle and slip it repaired immediately. ⅜ How to install...
...damaged. REMOVAL AND INSTALLATION METHOD OF BATTERY WARNING: Do not charge at voltage higher than indicated on the nameplate, the charger will light in red. (See Table 2) NOTE: If the pilot lamp flikers in red. (At 1-second intervals) WARNING: Do not use this grinder with cup wheels and/or saw ...blades. Have it into the battery charger as shown in place with the groove in tool handle and slip it repaired immediately. ⅜ How to install...
Instruction Manual
Page 12
... temperature of the receptacle by pulling on the cord. If the problem persists, call for repairs. ● Leave 5 minutes between charging batteries as shown in the table below, and batteries that have become hot should be recharged 32°F - 122°F (0°C - 50°C) 4. English ⅜ When the... does not light when the power cord is connected to the receptacle, disconnect the power cord, and check that the battery is attached correctly. ● The battery retains heat when used for short periods even when fully charged. Unable to charge (Charging will commence when the...
... temperature of the receptacle by pulling on the cord. If the problem persists, call for repairs. ● Leave 5 minutes between charging batteries as shown in the table below, and batteries that have become hot should be recharged 32°F - 122°F (0°C - 50°C) 4. English ⅜ When the... does not light when the power cord is connected to the receptacle, disconnect the power cord, and check that the battery is attached correctly. ● The battery retains heat when used for short periods even when fully charged. Unable to charge (Charging will commence when the...
Instruction Manual
Page 13
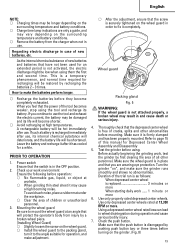
... When depressed center wheel is replaced 3 minutes or more When starting daily work , test the grinder by first clearing the area of new batteries and batteries that the push button is disengaged by pushing push button two or three times before mounting. personnel...the internal chemical substance of all other abnomalities before turning on the grinder. (Fig. 8) make sure the grinder runs smoothly and shows no abnormalities. Turn the grinder "on", and make adjustment. 13 A rechargeable battery will be shortened. Regarding electric discharge in and cause death or ...
... When depressed center wheel is replaced 3 minutes or more When starting daily work , test the grinder by first clearing the area of new batteries and batteries that the push button is disengaged by pushing push button two or three times before mounting. personnel...the internal chemical substance of all other abnomalities before turning on the grinder. (Fig. 8) make sure the grinder runs smoothly and shows no abnormalities. Turn the grinder "on", and make adjustment. 13 A rechargeable battery will be shortened. Regarding electric discharge in and cause death or ...
Instruction Manual
Page 14
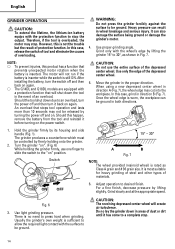
... in areas of overloading. Usually the grinder's own weight is sufficient to allow the required light contact with the surface to an overload, turn it before turning on again. ⅜ The G14DL and G18DL models are equipped with a protection function ...Turn the grinder "on". (Fig. 6) While holding onto the grinder. 2. For a fine finish, decrease pressure by firmly holding the grinder firmly, use the entire surface of materials. English GRINDER OPERATION WARNING: Do not press the grinder forcibly against the CAUTION: To extend the lifetime, the lithium-ion battery equips with ...
... in areas of overloading. Usually the grinder's own weight is sufficient to allow the required light contact with the surface to an overload, turn it before turning on again. ⅜ The G14DL and G18DL models are equipped with a protection function ...Turn the grinder "on". (Fig. 6) While holding onto the grinder. 2. For a fine finish, decrease pressure by firmly holding the grinder firmly, use the entire surface of materials. English GRINDER OPERATION WARNING: Do not press the grinder forcibly against the CAUTION: To extend the lifetime, the lithium-ion battery equips with ...
Instruction Manual
Page 15
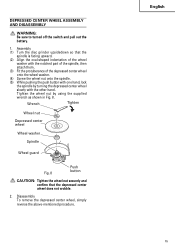
... depressed center wheel slowly with one hand, lock the spindle by using the supplied wrench as shown in Fig. 8. English 15 Assembly (1) Turn the disc grinder upsidedown so that the depressed center wheel does not wobble. 2. Disassembly To remove the depressed center wheel, simply reverse the above-mentioned procedure. Wrench Tighten... the push button with the other hand. DEPRESSED CENTER WHEEL ASSEMBLY AND DISASSEMBLY WARNING: Be sure to turned off the switch and pull out the battery. 1.
... depressed center wheel slowly with one hand, lock the spindle by using the supplied wrench as shown in Fig. 8. English 15 Assembly (1) Turn the disc grinder upsidedown so that the depressed center wheel does not wobble. 2. Disassembly To remove the depressed center wheel, simply reverse the above-mentioned procedure. Wrench Tighten... the push button with the other hand. DEPRESSED CENTER WHEEL ASSEMBLY AND DISASSEMBLY WARNING: Be sure to turned off the switch and pull out the battery. 1.
Instruction Manual
Page 16
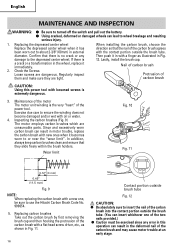
...brush with a new one of the power tool. English MAINTENANCE AND INSPECTION WARNING: ⅷ Be sure to turned off the switch and pull out the battery. ⅷ Using cracked, deformed or damaged wheels can insert whichever one , be exercised since any damage to the depressed center wheel. Confirm that the ...carbon brush, choose the direction so that there is the very "heart" of the two nails provided.) ● Caution must be sure to use the Hitachi Carbon Brush Code No. 999054. 5. Then push it has been worn out to or near the "wear limit". Maintenance of the carbon brush agrees ...
...brush with a new one of the power tool. English MAINTENANCE AND INSPECTION WARNING: ⅷ Be sure to turned off the switch and pull out the battery. ⅷ Using cracked, deformed or damaged wheels can insert whichever one , be exercised since any damage to the depressed center wheel. Confirm that the ...carbon brush, choose the direction so that there is the very "heart" of the two nails provided.) ● Caution must be sure to use the Hitachi Carbon Brush Code No. 999054. 5. Then push it has been worn out to or near the "wear limit". Maintenance of the carbon brush agrees ...
Instruction Manual
Page 17
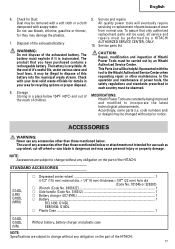
... parts list WARNING: Do not dispose of Hitachi Power Tools must be illegal to change without any accessories other maintenance. The battery is incinerated. In the operation and maintenance of it's useful life, under various state and local laws, it is recyclable. STANDARD ACCESSORIES G14DL (LRK) G18DL (MRK) ⅜ Depressed center wheel 1 4-1/2" (115...
... parts list WARNING: Do not dispose of Hitachi Power Tools must be illegal to change without any accessories other maintenance. The battery is incinerated. In the operation and maintenance of it's useful life, under various state and local laws, it is recyclable. STANDARD ACCESSORIES G14DL (LRK) G18DL (MRK) ⅜ Depressed center wheel 1 4-1/2" (115...
Instruction Manual
Page 50
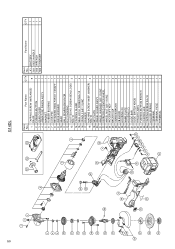
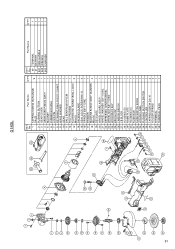
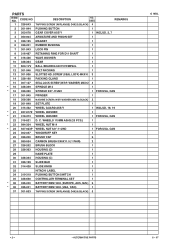
... 26 CARBON BRUSH 2 27 CB BLOCK 1 28 HOUSING (D) 1 29 NAME PLATE 1 30 HOUSING (C) 1 31 SLIDE BAR 1 32 SLIDE SWITCH KNOB 1 33 HITACHI LABEL 1 34 PUSHING BUTTON SWITCH 1 35 CONTROLLER 1 36 TAPPING SCREW D4×10 2 37 HOLDER SPRING 2 38 TERMINAL 1 39 TERMINAL PIECE 1 40 TERMINAL... 1 Item No. Part Name 41 BATTERY 501 SIDE HANDLE 502 WRENCH 503 CHARGER Q'TY 1 1 1 1 SCREW (SEAL LOCK) M4×10 3 14 PACKING GLAND 1 15 SEAL LOCH SCREW ...
... 26 CARBON BRUSH 2 27 CB BLOCK 1 28 HOUSING (D) 1 29 NAME PLATE 1 30 HOUSING (C) 1 31 SLIDE BAR 1 32 SLIDE SWITCH KNOB 1 33 HITACHI LABEL 1 34 PUSHING BUTTON SWITCH 1 35 CONTROLLER 1 36 TAPPING SCREW D4×10 2 37 HOLDER SPRING 2 38 TERMINAL 1 39 TERMINAL PIECE 1 40 TERMINAL... 1 Item No. Part Name 41 BATTERY 501 SIDE HANDLE 502 WRENCH 503 CHARGER Q'TY 1 1 1 1 SCREW (SEAL LOCK) M4×10 3 14 PACKING GLAND 1 15 SEAL LOCH SCREW ...
Instruction Manual
Page 51
... KEY 1 25 BRUSH CAP 2 26 CARBON BRUSH 2 27 CB BLOCK 1 28 HOUSING (D) 1 29 NAME PLATE 1 30 HOUSING (C) 1 31 SLIDE BAR 1 32 SLIDE SWITCH KNOB 1 33 HITACHI LABEL 1 34 PUSHING BUTTON SWITCH 1 35 CONTROLLER 1 36 TAPPING SCREW D4×10 2 37 HOLDER SPRING 2 38 TERMINAL 1 39 TERMINAL PIECE 1 Item No. Part Name...
... KEY 1 25 BRUSH CAP 2 26 CARBON BRUSH 2 27 CB BLOCK 1 28 HOUSING (D) 1 29 NAME PLATE 1 30 HOUSING (C) 1 31 SLIDE BAR 1 32 SLIDE SWITCH KNOB 1 33 HITACHI LABEL 1 34 PUSHING BUTTON SWITCH 1 35 CONTROLLER 1 36 TAPPING SCREW D4×10 2 37 HOLDER SPRING 2 38 TERMINAL 1 39 TERMINAL PIECE 1 Item No. Part Name...
Parts List
Page 2
...-354 HOUSING (C) 1 31 328-199 SLIDE BAR 1 32 314-428 SLIDE KNOB 1 33 HITACHI LABEL 1 34 319-319 PUSHING BUTTON SWITCH 1 35 328-658 CONTROLLER TERMINAL SET 1 * 36 326-240 BATTERY EBM 1830 (EUROPE, AUS, NZL) 2 * 36 326-241 BATTERY EBM 1830 (USA, CAN) 1 37 301-653 TAPPING SCREW (W/FLANGE) D4X20 (BLACK) 5 G 18DL...
...-354 HOUSING (C) 1 31 328-199 SLIDE BAR 1 32 314-428 SLIDE KNOB 1 33 HITACHI LABEL 1 34 319-319 PUSHING BUTTON SWITCH 1 35 328-658 CONTROLLER TERMINAL SET 1 * 36 326-240 BATTERY EBM 1830 (EUROPE, AUS, NZL) 2 * 36 326-241 BATTERY EBM 1830 (USA, CAN) 1 37 301-653 TAPPING SCREW (W/FLANGE) D4X20 (BLACK) 5 G 18DL...


