
Owners Guide
Page 16
...Cable . 123 USING DISC IN DVD DRIVE BUILT INTO PC.. 125 BEFORE TERMINATING PC CONNECTION (UNPLUGGING PC CONNECTION CABLE)/ CHANGING OVER POWER SWITCH 126 Using ImageMixer 3 for Windows 127 VIEWING IMAGES RECORDED ON HDD/DISC USING PC 127 CREATING DVD-VIDEO USING IMAGES RECORDED ON HDD/DISC 128 Using... ImageMixer 3 Mac Edition for DVDCAM 131 VIEWING IMAGES RECORDED ON HDD/DISC USING MACINTOSH 131 IMPORTING IMAGES RECORDED ON HDD/ DISC INTO MACINTOSH 132 CREATING ...
...Cable . 123 USING DISC IN DVD DRIVE BUILT INTO PC.. 125 BEFORE TERMINATING PC CONNECTION (UNPLUGGING PC CONNECTION CABLE)/ CHANGING OVER POWER SWITCH 126 Using ImageMixer 3 for Windows 127 VIEWING IMAGES RECORDED ON HDD/DISC USING PC 127 CREATING DVD-VIDEO USING IMAGES RECORDED ON HDD/DISC 128 Using... ImageMixer 3 Mac Edition for DVDCAM 131 VIEWING IMAGES RECORDED ON HDD/DISC USING MACINTOSH 131 IMPORTING IMAGES RECORDED ON HDD/ DISC INTO MACINTOSH 132 CREATING ...
Owners Guide
Page 118
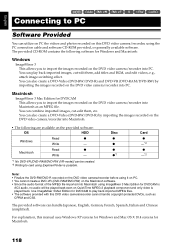
...- Disc 1 Card ● -*2 ● -*2 Note: • Finalize the DVD-RW/DVD-R recorded on the DVD video camera/recorder before using ImageMixer 3 Mac Edition for Macintosh. 118 For explanation, this manual uses Windows XP screens for Windows and Mac OS X 10.4 screens for DVDCAM is AC3 ... The following software for DVDCAM This allows you to import the images recorded on QuickTime MPEG-2 playback component and only video is possible. Use ImageMixer 3 Mac Edition for DVDCAM to play back imported images, cut -edit them , add titles and BGM, and edit videos, e.g., attach ...
...- Disc 1 Card ● -*2 ● -*2 Note: • Finalize the DVD-RW/DVD-R recorded on the DVD video camera/recorder before using ImageMixer 3 Mac Edition for Macintosh. 118 For explanation, this manual uses Windows XP screens for Windows and Mac OS X 10.4 screens for DVDCAM is AC3 ... The following software for DVDCAM This allows you to import the images recorded on QuickTime MPEG-2 playback component and only video is possible. Use ImageMixer 3 Mac Edition for DVDCAM to play back imported images, cut -edit them , add titles and BGM, and edit videos, e.g., attach ...

Owners Guide
Page 120
English Installing Software [When using Windows] 1 Turn the PC on the PC used with ImageMixer 3, and then click "Next". 5 Checking license agreement: Carefully read the license agreement: If you have been using the PC, terminate all running ...appear, use Windows My Computer or Explorer to change the folder, click "Change", designate the installation location, and then click "Next". Click 4 The "ImageMixer 3" installation screen will automatically appear. Click Click 120 ROM drive of the license agreement", and then click "Next". Click 6 Choosing the installation destination: ...
English Installing Software [When using Windows] 1 Turn the PC on the PC used with ImageMixer 3, and then click "Next". 5 Checking license agreement: Carefully read the license agreement: If you have been using the PC, terminate all running ...appear, use Windows My Computer or Explorer to change the folder, click "Change", designate the installation location, and then click "Next". Click 4 The "ImageMixer 3" installation screen will automatically appear. Click Click 120 ROM drive of the license agreement", and then click "Next". Click 6 Choosing the installation destination: ...
Owners Guide
Page 121
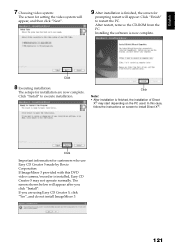
.... Click Important information for installation are using Easy CD Creator 5, click "Yes", and do not install ImageMixer 3. 121 Click 8 Executing installation: The setups for customers who use Easy CD Creator 5 made by Roxio Corporation: If ImageMixer 3 provided with this DVD video camera/recorder is finished, the installation of Direct X® may not...
.... Click Important information for installation are using Easy CD Creator 5, click "Yes", and do not install ImageMixer 3. 121 Click 8 Executing installation: The setups for customers who use Easy CD Creator 5 made by Roxio Corporation: If ImageMixer 3 provided with this DVD video camera/recorder is finished, the installation of Direct X® may not...

Owners Guide
Page 122
... insert the provided CD-ROM into the CD-ROM drive of Macintosh. 2 Double-click the DVDHS7S icon displayed on desktop. 3 Double-click the icon of "ImageMixer 3 for DVDCAM.pkg" displayed on screen for operation: Installation will start : Click "Continue". Setting language when installing 5 Choose the installation destination and type of the...
... insert the provided CD-ROM into the CD-ROM drive of Macintosh. 2 Double-click the DVDHS7S icon displayed on desktop. 3 Double-click the icon of "ImageMixer 3 for DVDCAM.pkg" displayed on screen for operation: Installation will start : Click "Continue". Setting language when installing 5 Choose the installation destination and type of the...
Owners Guide
Page 127
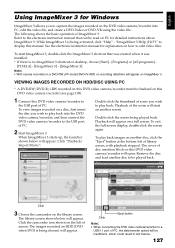
...appear on desktop, choose [Start] - [Programs] or [All programs] - [PIXELA] - [ImageMixer 3] - [ImageMixer 3]. To exit the full-screen display, double-click the screen again. Click 3 Choose the camcorder on the DVD video camera/recorder into the DVD video camera/recorder, and then connect the DVD.... 127 See the electronic instruction manual for detailed instructions about ImageMixer 3: While ImageMixer 3 is being chosen) will open: Remove the disc and load another disc to the USB port of ImageMixer 3. Click the camcorder icon shown on the left of the scene will be played...
...appear on desktop, choose [Start] - [Programs] or [All programs] - [PIXELA] - [ImageMixer 3] - [ImageMixer 3]. To exit the full-screen display, double-click the screen again. Click 3 Choose the camcorder on the DVD video camera/recorder into the DVD video camera/recorder, and then connect the DVD.... 127 See the electronic instruction manual for detailed instructions about ImageMixer 3: While ImageMixer 3 is being chosen) will open: Remove the disc and load another disc to the USB port of ImageMixer 3. Click the camcorder icon shown on the left of the scene will be played...
Owners Guide
Page 128
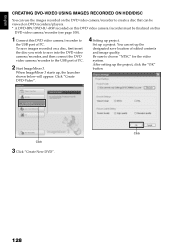
...-Video". 4 Setting up the project, click the "OK" button. Click Click 3 Click "Create New DVD". 128 Be sure to the USB port of PC. 2 Start ImageMixer 3. To save images recorded on this DVD video camera/recorder (see page 108). 1 Connect this DVD video camera/recorder must be viewed on DVD recorders...
...-Video". 4 Setting up the project, click the "OK" button. Click Click 3 Click "Create New DVD". 128 Be sure to the USB port of PC. 2 Start ImageMixer 3. To save images recorded on this DVD video camera/recorder (see page 108). 1 Connect this DVD video camera/recorder must be viewed on DVD recorders...
Owners Guide
Page 129
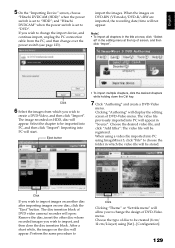
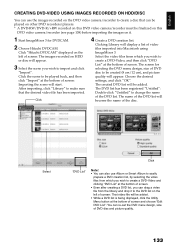
... • To import all chapters in the title at once, click "Select all" in which you to "HDD"; English 5 On the "Importing Device" screen, choose "Hitachi DVDCAM (HDD)" when the power switch is set to change over the power switch (see page 123). When using a video file imported into PC will... be created (8 cm/ 12 cm/2-layer) using ImageMixer 3, click "File" to choose the folder in the editing menu at the top of DVD-Video menu. After a short while, the images on one disc...
... • To import all chapters in the title at once, click "Select all" in which you to "HDD"; English 5 On the "Importing Device" screen, choose "Hitachi DVDCAM (HDD)" when the power switch is set to change over the power switch (see page 123). When using a video file imported into PC will... be created (8 cm/ 12 cm/2-layer) using ImageMixer 3, click "File" to choose the folder in the editing menu at the top of DVD-Video menu. After a short while, the images on one disc...
Owners Guide
Page 130
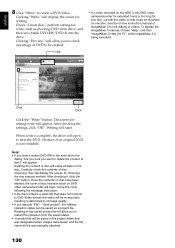
...will be re-encoded, resulting in this DVD video camera/recorder for extended hours is being executed. To display the ImageMixer 3 manual, choose "Help", and then "ImageMixer 3 Help (H) F1", while ImageMixer 3 is too long for writing. When write is now finished. Choosing "Yes" will appear. Reading in deterioration ... DVD write drive, and then set a blank DVD-RW/DVD-R into the drive. See the on the disc: Carefully check the contents of ImageMixer 3 for write, such as a project file. Clicking "Write" will erase all data on -line instruction manual of disc. Check "Create disc...
...will be re-encoded, resulting in this DVD video camera/recorder for extended hours is being executed. To display the ImageMixer 3 manual, choose "Help", and then "ImageMixer 3 Help (H) F1", while ImageMixer 3 is too long for writing. When write is now finished. Choosing "Yes" will appear. Reading in deterioration ... DVD write drive, and then set a blank DVD-RW/DVD-R into the drive. See the on the disc: Carefully check the contents of ImageMixer 3 for write, such as a project file. Clicking "Write" will erase all data on -line instruction manual of disc. Check "Create disc...
Owners Guide
Page 131
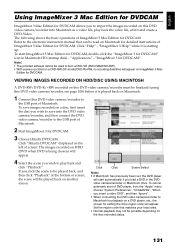
..."Help" - To save into Macintosh as a video file, play back and click "Playback". "ImageMixer 3 Help" while it is played back on Macintosh for detailed instructions of Macintosh. 2 Start ImageMixer 3 for DVDCAM. 3 Choose Hitachi DVDCAM. If you click the scene to be played back, and then click "Playback" at the ...) will appear. 4 Select the scene you wish to play back the video file, edit it and create a DVD-Video. Click "Hitachi DVDCAM" displayed on the left of ImageMixer 3 Mac Edition for DVDCAM". To start automatically if you load a DVD in Macintosh HD (startup disk) -
..."Help" - To save into Macintosh as a video file, play back and click "Playback". "ImageMixer 3 Help" while it is played back on Macintosh for detailed instructions of Macintosh. 2 Start ImageMixer 3 for DVDCAM. 3 Choose Hitachi DVDCAM. If you click the scene to be played back, and then click "Playback" at the ...) will appear. 4 Select the scene you wish to play back the video file, edit it and create a DVD-Video. Click "Hitachi DVDCAM" displayed on the left of ImageMixer 3 Mac Edition for DVDCAM". To start automatically if you load a DVD in Macintosh HD (startup disk) -

Owners Guide
Page 132
... allow you to import and click "Import". Click the scene to be played back. Refer to the electronic instruction manual of ImageMixer 3 for DVDCAM. 3 Choose Hitachi DVDCAM. For detailed use it to the USB port of screen: Importing the scene will start. Note: If you click "Recently... the video files collectively. If you designate a specific condition, such as MPEG files. Using ImageMixer 3, you wish to cut -edit them; Click "Library" at the bottom of Macintosh. Click "Hitachi DVDCAM" displayed on the left of screen: The images recorded on this DVD video camera/recorder...
... allow you to import and click "Import". Click the scene to be played back. Refer to the electronic instruction manual of ImageMixer 3 for DVDCAM. 3 Choose Hitachi DVDCAM. For detailed use it to the USB port of screen: Importing the scene will start. Note: If you click "Recently... the video files collectively. If you designate a specific condition, such as MPEG files. Using ImageMixer 3, you wish to cut -edit them; Click "Library" at the bottom of Macintosh. Click "Hitachi DVDCAM" displayed on the left of screen: The images recorded on this DVD video camera/recorder...
Owners Guide
Page 133
.... The name of the DVD list will display a list of the disc. Clicking Library will become the name of video files imported into Macintosh using ImageMixer 3. Select the video files from which you wish to create a DVD-Video and clicking "DVD List" at the bottom of screen. • Even after ...to create a DVD-Video, and then click "DVD List" at the bottom of screen: Importing the scene will be added. The screen for DVDCAM. 2 Choose Hitachi DVDCAM. Click the scene to be created (8 cm/12 cm), and picture quality will be added. • While a DVD list is being displayed, click ...
.... The name of the DVD list will display a list of the disc. Clicking Library will become the name of video files imported into Macintosh using ImageMixer 3. Select the video files from which you wish to create a DVD-Video and clicking "DVD List" at the bottom of screen. • Even after ...to create a DVD-Video, and then click "DVD List" at the bottom of screen: Importing the scene will be added. The screen for DVDCAM. 2 Choose Hitachi DVDCAM. Click the scene to be created (8 cm/12 cm), and picture quality will be added. • While a DVD list is being displayed, click ...
Owners Guide
Page 135
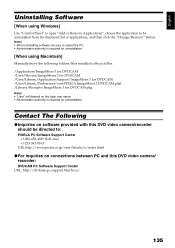
... URL: http://dvdcam-pc.support.hitachi.ca/ 135 English Uninstalling Software [When using Macintosh] Manually move the following folders/files installed to Recycle Bin: /Application/ImageMixer 3 for DVDCAM /User/Movies/ImageMixer 3 for DVDCAM /User/Library/Application Support/ImageMixer 3 for DVDCAM /User/Library/Preferences/com.PIXELA.ImageMixer 3.DVDCAM.plist /Library/Receipts/ImageMixer 3 for DVDCAM.pkg Note: •...
... URL: http://dvdcam-pc.support.hitachi.ca/ 135 English Uninstalling Software [When using Macintosh] Manually move the following folders/files installed to Recycle Bin: /Application/ImageMixer 3 for DVDCAM /User/Movies/ImageMixer 3 for DVDCAM /User/Library/Application Support/ImageMixer 3 for DVDCAM /User/Library/Preferences/com.PIXELA.ImageMixer 3.DVDCAM.plist /Library/Receipts/ImageMixer 3 for DVDCAM.pkg Note: •...
Owners Guide
Page 149
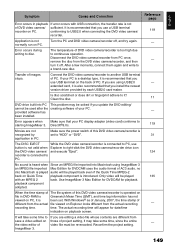
... video camera/recorder to a brand-new disc. If your PC display adapter (video card) conforms to save a video edited on playback screen. Movies are using ImageMixer 3 an MPEG file imported Mac Edition for DVDCAM uses the audio format of PC. The file system of... for DVDCAM for date/time indication on the video editor of this DVD video camera/recorder is played audio will take some time to starting ImageMixer 3. It will be used after the creating software of this DVD video camera/recorder is introduced: Only video will appear for playback. Make sure the...
... video camera/recorder to a brand-new disc. If your PC display adapter (video card) conforms to save a video edited on playback screen. Movies are using ImageMixer 3 an MPEG file imported Mac Edition for DVDCAM uses the audio format of PC. The file system of... for DVDCAM for date/time indication on the video editor of this DVD video camera/recorder is played audio will take some time to starting ImageMixer 3. It will be used after the creating software of this DVD video camera/recorder is introduced: Only video will appear for playback. Make sure the...
