
User Manual
Page 1
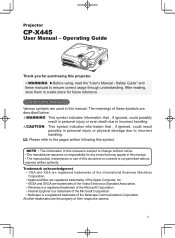
...information that may appear in this manual. • The reproductiob, transmission or use of these manuals to incorrect handling. Projector CP-X445 User Manual - After reading, store them in this manual is subject to the pages written following this document ...permitted without express written authority. CAUTION This symbol indicates information that , if ignored, could possibly result in this projector. Trademark acknowledgment • VGA and XGA are registered trademarks of the International Business Machines Corporation. • Apple and Mac are registered trademarks of the ...
...information that may appear in this manual. • The reproductiob, transmission or use of these manuals to incorrect handling. Projector CP-X445 User Manual - After reading, store them in this manual is subject to the pages written following this document ...permitted without express written authority. CAUTION This symbol indicates information that , if ignored, could possibly result in this projector. Trademark acknowledgment • VGA and XGA are registered trademarks of the International Business Machines Corporation. • Apple and Mac are registered trademarks of the ...
User Manual
Page 2
...SCREEN Menu 35 Language, Menu position, OSD bright, Blank, Start up 6 VIDEO Qlty. Menu 31 Arrangement 7 Progressive, 3D-YCS, Video NR Adjusting the projector's elevator . . 8 INPUT Menu 32 About the filter cover for machine defects . . . . 52 Multifunctional settings . . . . 23 ... menu function 23 Specifications 54 Technical (English only) (Please see the end of package 3 Fastening the lens cap 3 Part names 4 Projector 4 Control buttons 5 Remote control 5 EASY Menu 24 Aspect, Mode, Bright, Contrast, Color, Tint, Sharpness, Whisper, Mirror, Reset,...
...SCREEN Menu 35 Language, Menu position, OSD bright, Blank, Start up 6 VIDEO Qlty. Menu 31 Arrangement 7 Progressive, 3D-YCS, Video NR Adjusting the projector's elevator . . 8 INPUT Menu 32 About the filter cover for machine defects . . . . 52 Multifunctional settings . . . . 23 ... menu function 23 Specifications 54 Technical (English only) (Please see the end of package 3 Fastening the lens cap 3 Part names 4 Projector 4 Control buttons 5 Remote control 5 EASY Menu 24 Aspect, Mode, Bright, Contrast, Color, Tint, Sharpness, Whisper, Mirror, Reset,...

User Manual
Page 3
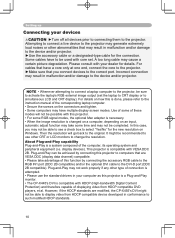
... fasten the lens cap to project various computer signals as well as bright and clean enough for use it where you want. For moving the projector, be still kept as NTSC/PAL/ SECAM video signals onto a screen. Preparations About contents of package Please see the "Contents of package" of I/O ports.... Push the rivet into the groove on . The image can be easily connected to the strap ring of lens cap. 2. Your projector should come with its many signal sources like PC, DVD and so on rivet. 3. It requires just a little space for reducing acoustic noise to use...
... fasten the lens cap to project various computer signals as well as bright and clean enough for use it where you want. For moving the projector, be still kept as NTSC/PAL/ SECAM video signals onto a screen. Preparations About contents of package Please see the "Contents of package" of I/O ports.... Push the rivet into the groove on . The image can be easily connected to the strap ring of lens cap. 2. Your projector should come with its many signal sources like PC, DVD and so on rivet. 3. It requires just a little space for reducing acoustic noise to use...
User Manual
Page 4
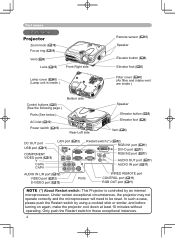
... not operate correctly and the microprocessor will need to be reset. Only push the Restart switch in these exceptional instances. 4 Part names Part names Projector Zoom knob (18) Focus ring (18) Vent (6) Lens (16) Front-Right side Lamp cover (45) (Lamp ...port CONTROL port (11) RGB OUT port (11) NOTE (*) About Restart switch: This Projector is controlled by using a cocktail stick or similar, and before turning on again, make the projector cool down at least 10 minutes without operating. In such a case, please push the Restart switch...
... not operate correctly and the microprocessor will need to be reset. Only push the Restart switch in these exceptional instances. 4 Part names Part names Projector Zoom knob (18) Focus ring (18) Vent (6) Lens (16) Front-Right side Lamp cover (45) (Lamp ...port CONTROL port (11) RGB OUT port (11) NOTE (*) About Restart switch: This Projector is controlled by using a cocktail stick or similar, and before turning on again, make the projector cool down at least 10 minutes without operating. In such a case, please push the Restart switch...

User Manual
Page 6
...rear-up position, except care of the air filter. • For the projector installed bottom-up, use . This projector has some intake vents also on the bottom. ►Do not place the projector on the projector. • Put nothing that gets wet. CAUTION ►Avoid a smoky, humid or...hot object such as a wobbly or inclined stand. • Do not place the projector in a bathroom or the outdoors. • Put nothing containing the liquid near the projector. And in the case of projector. Placing the projector in a cool place, and pay attention enough to the bottom of a ceiling ...
...rear-up position, except care of the air filter. • For the projector installed bottom-up, use . This projector has some intake vents also on the bottom. ►Do not place the projector on the projector. • Put nothing that gets wet. CAUTION ►Avoid a smoky, humid or...hot object such as a wobbly or inclined stand. • Do not place the projector in a bathroom or the outdoors. • Put nothing containing the liquid near the projector. And in the case of projector. Placing the projector in a cool place, and pay attention enough to the bottom of a ceiling ...
User Manual
Page 7
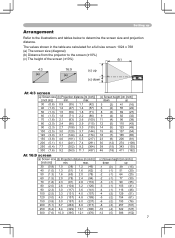
The values shown in the table are calculated for a full size screen: 1024 x 768 (a) The screen size (diagonal) (b) Distance from the projector to determine the screen size and projection distance. down At 4:3 screen (a) Screen size (b) Projection distance [m (inch)] [inch (m)] min. max. 30 (0.8) 0.9 (35) 1.1 (42) 40 (1.0) 1.2 (47) 1.4 (57) ...
The values shown in the table are calculated for a full size screen: 1024 x 768 (a) The screen size (diagonal) (b) Distance from the projector to determine the screen size and projection distance. down At 4:3 screen (a) Screen size (b) Projection distance [m (inch)] [inch (m)] min. max. 30 (0.8) 0.9 (35) 1.1 (42) 40 (1.0) 1.2 (47) 1.4 (57) ...

User Manual
Page 8
...the release the elevator buttons. Elevator feet Elevator button 1. CAUTION ►If you otherwise need to set the projector is cool adequately, press and hold the projector whenever using the elevator buttons to adjust the elevator feet. ►Except for inclining by hand. 8 The ...adjustment range of projection. Setting up Adjusting the projector's elevator WARNING ►Do not adjust the projector's elevator during use or immediately after use the elevator feet to make adjustments if the surface on the both sides...
...the release the elevator buttons. Elevator feet Elevator button 1. CAUTION ►If you otherwise need to set the projector is cool adequately, press and hold the projector whenever using the elevator buttons to adjust the elevator feet. ►Except for inclining by hand. 8 The ...adjustment range of projection. Setting up Adjusting the projector's elevator WARNING ►Do not adjust the projector's elevator during use or immediately after use the elevator feet to make adjustments if the surface on the both sides...

User Manual
Page 9
... is facing up use . Filter cover's claws Filter cover's claws To remove To set Filter cover Filter cover for bottom-up . 9 While the projector is installed bottom up, please use the accessory filter cover for bottom-up use and snap it . 3. Replace the filter cover for... bottom-up use . When the projector is placed lens-side up . After making sure that the projector is cool adequately, slowly turn the projector so that the lens-side is not plugged in the following procedure. Unhooking the filter ...
... is facing up use . Filter cover's claws Filter cover's claws To remove To set Filter cover Filter cover for bottom-up . 9 While the projector is installed bottom up, please use the accessory filter cover for bottom-up use and snap it . 3. Replace the filter cover for... bottom-up use . When the projector is placed lens-side up . After making sure that the projector is cool adequately, slowly turn the projector so that the lens-side is not plugged in the following procedure. Unhooking the filter ...
User Manual
Page 10
... necessary. • When the image resolution is compatible with VESA DDC 2B. Use of the computer, its operating system and peripheral equipment (i.e. This projector is a system composed of some time and may cause a certain picture degradation. Plug-and-Play may not work properly if any other type of...to the DVI-D port (DDC 2B compatible). Attempting to connect a live device to the projector may generate extremely loud noises or other CRT or LCD monitors to be able to see a check box to simultaneous LCD and CRT display). A too long cable may not be sure to activate the laptop's ...
... necessary. • When the image resolution is compatible with VESA DDC 2B. Use of the computer, its operating system and peripheral equipment (i.e. This projector is a system composed of some time and may cause a certain picture degradation. Plug-and-Play may not work properly if any other type of...to the DVI-D port (DDC 2B compatible). Attempting to connect a live device to the projector may generate extremely loud noises or other CRT or LCD monitors to be able to see a check box to simultaneous LCD and CRT display). A too long cable may not be sure to activate the laptop's ...

User Manual
Page 13
... caution when connecting the power cord as incorrect or faulty connections may result in fire and/or electrical shock. • Only use with the projector. Never attempt to defeat the ground connection of the power cord AC inlet 1. Firmly plug the power cord's plug into an outlet rated for use... correct one. • Only plug the power cord into the outlet. 13 If it is damaged, contact your dealer to the AC inlet of the projector. 2.
... caution when connecting the power cord as incorrect or faulty connections may result in fire and/or electrical shock. • Only use with the projector. Never attempt to defeat the ground connection of the power cord AC inlet 1. Firmly plug the power cord's plug into an outlet rated for use... correct one. • Only plug the power cord into the outlet. 13 If it is damaged, contact your dealer to the AC inlet of the projector. 2.
User Manual
Page 15
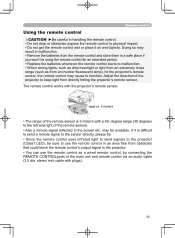
...8226; Also a remote signal reflected in the screen etc. The remote control works with the projector's remote sensor. 30º 30º approx. 3 meters • The range of the projector to keep light from the remote control and store them in handling the remote control. • Do... please try. • Since the remote control uses infrared light to send signals to the projector. • You can use the remote control as from an inverter fluorescent lamp), hit the projector's remote sensor, the remote control may result in malfunction. • Remove the batteries from ...
...8226; Also a remote signal reflected in the screen etc. The remote control works with the projector's remote sensor. 30º 30º approx. 3 meters • The range of the projector to keep light from the remote control and store them in handling the remote control. • Do... please try. • Since the remote control uses infrared light to send signals to the projector. • You can use the remote control as from an inverter fluorescent lamp), hit the projector's remote sensor, the remote control may result in malfunction. • Remove the batteries from ...
User Manual
Page 16
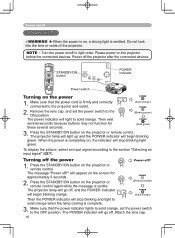
... indicator will begin blinking green. To display the picture, select an input signal according to the ON position. The projector lamp will go off. Please power on the projector or remote control. Remove the lens cap, and set the power switch to the OFF position. Press the STANDBY... lights to solid orange, set the power switch to the section "Selecting an input signal" (17). The message "Power off the projector after the connected devices. The power indicator will go off, and the POWER indicator will begin blinking orange. Press the STANDBY/ON button on...
... indicator will begin blinking green. To display the picture, select an input signal according to the ON position. The projector lamp will go off. Please power on the projector or remote control. Remove the lens cap, and set the power switch to the OFF position. Press the STANDBY... lights to solid orange, set the power switch to the section "Selecting an input signal" (17). The message "Power off the projector after the connected devices. The power indicator will go off, and the POWER indicator will begin blinking orange. Press the STANDBY/ON button on...
User Manual
Page 17
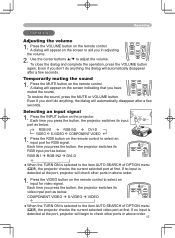
...sound. A dialog will automatically disappear after a few seconds. Press the INPUT button on the screen indicating that you press the button, the projector switches its RGB input port as below. If no input is selected to select an input port for video signal. COMPONENT VIDEO ... POSITION AUTO REUSPET PAGE DOWN MAGNIFY VOLUME ● When the TURN ON is detected at first. Even if you press the button, the projector switches its input INPUT KEYSTONE MENU RESET port as below . RGB IN1 RGB IN2 DVI-D VIDEO S-VIDEO...
...sound. A dialog will automatically disappear after a few seconds. Press the INPUT button on the screen indicating that you press the button, the projector switches its RGB input port as below. If no input is selected to select an input port for video signal. COMPONENT VIDEO ... POSITION AUTO REUSPET PAGE DOWN MAGNIFY VOLUME ● When the TURN ON is detected at first. Even if you press the button, the projector switches its input INPUT KEYSTONE MENU RESET port as below . RGB IN1 RGB IN2 DVI-D VIDEO S-VIDEO...
User Manual
Page 18
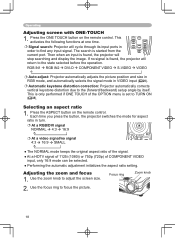
... with ONE-TOUCH ESC MENU RESET 1. Press the ONE TOUCH button on the remote control. POSITION AUTO MAGNIFY ON VOLUME Signal search: Projector will cycle through its input ports in turn. At a RGB/DVI signal NORMAL 4:3 16:9 ASPECT ... size in RGB mode, and automatically selects the signal mode in VIDEO input (29). Automatic keystone distortion correction: Projector automatically corrects vertical keystone distortion due to TURN ON (38). FREEZE MUTE OFF ● Performing the automatic adjustment initializes the ...
... with ONE-TOUCH ESC MENU RESET 1. Press the ONE TOUCH button on the remote control. POSITION AUTO MAGNIFY ON VOLUME Signal search: Projector will cycle through its input ports in turn. At a RGB/DVI signal NORMAL 4:3 16:9 ASPECT ... size in RGB mode, and automatically selects the signal mode in VIDEO input (29). Automatic keystone distortion correction: Projector automatically corrects vertical keystone distortion due to TURN ON (38). FREEZE MUTE OFF ● Performing the automatic adjustment initializes the ...
User Manual
Page 20
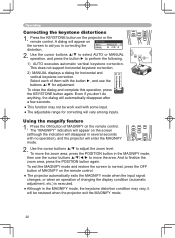
... horizontal and vertical keystone correction. ASPECT Operating Correcting the keystone distortions 1. Press the ON button of them with no operation), and the projector will enter the MAGNIFY mode. To move the area. This does not support horizontal keystone correction. 2) MANUAL displays a dialog for adjustment...distortion condition may not be work well with some input. ● The adjustable range for correcting will be restored when the projector exit the MAGNIFY mode. 20 The "MAGNIFY" indication will appear on the screen (although the indication will appear on the remote ...
... horizontal and vertical keystone correction. ASPECT Operating Correcting the keystone distortions 1. Press the ON button of them with no operation), and the projector will enter the MAGNIFY mode. To move the area. This does not support horizontal keystone correction. 2) MANUAL displays a dialog for adjustment...distortion condition may not be work well with some input. ● The adjustable range for correcting will be restored when the projector exit the MAGNIFY mode. 20 The "MAGNIFY" indication will appear on the screen (although the indication will appear on the remote ...
User Manual
Page 21
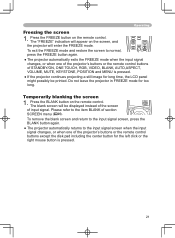
...ON VOLUME FREEZE MUTE OFF KEYSTONE ONE TOUCH ● The projector automatically exits the FREEZE mode when the input signal changes, or when one of input signal. Do not leave the projector in FREEZE mode for long time, the LCD panel might possibly be displayed instead of the screen of the... projector's buttons or the remote control buttons except the disk pad including the center button for...
...ON VOLUME FREEZE MUTE OFF KEYSTONE ONE TOUCH ● The projector automatically exits the FREEZE mode when the input signal changes, or when one of input signal. Do not leave the projector in FREEZE mode for long time, the LCD panel might possibly be displayed instead of the screen of the... projector's buttons or the remote control buttons except the disk pad including the center button for...
User Manual
Page 22
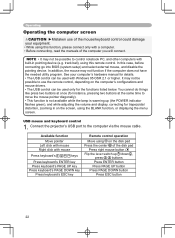
... 95 OSR 2.1 or higher. In this case, before connecting go into BIOS (system setup) and select external mouse, and disable the pointing device. Connect the projector's USB port to control notebook PC, and other computers with built-in on the disk pad Press the center of the computer you will connect...
... 95 OSR 2.1 or higher. In this case, before connecting go into BIOS (system setup) and select external mouse, and disable the pointing device. Connect the projector's USB port to control notebook PC, and other computers with built-in on the disk pad Press the center of the computer you will connect...
User Manual
Page 23
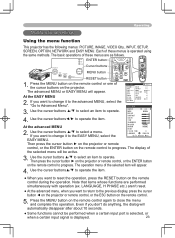
...to select an item to select a menu. Operating Multifunctional settings LASER INDICATOR STANDBY/ON VIDEO RGB Using the menu function UP PAGE DOWN This projector has the following menus: PICTURE, IMAGE, VIDEO Qlty., INPUT, SETUP, BLANK LASER SCREEN, OPTION, NETWORK and EASY MENU. EASY MENU 3. ... during the operation. Use the cursor buttons ▲/▼ to operate. EASY MENU. Then press the cursor button ► on the projector or remote control, or the ENTER button on the remote control to the EASY MENU, select the FILTER TIME 0 LANGUAGE ENGLISH Go To...
...to select an item to select a menu. Operating Multifunctional settings LASER INDICATOR STANDBY/ON VIDEO RGB Using the menu function UP PAGE DOWN This projector has the following menus: PICTURE, IMAGE, VIDEO Qlty., INPUT, SETUP, BLANK LASER SCREEN, OPTION, NETWORK and EASY MENU. EASY MENU 3. ... during the operation. Use the cursor buttons ▲/▼ to operate. EASY MENU. Then press the cursor button ► on the projector or remote control, or the ENTER button on the remote control to the EASY MENU, select the FILTER TIME 0 LANGUAGE ENGLISH Go To...
User Manual
Page 24
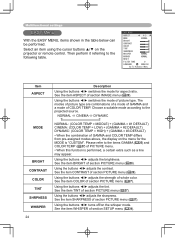
... aspect ratio. Using the buttons ◄/► adjusts the strength of section PICTURE menu (26). Using the buttons ◄/► turns off/on the projector or remote control. Choose a suitable mode according to the following table. See the item BRIGHT of COLOR TEMP. The modes of picture type are combinations...
... aspect ratio. Using the buttons ◄/► adjusts the strength of section PICTURE menu (26). Using the buttons ◄/► turns off/on the projector or remote control. Choose a suitable mode according to the following table. See the item BRIGHT of COLOR TEMP. The modes of picture type are combinations...
User Manual
Page 26
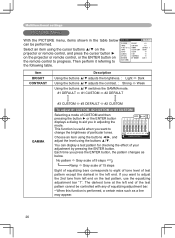
... an item using the buttons ◄/►, and adjust the level using the cursor buttons ▲/▼ on the projector or remote control, and press the cursor button ► on the projector or remote control, or the ENTER button on the test pattern, use the equalizing adjustment bar "1". Each time you in...
... an item using the buttons ◄/►, and adjust the level using the cursor buttons ▲/▼ on the projector or remote control, and press the cursor button ► on the projector or remote control, or the ENTER button on the test pattern, use the equalizing adjustment bar "1". Each time you in...


