User Manual
Page 1
... VGA and XGA are registered trademarks of International Business Machines Corporation. • Apple and Mac are registered trademarks of Apple Computer, Inc. • VESA and SVGA are the properties of this symbol. WARNING This symbol indicates information that may appear in personal injury or physical damage due to incorrect handling. .... • Windows is subject to incorrect handling. NOTE • The information in a safe place for future reference. After reading them, store them in this projector. All other trademarks are trademarks of Microsoft Corporation...
... VGA and XGA are registered trademarks of International Business Machines Corporation. • Apple and Mac are registered trademarks of Apple Computer, Inc. • VESA and SVGA are the properties of this symbol. WARNING This symbol indicates information that may appear in personal injury or physical damage due to incorrect handling. .... • Windows is subject to incorrect handling. NOTE • The information in a safe place for future reference. After reading them, store them in this projector. All other trademarks are trademarks of Microsoft Corporation...
User Manual
Page 2
...Language, About contents of package 3 Go to advanced menu Fastening the lens cover 3 PICTURE Menu 27 Part names 4 Brightness, Contrast, Gamma, Projector 4 Color temp, Color, Tint, Sharpness, Control buttons 6 Progressive, My memory Remote control 6 IMAGE Menu 30 Setting up , MyScreen, MyScreen... OSD bright., Blank, Start up 7 Arrangement 8 Aspect, Over scan, V. position, H. phase, H. size, Auto adjust execute Adjusting the projector's elevator . . 9 INPUT Menu 32 Using the Security Bar 10 Color space, Component, Video format, Connecting your devices 11 Frame lock, ...
...Language, About contents of package 3 Go to advanced menu Fastening the lens cover 3 PICTURE Menu 27 Part names 4 Brightness, Contrast, Gamma, Projector 4 Color temp, Color, Tint, Sharpness, Control buttons 6 Progressive, My memory Remote control 6 IMAGE Menu 30 Setting up , MyScreen, MyScreen... OSD bright., Blank, Start up 7 Arrangement 8 Aspect, Over scan, V. position, H. phase, H. size, Auto adjust execute Adjusting the projector's elevator . . 9 INPUT Menu 32 Using the Security Bar 10 Color space, Component, Video format, Connecting your devices 11 Frame lock, ...
User Manual
Page 3
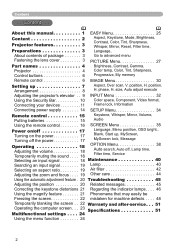
...in bright rooms. Low Noise WHISPER mode is available for reducing acoustic noise to realize quieter operation. Projector features / Preparations Projector features This projector is used to project various computer signals as well as bright and clean enough for use in low luminance rooms ...Fastening the lens cover To avoid losing the lens cover, please fasten it where you more important than brightness. Rich Connectivity This projector has a variety of I/O ports. NOTE • Keep the original packing materials for future reshipment. Put the strap into the strap hole...
...in bright rooms. Low Noise WHISPER mode is available for reducing acoustic noise to realize quieter operation. Projector features / Preparations Projector features This projector is used to project various computer signals as well as bright and clean enough for use in low luminance rooms ...Fastening the lens cover To avoid losing the lens cover, please fasten it where you more important than brightness. Rich Connectivity This projector has a variety of I/O ports. NOTE • Keep the original packing materials for future reshipment. Put the strap into the strap hole...
User Manual
Page 4
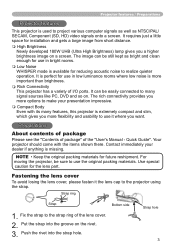
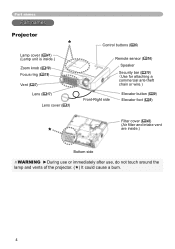
Part names Part names Projector Lamp cover (41) (Lamp unit is inside.) Zoom knob (19) Focus ring (19) Vent (7) Lens (17) Lens cover (3) ... intake vent are inside.) Bottom side WARNING ►During use or immediately after use, do not touch around the lamp and vents of the projector. () It could cause a burn. 4
Part names Part names Projector Lamp cover (41) (Lamp unit is inside.) Zoom knob (19) Focus ring (19) Vent (7) Lens (17) Lens cover (3) ... intake vent are inside.) Bottom side WARNING ►During use or immediately after use, do not touch around the lamp and vents of the projector. () It could cause a burn. 4
User Manual
Page 5
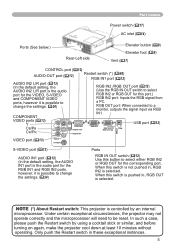
... to select either RGB IN2 or RGB OUT for this port.) RGB IN2 port: Inputs the RGB signal from a PC. Under certain exceptional circumstances, the projector may not operate correctly and the microprocessor will need to a monitor, outputs the signal input via RGB IN1. RGB OUT port: When connected to be... port (12) (Use the RGB IN OUT switch to select RGB IN2 or RGB OUT for the corresponding port. NOTE (*) About Restart switch: This projector is controlled by using a cocktail stick or similar, and before turning on again, make the...
... to select either RGB IN2 or RGB OUT for this port.) RGB IN2 port: Inputs the RGB signal from a PC. Under certain exceptional circumstances, the projector may not operate correctly and the microprocessor will need to a monitor, outputs the signal input via RGB IN1. RGB OUT port: When connected to be... port (12) (Use the RGB IN OUT switch to select RGB IN2 or RGB OUT for the corresponding port. NOTE (*) About Restart switch: This projector is controlled by using a cocktail stick or similar, and before turning on again, make the...
User Manual
Page 7
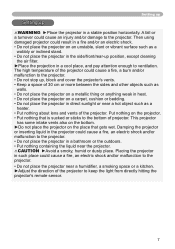
... turnover could cause a fire, an electric shock and/or malfunction to the projector. • Do not place the projector near the projector. Put nothing about lens and vents of the projector. Placing the projector in such place could cause an injury and/or damage to keep the light from ... heater. • Put nothing on the place that is sucked or sticks to the bottom of projector. This projector has some intake vents also on the bottom. ►Do not place the projector on the projector. • Put nothing containing the liquid near a humidifier, a smoking space or a...
... turnover could cause a fire, an electric shock and/or malfunction to the projector. • Do not place the projector near the projector. Put nothing about lens and vents of the projector. Placing the projector in such place could cause an injury and/or damage to keep the light from ... heater. • Put nothing on the place that is sucked or sticks to the bottom of projector. This projector has some intake vents also on the bottom. ►Do not place the projector on the projector. • Put nothing containing the liquid near a humidifier, a smoking space or a...
User Manual
Page 8
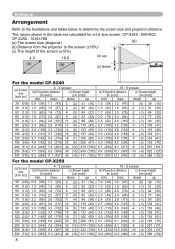
... the table are calculated for a full size screen: CP-S240 : 800×600, CP-X250 : 1024×768 (a) The screen size (diagonal) (b) (b) Distance from the projector to determine the screen size and projection distance. max. down For the model CP-S240 (a) Screen size [inch (m)] 4 : 3 screen (b) Projection distance [m (inch)] (c) Screen height [cm...
... the table are calculated for a full size screen: CP-S240 : 800×600, CP-X250 : 1024×768 (a) The screen size (diagonal) (b) (b) Distance from the projector to determine the screen size and projection distance. max. down For the model CP-S240 (a) Screen size [inch (m)] 4 : 3 screen (b) Projection distance [m (inch)] (c) Screen height [cm...
User Manual
Page 9
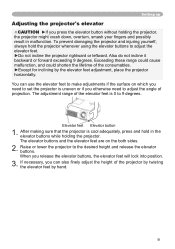
...release the elevator buttons. The elevator buttons and the elevator feet are on which you need to 9 degrees. To prevent damaging the projector and injuring yourself, always hold in malfunction. You can also finely adjust the height of the elevator feet is 0 to ...release the elevator buttons, the elevator feet will lock into position. 3. Setting up Adjusting the projector's elevator CAUTION ►If you press the elevator button without holding the projector, the projector might crash down, overturn, smash your fingers and possibly result in the elevator buttons while...
...release the elevator buttons. The elevator buttons and the elevator feet are on which you need to 9 degrees. To prevent damaging the projector and injuring yourself, always hold in malfunction. You can also finely adjust the height of the elevator feet is 0 to ...release the elevator buttons, the elevator feet will lock into position. 3. Setting up Adjusting the projector's elevator CAUTION ►If you press the elevator button without holding the projector, the projector might crash down, overturn, smash your fingers and possibly result in the elevator buttons while...
User Manual
Page 10
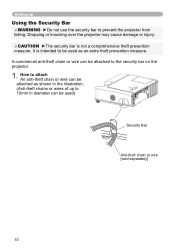
... It is not a comprehensive theft prevention measure. Setting up to 10mm in diameter can be attached to the security bar on the projector. 1. Dropping or knocking over the projector may cause damage or injury. How to attach An anti-theft chain or wire can be used as shown in the illustration. (Anti...-theft chains or wires of up Using the Security Bar WARNING ►Do not use the security bar to prevent the projector from falling. A commercial anti-theft chain or wire can be attached as an extra theft prevention measure.
... It is not a comprehensive theft prevention measure. Setting up to 10mm in diameter can be attached to the security bar on the projector. 1. Dropping or knocking over the projector may cause damage or injury. How to attach An anti-theft chain or wire can be used as shown in the illustration. (Anti...-theft chains or wires of up Using the Security Bar WARNING ►Do not use the security bar to prevent the projector from falling. A commercial anti-theft chain or wire can be attached as an extra theft prevention measure.
User Manual
Page 11
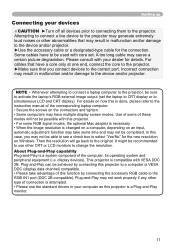
... (set . display devices). A too long cable may not be able to see a check box to simultaneous LCD and CRT display). NOTE • Whenever attempting to connect a laptop computer to the projector, be recommended to use the standard drivers in your computer as this function by connecting this... About Plug-and-Play capability Plug-and-Play is a Plug-and-Play monitor. 11 Attempting to connect a live device to the projector may generate extremely loud noises or other CRT or LCD monitors to the correct port. Incorrect connection may result in malfunction and/or damage to the...
... (set . display devices). A too long cable may not be able to see a check box to simultaneous LCD and CRT display). NOTE • Whenever attempting to connect a laptop computer to the projector, be recommended to use the standard drivers in your computer as this function by connecting this... About Plug-and-Play capability Plug-and-Play is a Plug-and-Play monitor. 11 Attempting to connect a live device to the projector may generate extremely loud noises or other CRT or LCD monitors to the correct port. Incorrect connection may result in malfunction and/or damage to the...
User Manual
Page 14
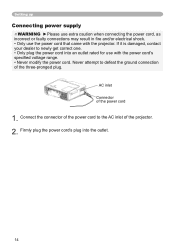
... caution when connecting the power cord, as incorrect or faulty connections may result in fire and/or electrical shock. • Only use with the projector. If it is damaged, contact your dealer to the AC inlet of the...
... caution when connecting the power cord, as incorrect or faulty connections may result in fire and/or electrical shock. • Only use with the projector. If it is damaged, contact your dealer to the AC inlet of the...

User Manual
Page 16
...sensor directly, please try to use the reflected signal. • Since the remote control uses infrared light to send signals to the projector (Class1 LED), be sure to use the remote control in an area free from obstacles that could block the remote control's output signal to the...8226; When strong lights (such as direct sunlight) or light from an extremely close range (such as from an inverter fluorescent lamp), hit the projector's remote sensor, the remote control may result in malfunction. • Remove the batteries from the remote control and store them in a safe place if you...
...sensor directly, please try to use the reflected signal. • Since the remote control uses infrared light to send signals to the projector (Class1 LED), be sure to use the remote control in an area free from obstacles that could block the remote control's output signal to the...8226; When strong lights (such as direct sunlight) or light from an extremely close range (such as from an inverter fluorescent lamp), hit the projector's remote sensor, the remote control may result in malfunction. • Remove the batteries from the remote control and store them in a safe place if you...

User Manual
Page 17
...right order. Also do not peep at least 1 minute in green) the section "Selecting an input signal" (18). Please power on the projector or the remote control. To display the picture, select an input signal according to (Steady orange) POWER (Blinking in this case. However, please pay... special attention to the projector and the outlet. 2. Make sure that the power cord is firmly and correctly connected to below two points when you do: (1) Please...
...right order. Also do not peep at least 1 minute in green) the section "Selecting an input signal" (18). Please power on the projector or the remote control. To display the picture, select an input signal according to (Steady orange) POWER (Blinking in this case. However, please pay... special attention to the projector and the outlet. 2. Make sure that the power cord is firmly and correctly connected to below two points when you do: (1) Please...

User Manual
Page 18
... as below . Use the cursor buttons ▲/▼ to RGB signals) OFF END PAGE DOWN MUTE when TURN ON is detected at the port, the projector will automatically disappear after a few seconds. A dialog will check the RGB IN1 port first. Each time you have muted the sound. Even if... anything , the dialog will appear on the screen to select an input port for the AUTO SEARCH item in the OPTION menu FREEZE KEYSTONE the projector will appear on the remote control. Press the VOLUME button on the screen indicating that case "RENGTER B2/ RGB OUT RGB OUT" ...
... as below . Use the cursor buttons ▲/▼ to RGB signals) OFF END PAGE DOWN MUTE when TURN ON is detected at the port, the projector will automatically disappear after a few seconds. A dialog will check the RGB IN1 port first. Each time you have muted the sound. Even if... anything , the dialog will appear on the screen to select an input port for the AUTO SEARCH item in the OPTION menu FREEZE KEYSTONE the projector will appear on the remote control. Press the VOLUME button on the screen indicating that case "RENGTER B2/ RGB OUT RGB OUT" ...

User Manual
Page 19
... ASPECT button on the remote control. Zoom knob ESC RESET 2. Operating Selecting an input signal (continued) 1. Then when an input is found , the projector will start to VIDEO RGB SEARCH ASPECT AUTO BLANK find any input signals. FREEZE KEYSTONE ● For an HDTV signal of the signal. Press... input port as the COMPONENT VIDEO input, only 16:9 mode can be selected. ENTER Adjusting the zoom and focus Focus ring 1. The projector will stop searching and display MAGNIFY ON HOME PAGE UP VOLUME the image. ESC RESET Each time you press the button, the...
... ASPECT button on the remote control. Zoom knob ESC RESET 2. Operating Selecting an input signal (continued) 1. Then when an input is found , the projector will start to VIDEO RGB SEARCH ASPECT AUTO BLANK find any input signals. FREEZE KEYSTONE ● For an HDTV signal of the signal. Press... input port as the COMPONENT VIDEO input, only 16:9 mode can be selected. ENTER Adjusting the zoom and focus Focus ring 1. The projector will stop searching and display MAGNIFY ON HOME PAGE UP VOLUME the image. ESC RESET Each time you press the button, the...
User Manual
Page 21
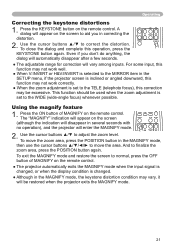
... excessive. Using the magnify feature 1. And to adjust the zoom level. OFF END PAGE DOWN MUTE 2. ESC RESET ● The projector automatically exits the MAGNIFY mode when the input signal is changed, or when the display condition is changed. ● Although in the ... to move the zoom area, press the POSITION button in several seconds with MAGNIFY ON HOME PAGE UP VOLUME no operation), and the projector will automatically disappear after a few seconds. Operating VIDEO RGB SEARCH Correcting the keystone distortions ASPECT AUTO BLANK 1. For somESC e input, ...
... excessive. Using the magnify feature 1. And to adjust the zoom level. OFF END PAGE DOWN MUTE 2. ESC RESET ● The projector automatically exits the MAGNIFY mode when the input signal is changed, or when the display condition is changed. ● Although in the ... to move the zoom area, press the POSITION button in several seconds with MAGNIFY ON HOME PAGE UP VOLUME no operation), and the projector will automatically disappear after a few seconds. Operating VIDEO RGB SEARCH Correcting the keystone distortions ASPECT AUTO BLANK 1. For somESC e input, ...
User Manual
Page 22
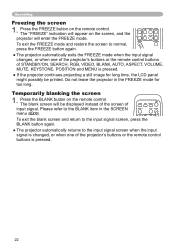
...MAGNIFY ON HOME PAGE UP VOLUME To exit the blank screen and return to the BLANK item in the FREEZE mode for long time, the LCD panel might possibly be displayed instead of the screen of STANDBY/ON, SEARCH, RGB, VIDEO, BLANK, AUTO, ASPECESCT, VOLURMESETE, MUTE, ...KEYSTONE, POSITION and MENU is changed, or when one of the projector's buttons or the remote control bENTuERttons of VIDEO RGB SEARCH input signal. Operating Freezing the screen VIDEO RGB SEARCH ASPECT AUTO BLANK 1. FREEZE KEYSTONE ...
...MAGNIFY ON HOME PAGE UP VOLUME To exit the blank screen and return to the BLANK item in the FREEZE mode for long time, the LCD panel might possibly be displayed instead of the screen of STANDBY/ON, SEARCH, RGB, VIDEO, BLANK, AUTO, ASPECESCT, VOLURMESETE, MUTE, ...KEYSTONE, POSITION and MENU is changed, or when one of the projector's buttons or the remote control bENTuERttons of VIDEO RGB SEARCH input signal. Operating Freezing the screen VIDEO RGB SEARCH ASPECT AUTO BLANK 1. FREEZE KEYSTONE ...
User Manual
Page 23
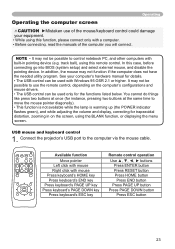
... ENTER button Press RESET button Press HOME button Press END button Press PAGE UP button Press PAGE DOWN button Press ESC button 23 Connect the projector's USB port to use of the computer you will connect. It may not be possible to the computer via the mouse cable. Operating Operating the...
... ENTER button Press RESET button Press HOME button Press END button Press PAGE UP button Press PAGE DOWN button Press ESC button 23 Connect the projector's USB port to use of the computer you will connect. It may not be possible to the computer via the mouse cable. Operating Operating the...
User Manual
Page 24
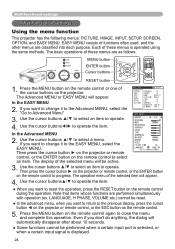
...selected menu will appear. 4. If you don't do anything, the dialog will appear. Press the MENU button on the projector. FREEZE KEYSTONE MENU button ENTER button Cursor buttons RESET button POSITION MENU ESC ENTER RESET VIDEO RGB SEARCH ASPECT AUTO BLANK MAGNIFY...FILTER TIME 0h LANGUAGE ENGLISH Go To Advance Menu... 3. Multifunctional settings Multifunctional settings Using the menu function VIDEO RGB SEARCH This projector has the following menus: PICTURE, IMAGE, INPUT, ASPECT SETUP, AUTO BLANK SCREEN, OPTION, and EASY MENU. EASY MENU ...
...selected menu will appear. 4. If you don't do anything, the dialog will appear. Press the MENU button on the projector. FREEZE KEYSTONE MENU button ENTER button Cursor buttons RESET button POSITION MENU ESC ENTER RESET VIDEO RGB SEARCH ASPECT AUTO BLANK MAGNIFY...FILTER TIME 0h LANGUAGE ENGLISH Go To Advance Menu... 3. Multifunctional settings Multifunctional settings Using the menu function VIDEO RGB SEARCH This projector has the following menus: PICTURE, IMAGE, INPUT, ASPECT SETUP, AUTO BLANK SCREEN, OPTION, and EASY MENU. EASY MENU ...
User Manual
Page 25
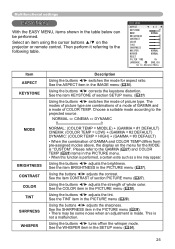
... the item CONTRAST of COLOR TEMP. See the TINT item in the PICTURE menu (28). Using the buttons ◄/► turns off/on the projector or remote control. Then perform it referring to the projected source. Choose a suitable mode according to the following table. This is not a malfunction. EASY MENU...
... the item CONTRAST of COLOR TEMP. See the TINT item in the PICTURE menu (28). Using the buttons ◄/► turns off/on the projector or remote control. Then perform it referring to the projected source. Choose a suitable mode according to the following table. This is not a malfunction. EASY MENU...


