
User Manual
Page 2
...memory IMAGE menu 30 Aspect, Over scan, V. phase, H. Contents Contents About this manual 1 EASY MENU 25 Contents 2 Projector features 3 Aspect, Zoom, Keystone, Mode, Bright, Contrast, Color, Tint, Sharpness, Whisper, Mirror, Reset, About contents of package . .... Language, Part names 4 Go to advanced menu Projector 4 PICTURE menu 27 Controls 5 Bright, Contrast, Gamma, Color temp, Remote control 5 Color, Tint, Sharpness, Progressive, Preparations 6 Fastening the lens cover 6 Putting batteries 7 Using the remote control 8 About the filter cover for...
...memory IMAGE menu 30 Aspect, Over scan, V. phase, H. Contents Contents About this manual 1 EASY MENU 25 Contents 2 Projector features 3 Aspect, Zoom, Keystone, Mode, Bright, Contrast, Color, Tint, Sharpness, Whisper, Mirror, Reset, About contents of package . .... Language, Part names 4 Go to advanced menu Projector 4 PICTURE menu 27 Controls 5 Bright, Contrast, Gamma, Color temp, Remote control 5 Color, Tint, Sharpness, Progressive, Preparations 6 Fastening the lens cover 6 Putting batteries 7 Using the remote control 8 About the filter cover for...
User Manual
Page 4
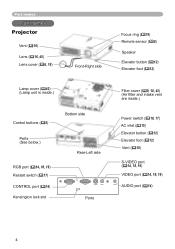
Part names Part names Projector Vent (10) Lens (16, 45) Lens cover (6, 16) Front-Right side Focus ring (19) Remote sensor (8) Speaker Elevator button (12) Elevator foot (12) Lamp cover (42) (Lamp unit is inside.) Filter cover (9, 10, 43) (Air &#...
Part names Part names Projector Vent (10) Lens (16, 45) Lens cover (6, 16) Front-Right side Focus ring (19) Remote sensor (8) Speaker Elevator button (12) Elevator foot (12) Lamp cover (42) (Lamp unit is inside.) Filter cover (9, 10, 43) (Air &#...

User Manual
Page 5
..., 17, 48) INPUT button (18) Cursor buttons 18~40) STANDBY/ON button (16, 17) LAMP TEMP POWER INPUT MENU STANDBY/ON Part names Remote control SEARCH button (19) RGB button (18) VIDEO button (18) ASPECT button (19) MAGNIFY ON button (21) OFF button (...
..., 17, 48) INPUT button (18) Cursor buttons 18~40) STANDBY/ON button (16, 17) LAMP TEMP POWER INPUT MENU STANDBY/ON Part names Remote control SEARCH button (19) RGB button (18) VIDEO button (18) ASPECT button (19) MAGNIFY ON button (21) OFF button (...

User Manual
Page 7
...out and/or put new batteries in fire, injury and/or pollution of the surrounding environment. • Be sure to use the remote control, please load the batteries. Replace the battery cover in the direction of different types at the same time. Remove the battery cover. ...direction of a battery, wipe out the flower and then replace a battery. To use only the batteries specified. Do not use the remote control for an extended period, remove the batteries from children and pets. • Do not recharge, short circuit, solder or disassemble a battery. •...
...out and/or put new batteries in fire, injury and/or pollution of the surrounding environment. • Be sure to use the remote control, please load the batteries. Replace the battery cover in the direction of different types at the same time. Remove the battery cover. ...direction of a battery, wipe out the flower and then replace a battery. To use only the batteries specified. Do not use the remote control for an extended period, remove the batteries from children and pets. • Do not recharge, short circuit, solder or disassemble a battery. •...

User Manual
Page 8
...in an area free from an inverter fluorescent lamp) hit the projector's remote sensor, the remote control may be using the remote control for an extended period. • Replace the batteries whenever the remote control starts to malfunction. • When strong lights such as direct ...sunlight or light from an extremely close range (such as from obstacles that could block the remote control's output signal to keep light from directly hitting the projector's remote sensor. Incorrect handling could cause damage or malfunction. • Do not drop or otherwise expose the...
...in an area free from an inverter fluorescent lamp) hit the projector's remote sensor, the remote control may be using the remote control for an extended period. • Replace the batteries whenever the remote control starts to malfunction. • When strong lights such as direct ...sunlight or light from an extremely close range (such as from obstacles that could block the remote control's output signal to keep light from directly hitting the projector's remote sensor. Incorrect handling could cause damage or malfunction. • Do not drop or otherwise expose the...
User Manual
Page 10
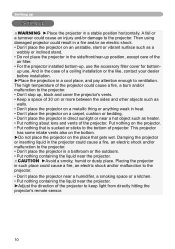
... the side/front/rear-up position, except care of projector. Placing the projector in heat. • Don't place the projector on the place that is sucked or sticks to keep light from directly hitting the projector's remote sensor. 10 Then using damaged projector could cause a fire, an electric shock and/or malfunction to ventilation. CAUTION...
... the side/front/rear-up position, except care of projector. Placing the projector in heat. • Don't place the projector on the place that is sucked or sticks to keep light from directly hitting the projector's remote sensor. 10 Then using damaged projector could cause a fire, an electric shock and/or malfunction to ventilation. CAUTION...
User Manual
Page 16
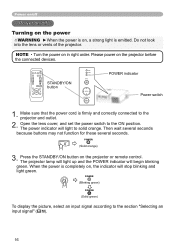
...stop blinking and light green. Then wait several seconds because buttons may not function for these several seconds. Press the STANDBY/ON button on the projector before the connected devices. POWER (Solid orange) 3. POWER (Blinking green) POWER (Solid green) To display the picture, select an input signal... to the ON position. Do not look into the lens or vents of the projector. When the power is completely on, the indicator will light to solid orange. Please power on the projector or remote control. Open the lens cover, and set the power switch to the section "...
...stop blinking and light green. Then wait several seconds because buttons may not function for these several seconds. Press the STANDBY/ON button on the projector before the connected devices. POWER (Solid orange) 3. POWER (Blinking green) POWER (Solid green) To display the picture, select an input signal... to the ON position. Do not look into the lens or vents of the projector. When the power is completely on, the indicator will light to solid orange. Please power on the projector or remote control. Open the lens cover, and set the power switch to the section "...

User Manual
Page 17
... orange. Close the lens cover. Only push the restart switch in right order. Press the STANDBY/ON button on the projector or remote control again while the message is green or blinking. Make sure that the power indicator lights to solid orange, set the...the OFF position. Press the STANDBY/ON button on the projector or remote control. POWER (Blinking orange) POWER (Solid orange) 3. For safety purposes, disconnect the power cord if the projector is complete. Under certain exceptional circumstances, the projector may not operate correctly even for approximately 5 seconds. Then...
... orange. Close the lens cover. Only push the restart switch in right order. Press the STANDBY/ON button on the projector or remote control again while the message is green or blinking. Make sure that the power indicator lights to solid orange, set the...the OFF position. Press the STANDBY/ON button on the projector or remote control. POWER (Blinking orange) POWER (Solid orange) 3. For safety purposes, disconnect the power cord if the projector is complete. Under certain exceptional circumstances, the projector may not operate correctly even for approximately 5 seconds. Then...
User Manual
Page 18
...SEARCH ASPECT AUTO BLANK MAGNIFY ON OFF FREEZE VOLUME MUTE KEYSTONE POSITION - Press the RGB button on the remote control to select the RGB port. Press the MUTE button on the projector. Selecting an input signal 1. S-VIDEO VIDEO VIDEO RGB SEARCH ASPECT AUTO BLANK MAGNIFY ON OFF... the S-VIDEO port at POSITION the MENU S-VIDEO port, projector will check the VIDEO port automatically. ZOOM + MENU ENTER ESC LAMP RESET TEMP POWER INPUT MENU STANDBY/ON 1. Press the VIDEO button on the remote control to select an input port for video signal. If no input ...
...SEARCH ASPECT AUTO BLANK MAGNIFY ON OFF FREEZE VOLUME MUTE KEYSTONE POSITION - Press the RGB button on the remote control to select the RGB port. Press the MUTE button on the projector. Selecting an input signal 1. S-VIDEO VIDEO VIDEO RGB SEARCH ASPECT AUTO BLANK MAGNIFY ON OFF... the S-VIDEO port at POSITION the MENU S-VIDEO port, projector will check the VIDEO port automatically. ZOOM + MENU ENTER ESC LAMP RESET TEMP POWER INPUT MENU STANDBY/ON 1. Press the VIDEO button on the remote control to select an input port for video signal. If no input ...

User Manual
Page 19
...adjust the zoom. RGB S-VIDEO VIDEO Operating STANDBY/ON VIDEO RGB SEARCH ASPECT AUTO BLANK VIDEO RGB SEARCH MAGNIFY HOME PAGE UP VOLUME ASPECTON AUTO BLANK END MAGNIFY OFF ON FREEZE OFF PAGE DOWN MUTE VOLUME KEYSTONE MUTE FREEZE POSITION POSITION KEYSTONE - Press... 16:9 At a video signal /no signal is found, the projector will begin to check its input ports in adjusting the zoom. 2. Then when an input is found, the projector will appear on the remote control. Press the ZOOM +/- VIDEO RGB SEARCH ASPECT AUTO BLANK Adjusting the zoom (...
...adjust the zoom. RGB S-VIDEO VIDEO Operating STANDBY/ON VIDEO RGB SEARCH ASPECT AUTO BLANK VIDEO RGB SEARCH MAGNIFY HOME PAGE UP VOLUME ASPECTON AUTO BLANK END MAGNIFY OFF ON FREEZE OFF PAGE DOWN MUTE VOLUME KEYSTONE MUTE FREEZE POSITION POSITION KEYSTONE - Press... 16:9 At a video signal /no signal is found, the projector will begin to check its input ports in adjusting the zoom. 2. Then when an input is found, the projector will appear on the remote control. Press the ZOOM +/- VIDEO RGB SEARCH ASPECT AUTO BLANK Adjusting the zoom (...

User Manual
Page 20
...after a few seconds. ● When this function is selected to reset the operation, press the RESET button on the remote control. Press the KEYSTONE button on the remote control. To complete this operation, press ENTER the KEYSTONE button again. Even if you in correcting the distortion. ASPECT ..., the clock POSITION - Use the cursor buttons ▲/▼ to adjust the picture position. Press the POSITION button on the remote control. VIDEO RGB SEARCH ASPECT AUTO BLANK MAGNIFY ON OFF FREEZE VOLUME MUTE KEYSTONE POSITION - Press the AUTO button on the...
...after a few seconds. ● When this function is selected to reset the operation, press the RESET button on the remote control. Press the KEYSTONE button on the remote control. To complete this operation, press ENTER the KEYSTONE button again. Even if you in correcting the distortion. ASPECT ..., the clock POSITION - Use the cursor buttons ▲/▼ to adjust the picture position. Press the POSITION button on the remote control. VIDEO RGB SEARCH ASPECT AUTO BLANK MAGNIFY ON OFF FREEZE VOLUME MUTE KEYSTONE POSITION - Press the AUTO button on the...
User Manual
Page 21
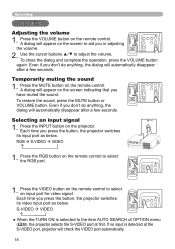
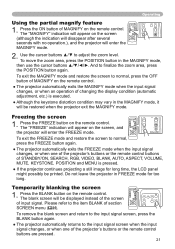
... zoom level. ZOOM + MENU ENTER 2. To exit the MAGNIFY mode and restore the screen to the item BLANK of the projector's buttons or the remote control ESC RESET buttons are pressed. 21 Temporarily blanking the screen 1. VIDEO RGB SEARCH ASPECT AUTO BLANK MAGNIFY ON OFF FREEZE... to the input signal screen when the input ENTER signal changes, or when one of the projector's buttons or the remote control buttons of MAGNIFY on the remote control. ● The projector automatically exits the MAGNIFY mode when the input signal changes, or when an operation of input ...
... zoom level. ZOOM + MENU ENTER 2. To exit the MAGNIFY mode and restore the screen to the item BLANK of the projector's buttons or the remote control ESC RESET buttons are pressed. 21 Temporarily blanking the screen 1. VIDEO RGB SEARCH ASPECT AUTO BLANK MAGNIFY ON OFF FREEZE... to the input signal screen when the input ENTER signal changes, or when one of the projector's buttons or the remote control buttons of MAGNIFY on the remote control. ● The projector automatically exits the MAGNIFY mode when the input signal changes, or when an operation of input ...

User Manual
Page 22
... VIDEO RGB SEARCH - The Advanced MENU or EASY MENU will appear. 2. VIDEO RGB SEARCH ASPECT AUTO BLANK Using the menu function MAGNIFY VOLUME ON This projector has the following menus: PICTURE, IMAGE, INPUT, SETUP, SCREEN, OPOTFFION and EAMUSTE Y MENU. At the Advance menu, when some input. ZOOM + MENU ... these functions may not work correctly with some menu is operated using the same methods. To display a menu Press the MENU button on the remote control or one of the cursor buttons on the menu using the cursor button ◄ or the ESC button before choosing the menu. (1) ...
... VIDEO RGB SEARCH - The Advanced MENU or EASY MENU will appear. 2. VIDEO RGB SEARCH ASPECT AUTO BLANK Using the menu function MAGNIFY VOLUME ON This projector has the following menus: PICTURE, IMAGE, INPUT, SETUP, SCREEN, OPOTFFION and EAMUSTE Y MENU. At the Advance menu, when some input. ZOOM + MENU ... these functions may not work correctly with some menu is operated using the same methods. To display a menu Press the MENU button on the remote control or one of the cursor buttons on the menu using the cursor button ◄ or the ESC button before choosing the menu. (1) ...

User Manual
Page 25
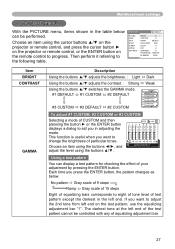
... mode according to the following table. See the item TINT of GAMMA and COLOR TEMP differs from pre-assigned modes above, the display on the projector or remote control. The modes of picture type are combinations of a mode of GAMMA (27) and a mode of section PICTURE menu. (27) Using the...
... mode according to the following table. See the item TINT of GAMMA and COLOR TEMP differs from pre-assigned modes above, the display on the projector or remote control. The modes of picture type are combinations of a mode of GAMMA (27) and a mode of section PICTURE menu. (27) Using the...
User Manual
Page 27
... the buttons ◄/►, and adjust the level using the cursor buttons ▲/▼ on the projector or remote control, and press the cursor button ► on the projector or remote control, or the ENTER button on the remote control to adjust the 2nd tone from left end on the test pattern, use the equalizing...
... the buttons ◄/►, and adjust the level using the cursor buttons ▲/▼ on the projector or remote control, and press the cursor button ► on the projector or remote control, or the ENTER button on the remote control to adjust the 2nd tone from left end on the test pattern, use the equalizing...

User Manual
Page 30
...;/▼ adjusts the horizontal position. Choose an item using the cursor buttons ▲/▼ on the projector or remote control, and press the cursor button ► on the projector or remote control, or the ENTER button on the remote control to eliminate flicker. Using the buttons ▲/▼ adjusts the over-scan ratio. Right...
...;/▼ adjusts the horizontal position. Choose an item using the cursor buttons ▲/▼ on the projector or remote control, and press the cursor button ► on the projector or remote control, or the ENTER button on the remote control to eliminate flicker. Using the buttons ▲/▼ adjusts the over-scan ratio. Right...

User Manual
Page 32
... to progress. If the picture becomes unstable (ex. Choose an item using the cursor buttons ▲/▼ on the projector or remote control, and press the cursor button ► on the projector or remote control, or the ENTER button on the input signal. 32 For a component video signal, the signal type is identifi...
... to progress. If the picture becomes unstable (ex. Choose an item using the cursor buttons ▲/▼ on the projector or remote control, and press the cursor button ► on the projector or remote control, or the ENTER button on the input signal. 32 For a component video signal, the signal type is identifi...
User Manual
Page 34
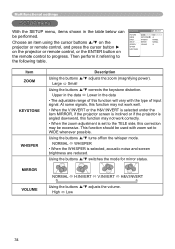
... may not work well. • When the V:INVERT or the H&V:INVERT is selected under the item MIRROR, if the projector screen is inclined or if the projector is selected, acoustic noise and screen brightness are reduced. Large Small Using the buttons ▲/▼ corrects the keystone... used with zoom set to progress. Choose an item using the cursor buttons ▲/▼ on the projector or remote control, and press the cursor button ► on the projector or remote control, or the ENTER button on the whisper mode. Then perform it referring to WIDE whenever possible....
... may not work well. • When the V:INVERT or the H&V:INVERT is selected under the item MIRROR, if the projector screen is inclined or if the projector is selected, acoustic noise and screen brightness are reduced. Large Small Using the buttons ▲/▼ corrects the keystone... used with zoom set to progress. Choose an item using the cursor buttons ▲/▼ on the projector or remote control, and press the cursor button ► on the projector or remote control, or the ENTER button on the whisper mode. Then perform it referring to WIDE whenever possible....

User Manual
Page 35
... perform it referring to progress. Choose an item using the cursor buttons ▲/▼ on the projector or remote control, and press the cursor button ► on the projector or remote control, or the ENTER button on the remote control to the following table. Multifunctional settings SCREEN menu With the SCREEN menu, items shown in...
... perform it referring to progress. Choose an item using the cursor buttons ▲/▼ on the projector or remote control, and press the cursor button ► on the projector or remote control, or the ENTER button on the remote control to the following table. Multifunctional settings SCREEN menu With the SCREEN menu, items shown in...

User Manual
Page 38
Choose an item using the cursor buttons ▲/▼ on the projector or remote control, and press the cursor button ► on the projector or remote control, or the ENTER button on /off the power" (17). 38 MENU [RGB] PICTURE IMAGE INPUT SETUP SCREEN OPTION EASY MENU...Item AUTO SEARCH Description Using the buttons ▲/▼ turns on the remote control to the following . TURN ON TURN OFF When the TURN ON is not turned off automatically. When the time is set to 1 to 0, the projector is selected, detecting no -signal or an unsuitable signal reaches at ...
Choose an item using the cursor buttons ▲/▼ on the projector or remote control, and press the cursor button ► on the projector or remote control, or the ENTER button on /off the power" (17). 38 MENU [RGB] PICTURE IMAGE INPUT SETUP SCREEN OPTION EASY MENU...Item AUTO SEARCH Description Using the buttons ▲/▼ turns on the remote control to the following . TURN ON TURN OFF When the TURN ON is not turned off automatically. When the time is set to 1 to 0, the projector is selected, detecting no -signal or an unsuitable signal reaches at ...

