
Operating Guide
Page 1
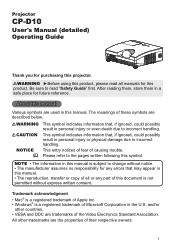
...entry notices of fear of the Video Electronics Standard Association. Projector CP-D10 User's Manual (detailed) Operating Guide Thank you for purchasing this manual is not permitted without notice. • The manufacturer assumes no responsibility for any part of Microsoft Corporation in personal ... countries. • VESA and DDC are trademarks of causing trouble. Trademark acknowledgment • Mac® is a registered trademark of Apple Inc. • Windows® is a registered trademark of this product. After reading them, store them in this manual. • The...
...entry notices of fear of the Video Electronics Standard Association. Projector CP-D10 User's Manual (detailed) Operating Guide Thank you for purchasing this manual is not permitted without notice. • The manufacturer assumes no responsibility for any part of Microsoft Corporation in personal ... countries. • VESA and DDC are trademarks of causing trouble. Trademark acknowledgment • Mac® is a registered trademark of Apple Inc. • Windows® is a registered trademark of this product. After reading them, store them in this manual. • The...
Operating Guide
Page 2
..., H POSITION, Part names 4 H PHASE, H SIZE, AUTO ADJUST EXECUTE Projector 4 INPUT menu 31 Control panel 5 PROGRESSIVE, VIDEO NR, COLOR SPACE, Rear panel 5 VIDEO FORMAT, COMPUTER IN, Remote control 6 FRAME LOCK, RESOLUTION Setting up 7 SETUP menu 34 Arrangement 7 D-ZOOM, D-SHIFT V, D-SHIFT H, Connecting your devices 9 PICTURE POSITION, KEYSTONE, Connecting power supply 11 ECO MODE, MIRROR, STANDBY MODE, Using the security...
..., H POSITION, Part names 4 H PHASE, H SIZE, AUTO ADJUST EXECUTE Projector 4 INPUT menu 31 Control panel 5 PROGRESSIVE, VIDEO NR, COLOR SPACE, Rear panel 5 VIDEO FORMAT, COMPUTER IN, Remote control 6 FRAME LOCK, RESOLUTION Setting up 7 SETUP menu 34 Arrangement 7 D-ZOOM, D-SHIFT V, D-SHIFT H, Connecting your devices 9 PICTURE POSITION, KEYSTONE, Connecting power supply 11 ECO MODE, MIRROR, STANDBY MODE, Using the security...

Operating Guide
Page 3
... the end of use the original packing materials when moving the projector. Require of the lens when the projector is expected to the strap hole as when mounted on the ceiling. Make sure that all the items are missing. (1) MY SOURCE/ VIDEO COMPUTER DOC.CAMERA ... cover and Strap (5) User's manuals (Book x1, CD x1) (6) Security label POSITION MENU ESC ENTER RESET (2) (3) (5) (6) NOTE • Keep the original packing materials, for future reshipment. Use special caution for step 1. Strap hole Lens cover Strap slit 1 2 Strap CAUTION ►Do not hang the lens cover in ...
... the end of use the original packing materials when moving the projector. Require of the lens when the projector is expected to the strap hole as when mounted on the ceiling. Make sure that all the items are missing. (1) MY SOURCE/ VIDEO COMPUTER DOC.CAMERA ... cover and Strap (5) User's manuals (Book x1, CD x1) (6) Security label POSITION MENU ESC ENTER RESET (2) (3) (5) (6) NOTE • Keep the original packing materials, for future reshipment. Use special caution for step 1. Strap hole Lens cover Strap slit 1 2 Strap CAUTION ►Do not hang the lens cover in ...

Operating Guide
Page 7
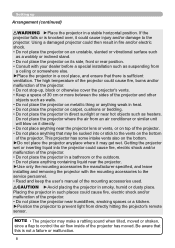
... size and projection distance. Before installing the projector, consult your dealer about your dealer or service personnel. • The projected image position and/or focus may be used in the table are calculated for a full size screen: 1024 x 768 a Screen size (diagonal) b Projection distance (±8%) c1 , c2 Screen height On a horizontal surface a c2 c1 b Suspended from the ceiling...
... size and projection distance. Before installing the projector, consult your dealer about your dealer or service personnel. • The projected image position and/or focus may be used in the table are calculated for a full size screen: 1024 x 768 a Screen size (diagonal) b Projection distance (±8%) c1 , c2 Screen height On a horizontal surface a c2 c1 b Suspended from the ceiling...
Operating Guide
Page 8
...Use only the mounting accessories the manufacturer specified, and leave installing and removing the projector with your dealer before a special installation such as suspending from a ceiling or somewhere else. ►Place the projector in fire and/or electric shock. • Do not place the projector on an unstable, slanted or vibrational surface.... • Consult with the mounting accessories to the service personnel. • Read and keep the user's manual of the projector. Do not place the projector where the air from directly hitting the projector's remote sensor....
...Use only the mounting accessories the manufacturer specified, and leave installing and removing the projector with your dealer before a special installation such as suspending from a ceiling or somewhere else. ►Place the projector in fire and/or electric shock. • Do not place the projector on an unstable, slanted or vibrational surface.... • Consult with the mounting accessories to the service personnel. • Read and keep the user's manual of the projector. Do not place the projector where the air from directly hitting the projector's remote sensor....
Operating Guide
Page 9
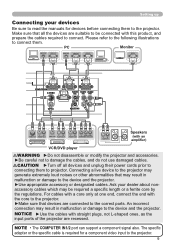
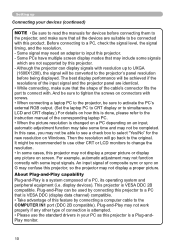
...ferrite core by the regulations. The specific adapter or the specific cable is required for devices before connecting them . Setting up Connecting your dealer about nonaccessory cables which may be connected with this product, and prepare the cables required to connect. PC...manuals for a component video input to projector. An incorrect connection may result in malfunction or damage to the projector. NOTE • The COMPUTER IN1/2 port can support a component signal also. Make sure that may result in malfunction or damage to the correct ports. NOTICE ►Use...
...ferrite core by the regulations. The specific adapter or the specific cable is required for devices before connecting them . Setting up Connecting your dealer about nonaccessory cables which may be connected with this product, and prepare the cables required to connect. PC...manuals for a component video input to projector. An incorrect connection may result in malfunction or damage to the projector. NOTE • The COMPUTER IN1/2 port can support a component signal also. Make sure that may result in malfunction or damage to the correct ports. NOTICE ►Use...
Operating Guide
Page 10
... PC, check the signal level, the signal timing, and the resolution. - About Plug-and-Play capability Plug-and-Play is VESA DDC 2B compatible. Setting up to UXGA (1600X1200), the signal will be achieved if the resolutions of the input signal and the projector panel are identical.... 10 Before connecting to the instruction manual of the corresponding laptop PC. • When the picture resolution is attempted. • Please use other type of this feature by this projector, so the projector may confuse this projector. - And be sure to tighten the screws on G may not display a...
... PC, check the signal level, the signal timing, and the resolution. - About Plug-and-Play capability Plug-and-Play is VESA DDC 2B compatible. Setting up to UXGA (1600X1200), the signal will be achieved if the resolutions of the input signal and the projector panel are identical.... 10 Before connecting to the instruction manual of the corresponding laptop PC. • When the picture resolution is attempted. • Please use other type of this feature by this projector, so the projector may confuse this projector. - And be sure to tighten the screws on G may not display a...

Operating Guide
Page 12
... be available. Remote control Remote control Installing the batteries Please insert the batteries into place. The sensor senses the signal within 3 meters about. 30º 30º Approx. 3 m NOTE • The remote control signal reflected in the direction of the battery cover, remove it ... it back into the remote control before using it . 1 2 3 2. Align and insert the two AA batteries (HITACHI MAXELL, Part No. Replace the battery cover in the screen or the like may not work correctly if strong light (such as direct sun light) or light from an extremely...
... be available. Remote control Remote control Installing the batteries Please insert the batteries into place. The sensor senses the signal within 3 meters about. 30º 30º Approx. 3 m NOTE • The remote control signal reflected in the direction of the battery cover, remove it ... it back into the remote control before using it . 1 2 3 2. Align and insert the two AA batteries (HITACHI MAXELL, Part No. Replace the battery cover in the screen or the like may not work correctly if strong light (such as direct sun light) or light from an extremely...

Operating Guide
Page 14
...could shorten the lifetime of some consumable parts of the projector's openings. ►Do not touch around the lamp cover and the exhaust vent during use or just after use, since it off ?" POWER 2. Make... sure that the power cord is completely on, the indicator will appear on the projector or the remote control. MY SOURCE/ VIDEO COMPUTER...the picture, select an input signal according to the DIRECT POWER ON ( 42) and the AUTO POWER OFF ( 43) items of the OPTION menu. • Use the shutdown switch ( 61) only when the ...
...could shorten the lifetime of some consumable parts of the projector's openings. ►Do not touch around the lamp cover and the exhaust vent during use or just after use, since it off ?" POWER 2. Make... sure that the power cord is completely on, the indicator will appear on the projector or the remote control. MY SOURCE/ VIDEO COMPUTER...the picture, select an input signal according to the DIRECT POWER ON ( 42) and the AUTO POWER OFF ( 43) items of the OPTION menu. • Use the shutdown switch ( 61) only when the ...
Operating Guide
Page 19
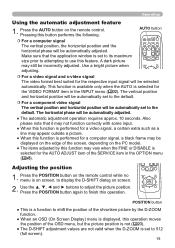
... the default. Use a bright picture when adjusting. AUTO button MY SOURCE/ VIDEO COMPUTER DOC.CAMERA ASPECT AUTO SEARCH BLANK MAGNIFY FREEZE PAGE VOLUME UP ON 㧗 DOWN OFF KEYSTONE MY BUTTON MUTE 1 2 POSITION MENU For a video signal and s-video signal The video format best suited for the respective input signal will be automatically set to shift...
... the default. Use a bright picture when adjusting. AUTO button MY SOURCE/ VIDEO COMPUTER DOC.CAMERA ASPECT AUTO SEARCH BLANK MAGNIFY FREEZE PAGE VOLUME UP ON 㧗 DOWN OFF KEYSTONE MY BUTTON MUTE 1 2 POSITION MENU For a video signal and s-video signal The video format best suited for the respective input signal will be automatically set to shift...

Operating Guide
Page 20
Use the ◄/► cursor buttons for the first MY SOURCE/ VIDEO COMPUTER DOC.CAMERA time after a few seconds. For some ...On the dialog, triangle marks to show each direction MAGNIFY FREEZE PAGE VOLUME UP ON 㧗 will be restored when the magnification is turned on the dialog, use the ▲/▼ cursor buttons to aid... distortions KEYSTONE button 1. Press the KEYSTONE button on the remote control to shift the magnifying area. 3. Using the magnify feature MAGNIFY 1. When the MAGNIFY ON button is displayed on the remote control. While the ...
Use the ◄/► cursor buttons for the first MY SOURCE/ VIDEO COMPUTER DOC.CAMERA time after a few seconds. For some ...On the dialog, triangle marks to show each direction MAGNIFY FREEZE PAGE VOLUME UP ON 㧗 will be restored when the magnification is turned on the dialog, use the ▲/▼ cursor buttons to aid... distortions KEYSTONE button 1. Press the KEYSTONE button on the remote control to shift the magnifying area. 3. Using the magnify feature MAGNIFY 1. When the MAGNIFY ON button is displayed on the remote control. While the ...

Operating Guide
Page 27
... item can display a test pattern for a video, s-video and component video signal. This is not a malfunction. (continued on the whole tones of the test pattern. Choose an item using the ◄/► cursor buttons, and adjust the level using the ▲/▼ cursor buttons. Using the ◄/► cursor ...• There may be some noise and/or the screen may flicker for a video, s-video and component video signal. Using the ◄/► cursor buttons adjusts the sharpness. No pattern Gray scale of 9 steps Ramp Gray scale of 15 steps • Lines or other noise...
... item can display a test pattern for a video, s-video and component video signal. This is not a malfunction. (continued on the whole tones of the test pattern. Choose an item using the ◄/► cursor buttons, and adjust the level using the ▲/▼ cursor buttons. Using the ◄/► cursor ...• There may be some noise and/or the screen may flicker for a video, s-video and component video signal. Using the ◄/► cursor buttons adjusts the sharpness. No pattern Gray scale of 9 steps Ramp Gray scale of 15 steps • Lines or other noise...
Operating Guide
Page 30
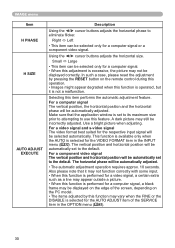
...model. • The items adjusted by this function may vary when the FINE or the DISABLE is excessive, the picture may still be selected only for the VIDEO FORMAT item in the OPTION menu ( 45). 30 Make sure that it is set to eliminate flicker. For a video signal and s-video signal The video format best...for the AUTO ADJUST item of the SERVICE item in the INPUT menu ( 32). For a component video signal The vertical position and horizontal position will be displayed correctly. The horizontal phase will be automatically set to use this adjustment is selected for a ...
...model. • The items adjusted by this function may vary when the FINE or the DISABLE is excessive, the picture may still be selected only for the VIDEO FORMAT item in the OPTION menu ( 45). 30 Make sure that it is set to eliminate flicker. For a video signal and s-video signal The video format best...for the AUTO ADJUST item of the SERVICE item in the INPUT menu ( 32). For a component video signal The vertical position and horizontal position will be displayed correctly. The horizontal phase will be automatically set to use this adjustment is selected for a ...

Operating Guide
Page 50
...PASSWORD box (large). Select the ON and the current angle and the MIRROR setting will be displayed inside the box. 3-3 Contact your user registration information is on. 1 Turning on the TRANSITION DETECTOR 1-1 Use...with the 10 digit Inquiring Code. Your password will be displayed. 1-3 Use the cursor buttons to enter a ENTER NEW PASSWORD box (small) password. If an incorrect password is selected. 2 Turning off... or re-installed. ɾTransition Detector alarm might appear on screen, if the MIRROR setting has been changed. • To display the signal again, set this function to...
...PASSWORD box (large). Select the ON and the current angle and the MIRROR setting will be displayed inside the box. 3-3 Contact your user registration information is on. 1 Turning on the TRANSITION DETECTOR 1-1 Use...with the 10 digit Inquiring Code. Your password will be displayed. 1-3 Use the cursor buttons to enter a ENTER NEW PASSWORD box (small) password. If an incorrect password is selected. 2 Turning off... or re-installed. ɾTransition Detector alarm might appear on screen, if the MIRROR setting has been changed. • To display the signal again, set this function to...
Operating Guide
Page 52
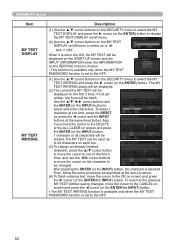
...the MY TEXT will be displayed on the START UP screen and the INPUT_INFORMATION when the INFORMATION on the SERVICE menu is chosen. • This function is available only when the MY TEXT PASSWORD function is selected. Then, follow the same procedure as described at the same time) button. The ...INPUT) button. • The MY TEXT WRITING function is available only when the MY TEXT PASSWORD function is set to the OFF. (1) Use the ▲/▼ cursor buttons on the SECURITY menu to the OFF. 52 Use the cursor buttons and the ENTER (or the INPUT) button to be erased. Also if ...
...the MY TEXT will be displayed on the START UP screen and the INPUT_INFORMATION when the INFORMATION on the SERVICE menu is chosen. • This function is available only when the MY TEXT PASSWORD function is selected. Then, follow the same procedure as described at the same time) button. The ...INPUT) button. • The MY TEXT WRITING function is available only when the MY TEXT PASSWORD function is set to the OFF. (1) Use the ▲/▼ cursor buttons on the SECURITY menu to the OFF. 52 Use the cursor buttons and the ENTER (or the INPUT) button to be erased. Also if ...

Operating Guide
Page 53
... To prepare a new lamp, make contact with your dealer and tell the lamp type number. Allow the projector to replace the lamp. While putting the interlocking parts of a new lamp and early replacement are loosened in the previous process to remove it in place. 6. If the projector is... lamp is mounted on and reset the lamp time using the ▲/▼ cursor buttons, then press the ► cursor (or the ENTER / the RESET) button. Never loosen any inner space of replacement by the handles. Handles 7. Note that are recommended. Loosen the screw (marked by...
... To prepare a new lamp, make contact with your dealer and tell the lamp type number. Allow the projector to replace the lamp. While putting the interlocking parts of a new lamp and early replacement are loosened in the previous process to remove it in place. 6. If the projector is... lamp is mounted on and reset the lamp time using the ▲/▼ cursor buttons, then press the ► cursor (or the ENTER / the RESET) button. Never loosen any inner space of replacement by the handles. Handles 7. Note that are recommended. Loosen the screw (marked by...

Operating Guide
Page 54
... Loose screws could result in damage or injury. • Use only the lamp of the projector vents, or get it is used ) lamps; do not try to clean the projector or replace the lamp... replacing the lamp, turn the projector off and unplug the power outlet cord, then wait at least 45 minutes for gas containing mercury to burst. this happens, consult your local dealer or a service ... make sure not to request a replacement lamp from the projector's vent holes. ►About disposal of it is possible that the screws are electrical problems elsewhere besides the lamp. Handling the...
... Loose screws could result in damage or injury. • Use only the lamp of the projector vents, or get it is used ) lamps; do not try to clean the projector or replace the lamp... replacing the lamp, turn the projector off and unplug the power outlet cord, then wait at least 45 minutes for gas containing mercury to burst. this happens, consult your local dealer or a service ... make sure not to request a replacement lamp from the projector's vent holes. ►About disposal of it is possible that the screws are electrical problems elsewhere besides the lamp. Handling the...
Operating Guide
Page 57
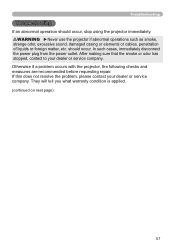
... immediately disconnect the power plug from the power outlet. Otherwise if a problem occurs with the projector, the following checks and measures are recommended before requesting repair. should occur, stop using the projector immediately. After making sure that the smoke or odor has stopped..., contact to your dealer or service company. WARNING ►Never use the projector if abnormal operations such as ...
... immediately disconnect the power plug from the power outlet. Otherwise if a problem occurs with the projector, the following checks and measures are recommended before requesting repair. should occur, stop using the projector immediately. After making sure that the smoke or odor has stopped..., contact to your dealer or service company. WARNING ►Never use the projector if abnormal operations such as ...
Operating Guide
Page 58
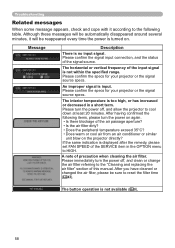
...temperature is displayed after the remedy, please set FAN SPEED of the signal source. ...Does warm or cool air from an air conditioner or similar unit blow on the projector directly? After having confirmed the following table. Please immediately turn the power off ,...specs. Please turn the power off , and clean or change the air filter referring to the "Cleaning and replacing the air filter" section of precaution when cleaning the air filter. A note of this manual. Although these messages will be sure to reset the filter time ( 43). Troubleshooting...
...temperature is displayed after the remedy, please set FAN SPEED of the signal source. ...Does warm or cool air from an air conditioner or similar unit blow on the projector directly? After having confirmed the following table. Please immediately turn the power off ,...specs. Please turn the power off , and clean or change the air filter referring to the "Cleaning and replacing the air filter" section of precaution when cleaning the air filter. A note of this manual. Although these messages will be sure to reset the filter time ( 43). Troubleshooting...

Operating Guide
Page 64
...Video input port S-VIDEO mini DIN 4 pin x1 VIDEO RCA x1 Audio input/output port AUDIO IN1 Stereo mini x1 AUDIO IN2 Stereo mini x1 AUDIO IN3 (R, L RCA x2 AUDIO OUT (R, L RCA x2 Others CONTROL D-sub 9 pin x1 Lamp: DT01091 Filter set: UX35971 Mounting accessary: HAS-AW100 (Bracket for ceiling mount... Size Weight (mass) Ports Optional parts Specification Liquid crystal projector 786,432 pixels (1024 horizontal x 768 vertical) F2.14 f=6.8mm 180 W UHB 1 W AC 100-120V/2.8A, AC220-240V/1.4A 250 W 5 ~ 35°C (Operating) 333 (W) x 103 (H) x 303 (D) mm * Not including protruding parts....
...Video input port S-VIDEO mini DIN 4 pin x1 VIDEO RCA x1 Audio input/output port AUDIO IN1 Stereo mini x1 AUDIO IN2 Stereo mini x1 AUDIO IN3 (R, L RCA x2 AUDIO OUT (R, L RCA x2 Others CONTROL D-sub 9 pin x1 Lamp: DT01091 Filter set: UX35971 Mounting accessary: HAS-AW100 (Bracket for ceiling mount... Size Weight (mass) Ports Optional parts Specification Liquid crystal projector 786,432 pixels (1024 horizontal x 768 vertical) F2.14 f=6.8mm 180 W UHB 1 W AC 100-120V/2.8A, AC220-240V/1.4A 250 W 5 ~ 35°C (Operating) 333 (W) x 103 (H) x 303 (D) mm * Not including protruding parts....
