

Instruction Manual
Page 5
...unattended. Turn power off. Should a power tool be securely mounted to be operated by a Hitachi authorized service center. 14. SPECIFIC SAFETY RULES AND SYMBOLS 1. Contact with such solvents. NEVER... particles. Your risk from chemically-treated lumber. Hold power tool by power sanding, sawing, grinding, drilling, and other construction activities contains chemicals known to the State of... cement and other body parts near the tool's moving parts. Blades and accessories must be secure and tight. 12. Blades, cutting implements and accessories which is cracked. Keep motor air...
...unattended. Turn power off. Should a power tool be securely mounted to be operated by a Hitachi authorized service center. 14. SPECIFIC SAFETY RULES AND SYMBOLS 1. Contact with such solvents. NEVER... particles. Your risk from chemically-treated lumber. Hold power tool by power sanding, sawing, grinding, drilling, and other construction activities contains chemicals known to the State of... cement and other body parts near the tool's moving parts. Blades and accessories must be secure and tight. 12. Blades, cutting implements and accessories which is cracked. Keep motor air...
Instruction Manual
Page 6
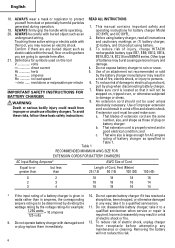
... to protect READ ALL INSTRUCTIONS yourself from improper or unsafe use of battery chargers. underground wiring. 2. direct current Hz hertz 4. That blades of batteries may result in any way; Do not operate battery charger if it to damage or stress. take it has received a watts... receptacle before attempting any buried object such as those of fire and electric shock. Before using battery. To reduce risk of injury, charge HITACHI electric cable within the wall, floor or ceiling where rechargeable battery type EB7, EB9, EB12, EB14, you may result in a risk ...
... to protect READ ALL INSTRUCTIONS yourself from improper or unsafe use of battery chargers. underground wiring. 2. direct current Hz hertz 4. That blades of batteries may result in any way; Do not operate battery charger if it to damage or stress. take it has received a watts... receptacle before attempting any buried object such as those of fire and electric shock. Before using battery. To reduce risk of injury, charge HITACHI electric cable within the wall, floor or ceiling where rechargeable battery type EB7, EB9, EB12, EB14, you may result in a risk ...
Instruction Manual
Page 9
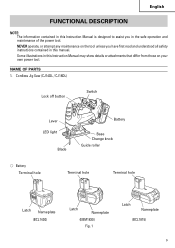
Cordless Jig Saw (CJ14DL / CJ18DL) Lock off button Switch Lever LED light Blade Battery Base Change knob Guide roller ⅜ Battery Terminal hole Terminal hole Terminal hole Latch Nameplate (BCL1430) Latch Nameplate (EBM1830) Fig. 1 Latch Nameplate (BCL1815) 9 NEVER ...
Cordless Jig Saw (CJ14DL / CJ18DL) Lock off button Switch Lever LED light Blade Battery Base Change knob Guide roller ⅜ Battery Terminal hole Terminal hole Terminal hole Latch Nameplate (BCL1430) Latch Nameplate (EBM1830) Fig. 1 Latch Nameplate (BCL1815) 9 NEVER ...
Instruction Manual
Page 11
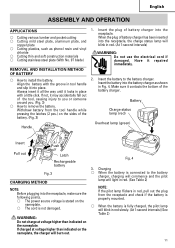
... into the battery charger as phenol resin and vinyl chloride ⅜ Cutting thin and soft construction materials ⅜ Cutting stainless steel plate (With No. 97 blade) REMOVAL AND INSTALLATION METHOD OF BATTERY ⅜ How to remove the battery. Have it may accidentally fall out of the battery. (Fig. 3) Handle 1. If charged...
... into the battery charger as phenol resin and vinyl chloride ⅜ Cutting thin and soft construction materials ⅜ Cutting stainless steel plate (With No. 97 blade) REMOVAL AND INSTALLATION METHOD OF BATTERY ⅜ How to remove the battery. Have it may accidentally fall out of the battery. (Fig. 3) Handle 1. If charged...
Instruction Manual
Page 13
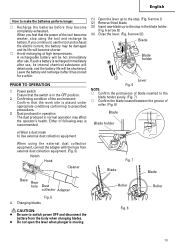
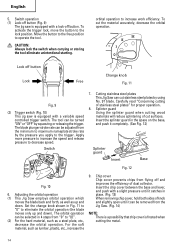
... the power of following way is recommended. (1) Open the lever up to the stop. (Fig. 6-arrow I) (2) Remove fitted blade. (3) Insert new blade up to the stop using the external dust collection equipment, connect the adapter with the hose from the body when changing... power OFF and disconnect the battery from external dust collection equipment. (Fig. 5) Notch Hook Cleaner Blade Fig. 7 Blade Base Rear hole Dust collector Adapter Roller Roller Fig. 5 4. PRIOR TO OPERATION 1. Changing blades CAUTION: ● Be sure to prescribed precautions. 3. Fig. 8 13 Power switch Ensure that ...
... the power of following way is recommended. (1) Open the lever up to the stop. (Fig. 6-arrow I) (2) Remove fitted blade. (3) Insert new blade up to the stop using the external dust collection equipment, connect the adapter with the hose from the body when changing... power OFF and disconnect the battery from external dust collection equipment. (Fig. 5) Notch Hook Cleaner Blade Fig. 7 Blade Base Rear hole Dust collector Adapter Roller Roller Fig. 5 4. PRIOR TO OPERATION 1. Changing blades CAUTION: ● Be sure to prescribed precautions. 3. Fig. 8 13 Power switch Ensure that ...
Instruction Manual
Page 14
...a steel plate, etc., decrease the orbital operation. Cutting stainless steel plates This Jig Saw can be turned "ON" or "OFF" by using No. 97 blade. Adjusting the orbital operation (1) This Jig Saw employs orbital operation which moves the blade back and forth, as well as lumber, plastic, etc., increase the 9. ...base and lever, and push with a lock-off button Lock Change knob Free Fig. 11 Fig. 9 (2) Trigger switch (Fig. 10) This jig saw is equipped with a variable speed controlled trigger switch. To activate the trigger lock, move the button to operate the tool. To cut surfaces. ...
...a steel plate, etc., decrease the orbital operation. Cutting stainless steel plates This Jig Saw can be turned "ON" or "OFF" by using No. 97 blade. Adjusting the orbital operation (1) This Jig Saw employs orbital operation which moves the blade back and forth, as well as lumber, plastic, etc., increase the 9. ...base and lever, and push with a lock-off button Lock Change knob Free Fig. 11 Fig. 9 (2) Trigger switch (Fig. 10) This jig saw is equipped with a variable speed controlled trigger switch. To activate the trigger lock, move the button to operate the tool. To cut surfaces. ...
Instruction Manual
Page 15
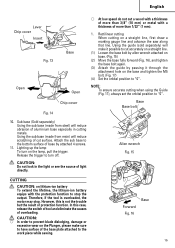
...(Fig. 17), always set the orbital position to turn on a straight line, first draw a marking gauge line and advance the saw along that line. Release the trigger to "0". However, this case, release the switch of tool and eliminate the causes of more ...sawing. Allen wrench Fig. 15 CUTTING CAUTION: on the base and tighten the M5 bolt. (Fig. 17) (4) Set the orbital position to stop . CAUTION: ⅜ In order to prevent blade dislodging, damage or excessive wear on the Plunger, please make it through the attachment hole on lithium-ion battery To extend the lifetime, the lithium-ion...
...(Fig. 17), always set the orbital position to turn on a straight line, first draw a marking gauge line and advance the saw along that line. Release the trigger to "0". However, this case, release the switch of tool and eliminate the causes of more ...sawing. Allen wrench Fig. 15 CUTTING CAUTION: on the base and tighten the M5 bolt. (Fig. 17) (4) Set the orbital position to stop . CAUTION: ⅜ In order to prevent blade dislodging, damage or excessive wear on the Plunger, please make it through the attachment hole on lithium-ion battery To extend the lifetime, the lithium-ion...
Instruction Manual
Page 16
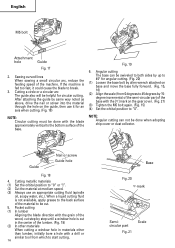
...guide also will be done when adopting chip cover or dust collector. Cutting metallic materials (1) Set the orbital position to break. 3. Sawing curved lines When sawing a small circular arc, reduce the feeding speed of the base. After attaching the guide by same way noted as above, drive the...When cutting a window hole in materials other than lumber, initially bore a hole with the [ ] mark on the guide, then use it could cause the blade to "0" or "I". (2) Cut the material at medium speed. (3) Always use an appropriate cutting fluid (spindle oil, soapy water, etc.). When a liquid cutting...
...guide also will be done when adopting chip cover or dust collector. Cutting metallic materials (1) Set the orbital position to break. 3. Sawing curved lines When sawing a small circular arc, reduce the feeding speed of the base. After attaching the guide by same way noted as above, drive the...When cutting a window hole in materials other than lumber, initially bore a hole with the [ ] mark on the guide, then use it could cause the blade to "0" or "I". (2) Cut the material at medium speed. (3) Always use an appropriate cutting fluid (spindle oil, soapy water, etc.). When a liquid cutting...

Instruction Manual
Page 17
...portion of each blade. Set the orbital position to "0" Chip cover Nose Cleaner Base Dust collector Adapter Fig. 22 Notch Hook Nose Base Rear hole Dust collector Adapter Fig. 23 NOTE: ⅜ When cutting use cutting fluid (oil base cutting fluid) to the work piece while sawing. When the ...speed is possible to house the allen wrench on the base. (See Fig. 24) Allen wrench CONCERNING CUTTING OF STAINLESS STEEL PLATES CAUTION: In order to prevent blade dislodging, damage or excessive wear on the Plunger, please ...
...portion of each blade. Set the orbital position to "0" Chip cover Nose Cleaner Base Dust collector Adapter Fig. 22 Notch Hook Nose Base Rear hole Dust collector Adapter Fig. 23 NOTE: ⅜ When cutting use cutting fluid (oil base cutting fluid) to the work piece while sawing. When the ...speed is possible to house the allen wrench on the base. (See Fig. 24) Allen wrench CONCERNING CUTTING OF STAINLESS STEEL PLATES CAUTION: In order to prevent blade dislodging, damage or excessive wear on the Plunger, please ...

Instruction Manual
Page 18
... No. 22 Thickness of No. 1 (Long), No. 1 ( Super Long), No. 21, No. 22 and No. 41 blades is 3-15/16" (100 mm). Vinyl chloride, acryl resin, etc. English 18 Table 4 List of appropriate blades Material Blade to 63/64(25) 3/16-19/32 (5-15) 3/16-19/32 (5-15) 3/16-63/64 (5-25) Pulp...
... No. 22 Thickness of No. 1 (Long), No. 1 ( Super Long), No. 21, No. 22 and No. 41 blades is 3-15/16" (100 mm). Vinyl chloride, acryl resin, etc. English 18 Table 4 List of appropriate blades Material Blade to 63/64(25) 3/16-19/32 (5-15) 3/16-19/32 (5-15) 3/16-63/64 (5-25) Pulp...
Instruction Manual
Page 19
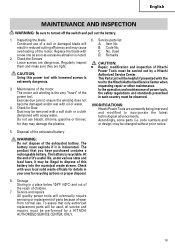
...Do not dispose of the motor. English MAINTENANCE AND INSPECTION WARNING: Be sure to the Hitachi Authorized Service Center when requesting repair or other maintenance. 3. Inspecting the blade 8. Maintenance of the motor In the operation and maintenance of power tools, The motor ... normal use bleach, chlorine, gasoline or thinner, MODIFICATIONS: Hitachi Power Tools are dangerous. To assure that you have purchased contains a rechargeable battery. Service parts list Continued use of a dull or damaged blade will eventually require servicing or replacement of parts because of it...
...Do not dispose of the motor. English MAINTENANCE AND INSPECTION WARNING: Be sure to the Hitachi Authorized Service Center when requesting repair or other maintenance. 3. Inspecting the blade 8. Maintenance of the motor In the operation and maintenance of power tools, The motor ... normal use bleach, chlorine, gasoline or thinner, MODIFICATIONS: Hitachi Power Tools are dangerous. To assure that you have purchased contains a rechargeable battery. Service parts list Continued use of a dull or damaged blade will eventually require servicing or replacement of parts because of it...

Instruction Manual
Page 20
... guard (Code No. 321590 1 ⅜ Chip cover (Code No. 328352 1 ⅜ Battery charger (UC18YRL 1 ⅜ Battery ...1 BCL1430: CJ14DL EBM1830: CJ18DL ⅜ Plastic Case ...1 ⅜ No. 41 Blade (Code No. 879357 1 ⅜ Allen wrench (Code No. 944458 1 ⅜ Splinter guard (Code No. 321590 1 ⅜ Chip cover (Code No.... than those mentioned below or attachments not intended for use any obligation on the part of the HITACHI. English ACCESSORIES WARNING: Never use such as cup wheel, cut-off wheel or saw blade is dangerous and may cause personal injury or property damage.
... guard (Code No. 321590 1 ⅜ Chip cover (Code No. 328352 1 ⅜ Battery charger (UC18YRL 1 ⅜ Battery ...1 BCL1430: CJ14DL EBM1830: CJ18DL ⅜ Plastic Case ...1 ⅜ No. 41 Blade (Code No. 879357 1 ⅜ Allen wrench (Code No. 944458 1 ⅜ Splinter guard (Code No. 321590 1 ⅜ Chip cover (Code No.... than those mentioned below or attachments not intended for use any obligation on the part of the HITACHI. English ACCESSORIES WARNING: Never use such as cup wheel, cut-off wheel or saw blade is dangerous and may cause personal injury or property damage.
Parts List
Page 2
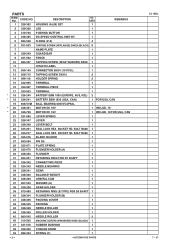
CODE NO. 1 328-362 DESCRIPTION HOUSING (A).(B) SET NO. SOCKET HD. BOLT M3X8 1 25 325-077 SEAL LOCK HEX. BOLT M3X6 1 26 325-076 BLADE HOLDER 1 27 983-564 PIN D6 1 28 325-071 PLATE SPRING 1 29 325-070 PLUNGER HOLDER (A) 1 30 328-343 PLUNGER 1 31 994-251 RETAINING...) M4X8 (BLACK) 1 47 321-576 RUBBER BUSHING 1 48 328-332 CHANGE KNOB 1 49 982-454 SPRING (C) 1 --- 2 --- * ALTERNATIVE PARTS CJ 18DL 7 -- 07 WASHER) D3X8 1 11 HITACHI LABEL 1 12 959-140 CONNECTOR 50091 (10 PCS.) 1 13 958-715 TAPPING SCREW D4X10 2 14 996-118 HOLDER SPRING 2 15 322-995 TERMINAL 1 16 320...
CODE NO. 1 328-362 DESCRIPTION HOUSING (A).(B) SET NO. SOCKET HD. BOLT M3X8 1 25 325-077 SEAL LOCK HEX. BOLT M3X6 1 26 325-076 BLADE HOLDER 1 27 983-564 PIN D6 1 28 325-071 PLATE SPRING 1 29 325-070 PLUNGER HOLDER (A) 1 30 328-343 PLUNGER 1 31 994-251 RETAINING...) M4X8 (BLACK) 1 47 321-576 RUBBER BUSHING 1 48 328-332 CHANGE KNOB 1 49 982-454 SPRING (C) 1 --- 2 --- * ALTERNATIVE PARTS CJ 18DL 7 -- 07 WASHER) D3X8 1 11 HITACHI LABEL 1 12 959-140 CONNECTOR 50091 (10 PCS.) 1 13 958-715 TAPPING SCREW D4X10 2 14 996-118 HOLDER SPRING 2 15 322-995 TERMINAL 1 16 320...
Parts List
Page 4
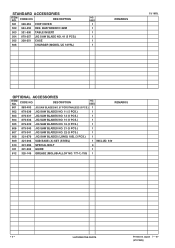
... 601 963-400 JIG SAW BLADES NO. 97 FOR STAINLESS (5 PCS.) 1 REMARKS 602 879-336 JIG SAW BLADES NO. 11 (5 PCS.) 1 603 879-337 JIG SAW BLADES NO. 12 (5 PCS.) 1 604 879-338 JIG SAW BLADES NO. 15 (5 PCS.) 1 605 879-339 JIG SAW BLADES NO. 16 (5 PCS.) 1 606 879-340 JIG SAW BLADES NO. 21 (5 PCS.) 1 607 879-341 JIG SAW BLADES NO. 22 (5 PCS.) 1 608 321-878 JIG SAW BLADES (LONG) 185L...
... 601 963-400 JIG SAW BLADES NO. 97 FOR STAINLESS (5 PCS.) 1 REMARKS 602 879-336 JIG SAW BLADES NO. 11 (5 PCS.) 1 603 879-337 JIG SAW BLADES NO. 12 (5 PCS.) 1 604 879-338 JIG SAW BLADES NO. 15 (5 PCS.) 1 605 879-339 JIG SAW BLADES NO. 16 (5 PCS.) 1 606 879-340 JIG SAW BLADES NO. 21 (5 PCS.) 1 607 879-341 JIG SAW BLADES NO. 22 (5 PCS.) 1 608 321-878 JIG SAW BLADES (LONG) 185L...


