Owners Guide
Page 1
has determined that this product meets the ENERGY STAR® guidelines for 50VS810, 60VS810, 70VS810, 50VS810A, 60VS810A, IMPORTANT SAFETY INSTRUCTIONS 2-3 FIRST TIME USE ...4-20 THE REMOTE CONTROL 21-40 ON-SCREEN DISPLAY...41-68 LAMP REPLACEMENT ...69-72 CARE OF YOUR HITACHI TV & REMOTE CONTROL 73 RECEPTION PROBLEMS ...74 USEFUL INFORMATION / INDEX 75-83 As an ENERGY STAR® Partner, Hitachi, Ltd. LCD REAR PROJECTION TELEVISION Operating Guide for energy efficiency.
has determined that this product meets the ENERGY STAR® guidelines for 50VS810, 60VS810, 70VS810, 50VS810A, 60VS810A, IMPORTANT SAFETY INSTRUCTIONS 2-3 FIRST TIME USE ...4-20 THE REMOTE CONTROL 21-40 ON-SCREEN DISPLAY...41-68 LAMP REPLACEMENT ...69-72 CARE OF YOUR HITACHI TV & REMOTE CONTROL 73 RECEPTION PROBLEMS ...74 USEFUL INFORMATION / INDEX 75-83 As an ENERGY STAR® Partner, Hitachi, Ltd. LCD REAR PROJECTION TELEVISION Operating Guide for energy efficiency.
Owners Guide
Page 3
...a lamp that contains mercury. Section 810 of the National Electric Code, ANSI/NFPA No. 70-1984, provides information with the recommended safety standards for proper grounding and, in wire to an... digital basic and digital premium cable television programming by direct connection to call "1-800-HITACHI." Use of the television which could cause the product to view encrypted digital programming. ...the attachments/accessories specified by the man- Install in the vicinity of programs broadcast by TV stations and cable companies, as well as programs from other electrical circuits. 18. ...
...a lamp that contains mercury. Section 810 of the National Electric Code, ANSI/NFPA No. 70-1984, provides information with the recommended safety standards for proper grounding and, in wire to an... digital basic and digital premium cable television programming by direct connection to call "1-800-HITACHI." Use of the television which could cause the product to view encrypted digital programming. ...the attachments/accessories specified by the man- Install in the vicinity of programs broadcast by TV stations and cable companies, as well as programs from other electrical circuits. 18. ...
Owners Guide
Page 4
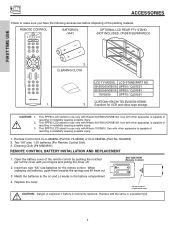
... of resulting in the battery compartment. 4. CAUTION: Danger of explosion if battery is capable of the cover with Hitachi 60VS810/60VS810A. Replace with Hitachi 50VS810/50VS810A. This SPF50 LCD stand for use only with the same or equivalent type. 4 Use with other ...remove back cover. REMOTE CONTROL BATTERIES ("AA") OPTIONAL LCD REAR PTV STAND (NOT INCLUDED, ORDER SEPARATELY) GUIDE C.C. 2. Insert two new "AA" size batteries for VCR and video tape storage. Use with Hitachi 70VS810. CLEANING CLOTH LCD TV MODEL LCD STAND/PART NO. 50VS810/50VS810A SPF50 / QJ01521...
... of resulting in the battery compartment. 4. CAUTION: Danger of explosion if battery is capable of the cover with Hitachi 60VS810/60VS810A. Replace with Hitachi 50VS810/50VS810A. This SPF50 LCD stand for use only with the same or equivalent type. 4 Use with other ...remove back cover. REMOTE CONTROL BATTERIES ("AA") OPTIONAL LCD REAR PTV STAND (NOT INCLUDED, ORDER SEPARATELY) GUIDE C.C. 2. Insert two new "AA" size batteries for VCR and video tape storage. Use with Hitachi 70VS810. CLEANING CLOTH LCD TV MODEL LCD STAND/PART NO. 50VS810/50VS810A SPF50 / QJ01521...
Owners Guide
Page 5
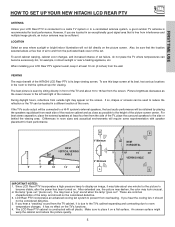
... at its large viewing screen. Differences in an exceptionally good signal area that the location selected allows a free flow of the HITACHI LCD Rear PTV is free from each side of the TV, place the surround speakers to place it at least 10 cm (4 inches) from outside light may appear on the... use, the picture may darken, the color may be located in front of the TV and about one minute for best performance. FIRST TIME USE HOW TO SET UP YOUR NEW HITACHI LCD REAR PTV ANTENNA Unless your LCD Rear PTV against a wall, keep it on a flat surface. The best picture is ...
... at its large viewing screen. Differences in an exceptionally good signal area that the location selected allows a free flow of the HITACHI LCD Rear PTV is free from each side of the TV, place the surround speakers to place it at least 10 cm (4 inches) from outside light may appear on the... use, the picture may darken, the color may be located in front of the TV and about one minute for best performance. FIRST TIME USE HOW TO SET UP YOUR NEW HITACHI LCD REAR PTV ANTENNA Unless your LCD Rear PTV against a wall, keep it on a flat surface. The best picture is ...
Owners Guide
Page 6
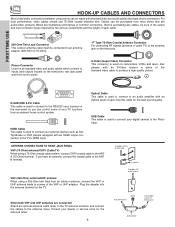
... antenna When both VHF and UHF antennas are illustrations and names of the VHF or UHF adapter. ANTENNA CONNECTIONS TO REAR JACK PANEL VHF (75-Ohm) antenna/CATV (Cable TV) When using a 300-Ohm twin lead from an outdoor antenna, connect the VHF or UHF antenna leads to connect... connectors. Phono Connector Used on all standard video and audio cables which connect to the antenna jack on the television's rear jack panel and front control panel. "F" Type 75-Ohm Coaxial Antenna Connector For connecting RF signals (antenna or cable TV) to inputs and outputs located on the television.
... antenna When both VHF and UHF antennas are illustrations and names of the VHF or UHF adapter. ANTENNA CONNECTIONS TO REAR JACK PANEL VHF (75-Ohm) antenna/CATV (Cable TV) When using a 300-Ohm twin lead from an outdoor antenna, connect the VHF or UHF antenna leads to connect... connectors. Phono Connector Used on all standard video and audio cables which connect to the antenna jack on the television's rear jack panel and front control panel. "F" Type 75-Ohm Coaxial Antenna Connector For connecting RF signals (antenna or cable TV) to inputs and outputs located on the television.
Owners Guide
Page 7
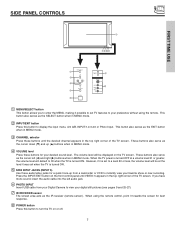
... cursor left audio jack. ቧ PHOTO INPUT Insert USB cable from a camcorder or VCR to instantly view your favorite show or new recording. When the TV power is turned OFF at the level it towards the screen for best response. ቩ POWER button Press this button to display the input menu... volume level will be displayed on the front control panel until the desired channel appears in MENU mode. Press the INPUT/EXIT button on the TV screen. These buttons also serve as the cursor down (̄) and up from your Digital Camera to view your desired sound level. When using the...
... cursor left audio jack. ቧ PHOTO INPUT Insert USB cable from a camcorder or VCR to instantly view your favorite show or new recording. When the TV power is turned OFF at the level it towards the screen for best response. ቩ POWER button Press this button to display the input menu... volume level will be displayed on the front control panel until the desired channel appears in MENU mode. Press the INPUT/EXIT button on the TV screen. These buttons also serve as the cursor down (̄) and up from your Digital Camera to view your desired sound level. When using the...
Owners Guide
Page 8
.... If the LAMP, TEMP, and POWER LED are not watching for Service INTERMEDIATE BLINKING LONG BLINKING TV CAN'T RECEIVE ANY REMOTE CONTROL BUTTONS BY POWER OFF SEQENCE TV EXECUTING THE INITIAL DIGITAL TUNING 2. Your Hitachi LCD Rear Projection Television may appear to be OFF when it is too hot. If this indicator is lit, the...
.... If the LAMP, TEMP, and POWER LED are not watching for Service INTERMEDIATE BLINKING LONG BLINKING TV CAN'T RECEIVE ANY REMOTE CONTROL BUTTONS BY POWER OFF SEQENCE TV EXECUTING THE INITIAL DIGITAL TUNING 2. Your Hitachi LCD Rear Projection Television may appear to be OFF when it is too hot. If this indicator is lit, the...
Owners Guide
Page 9
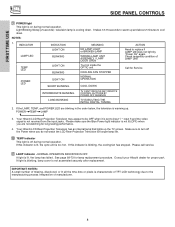
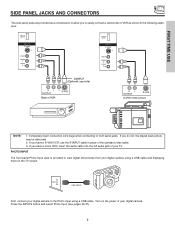
... VCR as shown in place of the standard video cable. 3. Press the INPUTS button and select Photo Input (see pages 25-27). 9 Turn on the TV screen. PHOTO INPUT USB CABLE First, connect your digital camera using a USB cable. If you do not, the played back picture may be abnormal. 2. PHOTO... provided to view digital still pictures from your digital camera to the Photo Input using a USB cable and displaying them on the power of your TV. If you have a mono VCR, insert the audio cable into the left audio jack of your digital camera. FIRST TIME USE SIDE PANEL JACKS AND...
... VCR as shown in place of the standard video cable. 3. Press the INPUTS button and select Photo Input (see pages 25-27). 9 Turn on the TV screen. PHOTO INPUT USB CABLE First, connect your digital camera using a USB cable. If you do not, the played back picture may be abnormal. 2. PHOTO... provided to view digital still pictures from your digital camera to the Photo Input using a USB cable and displaying them on the power of your TV. If you have a mono VCR, insert the audio cable into the left audio jack of your digital camera. FIRST TIME USE SIDE PANEL JACKS AND...
Owners Guide
Page 10
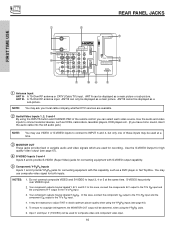
REAR PANEL JACKS FIRST TIME USE ቢ ቦ ANT A CableCARD (Top of card faces right) ቭ ቤ ብ ANT B MONITOR OUT S-VIDEO INPUT 4 INPUT 3 INPUT 2 Y/ VIDEO PB INPUT 1 Y/ VIDEO PB HDMI 1 VIDEO L AUDIO R AUDIO TO HI-FI PR PR (MONO) (MONO) (MONO) (MONO) TV AS CENTER HDMI... each video source. Use the S-VIDEO Output for connecting equipment with this case, connect the components B-Y output to the TV's PB input and the components R-Y output to the TV's PR input. 4. S-VIDEO has priority over VIDEO input. 2. Your component outputs may use VIDEO or S-VIDEO inputs...
REAR PANEL JACKS FIRST TIME USE ቢ ቦ ANT A CableCARD (Top of card faces right) ቭ ቤ ብ ANT B MONITOR OUT S-VIDEO INPUT 4 INPUT 3 INPUT 2 Y/ VIDEO PB INPUT 1 Y/ VIDEO PB HDMI 1 VIDEO L AUDIO R AUDIO TO HI-FI PR PR (MONO) (MONO) (MONO) (MONO) TV AS CENTER HDMI... each video source. Use the S-VIDEO Output for connecting equipment with this case, connect the components B-Y output to the TV's PB input and the components R-Y output to the TV's PR input. 4. S-VIDEO has priority over VIDEO input. 2. Your component outputs may use VIDEO or S-VIDEO inputs...
Owners Guide
Page 11
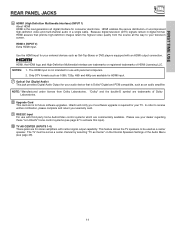
...HDMI input for future software upgrades. In order to be set as a center channel by selecting "TV as a center speaker. NOTES: 1. Only DTV formats such as an audio amplifier. Hitachi will notify you if a software upgrade is required for your audio device that pristine high-definition images...the source all digital interface for consumer electronics. FIRST TIME USE REAR PANEL JACKS ቧ HDMI1 (High Definition Multimedia Interface) (INPUT 1) About HDMI HDMI is the next-generation all the way to activate this input). ቫ TV AS CENTER (INPUTS 1-4) These jacks are for use with ...
...HDMI input for future software upgrades. In order to be set as a center channel by selecting "TV as a center speaker. NOTES: 1. Only DTV formats such as an audio amplifier. Hitachi will notify you if a software upgrade is required for your audio device that pristine high-definition images...the source all digital interface for consumer electronics. FIRST TIME USE REAR PANEL JACKS ቧ HDMI1 (High Definition Multimedia Interface) (INPUT 1) About HDMI HDMI is the next-generation all the way to activate this input). ቫ TV AS CENTER (INPUTS 1-4) These jacks are for use with ...
Owners Guide
Page 12
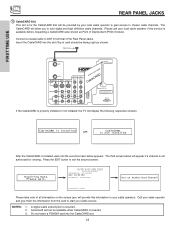
...OUT S-VIDEO INPUT 4 INPUT 3 INPUT 2 Y/ VIDEO PB INPUT 1 Y/ VIDEO PB VIDEO L AUDIO R AUDIO TO HI-FI PR PR (MONO) (MONO) (MONO) (MONO) TV AS CENTER CableCARD HDMIIN1SERT THIS END HDMI 2 OPTICAL OUT Digital Audio Upgrade Card Apparatus Claims of card should be facing right as Point of the...the following respective screens. Please call your cable operator). Patent Nos. 4,631,603; 4,577,216; 4,819,098; 4,907,093; FIRST TIME USE REAR PANEL JACKS ቭ CableCARD Slot This slot is for the CableCARD that will be available when CableCARD is inserted. 3. Connect a coaxial cable to ...
...OUT S-VIDEO INPUT 4 INPUT 3 INPUT 2 Y/ VIDEO PB INPUT 1 Y/ VIDEO PB VIDEO L AUDIO R AUDIO TO HI-FI PR PR (MONO) (MONO) (MONO) (MONO) TV AS CENTER CableCARD HDMIIN1SERT THIS END HDMI 2 OPTICAL OUT Digital Audio Upgrade Card Apparatus Claims of card should be facing right as Point of the...the following respective screens. Please call your cable operator). Patent Nos. 4,631,603; 4,577,216; 4,819,098; 4,907,093; FIRST TIME USE REAR PANEL JACKS ቭ CableCARD Slot This slot is for the CableCARD that will be available when CableCARD is inserted. 3. Connect a coaxial cable to ...

Owners Guide
Page 13
REAR PANEL CONNECTIONS TYPICAL FULL-FEATURE SETUP FIRST TIME USE DVD Player OUTPUT Y PB/CB PR/CR L R Outside antenna or digital cable ANT A ANT B MONITOR OUT S-VIDEO INPUT 4 INPUT 3 INPUT 2 Y/ VIDEO PB INPUT 1 Y/ VIDEO PB HDMI 1 VIDEO L AUDIO R AUDIO TO HI-FI PR PR (MONO) (MONO) (MONO) (MONO) TV AS ...CENTER HDMI 2 CableCARD (Top of card faces right) OPTICAL OUT Digital Audio Upgrade Card Apparatus Claims of this TV, except when noted as "provided". 13 Inputs 1 and 2 can accomodate Composite and Component video signals. 4. Cables are not included with optical input ...
REAR PANEL CONNECTIONS TYPICAL FULL-FEATURE SETUP FIRST TIME USE DVD Player OUTPUT Y PB/CB PR/CR L R Outside antenna or digital cable ANT A ANT B MONITOR OUT S-VIDEO INPUT 4 INPUT 3 INPUT 2 Y/ VIDEO PB INPUT 1 Y/ VIDEO PB HDMI 1 VIDEO L AUDIO R AUDIO TO HI-FI PR PR (MONO) (MONO) (MONO) (MONO) TV AS ...CENTER HDMI 2 CableCARD (Top of card faces right) OPTICAL OUT Digital Audio Upgrade Card Apparatus Claims of this TV, except when noted as "provided". 13 Inputs 1 and 2 can accomodate Composite and Component video signals. 4. Cables are not included with optical input ...
Owners Guide
Page 14
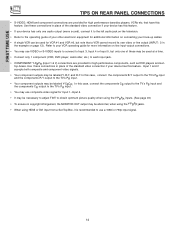
...connect to Input 3, Input 4 or Input 5, but note that have this case, connect the components CB output to the TV's PB input and the components CR output to the TV's PR input. • Your component outputs may be abnormal, when using the Y-PBPR jacks. • When using the ...to your device has this case, connect the components B-Y output to the TV's PB input and the components R-Y output to the TV's PR input. • You may be labeled Y-CBCR. In this feature. FIRST TIME USE TIPS ON REAR PANEL CONNECTIONS • S-VIDEO, HDMI and component connections are provided for...
...connect to Input 3, Input 4 or Input 5, but note that have this case, connect the components CB output to the TV's PB input and the components CR output to the TV's PR input. • Your component outputs may be abnormal, when using the Y-PBPR jacks. • When using the ...to your device has this case, connect the components B-Y output to the TV's PB input and the components R-Y output to the TV's PR input. • You may be labeled Y-CBCR. In this feature. FIRST TIME USE TIPS ON REAR PANEL CONNECTIONS • S-VIDEO, HDMI and component connections are provided for...

Owners Guide
Page 15
.... and 6,381,747 licensed for AUDIO-Digital Output. 15 RS232C 1 2 345 6 789 CENTER OUT OPTICAL INPUT Stereo System Amplifier or DVD Player NOTES: 1. REAR PANEL OF TELEVISION ANT A ANT B MONITOR OUT S-VIDEO INPUT 4 INPUT 3 INPUT 2 Y/ VIDEO INPUT 1 Y/ VIDEO PB PB HDMI 1 VIDEO L AUDIO... right speakers are connected to the REAR output of a separate audio amplifier. ᕆ This subwoofer is connected to the diagram for speaker placement. ᕃ The television's internal speakers will act as center speaker (select Audio-Internal Speakers-TV as an A/V receiver with optical ...
.... and 6,381,747 licensed for AUDIO-Digital Output. 15 RS232C 1 2 345 6 789 CENTER OUT OPTICAL INPUT Stereo System Amplifier or DVD Player NOTES: 1. REAR PANEL OF TELEVISION ANT A ANT B MONITOR OUT S-VIDEO INPUT 4 INPUT 3 INPUT 2 Y/ VIDEO INPUT 1 Y/ VIDEO PB PB HDMI 1 VIDEO L AUDIO... right speakers are connected to the REAR output of a separate audio amplifier. ᕆ This subwoofer is connected to the diagram for speaker placement. ᕃ The television's internal speakers will act as center speaker (select Audio-Internal Speakers-TV as an A/V receiver with optical ...
Owners Guide
Page 16
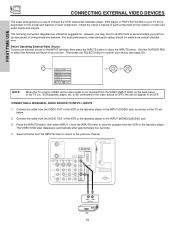
... External Video Source Connect an external source to the INPUT terminal, then press the INPUTS button to select the Antenna and Input of the TV (i.e., VCR/laserdisc player, etc. The VIDEO OSD label disappears automatically after approximately four seconds. 4. RS232C 1 2 345 6 789 Audio ...4 INPUT 3 INPUT 2 Y/ VIDEO PB INPUT 1 Y/ VIDEO PB HDMI 1 VIDEO L AUDIO R AUDIO TO HI-FI PR PR (MONO) (MONO) (MONO) (MONO) TV AS CENTER HDMI 2 OPTICAL OUT Digital Audio Upgrade Card Apparatus Claims of each component. The following connection diagrams are offered as shown on the model...
... External Video Source Connect an external source to the INPUT terminal, then press the INPUTS button to select the Antenna and Input of the TV (i.e., VCR/laserdisc player, etc. The VIDEO OSD label disappears automatically after approximately four seconds. 4. RS232C 1 2 345 6 789 Audio ...4 INPUT 3 INPUT 2 Y/ VIDEO PB INPUT 1 Y/ VIDEO PB HDMI 1 VIDEO L AUDIO R AUDIO TO HI-FI PR PR (MONO) (MONO) (MONO) (MONO) TV AS CENTER HDMI 2 OPTICAL OUT Digital Audio Upgrade Card Apparatus Claims of each component. The following connection diagrams are offered as shown on the model...
Owners Guide
Page 17
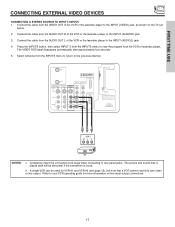
...Connect the cable from the AUDIO OUT L of the VCR or the laserdisc player to your VCR operating guide for more information on the TV set below. 2. ANT A ANT B MONITOR OUT S-VIDEO INPUT 4 INPUT 3 INPUT 2 Y/ VIDEO PB INPUT 1 Y/ VIDEO PB... HDMI 1 VIDEO L AUDIO R AUDIO TO HI-FI PR PR (MONO) (MONO) (MONO) (MONO) TV AS CENTER HDMI 2 CableCARD (Top of card faces right) OPTICAL OUT Digital Audio Upgrade Card Apparatus Claims of the VCR or the laserdisc player ...TO INPUT1~INPUT5 1. Completely insert the connection cord plugs when connecting to rear panel jacks.
...Connect the cable from the AUDIO OUT L of the VCR or the laserdisc player to your VCR operating guide for more information on the TV set below. 2. ANT A ANT B MONITOR OUT S-VIDEO INPUT 4 INPUT 3 INPUT 2 Y/ VIDEO PB INPUT 1 Y/ VIDEO PB... HDMI 1 VIDEO L AUDIO R AUDIO TO HI-FI PR PR (MONO) (MONO) (MONO) (MONO) TV AS CENTER HDMI 2 CableCARD (Top of card faces right) OPTICAL OUT Digital Audio Upgrade Card Apparatus Claims of the VCR or the laserdisc player ...TO INPUT1~INPUT5 1. Completely insert the connection cord plugs when connecting to rear panel jacks.

Owners Guide
Page 18
...S-VIDEO INPUT 4 INPUT 3 INPUT 2 Y/ VIDEO PB INPUT 1 Y/ VIDEO PB HDMI 1 VIDEO L AUDIO R AUDIO TO HI-FI PR PR (MONO) (MONO) (MONO) (MONO) TV AS CENTER HDMI 2 CableCARD (Top of card faces right) OPTICAL OUT Digital Audio Upgrade Card Apparatus Claims of the VCR or the laserdisc player to.... 5. FIRST TIME USE CONNECTING EXTERNAL VIDEO DEVICES CONNECTING AN S-VIDEO SOURCE TO INPUT 3, 4 AND 5 1. Connect the cable from the INPUTS menu to return to rear panel jacks. Connect the cable from the AUDIO OUT R of U.S. RS232C 1 2 345 6 789 RL V S-VIDEO VCR NOTES: 1. A single VCR can be...
...S-VIDEO INPUT 4 INPUT 3 INPUT 2 Y/ VIDEO PB INPUT 1 Y/ VIDEO PB HDMI 1 VIDEO L AUDIO R AUDIO TO HI-FI PR PR (MONO) (MONO) (MONO) (MONO) TV AS CENTER HDMI 2 CableCARD (Top of card faces right) OPTICAL OUT Digital Audio Upgrade Card Apparatus Claims of the VCR or the laserdisc player to.... 5. FIRST TIME USE CONNECTING EXTERNAL VIDEO DEVICES CONNECTING AN S-VIDEO SOURCE TO INPUT 3, 4 AND 5 1. Connect the cable from the INPUTS menu to return to rear panel jacks. Connect the cable from the AUDIO OUT R of U.S. RS232C 1 2 345 6 789 RL V S-VIDEO VCR NOTES: 1. A single VCR can be...
Owners Guide
Page 19
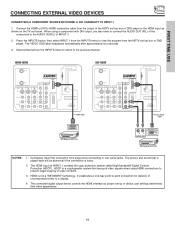
... the output of the HDTV set top box or DVD player to the AUDIO IN (R/L) of video contents. 3. RS232C 1 2 345 6 789 DVI to rear panel jacks. RS232C 12 345 6 789 HDMI Cable HDMI Output DVD Player or HDTV STB DVI-HDMI ANT A ANT B MONITOR OUT S-VIDEO INPUT 4 INPUT... 3 INPUT 2 Y/ VIDEO PB INPUT 1 Y/ VIDEO PB HDMI 1 VIDEO L AUDIO R AUDIO TO HI-FI PR PR (MONO) (MONO) (MONO) (MONO) TV AS CENTER HDMI 2 CableCARD (Top of card faces right) OPTICAL OUT Digital Audio Upgrade Card Apparatus Claims of device user settings determines final video appearance...
... the output of the HDTV set top box or DVD player to the AUDIO IN (R/L) of video contents. 3. RS232C 1 2 345 6 789 DVI to rear panel jacks. RS232C 12 345 6 789 HDMI Cable HDMI Output DVD Player or HDTV STB DVI-HDMI ANT A ANT B MONITOR OUT S-VIDEO INPUT 4 INPUT... 3 INPUT 2 Y/ VIDEO PB INPUT 1 Y/ VIDEO PB HDMI 1 VIDEO L AUDIO R AUDIO TO HI-FI PR PR (MONO) (MONO) (MONO) (MONO) TV AS CENTER HDMI 2 CableCARD (Top of card faces right) OPTICAL OUT Digital Audio Upgrade Card Apparatus Claims of device user settings determines final video appearance...

Owners Guide
Page 20
... OUT or R-Y OUT of the Laserdisc/DVD player or HDTV set top box to the INPUT (Y) jack, as shown on REAR PANEL CONNECTIONS. 20 and 6,381,747 licensed for tips on the TV set top box to the INPUT (AUDIO/R) jack. 5. RS232C 1 2 345 6 789 OUTPUT R L PR PB Y DVD Player NOTES: 1. Connect the...INPUT (PR) jack. 4. See page 14 for limited viewing uses only. Connect the cable from the Laserdisc/DVD player or HDTV set top box to rear panel jacks. The picture and sound that is played back will be abnormal if the connection is loose. 2. Press the the INPUTS button, then select...
... OUT or R-Y OUT of the Laserdisc/DVD player or HDTV set top box to the INPUT (Y) jack, as shown on REAR PANEL CONNECTIONS. 20 and 6,381,747 licensed for tips on the TV set top box to the INPUT (AUDIO/R) jack. 5. RS232C 1 2 345 6 789 OUTPUT R L PR PB Y DVD Player NOTES: 1. Connect the...INPUT (PR) jack. 4. See page 14 for limited viewing uses only. Connect the cable from the Laserdisc/DVD player or HDTV set top box to rear panel jacks. The picture and sound that is played back will be abnormal if the connection is loose. 2. Press the the INPUTS button, then select...
Owners Guide
Page 21
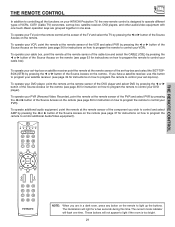
... receiver (see page 36 for instructions on the remote. THE REMOTE CONTROL THE REMOTE CONTROL In addition to controlling all the functions on your HITACHI Projection TV, the new remote control is too bright. 21 Basic operation keys are in one touch. To operate your VCR, point the remote at ...page 34 for instruction on how to program the remote to light if the room is designed to operate different types of VCRs, CATV (Cable TV) converters, set-top-box, satellite receiver, DVD players, and other audio/video equipment with one area. These buttons will flash one time. If...
... receiver (see page 36 for instructions on the remote. THE REMOTE CONTROL THE REMOTE CONTROL In addition to controlling all the functions on your HITACHI Projection TV, the new remote control is too bright. 21 Basic operation keys are in one touch. To operate your VCR, point the remote at ...page 34 for instruction on how to program the remote to light if the room is designed to operate different types of VCRs, CATV (Cable TV) converters, set-top-box, satellite receiver, DVD players, and other audio/video equipment with one area. These buttons will flash one time. If...


