
Owners Guide
Page 1
LCD REAR PROJECTION TELEVISION Operating Guide for energy efficiency. has determined that this product meets the ENERGY STAR® guidelines for 50V525E, 60V525E IMPORTANT SAFETY INSTRUCTIONS 2-3 FIRST TIME USE ...4-19 THE REMOTE CONTROL 20-33 ON-SCREEN DISPLAY...34-61 LAMP REPLACEMENT ...62-65 CARE OF YOUR HITACHI TV & REMOTE CONTROL 66 RECEPTION PROBLEMS ...67 USEFUL INFORMATION / INDEX 68-72 As an ENERGY STAR® Partner, Hitachi, Ltd.
LCD REAR PROJECTION TELEVISION Operating Guide for energy efficiency. has determined that this product meets the ENERGY STAR® guidelines for 50V525E, 60V525E IMPORTANT SAFETY INSTRUCTIONS 2-3 FIRST TIME USE ...4-19 THE REMOTE CONTROL 20-33 ON-SCREEN DISPLAY...34-61 LAMP REPLACEMENT ...62-65 CARE OF YOUR HITACHI TV & REMOTE CONTROL 66 RECEPTION PROBLEMS ...67 USEFUL INFORMATION / INDEX 68-72 As an ENERGY STAR® Partner, Hitachi, Ltd.
Owners Guide
Page 3
....ca (in Canada). Note to the CATV system installer: This reminder is protected by TV stations and cable companies, as well as programs from other . For more information, call the CATV system installer's attention to call "1-800-HITACHI." Reverse engineering or disassembly is damaged, liquid has been spilled or objects have fallen...
....ca (in Canada). Note to the CATV system installer: This reminder is protected by TV stations and cable companies, as well as programs from other . For more information, call the CATV system installer's attention to call "1-800-HITACHI." Reverse engineering or disassembly is damaged, liquid has been spilled or objects have fallen...
Owners Guide
Page 5
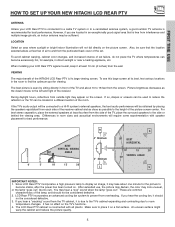
...TO SET UP YOUR NEW HITACHI LCD REAR PTV ANTENNA Unless your LCD Rear PTV against a wall, keep it should not be located in front of the HITACHI LCD Rear PTV is recommended for best performance. When installing your LCD Rear PTV is connected to a cable TV system or to a centralized ...antenna system, a good outdoor TV antenna is its best, test various locations in direct sunlight ...
...TO SET UP YOUR NEW HITACHI LCD REAR PTV ANTENNA Unless your LCD Rear PTV against a wall, keep it should not be located in front of the HITACHI LCD Rear PTV is recommended for best performance. When installing your LCD Rear PTV is connected to a cable TV system or to a centralized ...antenna system, a good outdoor TV antenna is its best, test various locations in direct sunlight ...

Owners Guide
Page 6
... / ANT B From UHF antenna From outdoor antenna or CATV System Antenna Mixer Below are connected Attach an optional antenna cable mixer to the TV antenna terminal, and connect the cables to the antenna mixer. Before purchasing any cables, be sure of the output and input connector types required...you can control some of common connectors. "F" Type 75-Ohm Coaxial Antenna Connector For connecting RF signals (antenna or cable TV) to the TV's HDMI input. Consult your TV functions from an outdoor antenna, connect the VHF or UHF antenna leads to 75-Ohm). FIRST TIME USE HOOK-UP CABLES ...
... / ANT B From UHF antenna From outdoor antenna or CATV System Antenna Mixer Below are connected Attach an optional antenna cable mixer to the TV antenna terminal, and connect the cables to the antenna mixer. Before purchasing any cables, be sure of the output and input connector types required...you can control some of common connectors. "F" Type 75-Ohm Coaxial Antenna Connector For connecting RF signals (antenna or cable TV) to the TV's HDMI input. Consult your TV functions from an outdoor antenna, connect the VHF or UHF antenna leads to 75-Ohm). FIRST TIME USE HOOK-UP CABLES ...
Owners Guide
Page 7
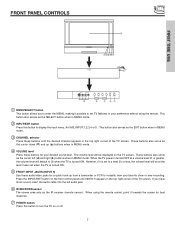
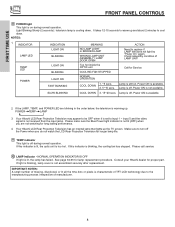
...the audio cable into the left (̇) and right (̈) buttons when in the top right corner of the TV screen. If you to enter the MENU, making it possible to set TV features to your preference without using the remote control, point it towards the screen for best response. ቨ POWER... buttons until VIDEO: 5 appears in MENU mode. This button also serves as the IR receiver (remote sensor). When the TV power is turned OFF at the level it is set when the TV is turned ON. VOL+ CH- FIRST TIME USE FRONT PANEL CONTROLS ቧ PUSH PUSH INPUT 5 AUDIO S-VIDEO VIDEO L/...
...the audio cable into the left (̇) and right (̈) buttons when in the top right corner of the TV screen. If you to enter the MENU, making it possible to set TV features to your preference without using the remote control, point it towards the screen for best response. ቨ POWER... buttons until VIDEO: 5 appears in MENU mode. This button also serves as the IR receiver (remote sensor). When the TV power is turned OFF at the level it is set when the TV is turned ON. VOL+ CH- FIRST TIME USE FRONT PANEL CONTROLS ቧ PUSH PUSH INPUT 5 AUDIO S-VIDEO VIDEO L/...
Owners Guide
Page 8
... 63-65 for proper part. Consult your Hitachi dealer for lamp replacement procedure. Light Blinking Slowly (2 seconds): television lamp is warming up the TV screen. If this indicator is set to cool down . Your Hitachi LCD Rear Projection Television has an internal lamp that lights up... . Please call service. ቫ LAMP indicator - Your Hitachi LCD Rear Projection Television may appear to be OFF when...
... 63-65 for proper part. Consult your Hitachi dealer for lamp replacement procedure. Light Blinking Slowly (2 seconds): television lamp is warming up the TV screen. If this indicator is set to cool down . Your Hitachi LCD Rear Projection Television has an internal lamp that lights up... . Please call service. ቫ LAMP indicator - Your Hitachi LCD Rear Projection Television may appear to be OFF when...

Owners Guide
Page 9
... jack of the standard video cable. 3. Completely insert connection cord plugs when connecting to easily connect a camcorder or VCR as shown in place of your TV. 9 If you to front panel jacks.
... jack of the standard video cable. 3. Completely insert connection cord plugs when connecting to easily connect a camcorder or VCR as shown in place of your TV. 9 If you to front panel jacks.

Owners Guide
Page 10
... be used for recording. S-VIDEO has priority over VIDEO input. 2. It may be labeled Y, B-Y, and R-Y. Use the audio and video inputs to the TV's PR input. 4. Use the S-VIDEO Output for high quality video output (see page 38). 5. REAR PANEL JACKS FIRST TIME USE ቢ ቦ... INPUT 3 INPUT 2 Y/ VIDEO PB INPUT 1 Y/ VIDEO PB HDMI 1 VIDEO L AUDIO R AUDIO TO HI-FI PR PR (MONO) (MONO) (MONO) (MONO) TV AS CENTER ባ ቩቧ RS232C 1 2 345 6 789 ቨ ቢ Antenna Input/Output The remote control allows you can only be displayed as a main ...
... be used for recording. S-VIDEO has priority over VIDEO input. 2. It may be labeled Y, B-Y, and R-Y. Use the audio and video inputs to the TV's PR input. 4. Use the S-VIDEO Output for high quality video output (see page 38). 5. REAR PANEL JACKS FIRST TIME USE ቢ ቦ... INPUT 3 INPUT 2 Y/ VIDEO PB INPUT 1 Y/ VIDEO PB HDMI 1 VIDEO L AUDIO R AUDIO TO HI-FI PR PR (MONO) (MONO) (MONO) (MONO) TV AS CENTER ባ ቩቧ RS232C 1 2 345 6 789 ቨ ቢ Antenna Input/Output The remote control allows you can only be displayed as a main ...

Owners Guide
Page 11
...such as Center" on the Internal Speakers Settings of the Audio Menu (see page 61 to activate this input). ቩ TV AS CENTER (INPUTS 1-4) These jacks are commercially available. The TV must be used as 1080i, 720p, 480i and 480p are available for HDMI input. ቨ RS232C Input For use with... The HDMI input is the next-generation all the way to be set as a center channel by selecting "TV as Set-Top-Boxes or DVD players equipped with an HDMI output connection. This feature allows the TV speakers to your dealer regarding these "non Hitachi" home control systems (see page 42). 11
...such as Center" on the Internal Speakers Settings of the Audio Menu (see page 61 to activate this input). ቩ TV AS CENTER (INPUTS 1-4) These jacks are commercially available. The TV must be used as 1080i, 720p, 480i and 480p are available for HDMI input. ቨ RS232C Input For use with... The HDMI input is the next-generation all the way to be set as a center channel by selecting "TV as Set-Top-Boxes or DVD players equipped with an HDMI output connection. This feature allows the TV speakers to your dealer regarding these "non Hitachi" home control systems (see page 42). 11

Owners Guide
Page 12
... ANT B MONITOR OUT S-VIDEO INPUT 4 INPUT 3 INPUT 2 Y/ VIDEO PB INPUT 1 Y/ VIDEO PB HDMI 1 VIDEO L AUDIO R AUDIO TO HI-FI PR PR (MONO) (MONO) (MONO) (MONO) TV AS CENTER RS232C 1 2 345 6 789 External Digital Component with the purchase of this...
... ANT B MONITOR OUT S-VIDEO INPUT 4 INPUT 3 INPUT 2 Y/ VIDEO PB INPUT 1 Y/ VIDEO PB HDMI 1 VIDEO L AUDIO R AUDIO TO HI-FI PR PR (MONO) (MONO) (MONO) (MONO) TV AS CENTER RS232C 1 2 345 6 789 External Digital Component with the purchase of this...

Owners Guide
Page 13
...audio output (mono sound), connect it is recommended to use a 1080i or 720p input signal. 13 In this case, connect the components B-Y output to the TV's PB input and the components R-Y output to each input jack. • COMPONENT: Y-PBPR (Input 1 & 2) connections are provided for additional information on...hook-up cables. • A single VCR can be used at a time. • Connect only 1 component (VCR, DVD player, camcorder, etc.) to the TV's PR input. • Your component outputs may be abnormal, when using the Y-PBPR jacks. • When using the Y-PBPR inputs. (See page 38) •...
...audio output (mono sound), connect it is recommended to use a 1080i or 720p input signal. 13 In this case, connect the components B-Y output to the TV's PB input and the components R-Y output to each input jack. • COMPONENT: Y-PBPR (Input 1 & 2) connections are provided for additional information on...hook-up cables. • A single VCR can be used at a time. • Connect only 1 component (VCR, DVD player, camcorder, etc.) to the TV's PR input. • Your component outputs may be abnormal, when using the Y-PBPR jacks. • When using the Y-PBPR inputs. (See page 38) •...

Owners Guide
Page 14
...4 INPUT 3 INPUT 2 Y/ VIDEO PB INPUT 1 Y/ VIDEO PB HDMI 1 VIDEO L AUDIO R AUDIO TO HI-FI PR PR (MONO) (MONO) (MONO) (MONO) TV AS CENTER RS232C 1 2 345 6 78 9 CENTER OUT Stereo System Amplifier or DVD Player NOTE: 1. See page 42 for speaker placement. ᕃ The television's internal speakers... will act as center speaker (select Audio-Internal Speakers-TV as Center see page 42). ᕄ These FRONT left and right speakers are connected to the FRONT output of a separate audio amplifier. ...
...4 INPUT 3 INPUT 2 Y/ VIDEO PB INPUT 1 Y/ VIDEO PB HDMI 1 VIDEO L AUDIO R AUDIO TO HI-FI PR PR (MONO) (MONO) (MONO) (MONO) TV AS CENTER RS232C 1 2 345 6 78 9 CENTER OUT Stereo System Amplifier or DVD Player NOTE: 1. See page 42 for speaker placement. ᕃ The television's internal speakers... will act as center speaker (select Audio-Internal Speakers-TV as Center see page 42). ᕄ These FRONT left and right speakers are connected to the FRONT output of a separate audio amplifier. ...

Owners Guide
Page 15
... player, DVD player, or HDTV Set Top Box to your choice (see page 23). Connect the cable from the VIDEO INPUT JACK on the TV set below. 2. Before Operating External Video Source Connect an external source to the INPUT terminal, then press the INPUTS button to show the INPUTS ...Press the INPUTS button, then select INPUT 1 from the INPUTS menu to view the program from coaxial shielded wire. Check the owner's manual of the TV (i.e., VCR/laserdisc player, etc. For best performance, video and audio cables should be OFF. Use the CURSOR buttons to select the Antenna and Input ...
... player, DVD player, or HDTV Set Top Box to your choice (see page 23). Connect the cable from the VIDEO INPUT JACK on the TV set below. 2. Before Operating External Video Source Connect an external source to the INPUT terminal, then press the INPUTS button to show the INPUTS ...Press the INPUTS button, then select INPUT 1 from the INPUTS menu to view the program from coaxial shielded wire. Check the owner's manual of the TV (i.e., VCR/laserdisc player, etc. For best performance, video and audio cables should be OFF. Use the CURSOR buttons to select the Antenna and Input ...

Owners Guide
Page 16
... laserdisc player to rear panel jacks. A single VCR can be abnormal if the connection is played back will be used for more information on the TV set below. 2. Connect the cable from the INPUTS menu to return to the INPUT (AUDIO/L) jack. 4. ANT A TO CONVERTER ANT B MONITOR OUT S-VIDEO INPUT 4 INPUT... 3 INPUT 2 Y/ VIDEO INPUT 1 Y/ VIDEO PB PB HDMI 1 VIDEO L AUDIO R AUDIO TO HI-FI PR PR (MONO) (MONO) (MONO) (MONO) TV AS CENTER RS232C 1 2 345 6 78 9 OUTPUT RL V VCR NOTES: 1.
... laserdisc player to rear panel jacks. A single VCR can be abnormal if the connection is played back will be used for more information on the TV set below. 2. Connect the cable from the INPUTS menu to return to the INPUT (AUDIO/L) jack. 4. ANT A TO CONVERTER ANT B MONITOR OUT S-VIDEO INPUT 4 INPUT... 3 INPUT 2 Y/ VIDEO INPUT 1 Y/ VIDEO PB PB HDMI 1 VIDEO L AUDIO R AUDIO TO HI-FI PR PR (MONO) (MONO) (MONO) (MONO) TV AS CENTER RS232C 1 2 345 6 78 9 OUTPUT RL V VCR NOTES: 1.

Owners Guide
Page 17
... S-VIDEO INPUT 4 INPUT 3 INPUT 2 Y/ VIDEO PB INPUT 1 Y/ VIDEO PB HDMI 1 VIDEO L AUDIO R AUDIO TO HI-FI PR PR (MONO) (MONO) (MONO) (MONO) TV AS CENTER RS232C 1 2 345 6 789 RL V S-VIDEO VCR NOTES: 1. A single VCR can be abnormal if the connection is played back will be used for more... information on the TV set below. 2. Select Antenna from the AUDIO OUT R of the VCR or the laserdisc player to the previous channel. Connect the cable from the INPUTS...
... S-VIDEO INPUT 4 INPUT 3 INPUT 2 Y/ VIDEO PB INPUT 1 Y/ VIDEO PB HDMI 1 VIDEO L AUDIO R AUDIO TO HI-FI PR PR (MONO) (MONO) (MONO) (MONO) TV AS CENTER RS232C 1 2 345 6 789 RL V S-VIDEO VCR NOTES: 1. A single VCR can be abnormal if the connection is played back will be used for more... information on the TV set below. 2. Select Antenna from the AUDIO OUT R of the VCR or the laserdisc player to the previous channel. Connect the cable from the INPUTS...

Owners Guide
Page 18
... the connection cord plugs when connecting to HDMI Cable RL AUDIO OUT DIGITAL OUTPUT DVD Player or HDTV STB NOTES: 1. The HDMI input on the TV set -up of INPUT 1. 2. HDMI is not a "NETWORK" technology. HDMI-HDMI ANT A TO CONVERTER ANT B MONITOR OUT S-VIDEO INPUT 4 INPUT 3 INPUT 2 Y/ VIDEO... PB INPUT 1 Y/ VIDEO PB HDMI 1 VIDEO L AUDIO R AUDIO TO HI-FI PR PR (MONO) (MONO) (MONO) (MONO) TV AS CENTER RS232C 1 2 345 6 789 HDMI Cable HDMI Output DVD Player or HDTV STB DVI-HDMI ANT A TO CONVERTER ANT B MONITOR OUT S-VIDEO INPUT 4 INPUT...
... the connection cord plugs when connecting to HDMI Cable RL AUDIO OUT DIGITAL OUTPUT DVD Player or HDTV STB NOTES: 1. The HDMI input on the TV set -up of INPUT 1. 2. HDMI is not a "NETWORK" technology. HDMI-HDMI ANT A TO CONVERTER ANT B MONITOR OUT S-VIDEO INPUT 4 INPUT 3 INPUT 2 Y/ VIDEO... PB INPUT 1 Y/ VIDEO PB HDMI 1 VIDEO L AUDIO R AUDIO TO HI-FI PR PR (MONO) (MONO) (MONO) (MONO) TV AS CENTER RS232C 1 2 345 6 789 HDMI Cable HDMI Output DVD Player or HDTV STB DVI-HDMI ANT A TO CONVERTER ANT B MONITOR OUT S-VIDEO INPUT 4 INPUT...

Owners Guide
Page 19
... 1 Y/ VIDEO PB PB HDMI 1 VIDEO L AUDIO R AUDIO TO HI-FI PR PR (MONO) (MONO) (MONO) (MONO) TV AS CENTER RS232C 1 2 345 6 789 OUTPUT R L PR PB Y DVD Player NOTES: 1. See page 13 for tips on the TV set top box to view the program from the AUDIO OUT R of the laserdisc/DVD player...
... 1 Y/ VIDEO PB PB HDMI 1 VIDEO L AUDIO R AUDIO TO HI-FI PR PR (MONO) (MONO) (MONO) (MONO) TV AS CENTER RS232C 1 2 345 6 789 OUTPUT R L PR PB Y DVD Player NOTES: 1. See page 13 for tips on the TV set top box to view the program from the AUDIO OUT R of the laserdisc/DVD player...

Owners Guide
Page 20
... remote will now control your set -top-box, satellite receiver (SAT) and DVD players with one area. To operate your TV, point the remote control at the screen of VCRs, CATV (Cable TV) converters, set -top-box or satellite receiver. The remote will now control your VCR (see page 29 for instructions... how to program the remote to control your cable box). The remote will now control your cable box (see page 32 for instructions on your HITACHI Projection TV, the new remote control is designed to operate different types of the...
... remote will now control your set -top-box, satellite receiver (SAT) and DVD players with one area. To operate your TV, point the remote control at the screen of VCRs, CATV (Cable TV) converters, set -top-box or satellite receiver. The remote will now control your VCR (see page 29 for instructions... how to program the remote to control your cable box). The remote will now control your cable box (see page 32 for instructions on your HITACHI Projection TV, the new remote control is designed to operate different types of the...
Owners Guide
Page 21
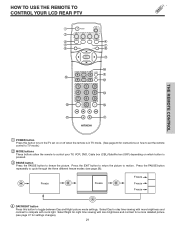
... night time viewing with less brightness and contrast for instructions on how to set the remote control to TV mode.) ባ MODE buttons These buttons allow the remote to control your TV, VCR, DVD, Cable box (CBL)/Satellite box (SAT) depending on which button is pressed. ቤ... light. Select Day for settings changes). 21 Press the EXIT button to return the picture to motion. HOW TO USE THE REMOTE TO CONTROL YOUR LCD REAR PTV ቢ ባ ቧ ብ ቦ ቨ ቩ ቫ ቭ ተ ቱ ቲ ታ ቤ THE REMOTE CONTROL ቢ...
... night time viewing with less brightness and contrast for instructions on how to set the remote control to TV mode.) ባ MODE buttons These buttons allow the remote to control your TV, VCR, DVD, Cable box (CBL)/Satellite box (SAT) depending on which button is pressed. ቤ... light. Select Day for settings changes). 21 Press the EXIT button to return the picture to motion. HOW TO USE THE REMOTE TO CONTROL YOUR LCD REAR PTV ቢ ባ ቧ ብ ቦ ቨ ቩ ቫ ቭ ተ ቱ ቲ ታ ቤ THE REMOTE CONTROL ቢ...

Owners Guide
Page 23
... SEL Select Select to select. Select to choose Input 4 for Video 3. Select to access the INPUTS menu. HOW TO USE THE REMOTE TO CONTROL YOUR LCD REAR PTV ቧ INPUTS button When the remote control is in TV mode, press this button to choose Input 2 for Video 2.
... SEL Select Select to select. Select to choose Input 4 for Video 3. Select to access the INPUTS menu. HOW TO USE THE REMOTE TO CONTROL YOUR LCD REAR PTV ቧ INPUTS button When the remote control is in TV mode, press this button to choose Input 2 for Video 2.


