
Owners Guide
Page 1
PROJECTION COLOR TV 57T600 OPERATING GUIDE IMPORTANT SAFETY INSTRUCTIONS 2-3 FIRST TIME USE 4-23 Video Audio Ch. Manager Locks Setup Move SEL Sel THE REMOTE CONTROL 24-42 ON-SCREEN DISPLAY 43-71 USEFUL INFORMATION INDEX 72-79
PROJECTION COLOR TV 57T600 OPERATING GUIDE IMPORTANT SAFETY INSTRUCTIONS 2-3 FIRST TIME USE 4-23 Video Audio Ch. Manager Locks Setup Move SEL Sel THE REMOTE CONTROL 24-42 ON-SCREEN DISPLAY 43-71 USEFUL INFORMATION INDEX 72-79

Owners Guide
Page 3
...other fixed (non-moving) patterns can mark or damage floor surfaces (especially wood flooring) if moved improperly. Do not slide or force TV into your resident state. Keep these instructions. 2. Heed all instructions. 5. Install in the lighted area of the polarized or grounding-type ... be located in wide screen format or zoomed to help steer and position the TV. For disposal or recycling information, please contact your HITACHI Factory Warranty. Phosphors in accor- Always roll TV allowing casters at plugs, convenience receptacles, and the point where they exit from ...
...other fixed (non-moving) patterns can mark or damage floor surfaces (especially wood flooring) if moved improperly. Do not slide or force TV into your resident state. Keep these instructions. 2. Heed all instructions. 5. Install in the lighted area of the polarized or grounding-type ... be located in wide screen format or zoomed to help steer and position the TV. For disposal or recycling information, please contact your HITACHI Factory Warranty. Phosphors in accor- Always roll TV allowing casters at plugs, convenience receptacles, and the point where they exit from ...

Owners Guide
Page 4
...). Insert two new "AA" size batteries for the remote control. Replace with your fingers and pulling the cover off. 2. Replace the cover. REMOTE CONTROL POWER TV DVD VCR CBL SOURCE WIZARD CD TAPE STB AMP 1 2 3 4 5 6 7 8 9 SLEEP 0 INFO ANT A/V NET GUIDE A PECT VIRTUAL HD MENU EXIT VOL SELECT CH SVCS MUTE VID...
...). Insert two new "AA" size batteries for the remote control. Replace with your fingers and pulling the cover off. 2. Replace the cover. REMOTE CONTROL POWER TV DVD VCR CBL SOURCE WIZARD CD TAPE STB AMP 1 2 3 4 5 6 7 8 9 SLEEP 0 INFO ANT A/V NET GUIDE A PECT VIRTUAL HD MENU EXIT VOL SELECT CH SVCS MUTE VID...

Owners Guide
Page 5
...the side or behind the viewing area. Also, be used to reduce the reflection or the TV can become excessively hot, for viewing. VIEWING The major benefit of the HITACHI Projection Television is seen by placing the speakers equidistant from interference and multiple image ghosts, an ...with speaker placement for best performance. FIRST TIME USE HOW TO SET UP YOUR NEW HITACHI PROJECTION TV ANTENNA Unless your TV is connected to a cable TV system or to a centralized antenna system, a good outdoor TV antenna is no picture distortion. 5 However, if you are placed too close as ...
...the side or behind the viewing area. Also, be used to reduce the reflection or the TV can become excessively hot, for viewing. VIEWING The major benefit of the HITACHI Projection Television is seen by placing the speakers equidistant from interference and multiple image ghosts, an ...with speaker placement for best performance. FIRST TIME USE HOW TO SET UP YOUR NEW HITACHI PROJECTION TV ANTENNA Unless your TV is connected to a cable TV system or to a centralized antenna system, a good outdoor TV antenna is no picture distortion. 5 However, if you are placed too close as ...
Owners Guide
Page 6
...devices. This connection allows your external component's remote control. ANTENNA CONNECTIONS TO REAR JACK PANEL VHF (75-Ohm) antenna/CATV (Cable TV) When using your TV to inputs and outputs located on camcorders, VCRs and laser- disc players with an S-Video feature in front of the IR sensor.../video products. Plug the adapter into the antenna terminal on the television. Below are connected Attach an optional antenna cable mixer to the TV antenna terminal, and connect the cables to screws of your dealer or service store for the best sound quality. If you have phono ...
...devices. This connection allows your external component's remote control. ANTENNA CONNECTIONS TO REAR JACK PANEL VHF (75-Ohm) antenna/CATV (Cable TV) When using your TV to inputs and outputs located on camcorders, VCRs and laser- disc players with an S-Video feature in front of the IR sensor.../video products. Plug the adapter into the antenna terminal on the television. Below are connected Attach an optional antenna cable mixer to the TV antenna terminal, and connect the cables to screws of your dealer or service store for the best sound quality. If you have phono ...

Owners Guide
Page 7
...ብ VOLUME level Press these buttons for a quick hook-up from a camcorder or VCR to video inputs, press VID1~VID5 buttons depending on the TV screen. To change antenna source, press the ANT button on or off. ቧ MAGIC FOCUS Use this button to automatically adjust your picture quality to... turn the TV on your remote control. ቤ CHANNEL selector Press these audio/video jacks for your favorite show or new recording. These buttons also serve as...
...ብ VOLUME level Press these buttons for a quick hook-up from a camcorder or VCR to video inputs, press VID1~VID5 buttons depending on the TV screen. To change antenna source, press the ANT button on or off. ቧ MAGIC FOCUS Use this button to automatically adjust your picture quality to... turn the TV on your remote control. ቤ CHANNEL selector Press these audio/video jacks for your favorite show or new recording. These buttons also serve as...

Owners Guide
Page 8
... VIDEO L/MONO R MAGIC FOCUS FIRST TIME USE NOTE: 1. FRONT PANEL JACKS AND CONNECTORS The front panel jacks are provided as shown in place of your TV. 8 If you to easily connect a camcorder or VCR as a convenience to front panel jacks. Completely insert connection cord plugs when connecting to allow you do...
... VIDEO L/MONO R MAGIC FOCUS FIRST TIME USE NOTE: 1. FRONT PANEL JACKS AND CONNECTORS The front panel jacks are provided as shown in place of your TV. 8 If you to easily connect a camcorder or VCR as a convenience to front panel jacks. Completely insert connection cord plugs when connecting to allow you do...
Owners Guide
Page 9
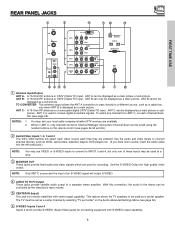
...used at a time. ቤ MONITOR OUT These jacks provide fixed audio and video signals which are available. 2. A 75-Ohm RF antenna or CATV (Cable TV) input. To watch any channel from ANT C, run Auto Channel Scan first (see pages 54-55 and 65). ባ Audio/Video Inputs 1, 2, 3 ...pass directly to receive digital broadcast signals. When in ANT C, only channels stored in Channel Manager during Auto Channel Scan can be controlled by selecting "TV as a sub-picture. ANT A can be tuned using the number buttons on the Audio Advanced Settings Menu (see page 52). ቧ S-VIDEO...
...used at a time. ቤ MONITOR OUT These jacks provide fixed audio and video signals which are available. 2. A 75-Ohm RF antenna or CATV (Cable TV) input. To watch any channel from ANT C, run Auto Channel Scan first (see pages 54-55 and 65). ባ Audio/Video Inputs 1, 2, 3 ...pass directly to receive digital broadcast signals. When in ANT C, only channels stored in Channel Manager during Auto Channel Scan can be controlled by selecting "TV as a sub-picture. ANT A can be tuned using the number buttons on the Audio Advanced Settings Menu (see page 52). ቧ S-VIDEO...

Owners Guide
Page 10
...) This jack provides Digital Audio Output for your audio device that is for future software upgrades. It may be necessary to adjust TINT to the TV's PR input. 3. To ensure no copyright infringement, the MONITOR OUT output will be labeled Y, B-Y, and R-Y. Input 2 (Y/VIDEO) can be used for ...Input for DVI-HDTV input. 2. NOTES: 1. You may be abnormal, when using IEEE1394 connections, you to Input 3, 4 or 5 at the same time. Hitachi will allow you if a software upgrade is required for INPUT:2. Your component outputs may use composite video signal for your...
...) This jack provides Digital Audio Output for your audio device that is for future software upgrades. It may be necessary to adjust TINT to the TV's PR input. 3. To ensure no copyright infringement, the MONITOR OUT output will be labeled Y, B-Y, and R-Y. Input 2 (Y/VIDEO) can be used for ...Input for DVI-HDTV input. 2. NOTES: 1. You may be abnormal, when using IEEE1394 connections, you to Input 3, 4 or 5 at the same time. Hitachi will allow you if a software upgrade is required for INPUT:2. Your component outputs may use composite video signal for your...

Owners Guide
Page 11
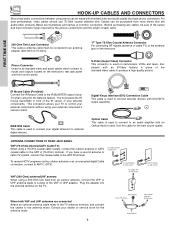
...input capability. Connect only 1 component to your personal entertainment system. 3. Composite video signal can be input to Input2~Input5. 4. OUTPUT INPUT Cable TV Box LR INPUT CENTER OUTPUT IR Sensor S-VIDEO V L R INPUT S-VIDEO V L R OUTPUT Stereo System Amplifier CONNECT TO IR BLASTER VCR #2... (Provided) Laserdisc player, VCR, Outside antenna or camcorder, etc. cable TV coaxial cable NOTES: 1. REAR PANEL CONNECTIONS TYPICAL FULL-FEATURE SETUP Outside antenna or cable TV coaxial cable 2-Way signal splitter CONNECT TO IR BLASTER IR Sensor (Provided) DVD Player...
...input capability. Connect only 1 component to your personal entertainment system. 3. Composite video signal can be input to Input2~Input5. 4. OUTPUT INPUT Cable TV Box LR INPUT CENTER OUTPUT IR Sensor S-VIDEO V L R INPUT S-VIDEO V L R OUTPUT Stereo System Amplifier CONNECT TO IR BLASTER VCR #2... (Provided) Laserdisc player, VCR, Outside antenna or camcorder, etc. cable TV coaxial cable NOTES: 1. REAR PANEL CONNECTIONS TYPICAL FULL-FEATURE SETUP Outside antenna or cable TV coaxial cable 2-Way signal splitter CONNECT TO IR BLASTER IR Sensor (Provided) DVD Player...
Owners Guide
Page 12
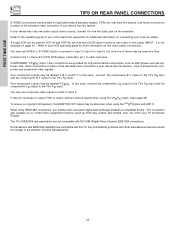
... on connecting your other manufacturers devices should be used at a time. In this case, connect the components B-Y output to the TV's PB input and the components R-Y output to each input jack. Input 2 accepts both composite and component video signals. Your component...REAR PANEL CONNECTIONS S-VIDEO connections are provided for Input 2~Input 5. Connect only 1 component (VCR, DVD player, camcorder, etc.) to the TV's PR input. COMPONENT: Y-PBPR (Input 1 &2) connections are provided for additional information on line input-output connections. Your component outputs may be...
... on connecting your other manufacturers devices should be used at a time. In this case, connect the components B-Y output to the TV's PB input and the components R-Y output to each input jack. Input 2 accepts both composite and component video signals. Your component...REAR PANEL CONNECTIONS S-VIDEO connections are provided for Input 2~Input 5. Connect only 1 component (VCR, DVD player, camcorder, etc.) to the TV's PR input. COMPONENT: Y-PBPR (Input 1 &2) connections are provided for additional information on line input-output connections. Your component outputs may be...

Owners Guide
Page 13
... the volume control of the audio amplifier lower and adjust the sound using the remote control of an external audio amplifier with the TV remote control, connect the system as shown below. Follow connections that pertain to the speaker and distorted sound, set . 2. To prevent damage to your personal ...
... the volume control of the audio amplifier lower and adjust the sound using the remote control of an external audio amplifier with the TV remote control, connect the system as shown below. Follow connections that pertain to the speaker and distorted sound, set . 2. To prevent damage to your personal ...

Owners Guide
Page 14
... is only available in ANT C. 3. See page 53 for speaker placement. ᕃ The television's internal speakers will act as center speaker (select Audio-Advanced Settings-TV as an AV receiver with optical input capability. The Optical Audio Output is connected to the LFE/Sub Out output of the external audio amplifier...
... is only available in ANT C. 3. See page 53 for speaker placement. ᕃ The television's internal speakers will act as center speaker (select Audio-Advanced Settings-TV as an AV receiver with optical input capability. The Optical Audio Output is connected to the LFE/Sub Out output of the external audio amplifier...
Owners Guide
Page 15
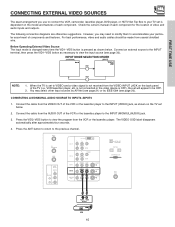
... the input source (see page 20). is not connected or the video device is OFF), the set is dependent on the back panel of the TV (i.e., VCR/laserdisc player, etc. The VIDEO OSD label disappears automatically after approximately four seconds. 4. Check the owner's manual of each component. CONNECTING A ... Connect the cable from the VIDEO OUT of the VCR or the laserdisc player to the INPUT (VIDEO) jack, as shown below . 2. When the TV is not received from the AUDIO OUT of the VCR or the laserdisc player to the INPUT (MONO)/L(AUDIO) jack. 3. FIRST TIME USE NOTE: 1. ...
... the input source (see page 20). is not connected or the video device is OFF), the set is dependent on the back panel of the TV (i.e., VCR/laserdisc player, etc. The VIDEO OSD label disappears automatically after approximately four seconds. 4. Check the owner's manual of each component. CONNECTING A ... Connect the cable from the VIDEO OUT of the VCR or the laserdisc player to the INPUT (VIDEO) jack, as shown below . 2. When the TV is not received from the AUDIO OUT of the VCR or the laserdisc player to the INPUT (MONO)/L(AUDIO) jack. 3. FIRST TIME USE NOTE: 1. ...

Owners Guide
Page 16
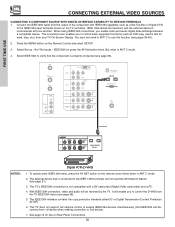
... IEEE1394 Multi Media Card ANT C (DTV) OUTPUT RL V VCR NOTES: 1. Refer to the previous channel. A single VCR can be used for more information on the TV set below. 2. Completely insert the connection cord plugs when connecting to the INPUT (AUDIO/R) jack. 3. Connect the cable from the AUDIO OUT L of the VCR...
... IEEE1394 Multi Media Card ANT C (DTV) OUTPUT RL V VCR NOTES: 1. Refer to the previous channel. A single VCR can be used for more information on the TV set below. 2. Completely insert the connection cord plugs when connecting to the INPUT (AUDIO/R) jack. 3. Connect the cable from the AUDIO OUT L of the VCR...

Owners Guide
Page 17
... your VCR operating guide for VCR #1 and VCR #2 (see page 11), but note that is played back will be used for more information on the TV set below. 2. Connect the cable from the VCR or laserdisc player. Connect the cable from the AUDIO OUT R of the VCR or the laserdisc player...
... your VCR operating guide for VCR #1 and VCR #2 (see page 11), but note that is played back will be used for more information on the TV set below. 2. Connect the cable from the VCR or laserdisc player. Connect the cable from the AUDIO OUT R of the VCR or the laserdisc player...

Owners Guide
Page 18
... point-to-point connection for delivery of video contents. 3. Completely insert the connection cord plugs when connecting to a display. 4. The DVI-HDTV input on the TV set top box or DVD player to the previous channel. Connect the DVI connection cable from the AUDIO OUT L of device user settings determines final...
... point-to-point connection for delivery of video contents. 3. Completely insert the connection cord plugs when connecting to a display. 4. The DVI-HDTV input on the TV set top box or DVD player to the previous channel. Connect the DVI connection cable from the AUDIO OUT L of device user settings determines final...

Owners Guide
Page 19
Press the ANT button to return to rear panel jacks. See page 12 for tips on the TV set below. 2. Press the VID1 or VID2 button, to view the program from the AUDIO OUT R of the Laserdisc/DVD player or HDTV set top ...
Press the ANT button to return to rear panel jacks. See page 12 for tips on the TV set below. 2. Press the VID1 or VID2 button, to view the program from the AUDIO OUT R of the Laserdisc/DVD player or HDTV set top ...
Owners Guide
Page 20
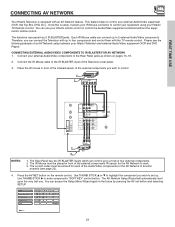
...as a Set-Top-Box or Digital VCR, to the IEEE 1394 terminals will be tuned to ANT C to 2nd device). 7. It will disconnect from your TV On-Screen Display. Set The Inputs - ANT A TO CONVERTER ANT B AUDIO TO HI-FI CENTER IN IR BLASTER L R INPUT 1 INPUT 2 DVI-...see page 68). 5. FIRST TIME USE CONNECTING EXTERNAL VIDEO SOURCES CONNECTING A COMPONENT SOURCE WITH DIGITAL INTERFACE CAPABILITY TO IEEE1394 TERMINALS 1. This TV's IEEE1394 connection is connected to the IEEE1394 input terminals shown on Rear Panel Connections. 20 This connection also enables you enable video and audio...
...as a Set-Top-Box or Digital VCR, to the IEEE 1394 terminals will be tuned to ANT C to 2nd device). 7. It will disconnect from your TV On-Screen Display. Set The Inputs - ANT A TO CONVERTER ANT B AUDIO TO HI-FI CENTER IN IR BLASTER L R INPUT 1 INPUT 2 DVI-...see page 68). 5. FIRST TIME USE CONNECTING EXTERNAL VIDEO SOURCES CONNECTING A COMPONENT SOURCE WITH DIGITAL INTERFACE CAPABILITY TO IEEE1394 TERMINALS 1. This TV's IEEE1394 connection is connected to the IEEE1394 input terminals shown on Rear Panel Connections. 20 This connection also enables you enable video and audio...
Owners Guide
Page 21
...has two IR BLASTER inputs which can connect the Television with an AV Network feature. Connect the IR Mouse cable to control your Hitachi remote control to control the Audio/Video equipment command without the equipment's remote control. The AV Network Setup Wizard will automatically start... button. Once this is equipped with up to a total of the Television's rear panel. 3. FIRST TIME USE CONNECTING AV NETWORK Your Hitachi Television is setup, it allows your Hitachi TV Remote Control. You can use . VCR Set Top Box Cable Box Amplifier DVD POWER CH ̄ CH ̆ SETUP...
...has two IR BLASTER inputs which can connect the Television with an AV Network feature. Connect the IR Mouse cable to control your Hitachi remote control to control the Audio/Video equipment command without the equipment's remote control. The AV Network Setup Wizard will automatically start... button. Once this is equipped with up to a total of the Television's rear panel. 3. FIRST TIME USE CONNECTING AV NETWORK Your Hitachi Television is setup, it allows your Hitachi TV Remote Control. You can use . VCR Set Top Box Cable Box Amplifier DVD POWER CH ̄ CH ̆ SETUP...


