Owners Guide
Page 2
... side of benefit to you obtain from it to very high voltages and other hazards. CAUTION: Adjust only those controls that are not expressly approved by HITACHI could void the user's authority to this television. Home Electronics Division may be discovered in the ...instructions, as this section illustrates safety tips which will be notified that are covered in your HITACHI television. To help you operate these units. CAUTION: Never remove the back cover of uninsulated "dangerous voltage" within an equilateral...
... side of benefit to you obtain from it to very high voltages and other hazards. CAUTION: Adjust only those controls that are not expressly approved by HITACHI could void the user's authority to this television. Home Electronics Division may be discovered in the ...instructions, as this section illustrates safety tips which will be notified that are covered in your HITACHI television. To help you operate these units. CAUTION: Never remove the back cover of uninsulated "dangerous voltage" within an equilateral...
Owners Guide
Page 7
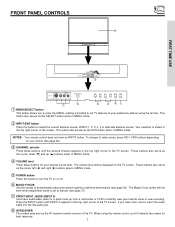
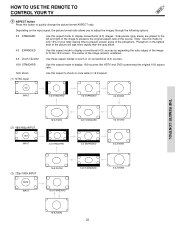
... have an INPUT button. This button also serves as the SELECT button when in MENU mode. ባ INPUT/EXIT button Press this button to automatically adjust your picture quality to manual (see page 37). ቨ FRONT INPUT JACKS (INPUT 5) Use these audio/video jacks for best response. 7 These buttons ...buttons depending on the TV screen. To change to instantly view your choice (see page 36). VOL+ CH- The volume level will not work when adjustment mode is shown in MENU mode. This button also serves as the IR receiver (remote sensor) of the TV screen. VIDEO L/MONO R MAGIC ...
... have an INPUT button. This button also serves as the SELECT button when in MENU mode. ባ INPUT/EXIT button Press this button to automatically adjust your picture quality to manual (see page 37). ቨ FRONT INPUT JACKS (INPUT 5) Use these audio/video jacks for best response. 7 These buttons ...buttons depending on the TV screen. To change to instantly view your choice (see page 36). VOL+ CH- The volume level will not work when adjustment mode is shown in MENU mode. This button also serves as the IR receiver (remote sensor) of the TV screen. VIDEO L/MONO R MAGIC ...
Owners Guide
Page 10
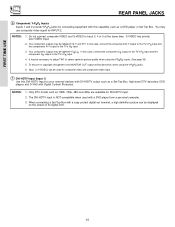
...'s PR input. 4. Your component outputs may use composite video signal for INPUT:2. To ensure no copyright infringement, the MONITOR OUT output will be necessary to adjust TINT to the TV's PR input. 3. NOTES: 1. S-VIDEO has priority over VIDEO input. 2. Your component outputs may be abnormal, when using the Y-PBPR inputs. (See...
...'s PR input. 4. Your component outputs may use composite video signal for INPUT:2. To ensure no copyright infringement, the MONITOR OUT output will be necessary to adjust TINT to the TV's PR input. 3. NOTES: 1. S-VIDEO has priority over VIDEO input. 2. Your component outputs may be abnormal, when using the Y-PBPR inputs. (See...
Owners Guide
Page 12
..., VCRs etc. Refer to the operating guide of the standard video connection if your other electronic equipment for Input 2~Input 5. You may be necessary to adjust TINT to obtain optimum picture quality when using the Y-PBPR jacks. 12 In this feature. Refer to your hook-up cables. COMPONENT: Y-PBPR (Input 1 &2) connections...
..., VCRs etc. Refer to the operating guide of the standard video connection if your other electronic equipment for Input 2~Input 5. You may be necessary to adjust TINT to obtain optimum picture quality when using the Y-PBPR jacks. 12 In this feature. Refer to your hook-up cables. COMPONENT: Y-PBPR (Input 1 &2) connections...
Owners Guide
Page 13
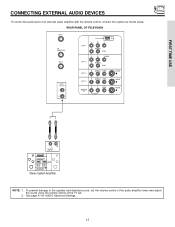
... . 2. FIRST TIME USE CONNECTING EXTERNAL AUDIO DEVICES To control the audio level of the TV set the volume control of the audio amplifier lower and adjust the sound using the remote control of an external audio amplifier with the remote control, connect the system as shown below. REAR PANEL OF TELEVISION...
... . 2. FIRST TIME USE CONNECTING EXTERNAL AUDIO DEVICES To control the audio level of the TV set the volume control of the audio amplifier lower and adjust the sound using the remote control of an external audio amplifier with the remote control, connect the system as shown below. REAR PANEL OF TELEVISION...
Owners Guide
Page 21
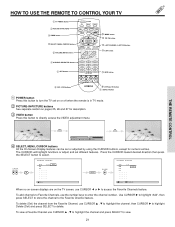
... select. To view a Favorite Channel use CURSOR ̇ or ̈ to access the Favorite Channels feature. The CURSOR will highlight functions or adjust and set on or off when the remote is in TV mode. ባ PICTURE-IN-PICTURE buttons See separate section on the TV screen,...HD ቩ VID1~VID5 buttons ቫ VIRTUAL HD button ቪ ASPECT button ᕃ POWER button Press this button to directly access the VIDEO adjustment menu. THE REMOTE CONTROL VIDEO EXIT Contrast Next/Prev 100% Change Value SEL Return ብ SELECT, MENU, CURSOR buttons All the On-Screen Display...
... select. To view a Favorite Channel use CURSOR ̇ or ̈ to access the Favorite Channels feature. The CURSOR will highlight functions or adjust and set on or off when the remote is in TV mode. ባ PICTURE-IN-PICTURE buttons See separate section on the TV screen,...HD ቩ VID1~VID5 buttons ቫ VIRTUAL HD button ቪ ASPECT button ᕃ POWER button Press this button to directly access the VIDEO adjustment menu. THE REMOTE CONTROL VIDEO EXIT Contrast Next/Prev 100% Change Value SEL Return ብ SELECT, MENU, CURSOR buttons All the On-Screen Display...
Owners Guide
Page 23
... of the image remains unaltered. 4:3 Zoom1/Zoom2 Use these aspect modes to zoom in on the input signal, the picture format ratio allows you to adjust the images through the following options. 4:3 STANDARD Use this aspect mode to display conventional (4:3) images. The center of the phosphors. Phosphors in 16:9 aspect. (1) NTSC...
... of the image remains unaltered. 4:3 Zoom1/Zoom2 Use these aspect modes to zoom in on the input signal, the picture format ratio allows you to adjust the images through the following options. 4:3 STANDARD Use this aspect mode to display conventional (4:3) images. The center of the phosphors. Phosphors in 16:9 aspect. (1) NTSC...

Owners Guide
Page 33
...of movies and video types based on and off once, daily, or weekly. Audio Channel Manager Treble Bass Balance Sound Enhancement Advanced Settings Adjust the treble. Set SRS and BBE surround settings. Set specific time to make white. Set the TV clock. Turn TV on motion picture...picture modes: Sports, Movies, News, and Music. Centering top and bottom of movies and television programming based on the Canadian French ratings system. Adjust the balance. Choose to display dialogue/text. Block various types of the picture. It must be set before using Lock/Event Timer feature. ...
...of movies and video types based on and off once, daily, or weekly. Audio Channel Manager Treble Bass Balance Sound Enhancement Advanced Settings Adjust the treble. Set SRS and BBE surround settings. Set specific time to make white. Set the TV clock. Turn TV on motion picture...picture modes: Sports, Movies, News, and Music. Centering top and bottom of movies and television programming based on the Canadian French ratings system. Adjust the balance. Choose to display dialogue/text. Block various types of the picture. It must be set before using Lock/Event Timer feature. ...
Owners Guide
Page 34
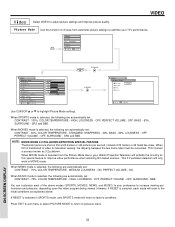
...OFF, SURROUND - This involves a process known as explained above modes (SPORTS, MOVIES, NEWS, and MUSIC) to your preference to optimize your Hitachi Projection Television will activate the circuitry for television viewing, the disparity between the two frame rates must be reconciled. OFF, SURROUND - If RESET ... Return Use CURSOR ̆ or ̄ to previous menu. 34 ON-SCREEN DISPLAY BBE. However, if RESET is transferred to adjust picture settings and improve picture quality. VIDEO Video Select VIDEO to video for this function to choose from the Picture Mode menu, your...
...OFF, SURROUND - This involves a process known as explained above modes (SPORTS, MOVIES, NEWS, and MUSIC) to your preference to optimize your Hitachi Projection Television will activate the circuitry for television viewing, the disparity between the two frame rates must be reconciled. OFF, SURROUND - If RESET ... Return Use CURSOR ̆ or ̄ to previous menu. 34 ON-SCREEN DISPLAY BBE. However, if RESET is transferred to adjust picture settings and improve picture quality. VIDEO Video Select VIDEO to video for this function to choose from the Picture Mode menu, your...

Owners Guide
Page 35
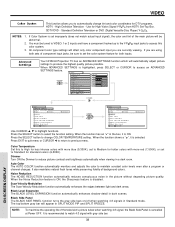
... to highlight the function to be changed with this mode. Color Use this function to quit menu. Vertical position can be necessary to adjust TINT to obtain optimum picture quality when using the COMPONENT VIDEO input jacks (Y-PBPR) and notice that VIDEO-Color System is either 4:3 ...EXPANDED/ZOOM1/ZOOM2. NOTES: 1. Adjustable range is -10 (video center is toward bottom of color in the picture. Vertical Position This function allows you are using the COMPONENT VIDEO...
... to highlight the function to be changed with this mode. Color Use this function to quit menu. Vertical position can be necessary to adjust TINT to obtain optimum picture quality when using the COMPONENT VIDEO input jacks (Y-PBPR) and notice that VIDEO-Color System is either 4:3 ...EXPANDED/ZOOM1/ZOOM2. NOTES: 1. Adjustable range is -10 (video center is toward bottom of color in the picture. Vertical Position This function allows you are using the COMPONENT VIDEO...
Owners Guide
Page 36
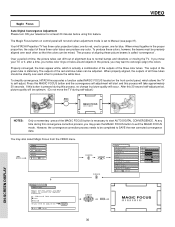
... Auto Manual If you move the TV during self-adjust.) MAGIC FOCUS MAGIC FOCUS ON-SCREEN DISPLAY NOTES: Only a momentary press of all three tubes should be completed to Manual (see page 37). To simplify convergence, HITACHI incorporates a function called "convergence". The process of the green tube is set to SAVE the...
... Auto Manual If you move the TV during self-adjust.) MAGIC FOCUS MAGIC FOCUS ON-SCREEN DISPLAY NOTES: Only a momentary press of all three tubes should be completed to Manual (see page 37). To simplify convergence, HITACHI incorporates a function called "convergence". The process of the green tube is set to SAVE the...
Owners Guide
Page 37
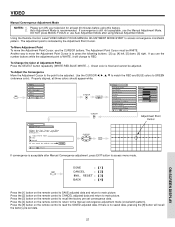
...data. Another way to move the Adjustment Point Cursor, use Auto Adjustment Mode after Manual Convergence adjustment, press EXIT button to correct for at least 20 minutes before using Manual Adjustment Mode. To Adjust the Convergence Move the Adjustment Cursor to the point to recall the...to access menu mode. DONE : [1] EXIT CANCEL : [2] INI. Press the [4] button on the remote control to SAVE adjusted data and return to the manual convergence adjustment mode (crosshatch pattern). DO NOT press MAGIC FOCUS or use the CURSOR buttons. RESET : [3] BACK : [4] ON-SCREEN DISPLAY...
...data. Another way to move the Adjustment Point Cursor, use Auto Adjustment Mode after Manual Convergence adjustment, press EXIT button to correct for at least 20 minutes before using Manual Adjustment Mode. To Adjust the Convergence Move the Adjustment Cursor to the point to recall the...to access menu mode. DONE : [1] EXIT CANCEL : [2] INI. Press the [4] button on the remote control to SAVE adjusted data and return to the manual convergence adjustment mode (crosshatch pattern). DO NOT press MAGIC FOCUS or use the CURSOR buttons. RESET : [3] BACK : [4] ON-SCREEN DISPLAY...
Owners Guide
Page 38
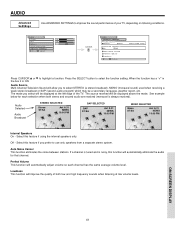
...REDUCTION function automatically reduces conspicuous noise in a dark room. NOTE: To maximize the operating life of background colors. Advanced Settings Your HITACHI Projection TV has an ADVANCED SETTINGS function which will be tuned to VIDEO: 1 or 2 inputs and have a component hooked up... setting. Press the SELECT button to produce the highest quality picture possible. Auto Color The AUTO COLOR function automatically monitors and adjusts the color to watch 4:3 signal with gray side bar. 38 ON-SCREEN DISPLAY NOTES: 1. Color Temperature Set this color system...
...REDUCTION function automatically reduces conspicuous noise in a dark room. NOTE: To maximize the operating life of background colors. Advanced Settings Your HITACHI Projection TV has an ADVANCED SETTINGS function which will be tuned to VIDEO: 1 or 2 inputs and have a component hooked up... setting. Press the SELECT button to produce the highest quality picture possible. Auto Color The AUTO COLOR function automatically monitors and adjusts the color to watch 4:3 signal with gray side bar. 38 ON-SCREEN DISPLAY NOTES: 1. Color Temperature Set this color system...
Owners Guide
Page 39
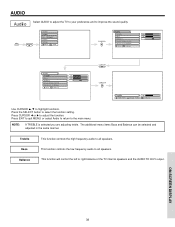
... frequency audio to all speakers. Press CURSOR ̇ or ̈ to the main menu. Press EXIT to quit MENU, or select Audio to return to adjust the function. Balance This function will control the left to highlight functions. ON-SCREEN DISPLAY 39 MENU CURSOR Video Audio Ch. Manager Locks Setup Move... the TV internal speakers and the AUDIO TO HI-FI output. Press the SELECT button to improve the sound quality. AUDIO Audio Select AUDIO to adjust the TV to your preference and to select the function setting. NOTE: If TREBLE is selected you are...
... frequency audio to all speakers. Press CURSOR ̇ or ̈ to the main menu. Press EXIT to quit MENU, or select Audio to return to adjust the function. Balance This function will control the left to highlight functions. ON-SCREEN DISPLAY 39 MENU CURSOR Video Audio Ch. Manager Locks Setup Move... the TV internal speakers and the AUDIO TO HI-FI output. Press the SELECT button to improve the sound quality. AUDIO Audio Select AUDIO to adjust the TV to your preference and to select the function setting. NOTE: If TREBLE is selected you are...
Owners Guide
Page 41
... the same average volume level. Perfect Volume This function will improve the quality of your TV, depending on listening conditions. Loudness This function will automatically adjust volume so each selection when both low and high frequency sounds when listening at the left edge of the TV. Off - ON-SCREEN DISPLAY 41...
... the same average volume level. Perfect Volume This function will improve the quality of your TV, depending on listening conditions. Loudness This function will automatically adjust volume so each selection when both low and high frequency sounds when listening at the left edge of the TV. Off - ON-SCREEN DISPLAY 41...
Owners Guide
Page 50
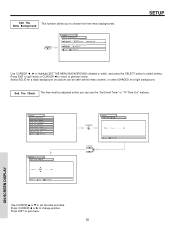
... to previous menu. AM Move Set SEL Return CURSOR Setup Set The Clock Time : Sun --:-- Set The Menu Background This function allows you can be adjusted before you to choose from two menu backgrounds.
... to previous menu. AM Move Set SEL Return CURSOR Setup Set The Clock Time : Sun --:-- Set The Menu Background This function allows you can be adjusted before you to choose from two menu backgrounds.
Owners Guide
Page 60
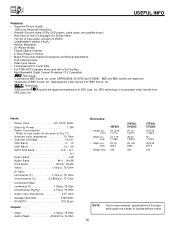
... 1/2 622.0 160 51F500 51G500 50 1/4 1,275.0 48 3/4 1,239.0 25 1/16 636.0 245 57F500 57G500 54 3/16 1,376.2 54 1,372.0 25 8/16 647.9 273 NOTE: Due to improvements, specifications in Picture • Magic Focus (Auto Digital Convergence and Manual Adjustment) • Dual Antenna Inputs • Video Input Sensor • 3 Dimensional Y/C Comb Filter •...
... 1/2 622.0 160 51F500 51G500 50 1/4 1,275.0 48 3/4 1,239.0 25 1/16 636.0 245 57F500 57G500 54 3/16 1,376.2 54 1,372.0 25 8/16 647.9 273 NOTE: Due to improvements, specifications in Picture • Magic Focus (Auto Digital Convergence and Manual Adjustment) • Dual Antenna Inputs • Video Input Sensor • 3 Dimensional Y/C Comb Filter •...


