Owners Guide
Page 1
Updated 04.25.06 has determined that this product meets the Energy Star® guidelines for 42HDX62, 42HDX62A and 55HDX62 IMPORTANT SAFETY INSTRUCTIONS 2-3 FIRST TIME USE ...4-23 THE REMOTE CONTROL ...24-43 ON-SCREEN DISPLAY ...44-93 USEFUL INFORMATION...94-101 END USER LICENSE AGREEMENT FOR HITACHI DTV SOFTWARE 102 APPENDIXES ...103 INDEX ...104 As an Energy Star® Partner, Hitachi, Ltd. PLASMA TELEVISION Operating Guide for energy efficiency.
Updated 04.25.06 has determined that this product meets the Energy Star® guidelines for 42HDX62, 42HDX62A and 55HDX62 IMPORTANT SAFETY INSTRUCTIONS 2-3 FIRST TIME USE ...4-23 THE REMOTE CONTROL ...24-43 ON-SCREEN DISPLAY ...44-93 USEFUL INFORMATION...94-101 END USER LICENSE AGREEMENT FOR HITACHI DTV SOFTWARE 102 APPENDIXES ...103 INDEX ...104 As an Energy Star® Partner, Hitachi, Ltd. PLASMA TELEVISION Operating Guide for energy efficiency.

Owners Guide
Page 4
...Top Stand (42" models only) µ 2 Ferrite Core (see page 14) For U.S. REMOTE CONTROL BATTERY INSTALLATION AND REPLACEMENT 1. models: For optional accessories, please access our web site at: www.hitachi.us/tv Note: Please visit our website for optional accessories for a maximum tilting angle of ...the remote control by BOTTOM VIEW (Remote Control) pushing down and slide back to the (+) and (-) marks in...
...Top Stand (42" models only) µ 2 Ferrite Core (see page 14) For U.S. REMOTE CONTROL BATTERY INSTALLATION AND REPLACEMENT 1. models: For optional accessories, please access our web site at: www.hitachi.us/tv Note: Please visit our website for optional accessories for a maximum tilting angle of ...the remote control by BOTTOM VIEW (Remote Control) pushing down and slide back to the (+) and (-) marks in...
Owners Guide
Page 8
.... DVD/VCR CONTROL BUTTONS (DVD, PVR/VCR, AMP/CD) Controls the functions of your HITACHI Plasma TV, the new remote control is designed to adjust the audio level of your TV. PIP CONTROL BUTTONS (TV) Press to change the Picture-in-Picture mode. INPUTS BUTTON (...) Accesses the OSD menu system. Pressing any button will illuminate the backlight for best results. 2. ASPECT BUTTON (TV) Changes the aspect ratio of the Universal Remote Control to pause other devices. EXIT BUTTON (TV, CBL, STB, PVR/VCR) Exits out of the functions on or blinks to Select/Activate highlighted menu...
.... DVD/VCR CONTROL BUTTONS (DVD, PVR/VCR, AMP/CD) Controls the functions of your HITACHI Plasma TV, the new remote control is designed to adjust the audio level of your TV. PIP CONTROL BUTTONS (TV) Press to change the Picture-in-Picture mode. INPUTS BUTTON (...) Accesses the OSD menu system. Pressing any button will illuminate the backlight for best results. 2. ASPECT BUTTON (TV) Changes the aspect ratio of the Universal Remote Control to pause other devices. EXIT BUTTON (TV, CBL, STB, PVR/VCR) Exits out of the functions on or blinks to Select/Activate highlighted menu...

Owners Guide
Page 9
..." button This power button is slightly different from your Digital Camera, USB memory or memory card USB drive to view your preference without using the remote. The Main Power button is recommended to leave the "MAIN POWER" to ON condition (lights red) for the complete system, and must be displayed on... for stand-by mode. Hook the band to the claw. NOTE: When the "MAIN POWER" button is unplugged, the clock will be at stand-by remote control. It can also be turned ON/OFF manually. Thread the band through the square hole. These buttons also serve as the cursor down (̄...
..." button This power button is slightly different from your Digital Camera, USB memory or memory card USB drive to view your preference without using the remote. The Main Power button is recommended to leave the "MAIN POWER" to ON condition (lights red) for the complete system, and must be displayed on... for stand-by mode. Hook the band to the claw. NOTE: When the "MAIN POWER" button is unplugged, the clock will be at stand-by remote control. It can also be turned ON/OFF manually. Thread the band through the square hole. These buttons also serve as the cursor down (̄...
Owners Guide
Page 10
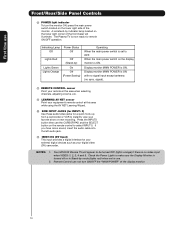
...from a camcorder or VCR to instantly view your digital video (DV) camcorder. Your HITACHI Plasma TV will illuminate. When the main power switch on the remote control to make sure the Display Monitor is ON. Remote Control can not turn the monitor ON, press the main power switch located on the... you have mono sound, insert the audio cable into the left audio jack. ቭ IEEE1394 (DV Input) This input provides a digital interface for remote ON/OFF operation. Indicating Lamp Power Status Off Off Lights Red Lights Green Lights Orange Off (Stand-by mode (lights red) when not in use...
...from a camcorder or VCR to instantly view your digital video (DV) camcorder. Your HITACHI Plasma TV will illuminate. When the main power switch on the remote control to make sure the Display Monitor is ON. Remote Control can not turn the monitor ON, press the main power switch located on the... you have mono sound, insert the audio cable into the left audio jack. ቭ IEEE1394 (DV Input) This input provides a digital interface for remote ON/OFF operation. Indicating Lamp Power Status Off Off Lights Red Lights Green Lights Orange Off (Stand-by mode (lights red) when not in use...
Owners Guide
Page 11
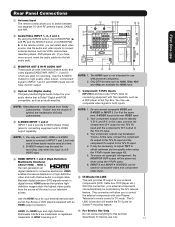
... case, connect the components B-Y output to the TV's PB input and the components R-Y output to INPUT 1 and 2, but only one of the remote control, you can select each video ቫ source. NOTE: 1. HDMI is Dolby® Digital and PCM compatible, such as VCRs, camcorders, laserdisc...devices, such as an audio amplifier. HDMI enables the secure distribution of HDMI Licensing LLC. Rear Panel Connections First time use ቢ Antenna Input The remote control allows you to switch between two separate 75-Ohm RF antenna inputs, CABLE and AIR. ቤ ባ Audio/Video INPUT 1, 2, 3...
... case, connect the components B-Y output to the TV's PB input and the components R-Y output to INPUT 1 and 2, but only one of the remote control, you can select each video ቫ source. NOTE: 1. HDMI is Dolby® Digital and PCM compatible, such as VCRs, camcorders, laserdisc...devices, such as an audio amplifier. HDMI enables the secure distribution of HDMI Licensing LLC. Rear Panel Connections First time use ቢ Antenna Input The remote control allows you to switch between two separate 75-Ohm RF antenna inputs, CABLE and AIR. ቤ ባ Audio/Video INPUT 1, 2, 3...
Owners Guide
Page 13
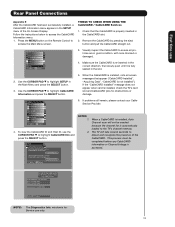
... the CableCARD to access CableCARD and Host Diagnostics. In order to start cable service for Service use only. 13 Press the MENU button on the Remote Control to return NOTE: The Diagnostics Info. The TV will not be completed before any CableCARD information or Channel listings is for this device, please...
... the CableCARD to access CableCARD and Host Diagnostics. In order to start cable service for Service use only. 13 Press the MENU button on the Remote Control to return NOTE: The Diagnostics Info. The TV will not be completed before any CableCARD information or Channel listings is for this device, please...

Owners Guide
Page 20
... 20 IEEE1394 Cabl e LINE OUT R (MONO)/L VIDEO 1 R (MONO)/L VIDEO 2 S-VIDEO S-VIDEO DIGI TA L INTERF ACE IEEE1394 Digital VCR (D-VHS) Press the INPUTS button on the Remote Control. 3. It will be received by the TV. NOTE: 1. Select the IEEE1394 option (see page 30). 2. IEEE 1394 allows the plasma television and the external...
... 20 IEEE1394 Cabl e LINE OUT R (MONO)/L VIDEO 1 R (MONO)/L VIDEO 2 S-VIDEO S-VIDEO DIGI TA L INTERF ACE IEEE1394 Digital VCR (D-VHS) Press the INPUTS button on the Remote Control. 3. It will be received by the TV. NOTE: 1. Select the IEEE1394 option (see page 30). 2. IEEE 1394 allows the plasma television and the external...
Owners Guide
Page 22
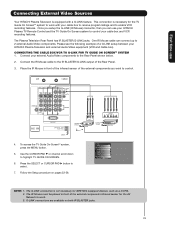
... of four external components. 2. Connect your Hitachi Plasma Television and external Audio/Video equipment (VCR and DVD Player). First time use your HITACHI remote control to control the Audio/Video equipment command without the equipment's remote control. Please see the following example of ...Infrared Sensor OUTPUT Y PB/CB PR/CR R L DVD Player 4. Use the CURSOR PAD ̄ or channel scroll to control your HITACHI Plasma TV Remote Control. Double-sided mounting tape may be chosen for each of the Rear Panel. 3. Therefore, you wish to 2 external Audio/Video components...
... of four external components. 2. Connect your Hitachi Plasma Television and external Audio/Video equipment (VCR and DVD Player). First time use your HITACHI remote control to control the Audio/Video equipment command without the equipment's remote control. Please see the following example of ...Infrared Sensor OUTPUT Y PB/CB PR/CR R L DVD Player 4. Use the CURSOR PAD ̄ or channel scroll to control your HITACHI Plasma TV Remote Control. Double-sided mounting tape may be chosen for each of the Rear Panel. 3. Therefore, you wish to 2 external Audio/Video components...
Owners Guide
Page 23
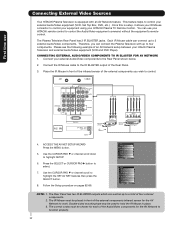
... Rear Panel shown below. 2. One IR Mouse cable can use Connecting External Video Sources Your HITACHI Plasma Television is equipped with your cable box to receive program listings and to enable VCR recording...Setup Power Swivel Move SEL Select NOTE: 1. First time use your HITACHI Plasma TV Remote Control and the TV Guide On Screen system to control your cable box and VCR recording ...features. Connect your HITACHI Plasma Television and external Audio/Video equipment (VCR and ...
... Rear Panel shown below. 2. One IR Mouse cable can use Connecting External Video Sources Your HITACHI Plasma Television is equipped with your cable box to receive program listings and to enable VCR recording...Setup Power Swivel Move SEL Select NOTE: 1. First time use your HITACHI Plasma TV Remote Control and the TV Guide On Screen system to control your cable box and VCR recording ...features. Connect your HITACHI Plasma Television and external Audio/Video equipment (VCR and ...
Owners Guide
Page 24
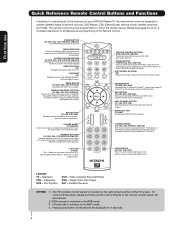
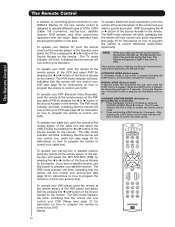
...mode, the illumination will light a few seconds during this button to Automatic) 1. The TV mode indicator will blink 3 times to confirm the remote control mode. 2. After releasing the LIGHT button, the TV mode indicator will blink 3 times to confirm the mode switch. To operate your ..., satellite receiver, DVD players, and other audio/video equipment with one area. The Remote Control The Remote Control In addition to controlling all the functions on your HITACHI Plasma TV, the new remote control is designed to control your set-top-box). Basic operation keys are grouped together...
...mode, the illumination will light a few seconds during this button to Automatic) 1. The TV mode indicator will blink 3 times to confirm the remote control mode. 2. After releasing the LIGHT button, the TV mode indicator will blink 3 times to confirm the mode switch. To operate your ..., satellite receiver, DVD players, and other audio/video equipment with one area. The Remote Control The Remote Control In addition to controlling all the functions on your HITACHI Plasma TV, the new remote control is designed to control your set-top-box). Basic operation keys are grouped together...

Owners Guide
Page 25
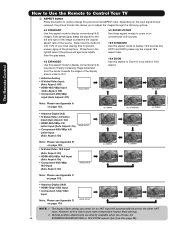
... Control Your TV ቢ POWER button Press this button to turn the TV set on or off when the remote is in TV mode. (See page 24 for ቢ instructions on how to set the remote control to TV mode.) ባ ቤ ብ ባ MODE Indicator Turns on or blinks to show... mode. ቦ ብ SOURCE ACCESS (ENT) button Hold down this button while entering your device ቧ ቩ code to program the remote (see pages 35-42). ቨ ቯ You can also use this button in an optional Input access feature (see ቫ ቱ page 34). ተ / ቲ &#...
... Control Your TV ቢ POWER button Press this button to turn the TV set on or off when the remote is in TV mode. (See page 24 for ቢ instructions on how to set the remote control to TV mode.) ባ ቤ ብ ባ MODE Indicator Turns on or blinks to show... mode. ቦ ብ SOURCE ACCESS (ENT) button Hold down this button while entering your device ቧ ቩ code to program the remote (see pages 35-42). ቨ ቯ You can also use this button in an optional Input access feature (see ቫ ቱ page 34). ተ / ቲ &#...
Owners Guide
Page 26
Phosphors in the lighted area of the picture will automatically be set for only 15% of the phosphors. The Remote Control • Antenna-Digital (4:3) • S-Video/Video 4:3/Letter Input (Auto Aspect: On) • HDMI-480i/480p 4:3/ Letter Input (Auto Aspect: On) • Component-480i/480p ...and DVD's preserving the original 16:9 aspect ratio. 16:9 ZOOM Use this button to quickly change the picture format ASPECT ratio. How to Use the Remote to Control Your TV ቧ ASPECT button Press this aspect to Zoom-in once while in 16:9 aspect. Note: Use this aspect mode to display...
Phosphors in the lighted area of the picture will automatically be set for only 15% of the phosphors. The Remote Control • Antenna-Digital (4:3) • S-Video/Video 4:3/Letter Input (Auto Aspect: On) • HDMI-480i/480p 4:3/ Letter Input (Auto Aspect: On) • Component-480i/480p ...and DVD's preserving the original 16:9 aspect ratio. 16:9 ZOOM Use this button to quickly change the picture format ASPECT ratio. How to Use the Remote to Control Your TV ቧ ASPECT button Press this aspect to Zoom-in once while in 16:9 aspect. Note: Use this aspect mode to display...
Owners Guide
Page 27
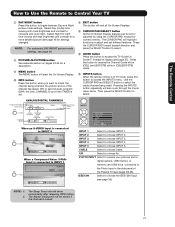
...to choose INPUT 5. The Aspect setting will not be set or adjusted by using the CURSOR PAD, except for settings changes). The Remote Control How to Use the Remote to Control Your TV ቨ DAY/NIGHT button Press this button to access the INPUTS menu. The CURSOR PAD will show momentarily ...if the TIMER is in the side panel of the (CBL), and (SAT/STB) while in (CBL)(SAT/STB) mode. ተ INPUTS button When the remote control is set different features. Select Night for a description. ቪ MENU button The MENU button will start the On-Screen Display. ቫ INFO button ...
...to choose INPUT 5. The Aspect setting will not be set or adjusted by using the CURSOR PAD, except for settings changes). The Remote Control How to Use the Remote to Control Your TV ቨ DAY/NIGHT button Press this button to access the INPUTS menu. The CURSOR PAD will show momentarily ...if the TIMER is in the side panel of the (CBL), and (SAT/STB) while in (CBL)(SAT/STB) mode. ተ INPUTS button When the remote control is set different features. Select Night for a description. ቪ MENU button The MENU button will start the On-Screen Display. ቫ INFO button ...

Owners Guide
Page 28
Press the CURSOR PAD ̇ or ̈ to view Photo information. 7. Next SEL Thumbnail [0-9] Jump The Remote Control 5. Press the INFO button to access PHOTO Input menu and to access the next or previous photo. 3. Press the CURSOR PAD ̆ or ̄ ... this Photo Input. 5. Press the picture number to jump from your Photo Input connections. Press the INPUTS button to view THUMBNAIL. 4. How to Use the Remote to Control Your TV PHOTO INPUT This feature is useful for viewing digital still pictures from picture to navigate and select the PHOTO Input menu...
Press the CURSOR PAD ̇ or ̈ to view Photo information. 7. Next SEL Thumbnail [0-9] Jump The Remote Control 5. Press the INFO button to access PHOTO Input menu and to access the next or previous photo. 3. Press the CURSOR PAD ̆ or ̄ ... this Photo Input. 5. Press the picture number to jump from your Photo Input connections. Press the INPUTS button to view THUMBNAIL. 4. How to Use the Remote to Control Your TV PHOTO INPUT This feature is useful for viewing digital still pictures from picture to navigate and select the PHOTO Input menu...

Owners Guide
Page 29
... press the SELECT button or CURSOR PAD ̈ to 3072 x 2304; Press the SELECT button to start a slideshow of the slideshow. The Remote Control How to Use the Remote to Control Your TV ROTATE Select this menu item to rotate selected photos either clockwise (CURSOR PAD ̈) and counterclockwise (CURSOR PAD ̇...
... press the SELECT button or CURSOR PAD ̈ to 3072 x 2304; Press the SELECT button to start a slideshow of the slideshow. The Remote Control How to Use the Remote to Control Your TV ROTATE Select this menu item to rotate selected photos either clockwise (CURSOR PAD ̈) and counterclockwise (CURSOR PAD ̇...

Owners Guide
Page 30
... using a CableCARD, this CCI data will be automatically recognized if properly connected. 2. Press down on its content value. 30 Device not detected The Remote Control When an IEEE1394 device is connected, it will not disappear until the EXIT button is not connected INPUTS Photo Input IEEE 1394 Cable Air...5 Photo Input IEEE 1394 Cable Air Move SEL Sel. Not all devices with other manufacturers devices should be used. How to Use the Remote to Control Your TV IEEE1394 Use this function to the attention of some programs depending on the CURSOR PAD to highlight POWER. 4. The ...
... using a CableCARD, this CCI data will be automatically recognized if properly connected. 2. Press down on its content value. 30 Device not detected The Remote Control When an IEEE1394 device is connected, it will not disappear until the EXIT button is not connected INPUTS Photo Input IEEE 1394 Cable Air...5 Photo Input IEEE 1394 Cable Air Move SEL Sel. Not all devices with other manufacturers devices should be used. How to Use the Remote to Control Your TV IEEE1394 Use this function to the attention of some programs depending on the CURSOR PAD to highlight POWER. 4. The ...

Owners Guide
Page 31
... (CH) wheel until the displayed channel turns highlighted GREEN to select channels. To restore the sound, press the VOL wheel one half of the remote control. ታ CHANNEL (CH) WHEEL/CHANNEL SELECTOR buttons The CHANNEL wheel or the CHANNEL SELECTOR buttons are in Favorite Channel mode when (FAV)... buttons to enter one, two, or three numbers to WHITE. To reduce the sound to one more time or VOL Up (̆). Cable 22 The Remote Control Volume 8 Cable 22 / Soft Mute 8 Cable 22 / Mute 8 Closed Captioning will be performed by (-) DASH (example 15-1). ት BACKLIGHT button ...
... (CH) wheel until the displayed channel turns highlighted GREEN to select channels. To restore the sound, press the VOL wheel one half of the remote control. ታ CHANNEL (CH) WHEEL/CHANNEL SELECTOR buttons The CHANNEL wheel or the CHANNEL SELECTOR buttons are in Favorite Channel mode when (FAV)... buttons to enter one, two, or three numbers to WHITE. To reduce the sound to one more time or VOL Up (̆). Cable 22 The Remote Control Volume 8 Cable 22 / Soft Mute 8 Cable 22 / Mute 8 Closed Captioning will be performed by (-) DASH (example 15-1). ት BACKLIGHT button ...
Owners Guide
Page 32
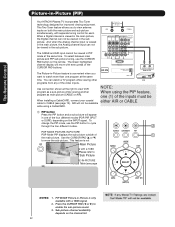
...the CURSOR PAD buttons. To select between main picture and PIP sub picture tuning, use the PIP button to view antenna inputs on the remote. The Picture-in-Picture feature is only available with a 1080i signal. Please refer to view VCR program as a sub-picture while ...for improved viewing enjoyment. Use the CURSOR PAD (̆ or ̄) to enable the sub-picture sound. 3. The Remote Control Picture-in-Picture (PIP) Your HITACHI Plasma TV incorporates Two Tuner technology designed for each. Sub-picture channel availability depends on the INPUT signal. This feature is...
...the CURSOR PAD buttons. To select between main picture and PIP sub picture tuning, use the PIP button to view antenna inputs on the remote. The Picture-in-Picture feature is only available with a 1080i signal. Please refer to view VCR program as a sub-picture while ...for improved viewing enjoyment. Use the CURSOR PAD (̆ or ̄) to enable the sub-picture sound. 3. The Remote Control Picture-in-Picture (PIP) Your HITACHI Plasma TV incorporates Two Tuner technology designed for each. Sub-picture channel availability depends on the INPUT signal. This feature is...

Owners Guide
Page 33
... EXIT button to enable your chosen channel and return to stop on the screen. Yes Yes Yes - -- - -- Use the remote CURSOR PAD ̆, ̄, ̇ or ̈ to navigate the Thumbnails. The Remote Control Picture-In-Picture (PIP) PIP MODE PICTURE-IN-PICTURE Select AIR from the INPUTS menu. Select a channel that...
... EXIT button to enable your chosen channel and return to stop on the screen. Yes Yes Yes - -- - -- Use the remote CURSOR PAD ̆, ̄, ̇ or ̈ to navigate the Thumbnails. The Remote Control Picture-In-Picture (PIP) PIP MODE PICTURE-IN-PICTURE Select AIR from the INPUTS menu. Select a channel that...


