Operation Guide
Page 1
has determined that this product meets the ENERGY STAR® guidelines for energy efficiency. 21-37 38-62 63-68 Manager Locks Setup Move SEL Sel ON-SCREEN DISPLAY USEFUL INFORMATION INDEX As an ENERGY STAR® Partner, Hitachi, Ltd. PROJECTION COLOR TV 65SWX20B 57SWX20B 51SWX20B OPERATING GUIDE 65TWX20B 57TWX20B IMPORTANT SAFETY INSTRUCTIONS 2-3 FIRST TIME USE 4-20 THE REMOTE CONTROL Video Audio Ch.
has determined that this product meets the ENERGY STAR® guidelines for energy efficiency. 21-37 38-62 63-68 Manager Locks Setup Move SEL Sel ON-SCREEN DISPLAY USEFUL INFORMATION INDEX As an ENERGY STAR® Partner, Hitachi, Ltd. PROJECTION COLOR TV 65SWX20B 57SWX20B 51SWX20B OPERATING GUIDE 65TWX20B 57TWX20B IMPORTANT SAFETY INSTRUCTIONS 2-3 FIRST TIME USE 4-20 THE REMOTE CONTROL Video Audio Ch.
Operation Guide
Page 3
...the product to qualified service personnel. Read these instructions. 3. Keep these instructions. 2. Do not place any way, such as recommended by TV stations and cable companies, as well as video games, stock market quotations, computer generated graphics, and other fixed (nonmoving) patterns can ...to the point of the National Electric Code, ANSI/NFPA No. 70-1984, provides information with respect to proper grounding for your HITACHI Factory Warranty. Disposal of the building, as practical. Do not block any heat sources such as to retrieve the objects. 15....
...the product to qualified service personnel. Read these instructions. 3. Keep these instructions. 2. Do not place any way, such as recommended by TV stations and cable companies, as well as video games, stock market quotations, computer generated graphics, and other fixed (nonmoving) patterns can ...to the point of the National Electric Code, ANSI/NFPA No. 70-1984, provides information with respect to proper grounding for your HITACHI Factory Warranty. Disposal of the building, as practical. Do not block any heat sources such as to retrieve the objects. 15....

Operation Guide
Page 4
... Unit). 5. Replace the cover. ANT 0 INFO A/V NET ASPECT VIRTUAL HD MENU EXIT VOL SELECT CH SVCS VID 1 MUTE VCR PLUS+ LAST CH GUIDE/TV SCHD VID 5 VID 2 PIP VID 3 PIP CH VID 4 FREEZE PIP MODE PIP ACCESS SWAP VIDEO BATTERIES ("AA") IR MOUSE CABLE 3. Simple Remote Control... size, 1.5V batteries (for the simple remote control. CAUTION: Danger of the packing material. MENU EXIT FAV CH ANT POWER REMOTE CONTROL POWER TV DVD VCR CBL SOURCE WIZARD CD TAPE STB AMP 1 2 3 4 5 6 7 8 9 SLEEP C.C. Remote Control Unit CLU-5722TSI (Part No. HL01822). 3. HL01861...
... Unit). 5. Replace the cover. ANT 0 INFO A/V NET ASPECT VIRTUAL HD MENU EXIT VOL SELECT CH SVCS VID 1 MUTE VCR PLUS+ LAST CH GUIDE/TV SCHD VID 5 VID 2 PIP VID 3 PIP CH VID 4 FREEZE PIP MODE PIP ACCESS SWAP VIDEO BATTERIES ("AA") IR MOUSE CABLE 3. Simple Remote Control... size, 1.5V batteries (for the simple remote control. CAUTION: Danger of the packing material. MENU EXIT FAV CH ANT POWER REMOTE CONTROL POWER TV DVD VCR CBL SOURCE WIZARD CD TAPE STB AMP 1 2 3 4 5 6 7 8 9 SLEEP C.C. Remote Control Unit CLU-5722TSI (Part No. HL01822). 3. HL01861...

Operation Guide
Page 5
...the location selected allows a free flow of air to a centralized antenna system, a good outdoor color TV antenna is recommended for best performance. VIEWING The major benefit of the HITACHI Projection Television is seen by placing the speakers equidistant from each side of the receiver cabinet and as close...so, drapes or screens can be used to reduce the reflection or the TV can become excessively hot, for viewing. HOW TO SET UP YOUR NEW HITACHI PROJECTION TV ANTENNA Unless your TV is connected to a cable TV system or to and from the perforated back cover of the set failure, ...
...the location selected allows a free flow of air to a centralized antenna system, a good outdoor color TV antenna is recommended for best performance. VIEWING The major benefit of the HITACHI Projection Television is seen by placing the speakers equidistant from each side of the receiver cabinet and as close...so, drapes or screens can be used to reduce the reflection or the TV can become excessively hot, for viewing. HOW TO SET UP YOUR NEW HITACHI PROJECTION TV ANTENNA Unless your TV is connected to a cable TV system or to and from the perforated back cover of the set failure, ...
Operation Guide
Page 6
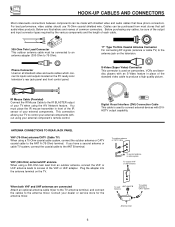
... connected to an antenna adapter (300-Ohm to produce a high quality picture. ANTENNA CONNECTIONS TO REAR JACK PANEL VHF (75-Ohm) antenna/CATV (Cable TV) When using your TV when using a 300-Ohm twin lead from most stores that have a second antenna or cable...the ANT B terminal. Phono Connector Used on the television. If you have phono connectors. Below are connected Attach an optional antenna cable mixer to the TV antenna terminal, and connect the cables to connect external devices with DVIHDTV output capability. "F" Type 75-Ohm Coaxial Antenna Connector For connecting RF signals (...
... connected to an antenna adapter (300-Ohm to produce a high quality picture. ANTENNA CONNECTIONS TO REAR JACK PANEL VHF (75-Ohm) antenna/CATV (Cable TV) When using your TV when using a 300-Ohm twin lead from most stores that have a second antenna or cable...the ANT B terminal. Phono Connector Used on the television. If you have phono connectors. Below are connected Attach an optional antenna cable mixer to the TV antenna terminal, and connect the cables to connect external devices with DVIHDTV output capability. "F" Type 75-Ohm Coaxial Antenna Connector For connecting RF signals (...

Operation Guide
Page 7
... Press these buttons until VIDEO: 5 appears in MENU mode. This button also serves as the EXIT button when in the top right corner of the TV screen. VIDEO L/MONO R MAGIC FOCUS VOL- Your selection is shown in MENU mode. ባ INPUT/EXIT button Press this button to select the... button until the desired channel appears in MENU mode. ቦ POWER button Press this button to turn the TV on the TV screen. If you to enter the MENU, making it possible to set TV features to instantly view your preference without using the remote. CH+ INPUT MENU ̇ ̈ ̄ ...
... Press these buttons until VIDEO: 5 appears in MENU mode. This button also serves as the EXIT button when in the top right corner of the TV screen. VIDEO L/MONO R MAGIC FOCUS VOL- Your selection is shown in MENU mode. ባ INPUT/EXIT button Press this button to select the... button until the desired channel appears in MENU mode. ቦ POWER button Press this button to turn the TV on the TV screen. If you to enter the MENU, making it possible to set TV features to instantly view your preference without using the remote. CH+ INPUT MENU ̇ ̈ ̄ ...

Operation Guide
Page 8
... not, the played back picture may be abnormal. 2. FRONT PANEL JACKS AND CONNECTORS The front panel jacks are provided as shown in place of your TV. 8 VIDEO L/MONO R MAGIC FOCUS NOTE: 1. VIDEO L/MONO R MAGIC FOCUS INPUT 5 S-VIDEO -AUDIO-
... not, the played back picture may be abnormal. 2. FRONT PANEL JACKS AND CONNECTORS The front panel jacks are provided as shown in place of your TV. 8 VIDEO L/MONO R MAGIC FOCUS NOTE: 1. VIDEO L/MONO R MAGIC FOCUS INPUT 5 S-VIDEO -AUDIO-

Operation Guide
Page 9
...be displayed as a main picture or sub-picture. Use the S-VIDEO Output for connecting equipment with S-VIDEO output capability. 9 This feature allows the TV speakers to a separate stereo amplifier. With this connection, the audio to switch between two separate 75-Ohm RF antenna inputs, ANT A and ANT B.... ANT A input can be controlled by selecting "TV as Center" on the Audio Advanced Settings Menu (see page 47). ቧ S-VIDEO Inputs 3 and 4 Inputs 3 and 4 provide S-VIDEO (Super Video...
...be displayed as a main picture or sub-picture. Use the S-VIDEO Output for connecting equipment with S-VIDEO output capability. 9 This feature allows the TV speakers to a separate stereo amplifier. With this connection, the audio to switch between two separate 75-Ohm RF antenna inputs, ANT A and ANT B.... ANT A input can be controlled by selecting "TV as Center" on the Audio Advanced Settings Menu (see page 47). ቧ S-VIDEO Inputs 3 and 4 Inputs 3 and 4 provide S-VIDEO (Super Video...

Operation Guide
Page 10
...HDTV input is NOT compatible when used for composite video and component video input. ቩ IR Blaster This jack provides IR output to the TV's PR input. 3. You may be displayed on the screen in its digital form. 10 S-VIDEO has priority over VIDEO input. 2. ... input. 2. In this connection, your external components (VCR, Cable box, DVD player, etc.). With this case, connect the components B-Y output to the TV's PB input and the components R-Y output to your external components can automatically be labeled Y-CBCR. NOTES: 1. NOTES: 1. Only DTV format such as a...
...HDTV input is NOT compatible when used for composite video and component video input. ቩ IR Blaster This jack provides IR output to the TV's PR input. 3. You may be displayed on the screen in its digital form. 10 S-VIDEO has priority over VIDEO input. 2. ... input. 2. In this connection, your external components (VCR, Cable box, DVD player, etc.). With this case, connect the components B-Y output to the TV's PB input and the components R-Y output to your external components can automatically be labeled Y-CBCR. NOTES: 1. NOTES: 1. Only DTV format such as a...

Operation Guide
Page 11
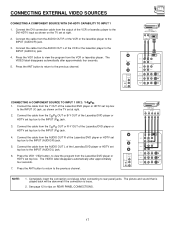
... input jack. 2. Connect only 1 component to Input2~Input5. 4. REAR PANEL CONNECTIONS TYPICAL FULL-FEATURE SETUP Outside antenna or cable TV coaxial cable 2-Way signal splitter CONNECT TO IR BLASTER IR Sensor (Provided) DVD Player OUTPUT Y PB/CB PR/CR L R...3 INPUT 4 R (MONO)/L VIDEO R (MONO)/L VIDEO MONITOR OUT R L AUDIO VIDEO S-VIDEO S-VIDEO S-VIDEO VCR #1 ANT OUTPUT IN S-VIDEO V L R INPUT OUTPUT Cable TV Box CL R INPUT IR Sensor S-VIDEO V L R INPUT S-VIDEO V L R OUTPUT Stereo System Amplifier CONNECT TO IR BLASTER VCR #2 (Provided) Laserdisc player, VCR, camcorder, ...
... input jack. 2. Connect only 1 component to Input2~Input5. 4. REAR PANEL CONNECTIONS TYPICAL FULL-FEATURE SETUP Outside antenna or cable TV coaxial cable 2-Way signal splitter CONNECT TO IR BLASTER IR Sensor (Provided) DVD Player OUTPUT Y PB/CB PR/CR L R...3 INPUT 4 R (MONO)/L VIDEO R (MONO)/L VIDEO MONITOR OUT R L AUDIO VIDEO S-VIDEO S-VIDEO S-VIDEO VCR #1 ANT OUTPUT IN S-VIDEO V L R INPUT OUTPUT Cable TV Box CL R INPUT IR Sensor S-VIDEO V L R INPUT S-VIDEO V L R OUTPUT Stereo System Amplifier CONNECT TO IR BLASTER VCR #2 (Provided) Laserdisc player, VCR, camcorder, ...

Operation Guide
Page 12
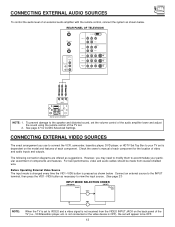
...connection if your device has this case, connect the components CB output to the TV's PB input and the components CR output to each input jack. Connect only 1 component (VCR, DVD player..., camcorder, etc.) to the TV's PR input. Input 2 accepts both composite and component video signals. Refer to obtain optimum picture quality...video connection if your device has this case, connect the components B-Y output to the TV's PB input and the components R-Y output to the left audio jack on line input-output connections. You...
...connection if your device has this case, connect the components CB output to the TV's PB input and the components CR output to each input jack. Connect only 1 component (VCR, DVD player..., camcorder, etc.) to the TV's PR input. Input 2 accepts both composite and component video signals. Refer to obtain optimum picture quality...video connection if your device has this case, connect the components B-Y output to the TV's PB input and the components R-Y output to the left audio jack on line input-output connections. You...
Operation Guide
Page 13
...speaker and distorted sound, set the volume control of the audio amplifier lower and adjust the sound using the remote control of the TV set is pressed as suggestions. To prevent damage to your particular assortment of video and audio inputs and outputs. Before Operating External... input mode is changed every time the VID1~VID5 button is dependent on the back panel of each component. Check the owner's manual of the TV (i.e., VCR/laserdisc player, etc. REAR PANEL OF TELEVISION ANT A TO CONVERTER ANT B INPUT 1 INPUT 2 DVI-HDTV PR PB Y R (MONO)/L AUDIO PR PB ...
...speaker and distorted sound, set the volume control of the audio amplifier lower and adjust the sound using the remote control of the TV set is pressed as suggestions. To prevent damage to your particular assortment of video and audio inputs and outputs. Before Operating External... input mode is changed every time the VID1~VID5 button is dependent on the back panel of each component. Check the owner's manual of the TV (i.e., VCR/laserdisc player, etc. REAR PANEL OF TELEVISION ANT A TO CONVERTER ANT B INPUT 1 INPUT 2 DVI-HDTV PR PB Y R (MONO)/L AUDIO PR PB ...

Operation Guide
Page 14
... VCR 14 Connect the cable from the VIDEO OUT of the VCR or the laserdisc player to the INPUT (VIDEO) jack, as shown on the TV set below. 2. Connect the cable from the AUDIO OUT of the VCR or the laserdisc player to the INPUT (MONO)/L(AUDIO) jack. 3. Press the VID2...
... VCR 14 Connect the cable from the VIDEO OUT of the VCR or the laserdisc player to the INPUT (VIDEO) jack, as shown on the TV set below. 2. Connect the cable from the AUDIO OUT of the VCR or the laserdisc player to the INPUT (MONO)/L(AUDIO) jack. 3. Press the VID2...

Operation Guide
Page 15
... to view the program from the AUDIO OUT R of the VCR or the laserdisc player to your VCR operating guide for more information on the TV set below. 2. Press the ANT button to return to rear panel jacks. Connect the cable from the VCR or laserdisc player. The VIDEO label disappears...
... to view the program from the AUDIO OUT R of the VCR or the laserdisc player to your VCR operating guide for more information on the TV set below. 2. Press the ANT button to return to rear panel jacks. Connect the cable from the VCR or laserdisc player. The VIDEO label disappears...

Operation Guide
Page 16
... or line output. (INPUT: 1 in example on page 11) Refer to the INPUT (AUDIO/L) jack. 4. A single VCR can be used for more information on the TV set below. 2. Press the VID3~VID5 button to view the program from the AUDIO OUT L of the VCR or the laserdisc player to your VCR...
... or line output. (INPUT: 1 in example on page 11) Refer to the INPUT (AUDIO/L) jack. 4. A single VCR can be used for more information on the TV set below. 2. Press the VID3~VID5 button to view the program from the AUDIO OUT L of the VCR or the laserdisc player to your VCR...
Operation Guide
Page 17
Connect the DVI connection cable from the Y OUT of the VCR or laserdisc player to the DVI-HDTV input as shown on the TV set top box to the INPUT (PB) jack. 3. The VIDEO label disappears automatically after approximately four seconds. 7. Connect the cable from the output of the ... OUT or R-Y OUT of the Laserdisc/DVD player or HDTV set top box to the INPUT (AUDIO/R) jack. 5. See page 12 for tips on the TV set at right. 2. Connect the cable from the AUDIO OUT R of the Laserdisc/DVD player or HDTV set top box to the INPUT (PR) jack...
Connect the DVI connection cable from the Y OUT of the VCR or laserdisc player to the DVI-HDTV input as shown on the TV set top box to the INPUT (PB) jack. 3. The VIDEO label disappears automatically after approximately four seconds. 7. Connect the cable from the output of the ... OUT or R-Y OUT of the Laserdisc/DVD player or HDTV set top box to the INPUT (AUDIO/R) jack. 5. See page 12 for tips on the TV set at right. 2. Connect the cable from the AUDIO OUT R of the Laserdisc/DVD player or HDTV set top box to the INPUT (PR) jack...
Operation Guide
Page 18
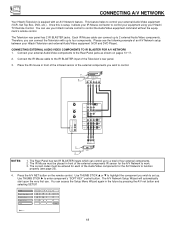
...Video equipment (VCR, Set Top Box, DVD, etc.). VCR Set Top Box Cable Box Amplifier DVD POWER CH ̄ CH ̆ SETUP TV/VCR b MORE Move 18 This feature helps to enter component's "SOFT KEY" control button. The A/V Network Setup Wizard will automatically start upon ...the very first use your Hitachi Television and external Audio/Video equipment (VCR and DVD Player). The Television rear panel has 2 IR BLASTER jacks. The IR Mouse must be...
...Video equipment (VCR, Set Top Box, DVD, etc.). VCR Set Top Box Cable Box Amplifier DVD POWER CH ̄ CH ̆ SETUP TV/VCR b MORE Move 18 This feature helps to enter component's "SOFT KEY" control button. The A/V Network Setup Wizard will automatically start upon ...the very first use your Hitachi Television and external Audio/Video equipment (VCR and DVD Player). The Television rear panel has 2 IR BLASTER jacks. The IR Mouse must be...
Operation Guide
Page 19
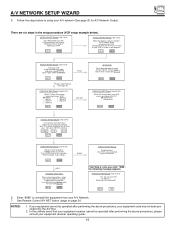
...VCR then press each of 6) This will uninstall VCR on page 24. HITACHI AV NET Wizard (step 3b of the 3 function keys below ). BACK YES 6. Would you like to the TV? (b) Channel 03 ( ) Channel 04 BACK NEXT HITACHI AV NET Wizard (step 5 of 6) Turn ON your AV network. ...HELP DONE HELP TROUBLE SHOOTING Please check connections shown in Hitachi's Easy Graphic Guide to setup your equipment receiver operating guide. ...
...VCR then press each of 6) This will uninstall VCR on page 24. HITACHI AV NET Wizard (step 3b of the 3 function keys below ). BACK YES 6. Would you like to the TV? (b) Channel 03 ( ) Channel 04 BACK NEXT HITACHI AV NET Wizard (step 5 of 6) Turn ON your AV network. ...HELP DONE HELP TROUBLE SHOOTING Please check connections shown in Hitachi's Easy Graphic Guide to setup your equipment receiver operating guide. ...

Operation Guide
Page 21
... will now control your VCR. (See page 31 for instructions on how to program the remote to control additional Audio/Video equipment.) ቢ POWER ባ TV DVD VCR CBL SOURCE WIZARD CD TAPE STB AMP 1 2 3 4 5 6 ቤ 7 8 9 SLEEP C.C. This button will blink, indicating that the ...other Audio/Video equipment depending on which mode is not pressed again. THE REMOTE CONTROL In addition to controlling all the functions on your HITACHI Projection TV, the new remote control is too bright. ቤ REC CLU-5722TSI 21 Basic operation keys are in a dark room, press ...
... will now control your VCR. (See page 31 for instructions on how to program the remote to control additional Audio/Video equipment.) ቢ POWER ባ TV DVD VCR CBL SOURCE WIZARD CD TAPE STB AMP 1 2 3 4 5 6 ቤ 7 8 9 SLEEP C.C. This button will blink, indicating that the ...other Audio/Video equipment depending on which mode is not pressed again. THE REMOTE CONTROL In addition to controlling all the functions on your HITACHI Projection TV, the new remote control is too bright. ቤ REC CLU-5722TSI 21 Basic operation keys are in a dark room, press ...

Operation Guide
Page 22
...2 3 4 5 6 7 8 9 SLEEP C.C. ANT 0 INFO A/V NET ASPECT VIRTUAL HD MENU EXIT VOL SELECT CH ብ ቦ ቨ ቫ SVCS VID 1 MUTE VCR PLUS+ LAST CH GUIDE/TV SCHD VID 5 VID 2 PIP VID 3 PIP CH VID 4 FREEZE PIP MODE PIP ACCESS SWAP VIDEO ቶ 23 1 24 REC CLU-5722TSI ᕃ POWER button Press... this button to turn the TV set on or off when the remote is in TV mode. (See page 21 for instructions on how to set the remote control to TV mode.) ባ TV button When the TV button is pressed, it will blink, to indicate the ...
...2 3 4 5 6 7 8 9 SLEEP C.C. ANT 0 INFO A/V NET ASPECT VIRTUAL HD MENU EXIT VOL SELECT CH ብ ቦ ቨ ቫ SVCS VID 1 MUTE VCR PLUS+ LAST CH GUIDE/TV SCHD VID 5 VID 2 PIP VID 3 PIP CH VID 4 FREEZE PIP MODE PIP ACCESS SWAP VIDEO ቶ 23 1 24 REC CLU-5722TSI ᕃ POWER button Press... this button to turn the TV set on or off when the remote is in TV mode. (See page 21 for instructions on how to set the remote control to TV mode.) ባ TV button When the TV button is pressed, it will blink, to indicate the ...


