Owners Guide
Page 1
has determined that this product meets the ENERGY STAR® guidelines for 50C10 IMPORTANT SAFETY INSTRUCTIONS 2-3 FIRST TIME USE ...4-19 THE REMOTE CONTROL 20-31 ON-SCREEN DISPLAY...32-56 LAMP REPLACEMENT ...57-60 CARE OF YOUR HITACHI TV & REMOTE CONTROL 61 RECEPTION PROBLEMS ...62 USEFUL INFORMATION / INDEX 63-70 As an ENERGY STAR® Partner, Hitachi, Ltd. LCD REAR PROJECTION TELEVISION Operating Guide for energy efficiency.
has determined that this product meets the ENERGY STAR® guidelines for 50C10 IMPORTANT SAFETY INSTRUCTIONS 2-3 FIRST TIME USE ...4-19 THE REMOTE CONTROL 20-31 ON-SCREEN DISPLAY...32-56 LAMP REPLACEMENT ...57-60 CARE OF YOUR HITACHI TV & REMOTE CONTROL 61 RECEPTION PROBLEMS ...62 USEFUL INFORMATION / INDEX 63-70 As an ENERGY STAR® Partner, Hitachi, Ltd. LCD REAR PROJECTION TELEVISION Operating Guide for energy efficiency.
Owners Guide
Page 4
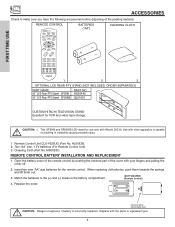
...Remote Control) 4. Remote Control Unit CLU-4329UG (Part No. Two "AA" size, 1.5V batteries (For Remote Control Unit). 3. Cleaning Cloth (Part No. REMOTE CONTROL BATTERY INSTALLATION AND REPLACEMENT 1. Replace the cover. OPTIONAL LCD REAR PTV STAND (NOT INCLUDED, ORDER SEPARATELY) PART NAME PART NO. 50" LCD Rear PTV Stand - HL01839). 2. Match the batteries to remove back cover. Replace with Hitachi 50C10...to the (+) and (-) marks in instability causing possible injury. 1. REMOTE CONTROL POWER TV CBL/SAT DVD/VCR SWAP PIP MODE PIP FREEZE DAY/NIGHT SURF ...
...Remote Control) 4. Remote Control Unit CLU-4329UG (Part No. Two "AA" size, 1.5V batteries (For Remote Control Unit). 3. Cleaning Cloth (Part No. REMOTE CONTROL BATTERY INSTALLATION AND REPLACEMENT 1. Replace the cover. OPTIONAL LCD REAR PTV STAND (NOT INCLUDED, ORDER SEPARATELY) PART NAME PART NO. 50" LCD Rear PTV Stand - HL01839). 2. Match the batteries to remove back cover. Replace with Hitachi 50C10...to the (+) and (-) marks in instability causing possible injury. 1. REMOTE CONTROL POWER TV CBL/SAT DVD/VCR SWAP PIP MODE PIP FREEZE DAY/NIGHT SURF ...

Owners Guide
Page 7
... SELECT button when in MENU mode. When the TV power is turned ON. NOTES: Your remote control does not have mono sound, insert the audio cable into the left (̇) and right (̈) buttons when in the top right corner of the TV screen. The volume level will default to video ...inputs, press VID1~VID5 buttons depending on your preference without using the remote. If you...
... SELECT button when in MENU mode. When the TV power is turned ON. NOTES: Your remote control does not have mono sound, insert the audio cable into the left (̇) and right (̈) buttons when in the top right corner of the TV screen. The volume level will default to video ...inputs, press VID1~VID5 buttons depending on your preference without using the remote. If you...

Owners Guide
Page 8
... FRONT PANEL CONTROLS ቧ IR RECEIVER The screen area also acts as the IR receiver (remote sensor) of manufacturer. 2. If the LAMP, TEMP, and POWER LED are blinking in the order below, the television is on or off during normal operation. Your Hitachi LCD Rear Projection Television has ...an internal lamp that lights up the TV screen. If you do not watch the LCD Rear Projection Television for longer lamp life. ቪ TEMP indicator This light is off ....
... FRONT PANEL CONTROLS ቧ IR RECEIVER The screen area also acts as the IR receiver (remote sensor) of manufacturer. 2. If the LAMP, TEMP, and POWER LED are blinking in the order below, the television is on or off during normal operation. Your Hitachi LCD Rear Projection Television has ...an internal lamp that lights up the TV screen. If you do not watch the LCD Rear Projection Television for longer lamp life. ቪ TEMP indicator This light is off ....

Owners Guide
Page 14
... INPUT Stereo System Amplifier NOTES: 1. Follow connections that pertain to the speaker and distorted sound, set the volume control of the audio amplifier lower and adjust the sound using the remote control of an external audio amplifier with the TV remote control, connect the system as shown below. FIRST TIME USE CONNECTING EXTERNAL AUDIO DEVICES To...
... INPUT Stereo System Amplifier NOTES: 1. Follow connections that pertain to the speaker and distorted sound, set the volume control of the audio amplifier lower and adjust the sound using the remote control of an external audio amplifier with the TV remote control, connect the system as shown below. FIRST TIME USE CONNECTING EXTERNAL AUDIO DEVICES To...
Owners Guide
Page 20
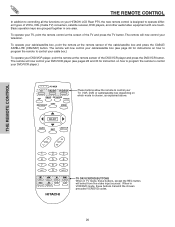
.../VCR button. THE REMOTE CONTROL THE REMOTE CONTROL In addition to controlling all the functions on your HITACHI LCD Rear PTV, the new remote control is chosen, as explained above. The remote will select from five video input sources. SELECT MUTE EXIT LAST CH VOL CH 1 2 3 4 5 6 7 8 9 ANT 0 INFO VID1 REC VID2 VID5 VID3 ASPECT VID4 SLEEP TV OR VCR/DVD BUTTONS...
.../VCR button. THE REMOTE CONTROL THE REMOTE CONTROL In addition to controlling all the functions on your HITACHI LCD Rear PTV, the new remote control is chosen, as explained above. The remote will select from five video input sources. SELECT MUTE EXIT LAST CH VOL CH 1 2 3 4 5 6 7 8 9 ANT 0 INFO VID1 REC VID2 VID5 VID3 ASPECT VID4 SLEEP TV OR VCR/DVD BUTTONS...

Owners Guide
Page 21
...entries. Use CURSOR ̈ to highlight "Add", then press SELECT to store the channel to select. HOW TO USE THE REMOTE TO CONTROL YOUR LCD REAR PTV THE REMOTE CONTROL ቢ TV POWER button ባ PICTURE-IN-PICTURE ቤ DAY/NIGHT button ብ SELECT, MENU, CURSOR buttons ቦ VOLUME,... MUTE buttons POWER TV CBL/SAT DVD/VCR SWAP PIP MODE PIP FREEZE SURF DAY/NIGHT MENU SELECT MUTE EXIT LAST CH &#...
...entries. Use CURSOR ̈ to highlight "Add", then press SELECT to store the channel to select. HOW TO USE THE REMOTE TO CONTROL YOUR LCD REAR PTV THE REMOTE CONTROL ቢ TV POWER button ባ PICTURE-IN-PICTURE ቤ DAY/NIGHT button ብ SELECT, MENU, CURSOR buttons ቦ VOLUME,... MUTE buttons POWER TV CBL/SAT DVD/VCR SWAP PIP MODE PIP FREEZE SURF DAY/NIGHT MENU SELECT MUTE EXIT LAST CH &#...

Owners Guide
Page 22
... then wait a few seconds for channels 1 to 9, or simply press the single digit channel you are used to tune. THE REMOTE CONTROL L L L HOW TO USE THE REMOTE TO CONTROL YOUR LCD REAR PTV ቦ VOLUME, MUTE button Press the VOLUME up (̆) or down (̄) button until two dashes appear next ... receiver, and execute the secondary function labeled. 22 Enter one more time, or press the VOLUME Up (̆) button. When the remote control is in TV mode, press these buttons will display when MUTE/SOFT MUTE is pressed. To reduce the sound to one half of normal volume (SOFT...
... then wait a few seconds for channels 1 to 9, or simply press the single digit channel you are used to tune. THE REMOTE CONTROL L L L HOW TO USE THE REMOTE TO CONTROL YOUR LCD REAR PTV ቦ VOLUME, MUTE button Press the VOLUME up (̆) or down (̄) button until two dashes appear next ... receiver, and execute the secondary function labeled. 22 Enter one more time, or press the VOLUME Up (̆) button. When the remote control is in TV mode, press these buttons will display when MUTE/SOFT MUTE is pressed. To reduce the sound to one half of normal volume (SOFT...

Owners Guide
Page 23
...:9 aspect ratio. 16:9 Zoom Use this aspect mode to zoom 16:9 images. (1) NTSC/480i/480p INPUT 4:3 INPUT 4:3 STANDARD 4:3 EXPANDED 4:3 ZOOM1 THE REMOTE CONTROL (2) 480i/480p INPUT 16:9 INPUT 16:9 ZOOM 16:9 STANDARD 4:3 ZOOM2 4:3 STANDARD 4:3 EXPANDED 4:3 ZOOM1 (3) 720p/1080i INPUT 16:9 INPUT 16:9 ZOOM ...the following options. 4:3 Standard Use this aspect mode to quickly change the picture format ASPECT ratio. HOW TO USE THE REMOTE TO CONTROL YOUR LCD REAR PTV ቪ ASPECT button Press this button to display conventional (4:3) images. Side panels (gray areas) are placed ...
...:9 aspect ratio. 16:9 Zoom Use this aspect mode to zoom 16:9 images. (1) NTSC/480i/480p INPUT 4:3 INPUT 4:3 STANDARD 4:3 EXPANDED 4:3 ZOOM1 THE REMOTE CONTROL (2) 480i/480p INPUT 16:9 INPUT 16:9 ZOOM 16:9 STANDARD 4:3 ZOOM2 4:3 STANDARD 4:3 EXPANDED 4:3 ZOOM1 (3) 720p/1080i INPUT 16:9 INPUT 16:9 ZOOM ...the following options. 4:3 Standard Use this aspect mode to quickly change the picture format ASPECT ratio. HOW TO USE THE REMOTE TO CONTROL YOUR LCD REAR PTV ቪ ASPECT button Press this button to display conventional (4:3) images. Side panels (gray areas) are placed ...

Owners Guide
Page 24
...sub-pictures from the screen. ቱ MENU button The MENU button will add 15 minutes to this timer up to a maximum of the screen. THE REMOTE CONTROL 24 Time Main Picture Source Audio Broadcast Broadcast Rating Signal Format Wide Mode Sleep Timer 3:32 PM Y-PBPR VID 1 When a COMPONENT VIDEO: Y-PBPR ...received, the picture source, if the channel has stereo (ST) or second audio program (SAP), the time and CHANNEL ID. HOW TO USE THE REMOTE TO CONTROL YOUR LCD REAR PTV ቫ SLEEP button Press this button to display the sleep timer in memory) and display them as PIP subpictures.
...sub-pictures from the screen. ቱ MENU button The MENU button will add 15 minutes to this timer up to a maximum of the screen. THE REMOTE CONTROL 24 Time Main Picture Source Audio Broadcast Broadcast Rating Signal Format Wide Mode Sleep Timer 3:32 PM Y-PBPR VID 1 When a COMPONENT VIDEO: Y-PBPR ...received, the picture source, if the channel has stereo (ST) or second audio program (SAP), the time and CHANNEL ID. HOW TO USE THE REMOTE TO CONTROL YOUR LCD REAR PTV ቫ SLEEP button Press this button to display the sleep timer in memory) and display them as PIP subpictures.
Owners Guide
Page 25
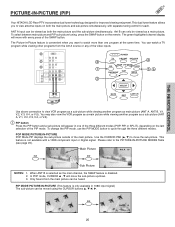
ANT A input can only be viewed as a main picture. The Picture-in-Picture feature is convenient when you to watch a TV program while viewing other programs from the Ant A source or any of the SWAP button. This feature is disabled. 2. Ant A 10 Main.... PIP MODE PICTURE-IN-PICTURE (This feature is selected as main picture (ANT A, ANT B, V:1, V:2, V:3, V:4, or V:5). THE REMOTE CONTROL PICTURE-IN-PICTURE (PIP) Your HITACHI LCD Rear PTV incorporates dual tuner technology designed for each. This dual tuner feature allows you want to view antenna inputs on the last selection ...
ANT A input can only be viewed as a main picture. The Picture-in-Picture feature is convenient when you to watch a TV program while viewing other programs from the Ant A source or any of the SWAP button. This feature is disabled. 2. Ant A 10 Main.... PIP MODE PICTURE-IN-PICTURE (This feature is selected as main picture (ANT A, ANT B, V:1, V:2, V:3, V:4, or V:5). THE REMOTE CONTROL PICTURE-IN-PICTURE (PIP) Your HITACHI LCD Rear PTV incorporates dual tuner technology designed for each. This dual tuner feature allows you want to view antenna inputs on the last selection ...

Owners Guide
Page 26
... Ant A 12 NOTE: The SWAP button will automatically scan all active channel numbers (those set in SURF scanning mode, press SELECT on the remote control to remove the sub-pictures from the screen. PICTURE-IN-PICTURE (PIP) MODES POP PIP SPLIT SURF NTSC (ANT A/B) YES x YES YES...720p 1080i x x YES x x x YES x x YES YES x 26 Ant A 28 SURF SURF THE REMOTE CONTROL NOTES: 1. 2. 3. 4. 5. 6. While in memory) and display them as the main channel. Each press of input signal. If MOVIE/TV RATINGS lock functions setting is ON, SURF mode will depend on a chosen channel. If no buttons...
... Ant A 12 NOTE: The SWAP button will automatically scan all active channel numbers (those set in SURF scanning mode, press SELECT on the remote control to remove the sub-pictures from the screen. PICTURE-IN-PICTURE (PIP) MODES POP PIP SPLIT SURF NTSC (ANT A/B) YES x YES YES...720p 1080i x x YES x x x YES x x YES YES x 26 Ant A 28 SURF SURF THE REMOTE CONTROL NOTES: 1. 2. 3. 4. 5. 6. While in memory) and display them as the main channel. Each press of input signal. If MOVIE/TV RATINGS lock functions setting is ON, SURF mode will depend on a chosen channel. If no buttons...

Owners Guide
Page 27
THE REMOTE CONTROL PICTURE-IN-PICTURE (PIP) ቦ FREEZE button (With PIP ON) If you are currently viewing. This is chosen. ቧ FREEZE button (with PIP OFF) Press ...
THE REMOTE CONTROL PICTURE-IN-PICTURE (PIP) ቦ FREEZE button (With PIP ON) If you are currently viewing. This is chosen. ቧ FREEZE button (with PIP OFF) Press ...
Owners Guide
Page 28
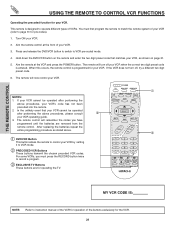
...CH programmed until the batteries are for operating the TV. 1 2 3 4 5 6 7 8 9 ANT 0 INFO VID1 REC VID2 VID5 VID3 ASPECT VID4 SLEEP MY VCR CODE IS: NOTE: Refer to instruction manual of the VCR for pre-codes). 1. The remote control will now control your VCR. 2. Hold down the DVD/VCR... different types of your VCR. 3. You must press the RECORD button twice to record a program. ቤ EXCLUSIVE TV Buttons These buttons are removed from the remote control. Press and release the DVD/VCR button to switch to VCR mode. ባ PRECODED VCR Buttons These buttons transmit ...
...CH programmed until the batteries are for operating the TV. 1 2 3 4 5 6 7 8 9 ANT 0 INFO VID1 REC VID2 VID5 VID3 ASPECT VID4 SLEEP MY VCR CODE IS: NOTE: Refer to instruction manual of the VCR for pre-codes). 1. The remote control will now control your VCR. 2. Hold down the DVD/VCR... different types of your VCR. 3. You must press the RECORD button twice to record a program. ቤ EXCLUSIVE TV Buttons These buttons are removed from the remote control. Press and release the DVD/VCR button to switch to VCR mode. ባ PRECODED VCR Buttons These buttons transmit ...
Owners Guide
Page 29
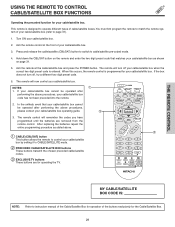
...These buttons transmit the chosen precoded cable/satellite codes. ቤ EXCLUSIVE TV buttons These buttons are removed from the remote control. Hold down the CBL/SAT button on page 31. 5. When this occurs, the remote control is entered. Press and release the cable/satellite (CBL/SAT) ...cable/satellite box code has not been precoded into the remote. 2. This remote is designed to cable/satellite pre-coded mode. 4. THE REMOTE CONTROL USING THE REMOTE TO CONTROL CABLE/SATELLITE BOX FUNCTIONS Operating the precoded function for operating the TV. If the box does not turn off , try ...
...These buttons transmit the chosen precoded cable/satellite codes. ቤ EXCLUSIVE TV buttons These buttons are removed from the remote control. Hold down the CBL/SAT button on page 31. 5. When this occurs, the remote control is entered. Press and release the cable/satellite (CBL/SAT) ...cable/satellite box code has not been precoded into the remote. 2. This remote is designed to cable/satellite pre-coded mode. 4. THE REMOTE CONTROL USING THE REMOTE TO CONTROL CABLE/SATELLITE BOX FUNCTIONS Operating the precoded function for operating the TV. If the box does not turn off , try ...

Owners Guide
Page 30
...of your DVD player. NOTES: 1. The remote control will now control your DVD player. 3. The remote will remember the codes you have programmed until the batteries are for operating the TV. You must first program the remote to match the remote system of the buttons exclusively for the DVD...These buttons transmit the chosen precoded DVD codes. ቤ EXCLUSIVE TV Buttons These buttons are removed from the remote control. Turn ON your DVD player's code has not been precoded into the remote. 2. Aim the remote at the front of DVD players. In the unlikely event that ...
...of your DVD player. NOTES: 1. The remote control will now control your DVD player. 3. The remote will remember the codes you have programmed until the batteries are for operating the TV. You must first program the remote to match the remote system of the buttons exclusively for the DVD...These buttons transmit the chosen precoded DVD codes. ቤ EXCLUSIVE TV Buttons These buttons are removed from the remote control. Turn ON your DVD player's code has not been precoded into the remote. 2. Aim the remote at the front of DVD players. In the unlikely event that ...

Owners Guide
Page 31
...REMOTE CONTROL CABLE BRAND CODE General Instrument 17 Hamlin 22,23,24,25 Jerrold 00,01,02,03,04,05,06,07,21 Oak 26,27,28 Panasonic 18,19,20 Pioneer 13,14 Scientific Atlanta 08,09,10 Tocom 15,16 Zenith 11,12 SATELLITE BRAND CODE Ecostar 32 Hitachi...20,21,22,23,24 Fisher 34,37,38,39 Funai 52 General Electric 33 Goldstar 36 Hitachi 00,01,02,03,04,05,06 JVC 18,49,50,51 Magnavox 12,13, 14... 42 Teknica 46 Toshiba 15 DVD BRAND CODE Hitachi 53, 59, 60 Panasonic 55 Pioneer 56 RCA 57 Samsung 59 Sanyo 60 Sony 54 Toshiba 58 THE REMOTE CONTROL 31
...REMOTE CONTROL CABLE BRAND CODE General Instrument 17 Hamlin 22,23,24,25 Jerrold 00,01,02,03,04,05,06,07,21 Oak 26,27,28 Panasonic 18,19,20 Pioneer 13,14 Scientific Atlanta 08,09,10 Tocom 15,16 Zenith 11,12 SATELLITE BRAND CODE Ecostar 32 Hitachi...20,21,22,23,24 Fisher 34,37,38,39 Funai 52 General Electric 33 Goldstar 36 Hitachi 00,01,02,03,04,05,06 JVC 18,49,50,51 Magnavox 12,13, 14... 42 Teknica 46 Toshiba 15 DVD BRAND CODE Hitachi 53, 59, 60 Panasonic 55 Pioneer 56 RCA 57 Samsung 59 Sanyo 60 Sony 54 Toshiba 58 THE REMOTE CONTROL 31

Owners Guide
Page 32
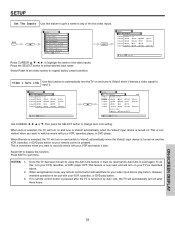
Press EXIT on your HITACHI LCD TV. 2. Manager Locks Setup Move SEL Sel This part of the screen shows which Remote Control buttons to quickly exit from a menu. 4. ON-SCREEN DISPLAY (OSD) 1. Press the CURSOR to highlight a different feature, then press SELECT to access Favorite Channels menu. Video Audio Aspect Chan. Press CURSOR ̇ or ̈ to choose. 3. Press MENU on the remote control to display the different features on the remote control to use. MENU SELECT EXIT This part of the screen shows which selections are available. PUSH ON-SCREEN DISPLAY 32
Press EXIT on your HITACHI LCD TV. 2. Manager Locks Setup Move SEL Sel This part of the screen shows which Remote Control buttons to quickly exit from a menu. 4. ON-SCREEN DISPLAY (OSD) 1. Press the CURSOR to highlight a different feature, then press SELECT to access Favorite Channels menu. Video Audio Aspect Chan. Press CURSOR ̇ or ̈ to choose. 3. Press MENU on the remote control to display the different features on the remote control to use. MENU SELECT EXIT This part of the screen shows which selections are available. PUSH ON-SCREEN DISPLAY 32

Owners Guide
Page 43
... review more channels. Scan Use this feature after Auto Channel Scan is highlighted, CURSOR ̈ to scan column, then CURSOR ̆ or ̄ to the remote control channel ̆ or ̄ buttons. A Ch# [2 3 4 5 6 7 8 9 Scan Off Off Off Off Off Off Off Off Move ̇ Return CH ID SEL Tune Lock ] Chan. Chan...
... review more channels. Scan Use this feature after Auto Channel Scan is highlighted, CURSOR ̈ to scan column, then CURSOR ̆ or ̄ to the remote control channel ̆ or ̄ buttons. A Ch# [2 3 4 5 6 7 8 9 Scan Off Off Off Off Off Off Off Off Move ̇ Return CH ID SEL Tune Lock ] Chan. Chan...
Owners Guide
Page 53
... your VCR, laserdisc player, or DVD player. Select Reset to set video names to quit menu. This is turned on your TV as described above. 2. If no remote control button is pressed after three hours. Press EXIT to original factory preset condition. NOTES: 1. When using the Auto Link feature,... it must be reset before Auto Link is pressed. Video 2 Auto Link Use this function to automatically turn your remote control is used again. Setup Set The Inputs Video1 Rename List Video2 AVR DVD Video3 CAM DVD2 Video4 CBL LD Video5 CBL2 PVR PVR2 SAT...
... your VCR, laserdisc player, or DVD player. Select Reset to set video names to quit menu. This is turned on your TV as described above. 2. If no remote control button is pressed after three hours. Press EXIT to original factory preset condition. NOTES: 1. When using the Auto Link feature,... it must be reset before Auto Link is pressed. Video 2 Auto Link Use this function to automatically turn your remote control is used again. Setup Set The Inputs Video1 Rename List Video2 AVR DVD Video3 CAM DVD2 Video4 CBL LD Video5 CBL2 PVR PVR2 SAT...


