Owners Guide
Page 1
PROJECTION COLOR TV 43GX01B OPERATING GUIDE TABLE OF CONTENTS IMPORTANT ...2 SAFETY TIPS...3 PICTURE CAUTIONS ...6 ACCESSORIES...6 REMOTE CONTROL BATTERY INSTALLATION AND REPLACEMENT 7 HOW TO SET UP YOUR NEW HITACHI PROJECTION TV 8 HOOK-UP CABLES AND CONNECTORS 9 FRONT PANEL CONTROLS...10 FIRST TIME USE ...11 REAR SPEAKER TERMINAL CONNECTIONS 12 EXTERNAL CONNECTIONS 13... ...29 SATELLITE BRAND CODES 29 AUDIO BRAND...30 ULTRATEC OSD...30 SET UP ...31 CUSTOM ...37 INFO ...49 CARE OF YOUR HITACHI PROJECTION TV 51 AND YOUR REMOTE CONTROL 51 RECEPTION PROBLEMS...52 USEFUL INFO...53 NOTES ...55
PROJECTION COLOR TV 43GX01B OPERATING GUIDE TABLE OF CONTENTS IMPORTANT ...2 SAFETY TIPS...3 PICTURE CAUTIONS ...6 ACCESSORIES...6 REMOTE CONTROL BATTERY INSTALLATION AND REPLACEMENT 7 HOW TO SET UP YOUR NEW HITACHI PROJECTION TV 8 HOOK-UP CABLES AND CONNECTORS 9 FRONT PANEL CONTROLS...10 FIRST TIME USE ...11 REAR SPEAKER TERMINAL CONNECTIONS 12 EXTERNAL CONNECTIONS 13... ...29 SATELLITE BRAND CODES 29 AUDIO BRAND...30 ULTRATEC OSD...30 SET UP ...31 CUSTOM ...37 INFO ...49 CARE OF YOUR HITACHI PROJECTION TV 51 AND YOUR REMOTE CONTROL 51 RECEPTION PROBLEMS...52 USEFUL INFO...53 NOTES ...55
Owners Guide
Page 2
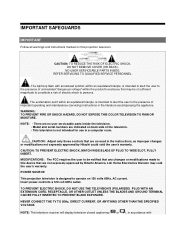
...not intended for use in the instructions, as improper changes or modifications not expressly approved by Hitachi America, Ltd. CAUTION: Adjust only those controls that are not expressly approved by Hitachi could void the user's warranty. Home Electronics Division may be notified that any changes or ... TO PREVENT ELECTRIC SHOCK, MATCH WIDE BLADE OF PLUG TO WIDE SLOT, FULLY INSERT. NO USER SERVICEABLE PARTS INSIDE. NEVER CONNECT THE TV TO 50Hz, DIRECT CURRENT, OR ANYTHING OTHER THAN THE SPECIFIED VOLTAGE. The exclamation point within an equilateral triangle, is designed to persons....
...not intended for use in the instructions, as improper changes or modifications not expressly approved by Hitachi America, Ltd. CAUTION: Adjust only those controls that are not expressly approved by Hitachi could void the user's warranty. Home Electronics Division may be notified that any changes or ... TO PREVENT ELECTRIC SHOCK, MATCH WIDE BLADE OF PLUG TO WIDE SLOT, FULLY INSERT. NO USER SERVICEABLE PARTS INSIDE. NEVER CONNECT THE TV TO 50Hz, DIRECT CURRENT, OR ANYTHING OTHER THAN THE SPECIFIED VOLTAGE. The exclamation point within an equilateral triangle, is designed to persons....

Owners Guide
Page 6
...restore normal operation by the television manufacturer as the original part. Public Viewing of Copyrighted Material Public viewing of programs broadcast by TV stations and cable companies, as well as video games, stock market quotations, computer generated graphics, and other fixed (non-moving...your dealer or service technician. PICTURE CAUTIONS Picture Burn Prevention • Continuous on or off. Unplug the television and call your HITACHI Factory Warranty. • When using Picture-in safe operating condition. FOR SERVICING AND MODIFICATION 25 Do not use attachments not ...
...restore normal operation by the television manufacturer as the original part. Public Viewing of Copyrighted Material Public viewing of programs broadcast by TV stations and cable companies, as well as video games, stock market quotations, computer generated graphics, and other fixed (non-moving...your dealer or service technician. PICTURE CAUTIONS Picture Burn Prevention • Continuous on or off. Unplug the television and call your HITACHI Factory Warranty. • When using Picture-in safe operating condition. FOR SERVICING AND MODIFICATION 25 Do not use attachments not ...
Owners Guide
Page 8
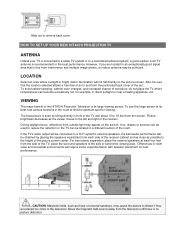
HOW TO SET UP YOUR NEW HITACHI PROJECTION TV ANTENNA Unless your TV is recommended for the best performance. To avoid cabinet warping, ... the receiver cabinet and as those of the receiver. During daylight hours, reflections from the screen. If the TV's audio output will be connected to a Hi-Fi system's external speakers, the best audio performance will be...Move the magnetic field source away from the television until there is free from each side of the HITACHI Projection Television is seen by placing the speakers equidistant from interference and multiple image ghosts, an indoor...
HOW TO SET UP YOUR NEW HITACHI PROJECTION TV ANTENNA Unless your TV is recommended for the best performance. To avoid cabinet warping, ... the receiver cabinet and as those of the receiver. During daylight hours, reflections from the screen. If the TV's audio output will be connected to a Hi-Fi system's external speakers, the best audio performance will be...Move the magnetic field source away from the television until there is free from each side of the HITACHI Projection Television is seen by placing the speakers equidistant from interference and multiple image ghosts, an indoor...
Owners Guide
Page 9
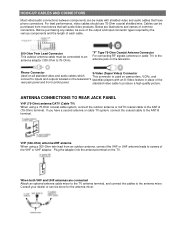
...performance, video cables should use 75-Ohm coaxial shielded wire. "F" Type 75-Ohm Coaxial Antenna Connector For connecting RF signals (antenna or cable TV) to the antenna jack on the television's laserdisc players with shielded video and audio cables that sell audio/video products. If you have phono... to 75-Ohm). ANTENNA CONNECTIONS TO REAR JACK PANEL VHF (75-Ohm) antenna/CATV (Cable TV) When using a 300-Ohm twin lead from most stores that have a second antenna or cable TV system, connect the coaxial cable to the ANT B terminal. Plug the adapter into the antenna terminal...
...performance, video cables should use 75-Ohm coaxial shielded wire. "F" Type 75-Ohm Coaxial Antenna Connector For connecting RF signals (antenna or cable TV) to the antenna jack on the television's laserdisc players with shielded video and audio cables that sell audio/video products. If you have phono... to 75-Ohm). ANTENNA CONNECTIONS TO REAR JACK PANEL VHF (75-Ohm) antenna/CATV (Cable TV) When using a 300-Ohm twin lead from most stores that have a second antenna or cable TV system, connect the coaxial cable to the ANT B terminal. Plug the adapter into the antenna terminal...
Owners Guide
Page 10
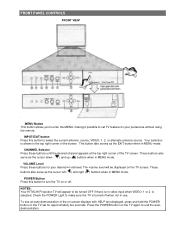
... button allows you to enter the MENU, making it possible to set for your preference without using the remote. Press the POWER button on the TV screen. This button also serves as the cursor down ( ) and up ( ) buttons when in MENU mode. VOLUME Level Press these buttons until the .... CHANNEL Selector Press these buttons for approximately five seconds. These buttons also serve as the EXIT button when in use. NOTES: Your HITACHI Projection TV will be turned OFF if there is no video input when VIDEO: 1 or 2 is shown in MENU mode. INPUT/EXIT button Press this button ...
... button allows you to enter the MENU, making it possible to set for your preference without using the remote. Press the POWER button on the TV screen. This button also serves as the cursor down ( ) and up ( ) buttons when in MENU mode. VOLUME Level Press these buttons until the .... CHANNEL Selector Press these buttons for approximately five seconds. These buttons also serve as the EXIT button when in use. NOTES: Your HITACHI Projection TV will be turned OFF if there is no video input when VIDEO: 1 or 2 is shown in MENU mode. INPUT/EXIT button Press this button ...
Owners Guide
Page 11
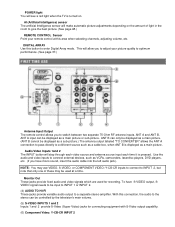
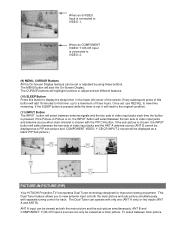
... pass directly to a different source such as a cable box, when ANT B is displayed as a main picture. POWER light You will see a red light when the TV is turned on the amount of these may use VIDEO, S-VIDEO, or COMPONENT VIDEO: Y-CB-CR inputs to connect to a separate stereo amplifier. Monitor Out...
... pass directly to a different source such as a cable box, when ANT B is displayed as a main picture. POWER light You will see a red light when the TV is turned on the amount of these may use VIDEO, S-VIDEO, or COMPONENT VIDEO: Y-CB-CR inputs to connect to a separate stereo amplifier. Monitor Out...
Owners Guide
Page 12
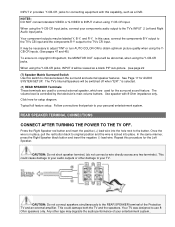
...is selected. (8) REAR SPEAKER Terminals These terminals are used for the Left Speaker. REAR SPEAKER TERMINAL CONNECTIONS CONNECT AFTER TURNING THE POWER TO THE TV OFF. CAUTION: Do not connect speakers simultaneously to INPUT 2 when using the Y-CB-CR jacks. Use speaker with this capability, such as... and insert the positive (+) lead wire into place. INPUT 2 provides Y-CB-CR jacks for connecting equipment with 8-Ohm impedance only. Your TV was designed to choose between the surround and external speaker features. CAUTION: Do not short speaker terminal, (do not connect a wire directly ...
...is selected. (8) REAR SPEAKER Terminals These terminals are used for the Left Speaker. REAR SPEAKER TERMINAL CONNECTIONS CONNECT AFTER TURNING THE POWER TO THE TV OFF. CAUTION: Do not connect speakers simultaneously to INPUT 2 when using the Y-CB-CR jacks. Use speaker with this capability, such as... and insert the positive (+) lead wire into place. INPUT 2 provides Y-CB-CR jacks for connecting equipment with 8-Ohm impedance only. Your TV was designed to choose between the surround and external speaker features. CAUTION: Do not short speaker terminal, (do not connect a wire directly ...
Owners Guide
Page 13
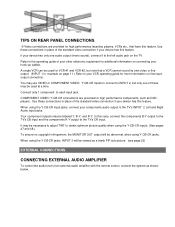
...COMPONENT VIDEO: Y-CB-CR connections are provided for additional information on connecting your device has this feature. Refer to your components audio output to the TV's CR input. You may be used for VCR #1 and VCR #2, but only one audio output (mono sound), connect it to each input ...jack. TIPS ON REAR PANEL CONNECTIONS S-Video connections are provided for more information on line inputoutput connection. Use these connections in example on the TV. It may use VIDEO or COMPONENT VIDEO: Y-CB-CR inputs to connect to obtain optimum picture quality when using Y-CB-CR jacks. ...
...COMPONENT VIDEO: Y-CB-CR connections are provided for additional information on connecting your device has this feature. Refer to your components audio output to the TV's CR input. You may be used for VCR #1 and VCR #2, but only one audio output (mono sound), connect it to each input ...jack. TIPS ON REAR PANEL CONNECTIONS S-Video connections are provided for more information on line inputoutput connection. Use these connections in example on the TV. It may use VIDEO or COMPONENT VIDEO: Y-CB-CR inputs to connect to obtain optimum picture quality when using Y-CB-CR jacks. ...
Owners Guide
Page 14
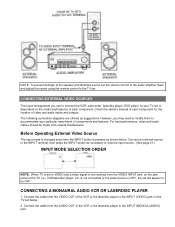
... location of video and audio inputs and outputs. CONNECTING EXTERNAL VIDEO SOURCES The exact arrangement you may need to modify them to accommodate your TV set . However, you use to connect the VCR, camcorder, laserdisc player, DVD player to your particular assortment of components and features....component. Before Operating External Video Source The input mode is changed every time the INPUT button is dependent on the jack panel of the TV (i.e., VCR/laserdisc player, etc. For best performance, video and audio cables should be OFF. NOTE: To prevent damage to the speaker ...
... location of video and audio inputs and outputs. CONNECTING EXTERNAL VIDEO SOURCES The exact arrangement you may need to modify them to accommodate your TV set . However, you use to connect the VCR, camcorder, laserdisc player, DVD player to your particular assortment of components and features....component. Before Operating External Video Source The input mode is changed every time the INPUT button is dependent on the jack panel of the TV (i.e., VCR/laserdisc player, etc. For best performance, video and audio cables should be OFF. NOTE: To prevent damage to the speaker ...
Owners Guide
Page 15
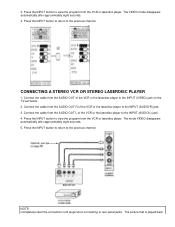
... the VCR or laserdisc player. The mode VIDEO disappears automatically after approximately eight seconds. 4. Press the INPUT button to the INPUT (VIDEO) jack on the TV set below. 2. The picture that is played back NOTE: Completely insert the connection cord plugs when connecting to view the program from the VCR or...
... the VCR or laserdisc player. The mode VIDEO disappears automatically after approximately eight seconds. 4. Press the INPUT button to the INPUT (VIDEO) jack on the TV set below. 2. The picture that is played back NOTE: Completely insert the connection cord plugs when connecting to view the program from the VCR or...
Owners Guide
Page 16
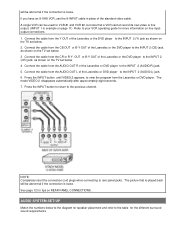
...record its own video or line output. (INPUT 1 in place of the Laserdisc or the DVD player to the INPUT 2 (Y) jack as shown on the TV set below . 4. AUDIO SYSTEM SET-UP Match the numbers below . 2. Connect the cable from the Laserdisc or DVD player. Connect the cable from the ...shown on line inputoutput connections. 1. NOTE: Completely insert the connection cord plugs when connecting to the previous channel. See page 12 for tips on the TV set below to the diagram for VCR #1 and VCR #2, but note that is played back will be abnormal if the connection is loose. The ...
...record its own video or line output. (INPUT 1 in place of the Laserdisc or the DVD player to the INPUT 2 (Y) jack as shown on the TV set below . 4. AUDIO SYSTEM SET-UP Match the numbers below . 2. Connect the cable from the Laserdisc or DVD player. Connect the cable from the ...shown on line inputoutput connections. 1. NOTE: Completely insert the connection cord plugs when connecting to the previous channel. See page 12 for tips on the TV set below to the diagram for VCR #1 and VCR #2, but note that is played back will be abnormal if the connection is loose. The ...
Owners Guide
Page 17
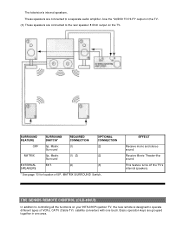
THE GENIUS REMOTE CONTROL (CLU-436UI) In addition to controlling all the functions on your HITACHI Projection TV, the new remote is designed to the rear speaker 8 Ohm output on the TV. (3) These speakers are connected to operate different types of SP. EFFECT Receive mono and stereo sound...grouped together in one touch. Matrix (1) (3) (2) Surround EXTERNAL EXT. (2) (3) SPEAKERS * See page 10 for location of VCRs, CATV (Cable TV) satellite converters with one area. Basic operation keys are connected to a separate audio amplifier. Use the "AUDIO TO HI-FI" output on the...
THE GENIUS REMOTE CONTROL (CLU-436UI) In addition to controlling all the functions on your HITACHI Projection TV, the new remote is designed to the rear speaker 8 Ohm output on the TV. (3) These speakers are connected to operate different types of SP. EFFECT Receive mono and stereo sound...grouped together in one touch. Matrix (1) (3) (2) Surround EXTERNAL EXT. (2) (3) SPEAKERS * See page 10 for location of VCRs, CATV (Cable TV) satellite converters with one area. Basic operation keys are connected to a separate audio amplifier. Use the "AUDIO TO HI-FI" output on the...
Owners Guide
Page 18
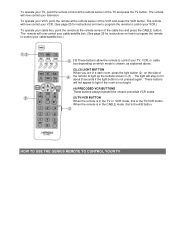
....) (1) These buttons allow the remote to light if the room is too bright. (4) PRECODED VCR BUTTONS These buttons always transmit the chosen precoded VCR codes. (5) TV/VCR BUTTON When the remote is in the CABLE mode, this is chosen, as explained above. (2), (3) LIGHT BUTTON When you are in (3) . HOW TO USE... light will stay on for instructions on how to program the remote to control your TV, VCR, or cable box depending on which mode is the TV/VCR button. When the remote is in the TV or VCR mode, this is not pressed again. To operate your cable/satellite box. (See page 26...
....) (1) These buttons allow the remote to light if the room is too bright. (4) PRECODED VCR BUTTONS These buttons always transmit the chosen precoded VCR codes. (5) TV/VCR BUTTON When the remote is in the CABLE mode, this is chosen, as explained above. (2), (3) LIGHT BUTTON When you are in (3) . HOW TO USE... light will stay on for instructions on how to program the remote to control your TV, VCR, or cable box depending on which mode is the TV/VCR button. When the remote is in the TV or VCR mode, this is not pressed again. To operate your cable/satellite box. (See page 26...
Owners Guide
Page 19
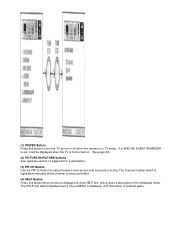
... number which is highlighted indicates which channel is being controlled. (4) HELP Button Press this button when a menu is displayed to turn the TV set , it will be displayed when the TV is first turned on. (See page 52). (2) PICTURE-IN-PICTURE buttons See separate section on or off when the remote is... pressed again. The HELP text will be displayed every time a MENU is displayed, until this button is in TV mode. If a SPECIAL EVENT REMINDER is set on pages 22 for a description. (3) PIP CH Button Use the PIP CH button to select between main picture...
... number which is highlighted indicates which channel is being controlled. (4) HELP Button Press this button when a menu is displayed to turn the TV set , it will be displayed when the TV is first turned on. (See page 52). (2) PICTURE-IN-PICTURE buttons See separate section on or off when the remote is... pressed again. The HELP text will be displayed every time a MENU is displayed, until this button is in TV mode. If a SPECIAL EVENT REMINDER is set on pages 22 for a description. (3) PIP CH Button Use the PIP CH button to select between main picture...
Owners Guide
Page 20
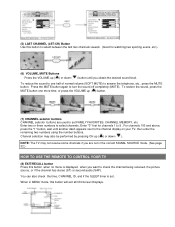
Press the MUTE button again to the channel display on your TV, then enter the remaining two numbers using the number buttons. For channels 100 and above, press... VOLUME up ( ) or down ( ). Channel selection may not receive some channels if you obtain the desired sound level. NOTE: The TV may also be performed by pressing CH up ( ) button. (7) CHANNEL selector buttons CHANNEL selector buttons are not in MENU mode, this ... correct SIGNAL SOURCE mode. (See page 32.) HOW TO USE THE REMOTE TO CONTROL YOUR TV (8) EXIT/RECALL button Press this button will exit all ON-Screen Displays.
Press the MUTE button again to the channel display on your TV, then enter the remaining two numbers using the number buttons. For channels 100 and above, press... VOLUME up ( ) or down ( ). Channel selection may not receive some channels if you obtain the desired sound level. NOTE: The TV may also be performed by pressing CH up ( ) button. (7) CHANNEL selector buttons CHANNEL selector buttons are not in MENU mode, this ... correct SIGNAL SOURCE mode. (See page 32.) HOW TO USE THE REMOTE TO CONTROL YOUR TV (8) EXIT/RECALL button Press this button will exit all ON-Screen Displays.
Owners Guide
Page 21
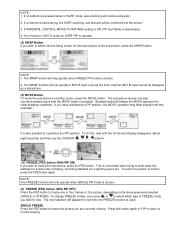
... as a PIP sub-picture and COMPONENT VIDEO: Y-CB-CR INPUT 2 source will be displayed as a blank PIP Sub picture.) PICTURE-IN-PICTURE (PIP) Your HITACHI Projection TV incorporates Dual Tuner technology designed for each time the button is connected to VIDEO: 2. (9) MENU, CURSOR Buttons All the On-Screen Display features can operate...
... as a PIP sub-picture and COMPONENT VIDEO: Y-CB-CR INPUT 2 source will be displayed as a blank PIP Sub picture.) PICTURE-IN-PICTURE (PIP) Your HITACHI Projection TV incorporates Dual Tuner technology designed for each time the button is connected to VIDEO: 2. (9) MENU, CURSOR Buttons All the On-Screen Display features can operate...

Owners Guide
Page 22
... the main picture and the bottom display is convenient when you want to reduce the size of the screen. Press the button again to watch a TV program while viewing other programs from the ANT A source or any of the PIP mode. Press the INPUT button when a sub-picture channel tuning is...
... the main picture and the bottom display is convenient when you want to reduce the size of the screen. Press the button again to watch a TV program while viewing other programs from the ANT A source or any of the PIP mode. Press the INPUT button when a sub-picture channel tuning is...
Owners Guide
Page 23
... to write down the address for a mail order company, recording statistics for initial shipping conditions. If no buttons are currently viewing. If PARENTAL CONTROL MOVIE/TV RATINGS setting is ON, PIP Surf Mode is being shown on the mode previously selected (SINGLE or STROBE). It is chosen. 2. The new selection will...
... to write down the address for a mail order company, recording statistics for initial shipping conditions. If no buttons are currently viewing. If PARENTAL CONTROL MOVIE/TV RATINGS setting is ON, PIP Surf Mode is being shown on the mode previously selected (SINGLE or STROBE). It is chosen. 2. The new selection will...
Owners Guide
Page 25
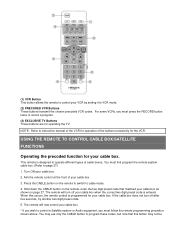
... control your cable box. 2. USING THE REMOTE TO CONTROL CABLE BOX/SATELLITE FUNCTIONS Operating the precoded function for operating the TV. You must press the RECORD button twice to record a program. (3) EXCLUSIVE TV Buttons These buttons are for your cable box. * If you wish to VCR mode. (2) PRECODED VCR Buttons These buttons...
... control your cable box. 2. USING THE REMOTE TO CONTROL CABLE BOX/SATELLITE FUNCTIONS Operating the precoded function for operating the TV. You must press the RECORD button twice to record a program. (3) EXCLUSIVE TV Buttons These buttons are for your cable box. * If you wish to VCR mode. (2) PRECODED VCR Buttons These buttons...


