Owners Guide
Page 1
PLASMA MONITOR Operating Guide for 42HDM12 IMPORTANT SAFETY INSTRUCTIONS 1-6 IMAGE RETENTION...7 ACCESSORIES...8 HOW TO SETUP YOUR NEW HITACHI PLASMA MONITOR 9-21 HOW TO USE REMOTE CONTROL TO CONTROL YOUR PLASMA MONITOR 22-24 OSD (ON-SCREEN DISPLAY 25-29 USEFUL INFORMATION ...30-37 0
PLASMA MONITOR Operating Guide for 42HDM12 IMPORTANT SAFETY INSTRUCTIONS 1-6 IMAGE RETENTION...7 ACCESSORIES...8 HOW TO SETUP YOUR NEW HITACHI PLASMA MONITOR 9-21 HOW TO USE REMOTE CONTROL TO CONTROL YOUR PLASMA MONITOR 22-24 OSD (ON-SCREEN DISPLAY 25-29 USEFUL INFORMATION ...30-37 0
Owners Guide
Page 5
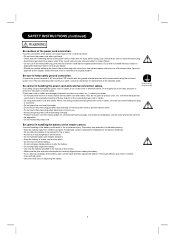
... battery. If you . • Avoid coiling the power cord and bending it can cause a fire or electrical shock. SAFETY INSTRUCTIONS (continued) Be cautious of the remote control. Avoid using the enclosed power cord. Also, do it from the power outlet to prevent electric shock. • Do not touch the power plug...
... battery. If you . • Avoid coiling the power cord and bending it can cause a fire or electrical shock. SAFETY INSTRUCTIONS (continued) Be cautious of the remote control. Avoid using the enclosed power cord. Also, do it from the power outlet to prevent electric shock. • Do not touch the power plug...
Owners Guide
Page 6
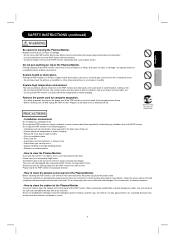
... direct rays of the PDP monitor. Never use . The heat could result in transformation, melting or fire. • Do not place the PDP monitor, the remote control and other place where there is not enough, then use harsh or abrasive cleaners. • How to clean the plasma screen panel of time...
... direct rays of the PDP monitor. Never use . The heat could result in transformation, melting or fire. • Do not place the PDP monitor, the remote control and other place where there is not enough, then use harsh or abrasive cleaners. • How to clean the plasma screen panel of time...
Owners Guide
Page 7
... the PDP monitor, check the instructions mentioned above. • Precautions for the cable connection - Any interfering radiation could invalidate the remote control. Do not use the original carton box and its packaging materials when the PDP monitor is designed to the instructions. - Use...equipment and show your resident region. - This product is transported. The antenna cable of this . Do not physically impact the remote control. Avoid radio interference. Furthermore, use makeshift stands and NEVER fix legs with the fixings provided according to comply with the ...
... the PDP monitor, check the instructions mentioned above. • Precautions for the cable connection - Any interfering radiation could invalidate the remote control. Do not use the original carton box and its packaging materials when the PDP monitor is designed to the instructions. - Use...equipment and show your resident region. - This product is transported. The antenna cable of this . Do not physically impact the remote control. Avoid radio interference. Furthermore, use makeshift stands and NEVER fix legs with the fixings provided according to comply with the ...
Owners Guide
Page 9
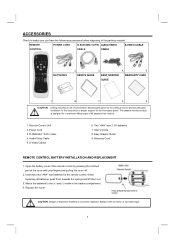
... BATTERY INSTALLATION AND REPLACEMENT 1. Insert two new "AAA" size batteries for the front glass panel. Replace the cover. REMOTE POWER CORD D-SUB MINI 15-PIN AUDIO/VIDEO S-VIDEO CABLE CONTROL CABLE CABLE BATTERIES 2. Mounting the panel on the ... does not provide adequate ventilation for the electronics or proper support for the remote control. Power Cord 3. EASY GRAPHIC WARRANTY CARD GUIDE 1. 6. 7. 8. 9. User's Guide 8. USER'S GUIDE 3. 4. 5. Open the battery cover of the remote control by pressing the notched part of the packing material. Replace with your...
... BATTERY INSTALLATION AND REPLACEMENT 1. Insert two new "AAA" size batteries for the front glass panel. Replace the cover. REMOTE POWER CORD D-SUB MINI 15-PIN AUDIO/VIDEO S-VIDEO CABLE CONTROL CABLE CABLE BATTERIES 2. Mounting the panel on the ... does not provide adequate ventilation for the electronics or proper support for the remote control. Power Cord 3. EASY GRAPHIC WARRANTY CARD GUIDE 1. 6. 7. 8. 9. User's Guide 8. USER'S GUIDE 3. 4. 5. Open the battery cover of the remote control by pressing the notched part of the packing material. Replace with your...
Owners Guide
Page 13
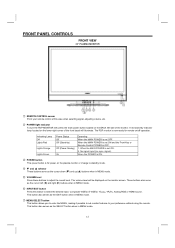
... the BACK left (W) and right (X) buttons when in MENU mode. 12 FRONT PANEL CONTROLS FRONT VIEW 42" PLASMA MONITOR ① REMOTE CONTROL sensor Point your preference without using the remote. signal). This button also serves as the cursor down (À) and up (·) buttons when in MENU mode. ⑦ MENU... This button allows you to enter the MENU, making it possible to set ON. 2. No signal input (no sync. The PDP monitor is for remote on the plasma monitor or change to standby mode. ④ À and · selector These buttons serve as the EXIT button when in MENU...
... the BACK left (W) and right (X) buttons when in MENU mode. 12 FRONT PANEL CONTROLS FRONT VIEW 42" PLASMA MONITOR ① REMOTE CONTROL sensor Point your preference without using the remote. signal). This button also serves as the cursor down (À) and up (·) buttons when in MENU mode. ⑦ MENU... This button allows you to enter the MENU, making it possible to set ON. 2. No signal input (no sync. The PDP monitor is for remote on the plasma monitor or change to standby mode. ④ À and · selector These buttons serve as the EXIT button when in MENU...
Owners Guide
Page 15
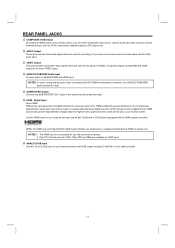
... input for recording. (If you can select Composite video source. NOTES: 1. REAR PANEL JACKS ⑨ COMPOSITE VIDEO Input By using the VIDEO button of the remote control, you have VIDEO output. ⑫ ANALOG RGB/HDMI Audio Input Connect audio for ANALOG RGB and HDMI input. The HDMI input is the next...
... input for recording. (If you can select Composite video source. NOTES: 1. REAR PANEL JACKS ⑨ COMPOSITE VIDEO Input By using the VIDEO button of the remote control, you have VIDEO output. ⑫ ANALOG RGB/HDMI Audio Input Connect audio for ANALOG RGB and HDMI input. The HDMI input is the next...
Owners Guide
Page 23
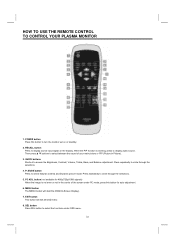
... access the Brightness, Contrast, Volume, Treble, Bass, and Balance adjustment. When the PIP function is not even or not in Picture). 3. HOW TO USE THE REMOTE CONTROL TO CONTROL YOUR PLASMA MONITOR 1. POWER button Press this button for auto adjustment. 6. SEL button Press SEL button to select the functions under PC...
... access the Brightness, Contrast, Volume, Treble, Bass, and Balance adjustment. When the PIP function is not even or not in Picture). 3. HOW TO USE THE REMOTE CONTROL TO CONTROL YOUR PLASMA MONITOR 1. POWER button Press this button for auto adjustment. 6. SEL button Press SEL button to select the functions under PC...

Owners Guide
Page 24
... mode. 13. Note: Use this mode for only 15% of your total viewing time to zoom in on the screen. English HOW TO USE THE REMOTE CONTROL TO CONTROL YOUR PLASMA MONITOR 9. ▲ ▼ W X buttons Press Up/Down/Left/Right buttons to access the composite video, S-video, Y/CB/CR, Y/PB/PR...
... mode. 13. Note: Use this mode for only 15% of your total viewing time to zoom in on the screen. English HOW TO USE THE REMOTE CONTROL TO CONTROL YOUR PLASMA MONITOR 9. ▲ ▼ W X buttons Press Up/Down/Left/Right buttons to access the composite video, S-video, Y/CB/CR, Y/PB/PR...
Owners Guide
Page 25
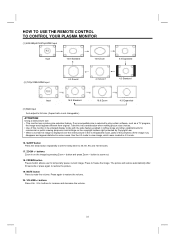
... press Zoom - button to freeze the image. MUTE button Press to restore the volume. 20. Press again to mute the volume. HOW TO USE THE REMOTE CONTROL TO CONTROL YOUR PLASMA MONITOR (1) 480i/480p/576i/576p/HDMI Input Input 16:9 Standard 16:9 Zoom 4:3 Expanded (2) 720p/1080i/HDMI Input 4:3 Zoom2 4:3 Zoom1 4:3 Standard...
... press Zoom - button to freeze the image. MUTE button Press to restore the volume. 20. Press again to mute the volume. HOW TO USE THE REMOTE CONTROL TO CONTROL YOUR PLASMA MONITOR (1) 480i/480p/576i/576p/HDMI Input Input 16:9 Standard 16:9 Zoom 4:3 Expanded (2) 720p/1080i/HDMI Input 4:3 Zoom2 4:3 Zoom1 4:3 Standard...
Owners Guide
Page 26
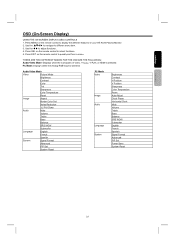
...Audio/Video Mode: Displays when the Composite, S-video, Y-CBCR, Y-PBPR or HDMI is selected. Press EXIT on the remote control to display the different features on your HITACHI Plasma Monitor. 2. Audio/Video Mode Video Picture Mode Brightness Contrast Color Tint Sharpness Color Temperature Reset Image Aspect Border Color ... PIP Set Power Save System Reset 25 Use the ·ÀW X to navigate to adjust functions. 4. Press MENU on the remote control to select functions. 5. English Français OSD (On-Screen Display) USING THE ON-SCREEN DISPLAY (OSD) CONTROLS 1.
...Audio/Video Mode: Displays when the Composite, S-video, Y-CBCR, Y-PBPR or HDMI is selected. Press EXIT on the remote control to display the different features on your HITACHI Plasma Monitor. 2. Audio/Video Mode Video Picture Mode Brightness Contrast Color Tint Sharpness Color Temperature Reset Image Aspect Border Color ... PIP Set Power Save System Reset 25 Use the ·ÀW X to navigate to adjust functions. 4. Press MENU on the remote control to select functions. 5. English Français OSD (On-Screen Display) USING THE ON-SCREEN DISPLAY (OSD) CONTROLS 1.
Owners Guide
Page 31
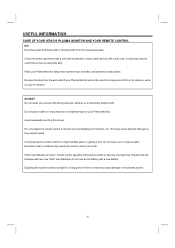
.... Do not place rubber or vinyl products or cellophane tape on vacation. DO NOT Do not clean your Plasma Monitor. Avoid placing the remote control in warm water and dry with a soft cloth moistened in a high humidity place or getting it wet. When the batteries run down... heat or moisture may be used if the screen is extremely dirty. Avoid repeatedly touching the screen. USEFUL INFORMATION CARE OF YOUR HITACHI PLASMA MONITOR AND YOUR REMOTE CONTROL DO Dust the screen and frame with strong cleaners, polishes or a chemically treated cloth. This may cause damage to direct ...
.... Do not place rubber or vinyl products or cellophane tape on vacation. DO NOT Do not clean your Plasma Monitor. Avoid placing the remote control in warm water and dry with a soft cloth moistened in a high humidity place or getting it wet. When the batteries run down... heat or moisture may be used if the screen is extremely dirty. Avoid repeatedly touching the screen. USEFUL INFORMATION CARE OF YOUR HITACHI PLASMA MONITOR AND YOUR REMOTE CONTROL DO Dust the screen and frame with strong cleaners, polishes or a chemically treated cloth. This may cause damage to direct ...
Owners Guide
Page 36
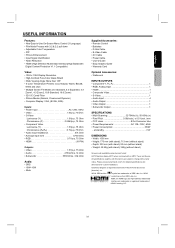
...• Audio 470mVrms, 1k Ohm • Subwoofer 500mVrms, 3.8k Ohm Audio: • SRS • 10W+10W • Mute Supplied Accessories: • Remote Control • Batteries • D-Sub Cable • S-Video Cable • AV Cable • Power Cable • User's Guide • Easy Graphic ... or registered trademarks of HDMI Licensing LLC. 35 UltraVision Digital is incorporated under license from SRS Labs, Inc. Please access www.hitachi.com/tv for detailed specifications and dimensions for Consumer Use • Power Requirements AC 108~132V, 60Hz • Power Consumption ...
...• Audio 470mVrms, 1k Ohm • Subwoofer 500mVrms, 3.8k Ohm Audio: • SRS • 10W+10W • Mute Supplied Accessories: • Remote Control • Batteries • D-Sub Cable • S-Video Cable • AV Cable • Power Cable • User's Guide • Easy Graphic ... or registered trademarks of HDMI Licensing LLC. 35 UltraVision Digital is incorporated under license from SRS Labs, Inc. Please access www.hitachi.com/tv for detailed specifications and dimensions for Consumer Use • Power Requirements AC 108~132V, 60Hz • Power Consumption ...


