Owners Guide
Page 2
...resulting in the design of cable 2 blades with the cart, stand, tripod, bracket, or table specified by the manufacturer. 17. proper grounding and, in the vicinity of the cabinet which will enable HITACHI to you promptly in your product model. A grounding type plug...with a dry cloth. 7. replacement of important operating and maintenance (servicing) instructions in accordance with respect to the proper operation of HITACHI LCD televisions. Follow instructions for tilt and stability. Do not install near water. 6. If the provided plug does not fit into apparatus...
...resulting in the design of cable 2 blades with the cart, stand, tripod, bracket, or table specified by the manufacturer. 17. proper grounding and, in the vicinity of the cabinet which will enable HITACHI to you promptly in your product model. A grounding type plug...with a dry cloth. 7. replacement of important operating and maintenance (servicing) instructions in accordance with respect to the proper operation of HITACHI LCD televisions. Follow instructions for tilt and stability. Do not install near water. 6. If the provided plug does not fit into apparatus...
Owners Guide
Page 4
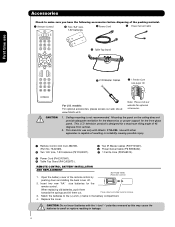
... please access our web site at: www.hitachi.us/tv Note: Please visit our website for the ...BOTTOM VIEW (Remote Control) pushing down and slide back to the (+) and (-) marks in leakage. 4 When replacing old batteries, push them towards the springs and lift them out. This LCD television ...(P# EW08432). ¶ 1 Ferrite Core (P#2169513). » Power Cord (P# EV01841). ¿ Table Top Stand (P# QJ02673 ). Replace the cover. Use with Hitachi 37HLX99. Accessories Check to swell or rupture resulting in the battery compartment. 4. Press down and sliding the back cover...
... please access our web site at: www.hitachi.us/tv Note: Please visit our website for the ...BOTTOM VIEW (Remote Control) pushing down and slide back to the (+) and (-) marks in leakage. 4 When replacing old batteries, push them towards the springs and lift them out. This LCD television ...(P# EW08432). ¶ 1 Ferrite Core (P#2169513). » Power Cord (P# EV01841). ¿ Table Top Stand (P# QJ02673 ). Replace the cover. Use with Hitachi 37HLX99. Accessories Check to swell or rupture resulting in the battery compartment. 4. Press down and sliding the back cover...
Owners Guide
Page 5
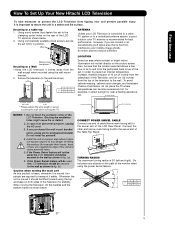
...in fig. (b). A B A 37" 4 in. 10 cm B 12 in. 30 cm LOCATION Select an area where sunlight or bright indoor illumination will not fall directly on the rear of the LCD TV stand as shown in position. If you are required to transport it safely. C C D D 37" 10.59 in. 13.93 in... of the set failure, do not place the TV where temperatures can become excessively hot, for example, in . 27 cm 36 cm 37" 5 First time use How To Set Up Your New Hitachi LCD Television To take measures to prevent the LCD Television from tipping over and prevent possible injury it...
...in fig. (b). A B A 37" 4 in. 10 cm B 12 in. 30 cm LOCATION Select an area where sunlight or bright indoor illumination will not fall directly on the rear of the LCD TV stand as shown in position. If you are required to transport it safely. C C D D 37" 10.59 in. 13.93 in... of the set failure, do not place the TV where temperatures can become excessively hot, for example, in . 27 cm 36 cm 37" 5 First time use How To Set Up Your New Hitachi LCD Television To take measures to prevent the LCD Television from tipping over and prevent possible injury it...

Owners Guide
Page 6
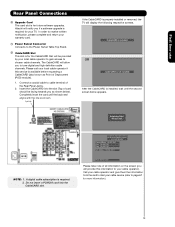
... separate the TV from the STAND BASE. 3 SCREWS STAND PLATE METAL 4 SCREWS PLACE BACK THIS SCREW TV STAND BASE NOTE: Use the specified WALL MOUNT base for your TV. Please access our web site at: www.hitachi.us/tv for recommended accessories for the LCD TV depending on the back of your tv. 6 How to set up your new HITACHI LCD Television SETTING...
... separate the TV from the STAND BASE. 3 SCREWS STAND PLATE METAL 4 SCREWS PLACE BACK THIS SCREW TV STAND BASE NOTE: Use the specified WALL MOUNT base for your TV. Please access our web site at: www.hitachi.us/tv for recommended accessories for the LCD TV depending on the back of your tv. 6 How to set up your new HITACHI LCD Television SETTING...

Owners Guide
Page 8
...should use Hook-up Cables and Connectors Most video/audio connections between components can be connected to an antenna adapter (300-Ohm to control your LCD Television when using other devices. AUDIO OUT 3.8mm STEREO MINI-PLUG 2 RCA TYPE PLUGS 8 Stereo Cable (3.8mm plug to 3.5mm plug)...on the television. A /V Cable Used on all standard video and audio cable which connect to the TV's HDMI input. Power Swivel Cable (Provided) This cable is used to connect the swivel stand to produce a high quality picture. HDMI Cable This cable is used to connect your digital camera ...
...should use Hook-up Cables and Connectors Most video/audio connections between components can be connected to an antenna adapter (300-Ohm to control your LCD Television when using other devices. AUDIO OUT 3.8mm STEREO MINI-PLUG 2 RCA TYPE PLUGS 8 Stereo Cable (3.8mm plug to 3.5mm plug)...on the television. A /V Cable Used on all standard video and audio cable which connect to the TV's HDMI input. Power Swivel Cable (Provided) This cable is used to connect the swivel stand to produce a high quality picture. HDMI Cable This cable is used to connect your digital camera ...

Owners Guide
Page 10
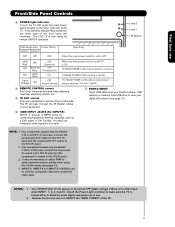
...mode. ቨ POWER button Television MAIN POWER button This power button is for reference). ብ INPUT/EXIT button Press this button to turn the LCD Television ON/OFF. Thread the square hole with an HDMI output connection (see page 15 for the complete system, and must be displayed on the... underside of the TV screen. NOTE: When the "MAIN POWER" button is unplugged, the clock will be at stand-by remote control. Hook the band to the claw. ባ MENU/SELECT button This button allows you...
...mode. ቨ POWER button Television MAIN POWER button This power button is for reference). ብ INPUT/EXIT button Press this button to turn the LCD Television ON/OFF. Thread the square hole with an HDMI output connection (see page 15 for the complete system, and must be displayed on the... underside of the TV screen. NOTE: When the "MAIN POWER" button is unplugged, the clock will be at stand-by remote control. Hook the band to the claw. ባ MENU/SELECT button This button allows you...
Owners Guide
Page 11
... video input. When the main power switch is ON ; In this case, connect the component CB output to the TV's PB input and the component CR output to view your equipment's remote control at this area. First time use Front/Side Panel Controls ቩ POWER light indicator To ...labeled Y, B-Y, and R-Y. NOTE: 1. Your HITACHI LCD TV will pass through the IR Blaster cables to your equipment. ቭ PHOTO INPUT Insert USB cable from your Digital Camera, USB memory or memory card USB drive to the TV's PR input. 3. Lights Red Off Off Blinking Blue OFF. (Stand-by) OFF. (Turning ON ) Off ...
... video input. When the main power switch is ON ; In this case, connect the component CB output to the TV's PB input and the component CR output to view your equipment's remote control at this area. First time use Front/Side Panel Controls ቩ POWER light indicator To ...labeled Y, B-Y, and R-Y. NOTE: 1. Your HITACHI LCD TV will pass through the IR Blaster cables to your equipment. ቭ PHOTO INPUT Insert USB cable from your Digital Camera, USB memory or memory card USB drive to the TV's PR input. 3. Lights Red Off Off Blinking Blue OFF. (Stand-by) OFF. (Turning ON ) Off ...
Owners Guide
Page 13
... OR CableCARD is not installed After the CableCARD is properly installed or removed, the TV will allow you to page 67 for future software upgrades. Acquiring Data. Call your...In order to start your cable service (refer to tune digital and high definition cable channels. Hitachi will be facing towards you if a software upgrade is required for this device, please contact... your warranty card. ቭ Power Swivel Connector Connects to the Power Swivel Table Top Stand. ቮ CableCARD Slot This slot is available before requesting a CableCARD (also known as Point...
... OR CableCARD is not installed After the CableCARD is properly installed or removed, the TV will allow you to page 67 for future software upgrades. Acquiring Data. Call your...In order to start your cable service (refer to tune digital and high definition cable channels. Hitachi will be facing towards you if a software upgrade is required for this device, please contact... your warranty card. ቭ Power Swivel Connector Connects to the Power Swivel Table Top Stand. ቮ CableCARD Slot This slot is available before requesting a CableCARD (also known as Point...
Owners Guide
Page 42
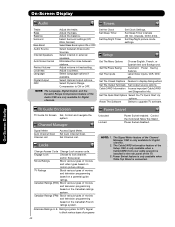
... Inputs, VCR, DVD, etc. Set The Output Terminals Set Output source options. Reset The Software Select to ON or OFF. TV Guide On Screen TV Guide On Screen Set, Control and navigate the system Channel Manager Power Swivel Unlocked Locked Power Swivel enabled. Signal Meter Auto Channel Scan... types of the Channel Manager OSD is only available for Digital channels. Power Swivel feature is only available when Table Top Stand is installed in fixed setting. CableCARD Information Access important CableCARD and Diagnostics info. Set Channel List. Movie Ratings Block various types of ...
... Inputs, VCR, DVD, etc. Set The Output Terminals Set Output source options. Reset The Software Select to ON or OFF. TV Guide On Screen TV Guide On Screen Set, Control and navigate the system Channel Manager Power Swivel Unlocked Locked Power Swivel enabled. Signal Meter Auto Channel Scan... types of the Channel Manager OSD is only available for Digital channels. Power Swivel feature is only available when Table Top Stand is installed in fixed setting. CableCARD Information Access important CableCARD and Diagnostics info. Set Channel List. Movie Ratings Block various types of ...

Owners Guide
Page 69
... Power Swivel This feature controls the motorized stand. Use the CURSOR PAD ̇ or ̈ to the right. 3. The Power Swivel has a maximum turning radius of the monitor when using the power swivel feature. On-Screen Display 69 Reset TV Settings : Select "Yes" to return...). Press the SELECT button or CURSOR PAD ̈ to stop rotation. This feature is only available when the Table Top Stand is disabled. Video Audio TV Guide On Screen Channel Manager Locks Timers Setup Power Swivel Move SEL Select or Power Swivel Select SEL Return Locked NOTE: 1....
... Power Swivel This feature controls the motorized stand. Use the CURSOR PAD ̇ or ̈ to the right. 3. The Power Swivel has a maximum turning radius of the monitor when using the power swivel feature. On-Screen Display 69 Reset TV Settings : Select "Yes" to return...). Press the SELECT button or CURSOR PAD ̈ to stop rotation. This feature is only available when the Table Top Stand is disabled. Video Audio TV Guide On Screen Channel Manager Locks Timers Setup Power Swivel Move SEL Select or Power Swivel Select SEL Return Locked NOTE: 1....

Owners Guide
Page 75
... Control • Batteries (AA) • 6' AC Power cord cable • Table Top Stand • IR Blaster Cables • Power Swivel Cable • Ferrite Core Optional Accessories: &#... registered trademark of the LCD Television Receiver • Antenna input impedance 75 Ohm • Channel coverage 191ch. Models: Please access our website: www.hitachi.us/tv INPUTS/OUTPUTS • ...• Technology • TV Guide On ScreenTM Video: • 1366 x 768 Display Resolution • IPS (In-Plane Switching Technology) • • Wide Viewing Angle: More than 160&#...
... Control • Batteries (AA) • 6' AC Power cord cable • Table Top Stand • IR Blaster Cables • Power Swivel Cable • Ferrite Core Optional Accessories: &#... registered trademark of the LCD Television Receiver • Antenna input impedance 75 Ohm • Channel coverage 191ch. Models: Please access our website: www.hitachi.us/tv INPUTS/OUTPUTS • ...• Technology • TV Guide On ScreenTM Video: • 1366 x 768 Display Resolution • IPS (In-Plane Switching Technology) • • Wide Viewing Angle: More than 160&#...

Owners Guide
Page 76
H 14-1/4 362.7 I K LM D E J H G F N Units Inches MM A 37-3/8 949.4 B 2-1/2 62.9 C 2-1/2 62.9 D 28-9/16 725.7 E 26-3/16 664.3 F 19-1/8 485.3 G 16-11/16 424.1. Set Dimensions 37 Inch Models (Includes Table Top Stand) Weight (lbs./kg): 63.9/29 A B C I 32-7/16 823.6 J 18-5/16 464.8 K 4-3/4 120.9 L MN 3/4 3-15/16 14-3/8 20.2 100.7 365 Useful Information 76
H 14-1/4 362.7 I K LM D E J H G F N Units Inches MM A 37-3/8 949.4 B 2-1/2 62.9 C 2-1/2 62.9 D 28-9/16 725.7 E 26-3/16 664.3 F 19-1/8 485.3 G 16-11/16 424.1. Set Dimensions 37 Inch Models (Includes Table Top Stand) Weight (lbs./kg): 63.9/29 A B C I 32-7/16 823.6 J 18-5/16 464.8 K 4-3/4 120.9 L MN 3/4 3-15/16 14-3/8 20.2 100.7 365 Useful Information 76


