
Owners Guide
Page 13
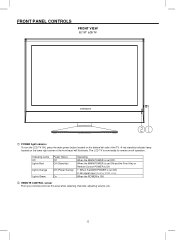
A red stand-by ) Off (Power Saving) On Operating When the MAIN POWER is set OFF. FRONT PANEL CONTROLS FRONT VIEW 32"/37" LCD TV ① POWER light indicator To turn the LCD TV ON, press the main power button located on the bottom left side of the front bezel will illuminate. When the MAIN ...POWER is set ON. 2. The LCD TV is Off. 1. Indicating Lamp Off Lights Red Lights Orange Lights Green Power Status Off ...
A red stand-by ) Off (Power Saving) On Operating When the MAIN POWER is set OFF. FRONT PANEL CONTROLS FRONT VIEW 32"/37" LCD TV ① POWER light indicator To turn the LCD TV ON, press the main power button located on the bottom left side of the front bezel will illuminate. When the MAIN ...POWER is set ON. 2. The LCD TV is Off. 1. Indicating Lamp Off Lights Red Lights Orange Lights Green Power Status Off ...

Owners Guide
Page 14
... Analog RGB or DVI source. English SIDE PANEL CONTROLS SIDE VIEW 32"/37" LCD TV ③ ④ ⑤ ⑥ ⑦ ③ POWER button This power button is for power on the TV screen. The volume level will be displayed on the LCD television or change to standby mode. ④ CHANNEL selector Press... these buttons to your preference without using the remote. This button also serves as the cursor left corner of the TV screen. These buttons also serve as the EXIT...
... Analog RGB or DVI source. English SIDE PANEL CONTROLS SIDE VIEW 32"/37" LCD TV ③ ④ ⑤ ⑥ ⑦ ③ POWER button This power button is for power on the TV screen. The volume level will be displayed on the LCD television or change to standby mode. ④ CHANNEL selector Press... these buttons to your preference without using the remote. This button also serves as the cursor left corner of the TV screen. These buttons also serve as the EXIT...

Owners Guide
Page 15
Note : It is required that there should be turned ON/OFF manually. between Main Power button off then on 120VOLTS 60Hz AC current. It is recommended to leave the "MAIN POWER" to operate on . 14 Insert the TV power cord into a 120VOLTS 60Hz outlet. ①-1 Main power button: This power button is for stand-by mode. REAR PANEL MAIN POWER SWITCH & AC INPUT 32"/37" LCD TV ① AC IN input This TV is designed to "ON" condition (lights red) for the complete system, and must be at least 5sec.
Note : It is required that there should be turned ON/OFF manually. between Main Power button off then on 120VOLTS 60Hz AC current. It is recommended to leave the "MAIN POWER" to operate on . 14 Insert the TV power cord into a 120VOLTS 60Hz outlet. ①-1 Main power button: This power button is for stand-by mode. REAR PANEL MAIN POWER SWITCH & AC INPUT 32"/37" LCD TV ① AC IN input This TV is designed to "ON" condition (lights red) for the complete system, and must be at least 5sec.
Owners Guide
Page 16
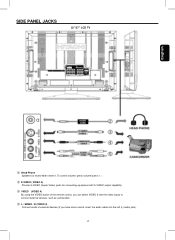
SIDE PANEL JACKS 32"/37" LCD TV English ② Head Phone Speakers is muted when insert it .To control volume: press volume button +, -. ③ S-VIDEO ( VIDEO 4) Provide S-VIDEO (Super Video) jacks for connecting equipment with S-VIDEO output capability ④ VIDEO (VIDEO 4) By using the VIDEO button of the remote control, you can select VIDEO 4.Use the video inputs to connect external devices, such as camcorders. ⑤ L / MONO / R (VIDEO 4) Connect audio of external devices.(if you have mono sound, insert the audio cable into the left (L) audio jack). 15
SIDE PANEL JACKS 32"/37" LCD TV English ② Head Phone Speakers is muted when insert it .To control volume: press volume button +, -. ③ S-VIDEO ( VIDEO 4) Provide S-VIDEO (Super Video) jacks for connecting equipment with S-VIDEO output capability ④ VIDEO (VIDEO 4) By using the VIDEO button of the remote control, you can select VIDEO 4.Use the video inputs to connect external devices, such as camcorders. ⑤ L / MONO / R (VIDEO 4) Connect audio of external devices.(if you have mono sound, insert the audio cable into the left (L) audio jack). 15

Owners Guide
Page 26
5.This LCD Television can automatically detect and display the signal format as below. Recommended Signal List No. Signal Name 1 VGA 2 VESA 3 VESA 4 VESA 5 VESA 6 1080i 7 720p 8 480p Resolution 640 x 480 800 x 600 800 x 600 1024 x 768 Signal Mode Vertical Frequency (Hz) 59.94 56.25 60.32 60.00 1280 x 768 60.00 1080 59.94 720 59.94 480 59.94 Horizontal Frequency (kHz) 31.47 35.16 37.88 48.36 47.73 33.72 44.96 31.47 English 25
5.This LCD Television can automatically detect and display the signal format as below. Recommended Signal List No. Signal Name 1 VGA 2 VESA 3 VESA 4 VESA 5 VESA 6 1080i 7 720p 8 480p Resolution 640 x 480 800 x 600 800 x 600 1024 x 768 Signal Mode Vertical Frequency (Hz) 59.94 56.25 60.32 60.00 1280 x 768 60.00 1080 59.94 720 59.94 480 59.94 Horizontal Frequency (kHz) 31.47 35.16 37.88 48.36 47.73 33.72 44.96 31.47 English 25

Owners Guide
Page 35
...OSD menu. Channel List Display memorize channel, add and delete See "Setting Up The TV Channels" channels on page 36. (Not available for Video signal) Require a password to be entered to view V-Chip movies and TV programs with unsuitable ratings See "Setting up the V-chip" on page for some ...Not available for the OSD. - Manual Tuning If the channel reception is poor, fine tune the See "Setting up the Closed Caption" on program page 37. 34 Please press "o" to erase the password. Then, selecting "initial setup" turn on page 36. English Language Set the language for Video signal)...
...OSD menu. Channel List Display memorize channel, add and delete See "Setting Up The TV Channels" channels on page 36. (Not available for Video signal) Require a password to be entered to view V-Chip movies and TV programs with unsuitable ratings See "Setting up the V-chip" on page for some ...Not available for the OSD. - Manual Tuning If the channel reception is poor, fine tune the See "Setting up the Closed Caption" on program page 37. 34 Please press "o" to erase the password. Then, selecting "initial setup" turn on page 36. English Language Set the language for Video signal)...

Owners Guide
Page 38
... bring up the OSD menu. 3. Use the W X buttons to manual adjust: 1. Use the following steps to fine tune the program. 6. Press the SEL button to view the options. 4. Use the ▲▼ buttons to highlight the Initial Setup function, and then press the SEL button to add or erase the current... the adjustment. 5. English 4. Press the EXIT button on your remote control to return to highlight Add or Erase. Use the▲▼ W X buttons to your TV display. 37 With the fine tune function , you can tune in each channel precisely which has poor picture.
... bring up the OSD menu. 3. Use the W X buttons to manual adjust: 1. Use the following steps to fine tune the program. 6. Press the SEL button to view the options. 4. Use the ▲▼ buttons to highlight the Initial Setup function, and then press the SEL button to add or erase the current... the adjustment. 5. English 4. Press the EXIT button on your remote control to return to highlight Add or Erase. Use the▲▼ W X buttons to your TV display. 37 With the fine tune function , you can tune in each channel precisely which has poor picture.
