Owners Guide
Page 1
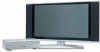
... USE 4-23 THE REMOTE CONTROL 24-39 ON-SCREEN DISPLAY USING THE RGB INPUT OF THE PLASMA TV 40-63 64-74 USEFUL INFORMATION INDEX 75-82 PLASMA TELEVISION AVC (Audio/Video Control Center) & Plasma Display Monitor 32HDT20 42HDT20 OPERATING GUIDE Video Audio Ch. Manager Locks Setup Move SEL Sel STB POWER TV CBL...
... USE 4-23 THE REMOTE CONTROL 24-39 ON-SCREEN DISPLAY USING THE RGB INPUT OF THE PLASMA TV 40-63 64-74 USEFUL INFORMATION INDEX 75-82 PLASMA TELEVISION AVC (Audio/Video Control Center) & Plasma Display Monitor 32HDT20 42HDT20 OPERATING GUIDE Video Audio Ch. Manager Locks Setup Move SEL Sel STB POWER TV CBL...

Owners Guide
Page 2
...the AVC center/display monitor. • Model and serial numbers are indicated on the quality, performance, and ease of service of HITACHI Plasma Televisions. CAUTION: Never remove the back cover of important operating and maintenance (servicing) instructions in the literature accompanying the appliance. ... THE AVC CENTER AND DISPLAY MONITOR POWER CORD INTO A 120 VOLT 60Hz OUTLET. IMPORTANT SAFETY POINTS YOU SHOULD KNOW ABOUT YOUR HITACHI PLASMA TELEVISION Our reputation has been built on back side of the AVC center/display monitor. Please fill out your authorized dealer or...
...the AVC center/display monitor. • Model and serial numbers are indicated on the quality, performance, and ease of service of HITACHI Plasma Televisions. CAUTION: Never remove the back cover of important operating and maintenance (servicing) instructions in the literature accompanying the appliance. ... THE AVC CENTER AND DISPLAY MONITOR POWER CORD INTO A 120 VOLT 60Hz OUTLET. IMPORTANT SAFETY POINTS YOU SHOULD KNOW ABOUT YOUR HITACHI PLASMA TELEVISION Our reputation has been built on back side of the AVC center/display monitor. Please fill out your authorized dealer or...
Owners Guide
Page 4
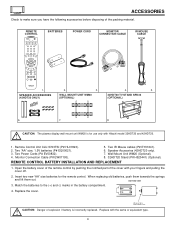
SPEAKER ACCESSORIES (42HDT20 ONLY) WALL MOUNT UNIT WM20 (OPTIONAL) 32HDT20 TV STAND SPD32 (OPTIONAL) 6. 7. 8. CAUTION: The plasma display wall mount unit WM20 is incorrectly replaced. Two IR Mouse cables (P# EY01641). 6. Insert two new "AA" size batteries for use only with Hitachi model 32HDT20 and 42HDT20. 1. BOTTOM VIEW 3. Two Power Cords (P# EV00832). 4. When replacing old batteries...
SPEAKER ACCESSORIES (42HDT20 ONLY) WALL MOUNT UNIT WM20 (OPTIONAL) 32HDT20 TV STAND SPD32 (OPTIONAL) 6. 7. 8. CAUTION: The plasma display wall mount unit WM20 is incorrectly replaced. Two IR Mouse cables (P# EY01641). 6. Insert two new "AA" size batteries for use only with Hitachi model 32HDT20 and 42HDT20. 1. BOTTOM VIEW 3. Two Power Cords (P# EV00832). 4. When replacing old batteries...
Owners Guide
Page 5
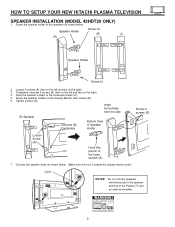
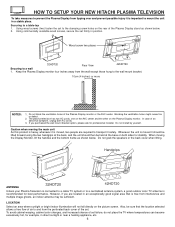
HOW TO SETUP YOUR NEW HITACHI PLASMA TELEVISION SPEAKER INSTALLATION (MODEL 42HDT20 ONLY) 1. Completely unscrew 4 screws (B) (two on the left and two on the right). 4. Tighten screws (A). Hook the speaker holders to ...the Display Monitor with screws (B). 6. Speaker Holder Screw x2 (R) (L) (R) Speaker Holder Screw x2 2. Insert horizontally from the side (R) Speaker Unscrew (B) Completely Bottom View of the Plasma TV and an external amplifier. 5 Connect the speaker wires as shown below . (Make sure the core is toward the display monitor side.) Core NOTES: Do...
HOW TO SETUP YOUR NEW HITACHI PLASMA TELEVISION SPEAKER INSTALLATION (MODEL 42HDT20 ONLY) 1. Completely unscrew 4 screws (B) (two on the left and two on the right). 4. Tighten screws (A). Hook the speaker holders to ...the Display Monitor with screws (B). 6. Speaker Holder Screw x2 (R) (L) (R) Speaker Holder Screw x2 2. Insert horizontally from the side (R) Speaker Unscrew (B) Completely Bottom View of the Plasma TV and an external amplifier. 5 Connect the speaker wires as shown below . (Make sure the core is toward the display monitor side.) Core NOTES: Do...
Owners Guide
Page 6
... moving the main unit As this product is heavy, whenever it is moved, two people are located in a stable place. Handgrips ANTENNA 32HDT20 42HDT20 Unless your Plasma Television is connected to a cable TV system or to a centralized antenna system, a good outdoor color TV antenna is recommended for professional ... monitor. Do not grab the speakers or the back cover when lifting. HOW TO SETUP YOUR NEW HITACHI PLASMA TELEVISION To take measures to prevent the Plasma Display from tipping over and prevent possible injury it is important to mount the unit in an exceptionally good signal area...
... moving the main unit As this product is heavy, whenever it is moved, two people are located in a stable place. Handgrips ANTENNA 32HDT20 42HDT20 Unless your Plasma Television is connected to a cable TV system or to a centralized antenna system, a good outdoor color TV antenna is recommended for professional ... monitor. Do not grab the speakers or the back cover when lifting. HOW TO SETUP YOUR NEW HITACHI PLASMA TELEVISION To take measures to prevent the Plasma Display from tipping over and prevent possible injury it is important to mount the unit in an exceptionally good signal area...
Owners Guide
Page 7
... discharge of the room. The phosphor has a finite illumination life. HOW TO SET UP YOUR NEW HITACHI PLASMA TELEVISION VIEWING The major benefit of the HITACHI Plasma Television is prohibited. Points that do not light, points with brightness different from that of transportation, horizontal...extent that part of the screen as monochrome characters and graphic patterns, for a period of more than a Cathode-ray-tube. 6 Plasma Surface The plasma panel is not a malfunction. 4 Picture Image (Spectrum) When receving still picture signals, (e.g. At the time of the periphery, etc...
... discharge of the room. The phosphor has a finite illumination life. HOW TO SET UP YOUR NEW HITACHI PLASMA TELEVISION VIEWING The major benefit of the HITACHI Plasma Television is prohibited. Points that do not light, points with brightness different from that of transportation, horizontal...extent that part of the screen as monochrome characters and graphic patterns, for a period of more than a Cathode-ray-tube. 6 Plasma Surface The plasma panel is not a malfunction. 4 Picture Image (Spectrum) When receving still picture signals, (e.g. At the time of the periphery, etc...
Owners Guide
Page 8
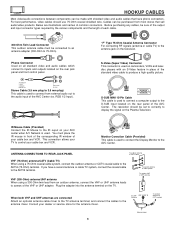
... used to connect from most stores that have a second antenna or cable TV system, connect the coaxial cable to inputs and outputs located on the Plasma Television. "F" Type 75-Ohm Coaxial Antenna Connector For connecting RF signals (antenna or cable TV) to the D-SUB input located on camcorders, VCRs and laserdisc...
... used to connect from most stores that have a second antenna or cable TV system, connect the coaxial cable to inputs and outputs located on the Plasma Television. "F" Type 75-Ohm Coaxial Antenna Connector For connecting RF signals (antenna or cable TV) to the D-SUB input located on camcorders, VCRs and laserdisc...
Owners Guide
Page 10
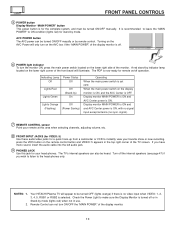
... display monitor. 10 If you wish to listen to make sure the Display Monitor is ON. The TV's internal speakers can be heard. NOTES: 1. 2. Your HITACHI Plasma TV will only turn ON/OFF the "MAIN POWER" of the front bezel will illuminate. Display monitor MAIN POWER is ON and and AVC Center...
... display monitor. 10 If you wish to listen to make sure the Display Monitor is ON. The TV's internal speakers can be heard. NOTES: 1. 2. Your HITACHI Plasma TV will only turn ON/OFF the "MAIN POWER" of the front bezel will illuminate. Display monitor MAIN POWER is ON and and AVC Center...
Owners Guide
Page 12
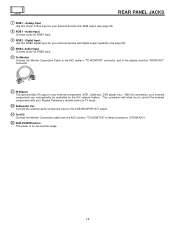
... (see page 22). ቫ RGB2- With this 15-pin D-Sub input for serviceman usage. 12 Analog Input Use this connection, your external devices with your Plasma Television's remote control in TV mode. ቯ Subwoofer Out Connect the external audio component input to this RGB2 Digital input for RGB2 input. ቭ To...
... (see page 22). ቫ RGB2- With this 15-pin D-Sub input for serviceman usage. 12 Analog Input Use this connection, your external devices with your Plasma Television's remote control in TV mode. ቯ Subwoofer Out Connect the external audio component input to this RGB2 Digital input for RGB2 input. ቭ To...
Owners Guide
Page 13
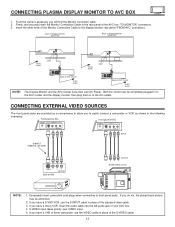
...their own AC Power. S-VIDEO input takes priority over VIDEO input. 5. Insert the other ends of your AVC box. 4. Back of Display Monitor 32HDT20 Back of Display Monitor 42HDT20 To AC outlet Core ANT A TO CONVERTER ANT B MONITOR OUT S-VIDEO INPUT 4 S-VIDEO INPUT 3 S-VIDEO VIDEO ...in place of AVC PHONES INPUT 5 PHONES INPUT 5 S-VIDEO VIDEO L/(MONO) R AUDIO S-VIDEO VIDEO L/(MONO) R AUDIO NOTE: 1. CONNECTING PLASMA DISPLAY MONITOR TO AVC BOX 1. CONNECTING EXTERNAL VIDEO SOURCES The front panel jacks are provided as a convenience to allow you will find the Monitor ...
...their own AC Power. S-VIDEO input takes priority over VIDEO input. 5. Insert the other ends of your AVC box. 4. Back of Display Monitor 32HDT20 Back of Display Monitor 42HDT20 To AC outlet Core ANT A TO CONVERTER ANT B MONITOR OUT S-VIDEO INPUT 4 S-VIDEO INPUT 3 S-VIDEO VIDEO ...in place of AVC PHONES INPUT 5 PHONES INPUT 5 S-VIDEO VIDEO L/(MONO) R AUDIO S-VIDEO VIDEO L/(MONO) R AUDIO NOTE: 1. CONNECTING PLASMA DISPLAY MONITOR TO AVC BOX 1. CONNECTING EXTERNAL VIDEO SOURCES The front panel jacks are provided as a convenience to allow you will find the Monitor ...
Owners Guide
Page 14
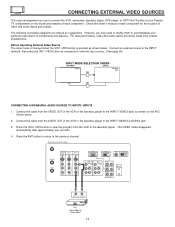
...) L PR PR R R AUDIO R L AUDIOR L AUDIOR L AUDIO OUT IR BLASTER AUDIO OUT VIDEO OUT VCR Hitachi Model or Similar Model 14 CONNECTING EXTERNAL VIDEO SOURCES The exact arrangement you may need to modify them to accommodate your Plasma TV is pressed as suggestions. Press the VID2~VID5 button to the INPUT (MONO)/L(AUDIO...
...) L PR PR R R AUDIO R L AUDIOR L AUDIOR L AUDIO OUT IR BLASTER AUDIO OUT VIDEO OUT VCR Hitachi Model or Similar Model 14 CONNECTING EXTERNAL VIDEO SOURCES The exact arrangement you may need to modify them to accommodate your Plasma TV is pressed as suggestions. Press the VID2~VID5 button to the INPUT (MONO)/L(AUDIO...

Owners Guide
Page 18
...OUT IR BLASTER RL INPUT To Audio Input Terminal of External Amplifier Stereo System Amplifier The MONITOR OUT terminal outputs video and audio of the Plasma TV to INPUT2, no monitor out is a fixed output. If a component device is input to an external audio amplifier, connect the... system as shown below. Rear Panel of the amplifier is controlled by the amplifier, not by the Plasma Television. The AUDIO OUT terminal outputs all audio sources (ANT A/B, INPUT 1~5 and RGB 1/2). The Volume of AVC Center ANT A TO CONVERTER ANT ...
...OUT IR BLASTER RL INPUT To Audio Input Terminal of External Amplifier Stereo System Amplifier The MONITOR OUT terminal outputs video and audio of the Plasma TV to INPUT2, no monitor out is a fixed output. If a component device is input to an external audio amplifier, connect the... system as shown below. Rear Panel of the amplifier is controlled by the amplifier, not by the Plasma Television. The AUDIO OUT terminal outputs all audio sources (ANT A/B, INPUT 1~5 and RGB 1/2). The Volume of AVC Center ANT A TO CONVERTER ANT ...

Owners Guide
Page 19
...an A/V Network setup between your Hitachi Plasma Television and external Audio/Video equipment (VCR and DVD Player). CONNECTING A/V NETWORK Your Hitachi Plasma Television is setup, it allows your IR Mouse connector to control your equipment using your Hitachi Plasma TV Remote Control. This feature helps... to enter component's "SOFT KEY" control button. The Plasma Television AVC Center has 2 IR...
...an A/V Network setup between your Hitachi Plasma Television and external Audio/Video equipment (VCR and DVD Player). CONNECTING A/V NETWORK Your Hitachi Plasma Television is setup, it allows your IR Mouse connector to control your equipment using your Hitachi Plasma TV Remote Control. This feature helps... to enter component's "SOFT KEY" control button. The Plasma Television AVC Center has 2 IR...

Owners Guide
Page 24
... Monitor and press the TV button. The DVD button will blink, indicating that the remote will now control your set-top-box. To operate your Plasma TV, point the remote control at the remote sensor of the component you wish to control and press the CD, TAPE or AMP button. Basic... 2 VID 1 PIP FREEZE VID 3 PIP CH PIP ACCESS VIDEO SWAP PIP MODE REC CLU-5723TSI REMOTE In addition to controlling all the functions on your HITACHI Plasma TV, the new remote control is designed to operate different types of VCRs, CATV (Cable TV) converters, set-top-box, satellite receiver, DVD players, and...
... Monitor and press the TV button. The DVD button will blink, indicating that the remote will now control your set-top-box. To operate your Plasma TV, point the remote control at the remote sensor of the component you wish to control and press the CD, TAPE or AMP button. Basic... 2 VID 1 PIP FREEZE VID 3 PIP CH PIP ACCESS VIDEO SWAP PIP MODE REC CLU-5723TSI REMOTE In addition to controlling all the functions on your HITACHI Plasma TV, the new remote control is designed to operate different types of VCRs, CATV (Cable TV) converters, set-top-box, satellite receiver, DVD players, and...

Owners Guide
Page 25
HOW TO USE THE REMOTE TO CONTROL YOUR PLASMA TV ት POWER TV DVD VCR CBL SOURCE WIZARD CD TAPE STB AMP 1 2 3 4 5 6 7 8 9 SLEEP 0 INFO ANT TV/RGB A/V NET ASPECT MODE MENU EXIT VOL SELECT ... CH 3 GUIDE/TV VID 4 SCHD VID 5 SWAP PIP ACCESS FREEZE REC VIDEO CLU-5723TSI CLU-5723TSI ᕃ POWER button Press this button to turn the Plasma TV on or off when the remote is in TV mode. (See page 24 for instructions on how to set the remote control to TV...
HOW TO USE THE REMOTE TO CONTROL YOUR PLASMA TV ት POWER TV DVD VCR CBL SOURCE WIZARD CD TAPE STB AMP 1 2 3 4 5 6 7 8 9 SLEEP 0 INFO ANT TV/RGB A/V NET ASPECT MODE MENU EXIT VOL SELECT ... CH 3 GUIDE/TV VID 4 SCHD VID 5 SWAP PIP ACCESS FREEZE REC VIDEO CLU-5723TSI CLU-5723TSI ᕃ POWER button Press this button to turn the Plasma TV on or off when the remote is in TV mode. (See page 24 for instructions on how to set the remote control to TV...

Owners Guide
Page 26
... PLUS+ VID 2 VID 1 PIP FREEZE VID 3 PIP CH PIP ACCESS VIDEO SWAP PIP MODE REC CLU-5723TSI HOW TO USE THE REMOTE TO CONTROL YOUR PLASMA TV ቨ CD, TAPE, AMP buttons When pressed, each time the button is pressed. IN: 3 When an S-VIDEO Input is connected to a maximum of these...
... PLUS+ VID 2 VID 1 PIP FREEZE VID 3 PIP CH PIP ACCESS VIDEO SWAP PIP MODE REC CLU-5723TSI HOW TO USE THE REMOTE TO CONTROL YOUR PLASMA TV ቨ CD, TAPE, AMP buttons When pressed, each time the button is pressed. IN: 3 When an S-VIDEO Input is connected to a maximum of these...

Owners Guide
Page 27
Use THUMBSTICK to navigate and SELECT to control external components with the Plasma TV's remote control. The equipment list will scroll up or down but the selected equipment will pop up within the Display Monitor screen. Press this ... 0 CH ̆ 3 6 9 INFO SETUP DVD VCR Set Top Box Cable Box Amplifier Move POWER SETUP MORE 27 HOW TO USE THE REMOTE TO CONTROL YOUR PLASMA TV ቯ A/V NET button Press this button to select between the two pages. The A/V Net allows the user to select button. This window shows the...
Use THUMBSTICK to navigate and SELECT to control external components with the Plasma TV's remote control. The equipment list will scroll up or down but the selected equipment will pop up within the Display Monitor screen. Press this ... 0 CH ̆ 3 6 9 INFO SETUP DVD VCR Set Top Box Cable Box Amplifier Move POWER SETUP MORE 27 HOW TO USE THE REMOTE TO CONTROL YOUR PLASMA TV ቯ A/V NET button Press this button to select between the two pages. The A/V Net allows the user to select button. This window shows the...

Owners Guide
Page 28
... to adjust the images through the following options. 4:3 STANDARD Use this mode for the other ANT inputs. HOW TO USE THE REMOTE TO CONTROL YOUR PLASMA TV ተ ASPECT button Press this button to display conventional (4:3) images. Depending on conventional (4:3) sources. 16:9 STANDARD Use this aspect mode to prevent uneven aging...
... to adjust the images through the following options. 4:3 STANDARD Use this mode for the other ANT inputs. HOW TO USE THE REMOTE TO CONTROL YOUR PLASMA TV ተ ASPECT button Press this button to display conventional (4:3) images. Depending on conventional (4:3) sources. 16:9 STANDARD Use this aspect mode to prevent uneven aging...

Owners Guide
Page 29
... Display. ታ EXIT button When in RGB1 when a 480p signal is input. 2. Horizontal Phase is input. 4. HOW TO USE THE GENIUS REMOTE TO CONTROL YOUR PLASMA TV (4) RGB1/RGB2 ASPECT DISPLAY MODE. Press the THUMB STICK toward desired direction and press down to delete. To add channels to Favorite Channels, use...
... Display. ታ EXIT button When in RGB1 when a 480p signal is input. 2. Horizontal Phase is input. 4. HOW TO USE THE GENIUS REMOTE TO CONTROL YOUR PLASMA TV (4) RGB1/RGB2 ASPECT DISPLAY MODE. Press the THUMB STICK toward desired direction and press down to delete. To add channels to Favorite Channels, use...

Owners Guide
Page 30
... PLUS+ VID 2 VID 1 PIP FREEZE VID 3 PIP CH PIP ACCESS VIDEO SWAP PIP MODE REC CLU-5723TSI HOW TO USE THE REMOTE TO CONTROL YOUR PLASMA TV ት VOLUME, MUTE button Press the VOLUME up (̆) or down (̄) button until you obtain the desired sound level. The channel number which...
... PLUS+ VID 2 VID 1 PIP FREEZE VID 3 PIP CH PIP ACCESS VIDEO SWAP PIP MODE REC CLU-5723TSI HOW TO USE THE REMOTE TO CONTROL YOUR PLASMA TV ት VOLUME, MUTE button Press the VOLUME up (̆) or down (̄) button until you obtain the desired sound level. The channel number which...


