Owners Guide
Page 1
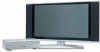
... VCR SOURCE WIZARDTAPE CD 2 AMP 3 6 DVD 1 5 9 INFO 4 8 MODE 7 0 ASPECT A/V NET SLEEP EXIT CH SELECT ANT TV/RGB MENU LAST CH GUIDE/TV SCHD VID 4 VID 5 VOL MUTE SVCS VCR PLUS+ VID 2 VID 1 PIP FREEZE VID 3 PIP CH PIP ACCESS VIDEO SWAP PIP MODE REC CLU-5723TSI Video ... Move SEL Sel IMPORTANT SAFETY INSTRUCTIONS 2-3 FIRST TIME USE 4-23 THE REMOTE CONTROL 24-39 ON-SCREEN DISPLAY USING THE RGB INPUT OF THE PLASMA TV 40-63 64-74 USEFUL INFORMATION INDEX 75-82 PLASMA TELEVISION AVC (Audio/Video Control Center) & Plasma Display Monitor...
... VCR SOURCE WIZARDTAPE CD 2 AMP 3 6 DVD 1 5 9 INFO 4 8 MODE 7 0 ASPECT A/V NET SLEEP EXIT CH SELECT ANT TV/RGB MENU LAST CH GUIDE/TV SCHD VID 4 VID 5 VOL MUTE SVCS VCR PLUS+ VID 2 VID 1 PIP FREEZE VID 3 PIP CH PIP ACCESS VIDEO SWAP PIP MODE REC CLU-5723TSI Video ... Move SEL Sel IMPORTANT SAFETY INSTRUCTIONS 2-3 FIRST TIME USE 4-23 THE REMOTE CONTROL 24-39 ON-SCREEN DISPLAY USING THE RGB INPUT OF THE PLASMA TV 40-63 64-74 USEFUL INFORMATION INDEX 75-82 PLASMA TELEVISION AVC (Audio/Video Control Center) & Plasma Display Monitor...
Owners Guide
Page 3
... PUBLIC VIEWING OF COPYRIGHTED MATERIAL Public viewing of the video program material. 3 The wide blade or the third prong are NOT COVERED by TV stations and cable companies, as well as to Article 820-40 of overhead power lines or other fixed (nonmoving) patterns can cause permanent ...to rain or moisture, does not operate normally, or has been dropped. Only use caution when moving the cart/apparatus combination to your HITACHI Factory Warranty. Refer all servicing to the point of this apparatus during lightning storms or when unused for your local authorities or the ...
... PUBLIC VIEWING OF COPYRIGHTED MATERIAL Public viewing of the video program material. 3 The wide blade or the third prong are NOT COVERED by TV stations and cable companies, as well as to Article 820-40 of overhead power lines or other fixed (nonmoving) patterns can cause permanent ...to rain or moisture, does not operate normally, or has been dropped. Only use caution when moving the cart/apparatus combination to your HITACHI Factory Warranty. Refer all servicing to the point of this apparatus during lightning storms or when unused for your local authorities or the ...
Owners Guide
Page 4
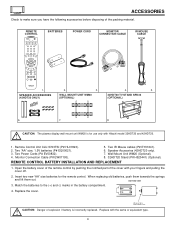
...the battery compartment. 4. CAUTION: The plasma display wall mount unit WM20 is incorrectly replaced. Monitor Connection Cable (P# EW07193). 5. BOTTOM VIEW 3. Replace with Hitachi model 32HDT20 and 42HDT20. 1. REMOTE CONTROL BATTERY INSTALLATION AND REPLACEMENT 1. CAUTION: Danger of the packing material. Insert two new "AA" size batteries for use only ... A/V NET ASPECT MODE MENU EXIT VOL SELECT CH SVCS VID 1 MUTE VCR PLUS+ LAST CH GUIDE/TV SCHD VID 5 VID 2 PIP VID 3 PIP CH VID 4 FREEZE PIP MODE PIP ACCESS SWAP VIDEO BATTERIES POWER CORD MONITOR CONNECTION ...
...the battery compartment. 4. CAUTION: The plasma display wall mount unit WM20 is incorrectly replaced. Monitor Connection Cable (P# EW07193). 5. BOTTOM VIEW 3. Replace with Hitachi model 32HDT20 and 42HDT20. 1. REMOTE CONTROL BATTERY INSTALLATION AND REPLACEMENT 1. CAUTION: Danger of the packing material. Insert two new "AA" size batteries for use only ... A/V NET ASPECT MODE MENU EXIT VOL SELECT CH SVCS VID 1 MUTE VCR PLUS+ LAST CH GUIDE/TV SCHD VID 5 VID 2 PIP VID 3 PIP CH VID 4 FREEZE PIP MODE PIP ACCESS SWAP VIDEO BATTERIES POWER CORD MONITOR CONNECTION ...
Owners Guide
Page 5
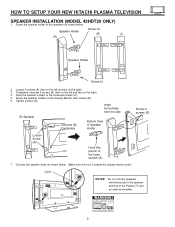
...4. Screw the speaker holders to the loose screws (A). 7. Insert horizontally from the side (R) Speaker Unscrew (B) Completely Bottom View of the Plasma TV and an external amplifier. 5 Loosen 4 screws (A) (two on the left and two on the right). 3. Connect the speaker wires as ... toward the display monitor side.) Core NOTES: Do not connect speakers simultaneously to the loosened screws (A). 5. HOW TO SETUP YOUR NEW HITACHI PLASMA TELEVISION SPEAKER INSTALLATION (MODEL 42HDT20 ONLY) 1. Speaker Holder Screw x2 (R) (L) (R) Speaker Holder Screw x2 2. Hook the speaker ...
...4. Screw the speaker holders to the loose screws (A). 7. Insert horizontally from the side (R) Speaker Unscrew (B) Completely Bottom View of the Plasma TV and an external amplifier. 5 Loosen 4 screws (A) (two on the left and two on the right). 3. Connect the speaker wires as ... toward the display monitor side.) Core NOTES: Do not connect speakers simultaneously to the loosened screws (A). 5. HOW TO SETUP YOUR NEW HITACHI PLASMA TELEVISION SPEAKER INSTALLATION (MODEL 42HDT20 ONLY) 1. Speaker Holder Screw x2 (R) (L) (R) Speaker Holder Screw x2 2. Hook the speaker ...
Owners Guide
Page 6
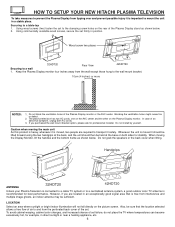
... monitor. Using commercially available wood screws, secure the set failure, do not place the TV where temperatures can become excessively hot, for professional installer. Blocking the ventillation holes might cuase... the back, and the unit should then be sufficient. HOW TO SETUP YOUR NEW HITACHI PLASMA TELEVISION To take measures to prevent the Plasma Display from tipping over and prevent ...rear of air to the clamping screw holes on both AC cords. 3. Handgrips ANTENNA 32HDT20 42HDT20 Unless your Plasma Television is recommended for stability. Keep the Plasma Display monitor four...
... monitor. Using commercially available wood screws, secure the set failure, do not place the TV where temperatures can become excessively hot, for professional installer. Blocking the ventillation holes might cuase... the back, and the unit should then be sufficient. HOW TO SETUP YOUR NEW HITACHI PLASMA TELEVISION To take measures to prevent the Plasma Display from tipping over and prevent ...rear of air to the clamping screw holes on both AC cords. 3. Handgrips ANTENNA 32HDT20 42HDT20 Unless your Plasma Television is recommended for stability. Keep the Plasma Display monitor four...
Owners Guide
Page 7
... 20 ANGLE 3' 0' 5' 10' 15' 20' R 4" Minimum 4" Minimum S 50 BEST HORIZONTAL 5' 10' 15' 20' VIEWING ANGLE 50 IMPORTANT NOTES L S No. If the TV's audio output will be heard when the plasma display monitor is turned on . 7 But in some cases, there are minor defects in room sizes and... and contrast PDP television has luminosity and low contrast compared with color different from glass. HOW TO SET UP YOUR NEW HITACHI PLASMA TELEVISION VIEWING The major benefit of the HITACHI Plasma Television is its best, test various locations in a different section of the room.
... 20 ANGLE 3' 0' 5' 10' 15' 20' R 4" Minimum 4" Minimum S 50 BEST HORIZONTAL 5' 10' 15' 20' VIEWING ANGLE 50 IMPORTANT NOTES L S No. If the TV's audio output will be heard when the plasma display monitor is turned on . 7 But in some cases, there are minor defects in room sizes and... and contrast PDP television has luminosity and low contrast compared with color different from glass. HOW TO SET UP YOUR NEW HITACHI PLASMA TELEVISION VIEWING The major benefit of the HITACHI Plasma Television is its best, test various locations in a different section of the room.
Owners Guide
Page 8
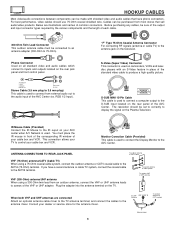
... the IR mouse in place of the AVC Center. RGB 1/2 Input). "F" Type 75-Ohm Coaxial Antenna Connector For connecting RF signals (antenna or cable TV) to the antenna jack on the rear jack panel and front control panel. To second antenna or cable system To outdoor VHF or UHF antenna...use 75-Ohm coaxial shielded wire. Monitor Conection Cable (Provided) This cable is used to connect a computer output to the D-SUB input located on the TV. IR Mouse Cable (Provided) Connect the IR Mouse to the IR ouput on the Plasma Television. Cables can be made with an S-Video feature in...
... the IR mouse in place of the AVC Center. RGB 1/2 Input). "F" Type 75-Ohm Coaxial Antenna Connector For connecting RF signals (antenna or cable TV) to the antenna jack on the rear jack panel and front control panel. To second antenna or cable system To outdoor VHF or UHF antenna...use 75-Ohm coaxial shielded wire. Monitor Conection Cable (Provided) This cable is used to connect a computer output to the D-SUB input located on the TV. IR Mouse Cable (Provided) Connect the IR Mouse to the IR ouput on the Plasma Television. Cables can be made with an S-Video feature in...

Owners Guide
Page 9
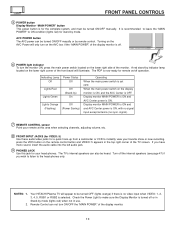
...to select the desired input, VIDEO 1 to 5, RGB 1/2, or Ant A/B source. Press TV/RGB button on the remote control to change to your preference without using the remote. FRONT PANEL CONTROLS 32HDT20 DISPLAY MONITOR FRONT VIEW 42HDT20 DISPLAY MONITOR AUDIO/VIDEO CONTROL CENTER STANDBY (RED) ON (GREEN... VIDEO L/(MONO) R AUDIO ቢ MENU/SELECT button This button allows you wish to switch to (see page 30). To change between the TV's RGB1, and RGB2 modes. ቤ CHANNEL selector Press these buttons until the desired channel appears in MENU mode. ብ VOLUME level Press these...
...to select the desired input, VIDEO 1 to 5, RGB 1/2, or Ant A/B source. Press TV/RGB button on the remote control to change to your preference without using the remote. FRONT PANEL CONTROLS 32HDT20 DISPLAY MONITOR FRONT VIEW 42HDT20 DISPLAY MONITOR AUDIO/VIDEO CONTROL CENTER STANDBY (RED) ON (GREEN... VIDEO L/(MONO) R AUDIO ቢ MENU/SELECT button This button allows you wish to switch to (see page 30). To change between the TV's RGB1, and RGB2 modes. ቤ CHANNEL selector Press these buttons until the desired channel appears in MENU mode. ብ VOLUME level Press these...
Owners Guide
Page 10
... If you wish to listen to the head-phones only. Turn off or in Stand-by mode. Your HITACHI Plasma TV will only turn on /off . STANDBY (RED) ON (GREEN) MAIN POWER ቧ POWER light indicator...be heard. It is now ready for remote on the AVC box if the "MAIN POWER" of the TV screen. A red stand-by remote control. The PDP is recommended to leave the "MAIN POWER" to ...OFF. Turning on the AVC Power will appear to make sure the Display Monitor is off operation. The TV's internal speakers can also be turned ON/OFF manually. NOTES: 1. 2. AVC POWER button The AVC power...
... If you wish to listen to the head-phones only. Turn off or in Stand-by mode. Your HITACHI Plasma TV will only turn on /off . STANDBY (RED) ON (GREEN) MAIN POWER ቧ POWER light indicator...be heard. It is now ready for remote on the AVC box if the "MAIN POWER" of the TV screen. A red stand-by remote control. The PDP is recommended to leave the "MAIN POWER" to ...OFF. Turning on the AVC Power will appear to make sure the Display Monitor is off operation. The TV's internal speakers can also be turned ON/OFF manually. NOTES: 1. 2. AVC POWER button The AVC power...
Owners Guide
Page 12
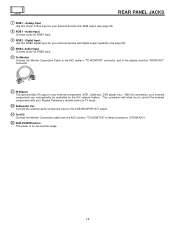
... output to this RGB2 Digital input for serviceman usage. 12 Audio Input Connect audio for your external devices with your Plasma Television's remote control in TV mode. ቯ Subwoofer Out Connect the external audio component input to your external components can automatically be controlled by the A/V network feature. Digital Input Use...
... output to this RGB2 Digital input for serviceman usage. 12 Audio Input Connect audio for your external devices with your Plasma Television's remote control in TV mode. ቯ Subwoofer Out Connect the external audio component input to your external components can automatically be controlled by the A/V network feature. Digital Input Use...
Owners Guide
Page 14
...player, DVD player, or HDTV Set Top Box to your particular assortment of the VCR or the laserdisc player to accommodate your Plasma TV is pressed as suggestions. For best performance, video and audio cables should be made from the VIDEO OUT of video and audio ... Y AUDIO PB (MONO) L PB INPUT 1 AUDIO (MONO) L PR PR R R AUDIO R L AUDIOR L AUDIOR L AUDIO OUT IR BLASTER AUDIO OUT VIDEO OUT VCR Hitachi Model or Similar Model 14 The following connection diagrams are offered as shown below . 2. The VIDEO mode disappears automatically after approximately four seconds. 4.
...player, DVD player, or HDTV Set Top Box to your particular assortment of the VCR or the laserdisc player to accommodate your Plasma TV is pressed as suggestions. For best performance, video and audio cables should be made from the VIDEO OUT of video and audio ... Y AUDIO PB (MONO) L PB INPUT 1 AUDIO (MONO) L PR PR R R AUDIO R L AUDIOR L AUDIOR L AUDIO OUT IR BLASTER AUDIO OUT VIDEO OUT VCR Hitachi Model or Similar Model 14 The following connection diagrams are offered as shown below . 2. The VIDEO mode disappears automatically after approximately four seconds. 4.

Owners Guide
Page 18
... page 23 VCR or other external components 18 The "AUDIO OUT" from the AVC center is available for this output. Rear Panel of the Plasma TV to INPUT2, no monitor out is a fixed output. If a component device is input to an external audio amplifier, connect the system as shown below. Rear...
... page 23 VCR or other external components 18 The "AUDIO OUT" from the AVC center is available for this output. Rear Panel of the Plasma TV to INPUT2, no monitor out is a fixed output. If a component device is input to an external audio amplifier, connect the system as shown below. Rear...

Owners Guide
Page 19
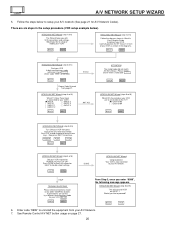
... or ̄ to highlight the component you wish to control. CONNECTING A/V NETWORK Your Hitachi Plasma Television is setup, it allows your IR Mouse connector to control your equipment using your Hitachi Plasma TV Remote Control. You can connect the Plasma Television with an A/V Network feature. Each IR ...The Plasma Television AVC Center has 2 IR BLASTER jacks. The A/V Network Setup Wizard will automatically start upon the very first use your Hitachi remote control to the AVC Center shown on the remote control. Press the A/V NET button on pages 13~18. 2. This feature helps...
... or ̄ to highlight the component you wish to control. CONNECTING A/V NETWORK Your Hitachi Plasma Television is setup, it allows your IR Mouse connector to control your equipment using your Hitachi Plasma TV Remote Control. You can connect the Plasma Television with an A/V Network feature. Each IR ...The Plasma Television AVC Center has 2 IR BLASTER jacks. The A/V Network Setup Wizard will automatically start upon the very first use your Hitachi remote control to the AVC Center shown on the remote control. Press the A/V NET button on pages 13~18. 2. This feature helps...
Owners Guide
Page 20
... you like to proceed? BACK YES 6. A/V NETWORK SETUP WIZARD 5. Follow the steps below to your VCR then press each of these keys. HITACHI AV NET Wizard (step 1 of 6) Which TV Rear Panel Input is now conected to setup your A/V network (See page 21 for your VCR? (b) ANT A ( ) INPUT 3 ( ) ANT B ( ... to trouble shoot settings. HELP DONE DONE HITACHI AV NET Wizard Congratulations! Enter code "9999" to the TV? (b) Channel 03 ( ) Channel 04 BACK NEXT HITACHI AV NET Wizard (step 5 of 6) Turn ON your AV network. BACK NEXT HITACHI AV NET Wizard (step 4b of 6) Which...
... you like to proceed? BACK YES 6. A/V NETWORK SETUP WIZARD 5. Follow the steps below to your VCR then press each of these keys. HITACHI AV NET Wizard (step 1 of 6) Which TV Rear Panel Input is now conected to setup your A/V network (See page 21 for your VCR? (b) ANT A ( ) INPUT 3 ( ) ANT B ( ... to trouble shoot settings. HELP DONE DONE HITACHI AV NET Wizard Congratulations! Enter code "9999" to the TV? (b) Channel 03 ( ) Channel 04 BACK NEXT HITACHI AV NET Wizard (step 5 of 6) Turn ON your AV network. BACK NEXT HITACHI AV NET Wizard (step 4b of 6) Which...

Owners Guide
Page 22
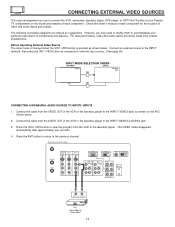
... 10 9 8 7 6 15 14 13 12 11 RGB OUTPUT AUDIO OUT DIGITAL OUTPUT CAPABILITY DIGITAL OUTPUT AUDIO OUT Rear Panel of AVC Center INPUT OUTPUT Cable TV Box LR INPUT S-VIDEO V L R INPUT VCR #2 S-VIDEO V L R OUTPUT Laserdisc player, VCR, camcorder, etc. OUTPUT Y PB/CB PR/CR L R DVD Player Y PB PR L R OUTPUT Stereo System... OUT S-VIDEO INPUT 4 S-VIDEO INPUT 3 S-VIDEO VIDEO VIDEO VIDEO (MONO) (MONO) (MONO) L L L R AUDIO R AUDIO R AUDIO RGB 1 ANALOG INPUT RGB 2 DIGITAL INPUT TO MONITOR Please use Hitachi specified cable.
... 10 9 8 7 6 15 14 13 12 11 RGB OUTPUT AUDIO OUT DIGITAL OUTPUT CAPABILITY DIGITAL OUTPUT AUDIO OUT Rear Panel of AVC Center INPUT OUTPUT Cable TV Box LR INPUT S-VIDEO V L R INPUT VCR #2 S-VIDEO V L R OUTPUT Laserdisc player, VCR, camcorder, etc. OUTPUT Y PB/CB PR/CR L R DVD Player Y PB PR L R OUTPUT Stereo System... OUT S-VIDEO INPUT 4 S-VIDEO INPUT 3 S-VIDEO VIDEO VIDEO VIDEO (MONO) (MONO) (MONO) L L L R AUDIO R AUDIO R AUDIO RGB 1 ANALOG INPUT RGB 2 DIGITAL INPUT TO MONITOR Please use Hitachi specified cable.

Owners Guide
Page 23
... line input-output connections. Your component outputs may be labeled Y, B-Y, and R-Y. In this case, connect the components CB output to the TV's PB input and the components CR output to the operating guide of the standard video connection if your device has this feature. TIPS ON... connections are provided for high performance laserdisc players, VCRs etc. Input 1 can accept both component Y-PBPR and composite video signal. Refer to the TV's PR input. that a VCR cannot record its own video or line output (INPUT: 4 in place of your other electronic equipment for additional ...
... line input-output connections. Your component outputs may be labeled Y, B-Y, and R-Y. In this case, connect the components CB output to the TV's PB input and the components CR output to the operating guide of the standard video connection if your device has this feature. TIPS ON... connections are provided for high performance laserdisc players, VCRs etc. Input 1 can accept both component Y-PBPR and composite video signal. Refer to the TV's PR input. that a VCR cannot record its own video or line output (INPUT: 4 in place of your other electronic equipment for additional ...

Owners Guide
Page 24
... remote sensor of the cable box and press the CABLE (CBL) button. These buttons will not appear to operate different types of VCRs, CATV (Cable TV) converters, set -top-box and press the SET-TOPBOX (STB) button. Basic operation keys are in a dark room, press the light button ባ on ... REC CLU-5723TSI REMOTE In addition to controlling all the functions on your Plasma TV, point the remote control at the remote sensor of the AVC box/Display Monitor and press the TV button. To operate your HITACHI Plasma TV, the new remote control is designed to illuminate if the room is not pressed...
... remote sensor of the cable box and press the CABLE (CBL) button. These buttons will not appear to operate different types of VCRs, CATV (Cable TV) converters, set -top-box and press the SET-TOPBOX (STB) button. Basic operation keys are in a dark room, press the light button ባ on ... REC CLU-5723TSI REMOTE In addition to controlling all the functions on your Plasma TV, point the remote control at the remote sensor of the AVC box/Display Monitor and press the TV button. To operate your HITACHI Plasma TV, the new remote control is designed to illuminate if the room is not pressed...

Owners Guide
Page 25
... 2 PIP VID 3 PIP CH VID 4 FREEZE PIP MODE PIP ACCESS SWAP VIDEO ብ ቦ ቨ 23 1 24 REC VOL TV POWER DVD 1 4 VCR CD SOURCETWAPIZEARD CBL 2 STB 7 SLEEP 5 3 AMP ANT 8 6 TV/RGB 0 9 A/V NET MENU INFO MODE ASPECT EXIT SELECT SVCS MUTE VID 2 VID 1 VCR PLUS+ CH PIP LAST CH PIP MODE... ᕃ POWER button Press this button to turn the Plasma TV on or off when the remote is in TV mode. (See page 24 for instructions on how to set the remote control to TV mode.) ባ TV button When the TV button is pressed, it will blink, to indicate the remote ...
... 2 PIP VID 3 PIP CH VID 4 FREEZE PIP MODE PIP ACCESS SWAP VIDEO ብ ቦ ቨ 23 1 24 REC VOL TV POWER DVD 1 4 VCR CD SOURCETWAPIZEARD CBL 2 STB 7 SLEEP 5 3 AMP ANT 8 6 TV/RGB 0 9 A/V NET MENU INFO MODE ASPECT EXIT SELECT SVCS MUTE VID 2 VID 1 VCR PLUS+ CH PIP LAST CH PIP MODE... ᕃ POWER button Press this button to turn the Plasma TV on or off when the remote is in TV mode. (See page 24 for instructions on how to set the remote control to TV mode.) ባ TV button When the TV button is pressed, it will blink, to indicate the remote ...

Owners Guide
Page 26
...Input is connected to VIDEO: 1. ቭ ANTENNA button The ANT button will select between RGB1, RGB2 and TV mode. 26 On Off 10:05 AM Time Lock 10:05 AM Sleep 0:01 Channel ID/Video ID Time.... Channel selection may not receive some channels if you wish to tune then wait a few seconds for the TV to display the sleep timer in Audio mode. (see page 58) ቪ SLEEP button Press this timer,... up (̆) or down (̄). NOTE: The Plasma TV may also be performed by pressing CH up to a maximum of this button will add 15 minutes to this...
...Input is connected to VIDEO: 1. ቭ ANTENNA button The ANT button will select between RGB1, RGB2 and TV mode. 26 On Off 10:05 AM Time Lock 10:05 AM Sleep 0:01 Channel ID/Video ID Time.... Channel selection may not receive some channels if you wish to tune then wait a few seconds for the TV to display the sleep timer in Audio mode. (see page 58) ቪ SLEEP button Press this timer,... up (̆) or down (̄). NOTE: The Plasma TV may also be performed by pressing CH up to a maximum of this button will add 15 minutes to this...

Owners Guide
Page 27
... stay on the button is passed through the IR mouse and onto the AUDIO/VIDEO equipment. HOW TO USE THE REMOTE TO CONTROL YOUR PLASMA TV ቯ A/V NET button Press this button to select between the two pages. The A/V Net allows the user to access the Audio/Video network (A/V Net) menu... button, the following window will pop up or down but the selected equipment will scroll up within the Display Monitor screen. Cable Box Amplifier DVD TV/VCR b MORE THUMB STICK SELECT MENU SELECT MORE EXIT Move Move SEL Select THUMB STICK SELECT Set Top Box Cable Box Amplifier DVD VCR Move...
... stay on the button is passed through the IR mouse and onto the AUDIO/VIDEO equipment. HOW TO USE THE REMOTE TO CONTROL YOUR PLASMA TV ቯ A/V NET button Press this button to select between the two pages. The A/V Net allows the user to access the Audio/Video network (A/V Net) menu... button, the following window will pop up or down but the selected equipment will scroll up within the Display Monitor screen. Cable Box Amplifier DVD TV/VCR b MORE THUMB STICK SELECT MENU SELECT MORE EXIT Move Move SEL Select THUMB STICK SELECT Set Top Box Cable Box Amplifier DVD VCR Move...


