
HP Image Manager 5.0: Quick Setup Guide
Page 27
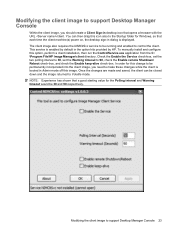
.... Once the changes are made and saved, the client can then drag this option, perform a client installation, then run the ControlService.exe application from the C: \Program File\HP Image Manager\client directory. Modifying the client image to control the client. The client image also requires the NIMCltSvc service to...client image, you should create a Client Sign-in desktop icon that each time the client machine(s) power on, the desktop sign-in the option kits provided by default in dialog is displayed. Check the Enable the Service check-box, set the two polling interval to 30, set...
.... Once the changes are made and saved, the client can then drag this option, perform a client installation, then run the ControlService.exe application from the C: \Program File\HP Image Manager\client directory. Modifying the client image to control the client. The client image also requires the NIMCltSvc service to...client image, you should create a Client Sign-in desktop icon that each time the client machine(s) power on, the desktop sign-in the option kits provided by default in dialog is displayed. Check the Enable the Service check-box, set the two polling interval to 30, set...

HP ezUpdate Administrator's Guide
Page 1
... mode, the thin client does not save any connection information or settings to a group of HP thin clients running the HP ThinPro Operating System. HP ezUpdate Administrator's Guide Table of Contents: Introduction ...1 Setup Overview ...2 Setting Up the FTP Server 2 Uploading a Profile Using HP ThinState 3 Other Update Methods 4 Downloading New Packages 4 Uploading an Image Using HP ThinState 4 Creating a Custom Update 5 Setting up in combination...
... mode, the thin client does not save any connection information or settings to a group of HP thin clients running the HP ThinPro Operating System. HP ezUpdate Administrator's Guide Table of Contents: Introduction ...1 Setup Overview ...2 Setting Up the FTP Server 2 Uploading a Profile Using HP ThinState 3 Other Update Methods 4 Downloading New Packages 4 Uploading an Image Using HP ThinState 4 Creating a Custom Update 5 Setting up in combination...

HP ezUpdate Administrator's Guide
Page 3
...if stateless mode is not used File directory: The relative path from the Control Panel Management tab. 3. Create a set to include HP ezUpdate configuration settings if a DHCP tag is desired). File name: The name of the ezUpdate server Username: The username;...Image: A full image created by the other thin clients. 1. Select save the configuration and then click Next. 5. 4. Create a subdirectory inside the ezupdate directory for instance, t5745, t5325, or t5735) on which you would like the users to see Setting up with read/write access to a more ...
...if stateless mode is not used File directory: The relative path from the Control Panel Management tab. 3. Create a set to include HP ezUpdate configuration settings if a DHCP tag is desired). File name: The name of the ezUpdate server Username: The username;...Image: A full image created by the other thin clients. 1. Select save the configuration and then click Next. 5. 4. Create a subdirectory inside the ezupdate directory for instance, t5745, t5325, or t5735) on which you would like the users to see Setting up with read/write access to a more ...

HP ezUpdate Administrator's Guide
Page 7
... placing the profile in the PersistentProfile directory, place it in the update process, verify that a lost or stolen thin client contains no configuration settings are saved to the thin client, but instead are automatically downloaded and applied at the end of data. 64 bytes from 10.30.8.52: icmp_seq...=1 ttl=64 time=0.815 ms 64 bytes from its solid state drive. To activate stateless mode, follow the directions in Uploading a Profile Using HP...
... placing the profile in the PersistentProfile directory, place it in the update process, verify that a lost or stolen thin client contains no configuration settings are saved to the thin client, but instead are automatically downloaded and applied at the end of data. 64 bytes from 10.30.8.52: icmp_seq...=1 ttl=64 time=0.815 ms 64 bytes from its solid state drive. To activate stateless mode, follow the directions in Uploading a Profile Using HP...

HP ThinPro Administrator's Guide
Page 13
or multipurpose ● Select the user interface style ● Set up the connection mode ● Select the thin client management method ● Save the thin client configuration ENWW Easy Config Wizard 5 Easy Config Wizard Easy Config Wizard simplifies the configuration process, allowing you to accomplish the following: ● Select the language ● Identify and configure peripherals ● Change the Administrator password ● Designate the thin client as single-
or multipurpose ● Select the user interface style ● Set up the connection mode ● Select the thin client management method ● Save the thin client configuration ENWW Easy Config Wizard 5 Easy Config Wizard Easy Config Wizard simplifies the configuration process, allowing you to accomplish the following: ● Select the language ● Identify and configure peripherals ● Change the Administrator password ● Designate the thin client as single-

HP ThinPro Administrator's Guide
Page 34
... be able to change their own settings, if desired. Click OK when you have them saved. 6. Set the following options: ● General on page 26 ● USB on page 27 General 1. ● Applications ● Privacy ● Security ● Advanced Click Close to save your settings. 7. RDP 1. Select RDP and set the following options: ● Send hostname...
... be able to change their own settings, if desired. Click OK when you have them saved. 6. Set the following options: ● General on page 26 ● USB on page 27 General 1. ● Applications ● Privacy ● Security ● Advanced Click Close to save your settings. 7. RDP 1. Select RDP and set the following options: ● Send hostname...

HP ThinPro Administrator's Guide
Page 38
Connection 1. Set the following options: ● Enable Audio Input ● Use Data Compression ● Enable Middle Button Paste ● Use Disk Cache for Bitmaps 30 Chapter 2 Installation ENWW Click Next to advance to the next window or click Finish save your settings and close the dialog box. ● Credentials ◦ Username ◦ Password ◦ Domain ● Allow Smart Card Logon 2.
Connection 1. Set the following options: ● Enable Audio Input ● Use Data Compression ● Enable Middle Button Paste ● Use Disk Cache for Bitmaps 30 Chapter 2 Installation ENWW Click Next to advance to the next window or click Finish save your settings and close the dialog box. ● Credentials ◦ Username ◦ Password ◦ Domain ● Allow Smart Card Logon 2.

HP ThinPro Administrator's Guide
Page 39
Set the following options: ● Enable Seamless Window ● Window Size ENWW Connections 31 Click Next to advance to the next window or click Finish save your settings and close the dialog box. Window 1. ● Enable Drive Mapping ● Sound ● Speed Screen ● Mouse Click Feedback ● Local Text Echo ● Encryption Level 2.
Set the following options: ● Enable Seamless Window ● Window Size ENWW Connections 31 Click Next to advance to the next window or click Finish save your settings and close the dialog box. Window 1. ● Enable Drive Mapping ● Sound ● Speed Screen ● Mouse Click Feedback ● Local Text Echo ● Encryption Level 2.

HP ThinPro Administrator's Guide
Page 40
Click Next to advance to the next window or click Finish save your settings and close the dialog box. Set the following options: ● Application ● Directory 2. Application 1. Click Next to advance to the next window or click Finish save your settings and close the dialog box. 32 Chapter 2 Installation ENWW ● Window Colors ● 256 Color Mapping 2.
Click Next to advance to the next window or click Finish save your settings and close the dialog box. Set the following options: ● Application ● Directory 2. Application 1. Click Next to advance to the next window or click Finish save your settings and close the dialog box. 32 Chapter 2 Installation ENWW ● Window Colors ● 256 Color Mapping 2.

HP ThinPro Administrator's Guide
Page 41
Click Next to advance to a remote computer. ● Use Alternate Address for the account to use to connect to the next window or click Finish save your settings and close the dialog box. ENWW Connections 33 Set the following options: ● Proxy ◦ Proxy Type: Select a proxy type ◦ Proxy Address: Type the proxy host name ◦ Proxy Port: Type the proxy host port ◦ Username: Type the proxy user name for the account to use to connect to a remote computer. ◦ Password: Type a password for Firewall Connection 2. Firewall 1.
Click Next to advance to a remote computer. ● Use Alternate Address for the account to use to connect to the next window or click Finish save your settings and close the dialog box. ENWW Connections 33 Set the following options: ● Proxy ◦ Proxy Type: Select a proxy type ◦ Proxy Address: Type the proxy host name ◦ Proxy Port: Type the proxy host port ◦ Username: Type the proxy user name for the account to use to connect to a remote computer. ◦ Password: Type a password for Firewall Connection 2. Firewall 1.

HP ThinPro Administrator's Guide
Page 42
Smart Ping 1. Set the following options: ● Smart Ping: Allows you to specify a time period for Smart Ping. ● Smart Ping Timeout: Allows you to enable HP ThinPro to ping the server before attempting a connection. Click Next to advance to keep pinging. 2. If the server name fails to resolve or the server fails to respond to the ping, the thin client aborts the connection attempt. ● Smart Ping Port: Allows you to specify a port for Smart Ping to the next window or click Finish save your settings and close the dialog box. 34 Chapter 2 Installation ENWW
Smart Ping 1. Set the following options: ● Smart Ping: Allows you to specify a time period for Smart Ping. ● Smart Ping Timeout: Allows you to enable HP ThinPro to ping the server before attempting a connection. Click Next to advance to keep pinging. 2. If the server name fails to resolve or the server fails to respond to the ping, the thin client aborts the connection attempt. ● Smart Ping Port: Allows you to specify a port for Smart Ping to the next window or click Finish save your settings and close the dialog box. 34 Chapter 2 Installation ENWW
HP ThinPro Administrator's Guide
Page 43
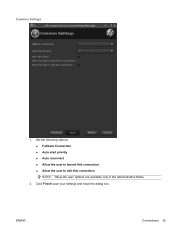
Common Settings 1. Set the following options: ● Fallback Connection ● Auto start priority ● Auto reconnect ● Allow the user to launch this connection ● Allow the user to edit this connection NOTE: 'Allow the user' options are available only in the Administrative Mode. 2. ENWW Connections 35 Click Finish save your settings and close the dialog box.
Common Settings 1. Set the following options: ● Fallback Connection ● Auto start priority ● Auto reconnect ● Allow the user to launch this connection ● Allow the user to edit this connection NOTE: 'Allow the user' options are available only in the Administrative Mode. 2. ENWW Connections 35 Click Finish save your settings and close the dialog box.

HP ThinPro Administrator's Guide
Page 45
Click Next to advance to the next window or click Finish save your settings and close the dialog box. Click Next to advance to the next window or click Finish save your settings and close the dialog box. Set the following options: ● Enable Seamless Windows ● Window Size ◦ Window size ◦ Fixed Size ◦ Percentage Size ● Window Colors 2. ● Domain ● Allow Smartcard Login 2. ENWW Connections 37 Window 1.
Click Next to advance to the next window or click Finish save your settings and close the dialog box. Click Next to advance to the next window or click Finish save your settings and close the dialog box. Set the following options: ● Enable Seamless Windows ● Window Size ◦ Window size ◦ Fixed Size ◦ Percentage Size ● Window Colors 2. ● Domain ● Allow Smartcard Login 2. ENWW Connections 37 Window 1.
HP ThinPro Administrator's Guide
Page 46
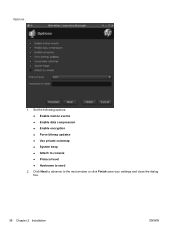
Click Next to advance to send 2. Set the following options: ● Enable motion events ● Enable data compression ● Enable encryption ● Force bitmap updates ● Use private colormap ● System beep ● Attach to console ● Protocol level ● Hostname to the next window or click Finish save your settings and close the dialog box. 38 Chapter 2 Installation ENWW Options 1.
Click Next to advance to send 2. Set the following options: ● Enable motion events ● Enable data compression ● Enable encryption ● Force bitmap updates ● Use private colormap ● System beep ● Attach to console ● Protocol level ● Hostname to the next window or click Finish save your settings and close the dialog box. 38 Chapter 2 Installation ENWW Options 1.

HP ThinPro Administrator's Guide
Page 47
Click Next to advance to the next window or click Finish save your settings and close the dialog box. Set the following options: ● Remote computer sound ● Devices mapping ◦ Enable USB storage mapping ◦ Enable port mapping ◦ Enable printer mapping 2. ENWW Connections 39 Local Resources 1.
Click Next to advance to the next window or click Finish save your settings and close the dialog box. Set the following options: ● Remote computer sound ● Devices mapping ◦ Enable USB storage mapping ◦ Enable port mapping ◦ Enable printer mapping 2. ENWW Connections 39 Local Resources 1.

HP ThinPro Administrator's Guide
Page 48
Experience 1. Click Next to advance to the next window or click Finish save your settings and close the dialog box. 40 Chapter 2 Installation ENWW Set the following options: ● Desktop background ● Show contents of window while dragging ● Menu and window animation ● Themes ● Bitmap caching 2.
Experience 1. Click Next to advance to the next window or click Finish save your settings and close the dialog box. 40 Chapter 2 Installation ENWW Set the following options: ● Desktop background ● Show contents of window while dragging ● Menu and window animation ● Themes ● Bitmap caching 2.

HP ThinPro Administrator's Guide
Page 49
... present nor supported on HP TeemTalk, see HP TeemTalk Terminal Emulator 7.0 User Guide at http://bizsupport.austin.hp.com/bc/docs/support/SupportManual/c01534810/c01534810.pdf. Click Finish save your settings and close the dialog box. You can add a new HP TeemTalk connection in the Administrative Mode. 2. ENWW Connections 41 Set the following options: ●...; Adding a TeemTalk Connection using the TeemTalk Creation Wizard on page 42 ● Adding a TeemTalk Connection Manually on page 44 For more information on the HP ThinPro image for the HP t5325 thin client. Advanced 1.
... present nor supported on HP TeemTalk, see HP TeemTalk Terminal Emulator 7.0 User Guide at http://bizsupport.austin.hp.com/bc/docs/support/SupportManual/c01534810/c01534810.pdf. Click Finish save your settings and close the dialog box. You can add a new HP TeemTalk connection in the Administrative Mode. 2. ENWW Connections 41 Set the following options: ●...; Adding a TeemTalk Connection using the TeemTalk Creation Wizard on page 42 ● Adding a TeemTalk Connection Manually on page 44 For more information on the HP ThinPro image for the HP t5325 thin client. Advanced 1.

HP ThinPro Administrator's Guide
Page 52
Click Finish to create an icon on the desktop and click OK. 2. To add a TeemTalk connection manually, click Connections > Add. 2. Select Teemtalk and set the following options: ● Configuration ● Advanced 44 Chapter 2 Installation ENWW Adding a TeemTalk Connection Manually 1. Select whether or not to save your settings and close the dialog box. Finalization 1.
Click Finish to create an icon on the desktop and click OK. 2. To add a TeemTalk connection manually, click Connections > Add. 2. Select Teemtalk and set the following options: ● Configuration ● Advanced 44 Chapter 2 Installation ENWW Adding a TeemTalk Connection Manually 1. Select whether or not to save your settings and close the dialog box. Finalization 1.

HP ThinPro Administrator's Guide
Page 53
Set the following options: ● Name ● System beep 2. Click Next to advance to edit this connection ENWW Connections 45 Advanced 1. Configuration 1. Set the following options: ● Fallback Connection ● Auto start priority ● Auto reconnect ● Allow the user to launch this connection ● Allow the user to the next window or click Finish save your settings and close the dialog box.
Set the following options: ● Name ● System beep 2. Click Next to advance to edit this connection ENWW Connections 45 Advanced 1. Configuration 1. Set the following options: ● Fallback Connection ● Auto start priority ● Auto reconnect ● Allow the user to launch this connection ● Allow the user to the next window or click Finish save your settings and close the dialog box.

HP ThinPro Administrator's Guide
Page 54
...Advanced on page 47 Configuration 1. NOTE: 'Allow the user' options are available only in the Administrative Mode. 2. Iceweasel 1. Select Iceweasel and set the following options: ● Name ● URL ● Enable kiosk mode ● Enable full screen ● Enable print dialog 2. ...Click Next to advance to the next window or click Finish save your settings and close the dialog box. Click Finish save your settings and close the dialog box. 46 Chapter 2 Installation ENWW To add a connection, click Connections > Add. 2.
...Advanced on page 47 Configuration 1. NOTE: 'Allow the user' options are available only in the Administrative Mode. 2. Iceweasel 1. Select Iceweasel and set the following options: ● Name ● URL ● Enable kiosk mode ● Enable full screen ● Enable print dialog 2. ...Click Next to advance to the next window or click Finish save your settings and close the dialog box. Click Finish save your settings and close the dialog box. 46 Chapter 2 Installation ENWW To add a connection, click Connections > Add. 2.


