

HP ThinPro Administrator's Guide
Page 11
...cursor in the screen background and right-click. To switch to the Administrative Mode: 1. The Administrator can press Ctrl+Alt+Shift+S, select Switch to Admin Mode, and click OK. HP ThinPro opens by creating an ICA, XenApp, RDP, HP TeemTalk, Leostream, vWorkspace, VMware View, X Windows, or Iceweasel ...this as ThinPro Control Center. You can define which connections and connection types are visible when in User mode. ENWW Using HP ThinPro 3 If you are in Administrative Mode, when you position your cursor over the ThinPro Control Center in the bottom left of the screen, ...
...cursor in the screen background and right-click. To switch to the Administrative Mode: 1. The Administrator can press Ctrl+Alt+Shift+S, select Switch to Admin Mode, and click OK. HP ThinPro opens by creating an ICA, XenApp, RDP, HP TeemTalk, Leostream, vWorkspace, VMware View, X Windows, or Iceweasel ...this as ThinPro Control Center. You can define which connections and connection types are visible when in User mode. ENWW Using HP ThinPro 3 If you are in Administrative Mode, when you position your cursor over the ThinPro Control Center in the bottom left of the screen, ...

HP ThinPro Administrator's Guide
Page 12
NOTE: The default password for Administrative Mode is root. 4 Chapter 1 Introduction ENWW Type the Administrative password in the field and click OK. 2.
NOTE: The default password for Administrative Mode is root. 4 Chapter 1 Introduction ENWW Type the Administrative password in the field and click OK. 2.
HP ThinPro Administrator's Guide
Page 14
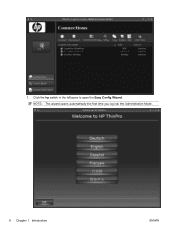
NOTE: The wizard opens automatically the first time you log into the Administrative Mode. 6 Chapter 1 Introduction ENWW Click the hp switch in the left pane to open the Easy Config Wizard. 1.
NOTE: The wizard opens automatically the first time you log into the Administrative Mode. 6 Chapter 1 Introduction ENWW Click the hp switch in the left pane to open the Easy Config Wizard. 1.
HP ThinPro Administrator's Guide
Page 25
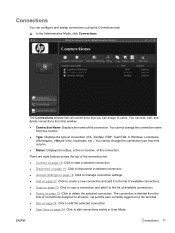
.... ● Connection Name: Displays the name of available connections. ● Delete on page 73: Click to edit connections visible in User Mode. ENWW Connections 17 The Connections window lists all users, not just the user currently logged on to the terminal. ● Edit on page...name from the lists of connections assigned to all connections that you can configure and assign connections using the Connections tab. ▲ In the Administrative Mode, click Connections. There are eight buttons across the top of the connection list: ● Connect on page 18: Click to start a ...
.... ● Connection Name: Displays the name of available connections. ● Delete on page 73: Click to edit connections visible in User Mode. ENWW Connections 17 The Connections window lists all users, not just the user currently logged on to the terminal. ● Edit on page...name from the lists of connections assigned to all connections that you can configure and assign connections using the Connections tab. ▲ In the Administrative Mode, click Connections. There are eight buttons across the top of the connection list: ● Connect on page 18: Click to start a ...
HP ThinPro Administrator's Guide
Page 43
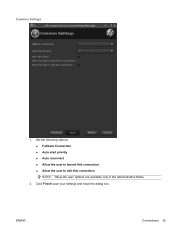
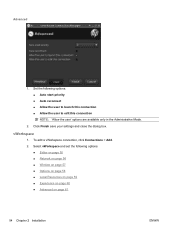
Set the following options: ● Fallback Connection ● Auto start priority ● Auto reconnect ● Allow the user to launch this connection ● Allow the user to edit this connection NOTE: 'Allow the user' options are available only in the Administrative Mode. 2. ENWW Connections 35 Click Finish save your settings and close the dialog box. Common Settings 1.
Set the following options: ● Fallback Connection ● Auto start priority ● Auto reconnect ● Allow the user to launch this connection ● Allow the user to edit this connection NOTE: 'Allow the user' options are available only in the Administrative Mode. 2. ENWW Connections 35 Click Finish save your settings and close the dialog box. Common Settings 1.

HP ThinPro Administrator's Guide
Page 49
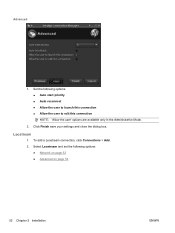
.../docs/support/SupportManual/c01534810/c01534810.pdf. Click Finish save your settings and close the dialog box. ENWW Connections 41 You can add a new HP TeemTalk connection in the Administrative Mode. 2. Set the following options: ● Fallback Connection ● Auto start priority ● Auto reconnect ● Allow the user to launch this connection ... ● Adding a TeemTalk Connection using the TeemTalk Creation Wizard on page 42 ● Adding a TeemTalk Connection Manually on page 44 For more information on the HP ThinPro image for the HP t5325 thin client. Advanced 1.
.../docs/support/SupportManual/c01534810/c01534810.pdf. Click Finish save your settings and close the dialog box. ENWW Connections 41 You can add a new HP TeemTalk connection in the Administrative Mode. 2. Set the following options: ● Fallback Connection ● Auto start priority ● Auto reconnect ● Allow the user to launch this connection ... ● Adding a TeemTalk Connection using the TeemTalk Creation Wizard on page 42 ● Adding a TeemTalk Connection Manually on page 44 For more information on the HP ThinPro image for the HP t5325 thin client. Advanced 1.

HP ThinPro Administrator's Guide
Page 54
... box. 46 Chapter 2 Installation ENWW To add a connection, click Connections > Add. 2. Select Iceweasel and set the following options: ● Name ● URL ● Enable kiosk mode ● Enable full screen ● Enable print dialog 2. Set the following options: ● Configuration on page 46 ● Advanced on page 47 Configuration 1. Click Next... to the next window or click Finish save your settings and close the dialog box. NOTE: 'Allow the user' options are available only in the Administrative Mode. 2. Iceweasel 1.
... box. 46 Chapter 2 Installation ENWW To add a connection, click Connections > Add. 2. Select Iceweasel and set the following options: ● Name ● URL ● Enable kiosk mode ● Enable full screen ● Enable print dialog 2. Set the following options: ● Configuration on page 46 ● Advanced on page 47 Configuration 1. Click Next... to the next window or click Finish save your settings and close the dialog box. NOTE: 'Allow the user' options are available only in the Administrative Mode. 2. Iceweasel 1.

HP ThinPro Administrator's Guide
Page 55
To add an RGS connection, click Connections > Add. 2. HP Remote Graphics Software (RGS) 1. Select RGS and set the following options: ● Fallback Connection ● Auto start priority ● Auto reconnect ● Allow the user to launch this connection ● Allow the user to edit this connection NOTE: 'Allow the user' options are available only in the Administrative Mode. 2. Advanced 1. Click Finish save your settings and close the dialog box. Set the following options: ● RGS Connection on page 48 ● Advanced on page 49 ENWW Connections 47
To add an RGS connection, click Connections > Add. 2. HP Remote Graphics Software (RGS) 1. Select RGS and set the following options: ● Fallback Connection ● Auto start priority ● Auto reconnect ● Allow the user to launch this connection ● Allow the user to edit this connection NOTE: 'Allow the user' options are available only in the Administrative Mode. 2. Advanced 1. Click Finish save your settings and close the dialog box. Set the following options: ● RGS Connection on page 48 ● Advanced on page 49 ENWW Connections 47

HP ThinPro Administrator's Guide
Page 57
Click Finish save your settings and close the dialog box. Set the following options: ● HP SAM Client on page 50 ● Advanced on page 50 ENWW Connections 49 HP Session Allocation Manager (SAM) 1. Select SAM and set the following options: ● Fallback Connection ● Auto start priority ● Auto reconnect ● Allow the user to launch this connection ● Allow the user to edit this connection NOTE: 'Allow the user' options are available only in the Administrative Mode. 2. Advanced 1. To add a SAM connection, click Connections > Add. 2.
Click Finish save your settings and close the dialog box. Set the following options: ● HP SAM Client on page 50 ● Advanced on page 50 ENWW Connections 49 HP Session Allocation Manager (SAM) 1. Select SAM and set the following options: ● Fallback Connection ● Auto start priority ● Auto reconnect ● Allow the user to launch this connection ● Allow the user to edit this connection NOTE: 'Allow the user' options are available only in the Administrative Mode. 2. Advanced 1. To add a SAM connection, click Connections > Add. 2.

HP ThinPro Administrator's Guide
Page 59
Select XenAPP and set the following options: ● Name ● Server URL ● Username ● Password ● Domain 2. Set the following options: ● Configuration on page 51 ● Advanced on page 52 Configuration 1. To add a XenApp connection, click Connections > Add. 2. Click Next to advance to the next window or click Finish save your settings and close the dialog box. ENWW Connections 51 NOTE: 'Allow the user' options are available only in the Administrative Mode. 2. XenApp 1. Click Finish save your settings and close the dialog box.
Select XenAPP and set the following options: ● Name ● Server URL ● Username ● Password ● Domain 2. Set the following options: ● Configuration on page 51 ● Advanced on page 52 Configuration 1. To add a XenApp connection, click Connections > Add. 2. Click Next to advance to the next window or click Finish save your settings and close the dialog box. ENWW Connections 51 NOTE: 'Allow the user' options are available only in the Administrative Mode. 2. XenApp 1. Click Finish save your settings and close the dialog box.
HP ThinPro Administrator's Guide
Page 60
Click Finish save your settings and close the dialog box. To add a Leostream connection, click Connections > Add. 2. Select Leostream and set the following options: ● Auto start priority ● Auto reconnect ● Allow the user to launch this connection ● Allow the user to edit this connection NOTE: 'Allow the user' options are available only in the Administrative Mode. 2. Leostream 1. Set the following options: ● Network on page 53 ● Advanced on page 54 52 Chapter 2 Installation ENWW Advanced 1.
Click Finish save your settings and close the dialog box. To add a Leostream connection, click Connections > Add. 2. Select Leostream and set the following options: ● Auto start priority ● Auto reconnect ● Allow the user to launch this connection ● Allow the user to edit this connection NOTE: 'Allow the user' options are available only in the Administrative Mode. 2. Leostream 1. Set the following options: ● Network on page 53 ● Advanced on page 54 52 Chapter 2 Installation ENWW Advanced 1.
HP ThinPro Administrator's Guide
Page 62
...; Allow the user to launch this connection ● Allow the user to edit this connection NOTE: 'Allow the user' options are available only in the Administrative Mode. 2. To add a vWorkspace connection, click Connections > Add. 2.
...; Allow the user to launch this connection ● Allow the user to edit this connection NOTE: 'Allow the user' options are available only in the Administrative Mode. 2. To add a vWorkspace connection, click Connections > Add. 2.
HP ThinPro Administrator's Guide
Page 69
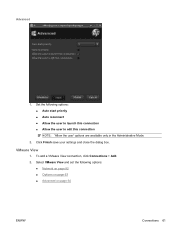
Advanced 1. Set the following options: ● Network on page 62 ● Options on page 63 ● Advanced on page 64 ENWW Connections 61 Select VMware View and set the following options: ● Auto start priority ● Auto reconnect ● Allow the user to launch this connection ● Allow the user to edit this connection NOTE: 'Allow the user' options are available only in the Administrative Mode. 2. VMware View 1. Click Finish save your settings and close the dialog box. To add a VMware View connection, click Connections > Add. 2.
Advanced 1. Set the following options: ● Network on page 62 ● Options on page 63 ● Advanced on page 64 ENWW Connections 61 Select VMware View and set the following options: ● Auto start priority ● Auto reconnect ● Allow the user to launch this connection ● Allow the user to edit this connection NOTE: 'Allow the user' options are available only in the Administrative Mode. 2. VMware View 1. Click Finish save your settings and close the dialog box. To add a VMware View connection, click Connections > Add. 2.

HP ThinPro Administrator's Guide
Page 72
... the user to edit this connection NOTE: 'Allow the user' options are available only in the Administrative Mode. 2. Advanced 1. Set the following options: ● Configuration on page 65 ● Advanced on the HP ThinPro image for the HP t5325 thin client. 1. Xdmcp NOTE: This feature is neither present nor supported on page 67 64 Chapter 2 Installation ENWW...
... the user to edit this connection NOTE: 'Allow the user' options are available only in the Administrative Mode. 2. Advanced 1. Set the following options: ● Configuration on page 65 ● Advanced on the HP ThinPro image for the HP t5325 thin client. 1. Xdmcp NOTE: This feature is neither present nor supported on page 67 64 Chapter 2 Installation ENWW...
HP ThinPro Administrator's Guide
Page 75
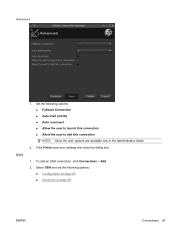
Click Finish save your settings and close the dialog box. 1. Select SSH and set the following options: ● Fallback Connection ● Auto start priority ● Auto reconnect ● Allow the user to launch this connection ● Allow the user to edit this connection NOTE: 'Allow the user' options are available only in the Administrative Mode. 2. To add an SSH connection, click Connections > Add. 2. Set the following options: ● Configuration on page 68 ● Advanced on page 69 ENWW Connections 67 Advanced SSH 1.
Click Finish save your settings and close the dialog box. 1. Select SSH and set the following options: ● Fallback Connection ● Auto start priority ● Auto reconnect ● Allow the user to launch this connection ● Allow the user to edit this connection NOTE: 'Allow the user' options are available only in the Administrative Mode. 2. To add an SSH connection, click Connections > Add. 2. Set the following options: ● Configuration on page 68 ● Advanced on page 69 ENWW Connections 67 Advanced SSH 1.

HP ThinPro Administrator's Guide
Page 78
... the dialog box. 70 Chapter 2 Installation ENWW Click Next to advance to edit this connection NOTE: 'Allow the user' options are available only in the Administrative Mode. 2. Select Telnet and set the following options: ● Name ● Address ● Port ● Style ◦ Foreground color ◦ Background color ◦ Font 2. Set the...
... the dialog box. 70 Chapter 2 Installation ENWW Click Next to advance to edit this connection NOTE: 'Allow the user' options are available only in the Administrative Mode. 2. Select Telnet and set the following options: ● Name ● Address ● Port ● Style ◦ Foreground color ◦ Background color ◦ Font 2. Set the...

HP ThinPro Administrator's Guide
Page 79
... on the HP ThinPro image for the HP t5325 thin client. 1. Select Custom and set the following options: ● Fallback Connection ● Auto start priority ● Auto reconnect ● Allow the user to launch this connection ● Allow the user to edit this connection NOTE: 'Allow the user' options are available only in the Administrative Mode. 2. Advanced...
... on the HP ThinPro image for the HP t5325 thin client. 1. Select Custom and set the following options: ● Fallback Connection ● Auto start priority ● Auto reconnect ● Allow the user to launch this connection ● Allow the user to edit this connection NOTE: 'Allow the user' options are available only in the Administrative Mode. 2. Advanced...
HP ThinPro Administrator's Guide
Page 81
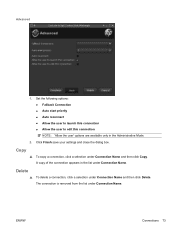
... NOTE: 'Allow the user' options are available only in the list under Connection Name and then click Copy. A copy of the connection appears in the Administrative Mode. 2. Advanced 1. Copy ▲ To copy a connection, click a selection under Connection Name. ENWW Connections 73 Delete ▲ To delete a connection, click a selection under Connection Name. The...
... NOTE: 'Allow the user' options are available only in the list under Connection Name and then click Copy. A copy of the connection appears in the Administrative Mode. 2. Advanced 1. Copy ▲ To copy a connection, click a selection under Connection Name. ENWW Connections 73 Delete ▲ To delete a connection, click a selection under Connection Name. The...

HP ThinPro Administrator's Guide
Page 82
Edit the connection and click Apply. 3. To change what connections are visible in the User Mode. 4. Click Allow to allow the connections to be visible in the User Mode or click Deny to make the connection unavailable in the User Mode, click User View. Click OK. To edit a connection, click a selection under Connection Name... buttons appear above the Connection Name bar. 2. Select one or more of the connections listed. 3. User View NOTE: This feature is available only in the Administrative Mode. 1. Edit 1. The connection settings window for that connection opens. 2.
Edit the connection and click Apply. 3. To change what connections are visible in the User Mode. 4. Click Allow to allow the connections to be visible in the User Mode or click Deny to make the connection unavailable in the User Mode, click User View. Click OK. To edit a connection, click a selection under Connection Name... buttons appear above the Connection Name bar. 2. Select one or more of the connections listed. 3. User View NOTE: This feature is available only in the Administrative Mode. 1. Edit 1. The connection settings window for that connection opens. 2.

Troubleshooting Guide: HP t5325 Thin Clients
Page 36
6 Bootloader The t5325 does not use a BIOS; uBoot allows you must be in administrator mode to configure these settings. Create a ThinState key as described in Restoring the Flash Image on page 29. 8. Safely remove the USB drive from the user... update uBoot: 1. Type 4 to configure a limited number of parameters. Copy the new uBoot binary to the uBoot directory on LAN mode, you to enter "Update uBoot Mode" and follow the on the thin client is displayed. 9. Save the file. 5. Insert the key into a computer. 3. You can set useQuickImageMode to ThinPro. Edit the file ...
6 Bootloader The t5325 does not use a BIOS; uBoot allows you must be in administrator mode to configure these settings. Create a ThinState key as described in Restoring the Flash Image on page 29. 8. Safely remove the USB drive from the user... update uBoot: 1. Type 4 to configure a limited number of parameters. Copy the new uBoot binary to the uBoot directory on LAN mode, you to enter "Update uBoot Mode" and follow the on the thin client is displayed. 9. Save the file. 5. Insert the key into a computer. 3. You can set useQuickImageMode to ThinPro. Edit the file ...


