PC Basics Guide
Page 43
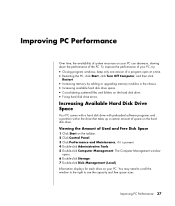
... window to the right to see the capacity and free space sizes. click Start, click Turn Off Computer, and then click Restart. • Increasing memory by adding or upgrading memory modules in the chassis. • Increasing available hard disk drive space. • Consolidating scattered files and folders on the hard disk drive. Information...
... window to the right to see the capacity and free space sizes. click Start, click Turn Off Computer, and then click Restart. • Increasing memory by adding or upgrading memory modules in the chassis. • Increasing available hard disk drive space. • Consolidating scattered files and folders on the hard disk drive. Information...
Limited Warranty and Support Guide
Page 6
... terms and conditions of this EULA, and if applicable, the Certificate of Authenticity. UPGRADES. After upgrading, you may copy the Software Product into Your Computer's temporary memory (RAM) for your HP Product, whether in any portion of the Software Product may use the Software Product for...copy contains all rights not expressly granted to the transfer, the end user receiving the transferred product must include all component parts, media, printed materials, this EULA, all the EULA terms. Upon transfer of the Software Product, your license is automatically terminated. You ...
... terms and conditions of this EULA, and if applicable, the Certificate of Authenticity. UPGRADES. After upgrading, you may copy the Software Product into Your Computer's temporary memory (RAM) for your HP Product, whether in any portion of the Software Product may use the Software Product for...copy contains all rights not expressly granted to the transfer, the end user receiving the transferred product must include all component parts, media, printed materials, this EULA, all the EULA terms. Upon transfer of the Software Product, your license is automatically terminated. You ...
Limited Warranty and Support Guide (Refurbished Desktops)
Page 7
... on more than one -time transfer of the Software Product to all component parts, media, printed materials, this EULA, and if applicable, the Certificate of Authenticity. Reservation of Rights. HP and its online documentation. Freeware. Notwithstanding the terms and conditions of this EULA, all... Use of the Freeware by you shall be governed by the Microsoft License Agreement. 2. After upgrading, you may load the Software Product into the local memory or storage device of the HP Product. ADDITIONAL SOFTWARE. TRANSFER. The term "Software Product" means computer software and may not ...
... on more than one -time transfer of the Software Product to all component parts, media, printed materials, this EULA, and if applicable, the Certificate of Authenticity. Reservation of Rights. HP and its online documentation. Freeware. Notwithstanding the terms and conditions of this EULA, all... Use of the Freeware by you shall be governed by the Microsoft License Agreement. 2. After upgrading, you may load the Software Product into the local memory or storage device of the HP Product. ADDITIONAL SOFTWARE. TRANSFER. The term "Software Product" means computer software and may not ...

PC Troubleshooting and Maintenance Guide
Page 16
... running. Ensure that your PC may not have an internal fan. 12 PC Troubleshooting and Maintenance Guide if the light is pressed. Reinstall the old memory to return your country/region, or refer to the Warranty and Support Guide to mouse movement. 4 Click OK. Reseat drive power, data, and ... the PC to contact Support. when the On button is not on the keyboard to open the Help and Support Center, or refer to the Warranty and Support Guide to the Upgrading and Servicing Guide for replacement details. Keyboard and Mouse (continued) Symptom Cursor moves too fast or too slow. Set...
... running. Ensure that your PC may not have an internal fan. 12 PC Troubleshooting and Maintenance Guide if the light is pressed. Reinstall the old memory to return your country/region, or refer to the Warranty and Support Guide to mouse movement. 4 Click OK. Reseat drive power, data, and ... the PC to contact Support. when the On button is not on the keyboard to open the Help and Support Center, or refer to the Warranty and Support Guide to the Upgrading and Servicing Guide for replacement details. Keyboard and Mouse (continued) Symptom Cursor moves too fast or too slow. Set...

My HP Pavilion PC Brochure
Page 14
... it can run several programs at once without annoying time lags. only Available at www.hpshopping.com 12 Rev up to connect your HP Pavilion PC. It's the easy way to 54 Mbps, without stringing wires! Valid in the U.S. The Linksys Wireless-G Broadband Router is also..., it to a high-speed wireless network! Our HP memory has been specifically tested and qualified for your desktop to a wireless network at up your new PC with a memory upgrade With the combination of your new PC and a power-packing memory upgrade, you can also interoperate with Linksys Share your high...
... it can run several programs at once without annoying time lags. only Available at www.hpshopping.com 12 Rev up to connect your HP Pavilion PC. It's the easy way to 54 Mbps, without stringing wires! Valid in the U.S. The Linksys Wireless-G Broadband Router is also..., it to a high-speed wireless network! Our HP memory has been specifically tested and qualified for your desktop to a wireless network at up your new PC with a memory upgrade With the combination of your new PC and a power-packing memory upgrade, you can also interoperate with Linksys Share your high...

Media Center Software Guide
Page 72
M magicSpot 54 Media Center navigating 5 playing DVDs 47 resizing window 4 Start menu 8 toolbars 4 using muvee autoProducer unPlugged 61 using with another program open 4 viewing your pictures 38 what you can do in My Music 17 in My Pictures 25 in My Videos 43 memory card reader 26 music library adding CD ... movie 51, 57, 65 rotating images clockwise 54 selecting style 55 setting the duration of video 55, 65 setting the style 64 upgrading 66 using muvee in Media Center 61 using settings 64 using the magicMoments feature 53 My Music 17, 63 copying music to CD 24 creating a queue list 22 deleting...
M magicSpot 54 Media Center navigating 5 playing DVDs 47 resizing window 4 Start menu 8 toolbars 4 using muvee autoProducer unPlugged 61 using with another program open 4 viewing your pictures 38 what you can do in My Music 17 in My Pictures 25 in My Videos 43 memory card reader 26 music library adding CD ... movie 51, 57, 65 rotating images clockwise 54 selecting style 55 setting the duration of video 55, 65 setting the style 64 upgrading 66 using muvee in Media Center 61 using settings 64 using the magicMoments feature 53 My Music 17, 63 copying music to CD 24 creating a queue list 22 deleting...

Upgrading and Servicing Guide
Page 3
... or Adding an Optical Drive 5 Removing a Memory Card Reader 5 Installing a Memory Card Reader 6 Removing a Hard Disk Drive 6 Replacing a Hard Disk Drive 8 Adding an Additional Hard Disk Drive 9 Adding Memory 11 Removing a Memory Module 11 Installing a Memory Module 12 Removing or Installing an Add-in ...Card 12 Removing an Add-in Card 13 Installing an Add-in Card 13 Replacing the Battery 14 Upgrading and Servicing Guide iii
... or Adding an Optical Drive 5 Removing a Memory Card Reader 5 Installing a Memory Card Reader 6 Removing a Hard Disk Drive 6 Replacing a Hard Disk Drive 8 Adding an Additional Hard Disk Drive 9 Adding Memory 11 Removing a Memory Module 11 Installing a Memory Module 12 Removing or Installing an Add-in ...Card 12 Removing an Add-in Card 13 Installing an Add-in Card 13 Replacing the Battery 14 Upgrading and Servicing Guide iii

Upgrading and Servicing Guide
Page 7
Upgrading and Servicing Guide 3 Replacing the Front Panel 1 Place the chassis upright, and then align the three tabs on the right side of the front panel ... side panel. 3 See "After Closing the PC" on page 2. Removing the Front Panel This procedure is necessary only when removing or replacing an optical drive, a memory card reader, or a hard disk drive. 1 Locate the three small tabs attached to the front panel on the side of the chassis. 2 Press each tab...
Upgrading and Servicing Guide 3 Replacing the Front Panel 1 Place the chassis upright, and then align the three tabs on the right side of the front panel ... side panel. 3 See "After Closing the PC" on page 2. Removing the Front Panel This procedure is necessary only when removing or replacing an optical drive, a memory card reader, or a hard disk drive. 1 Locate the three small tabs attached to the front panel on the side of the chassis. 2 Press each tab...

Upgrading and Servicing Guide
Page 8
...the correct software and drivers for the optical drive to work with the Microsoft ® Windows® XP operating system. Locating Components Inside the PC A Memory card reader B Upper optical drive bay, may be a CD-ROM, CD-RW, DVD-ROM, DVD+RW, or combination drive C Lower optical drive ... Media Drive bay) E HP Personal Media Drive bay Removing an Optical Drive 1 Complete the procedures to prepare the PC and to remove the side panel as described in "Opening and Closing the PC" on the side of the optical drive you want to replace before removing the cables. 4 Upgrading and Servicing...
...the correct software and drivers for the optical drive to work with the Microsoft ® Windows® XP operating system. Locating Components Inside the PC A Memory card reader B Upper optical drive bay, may be a CD-ROM, CD-RW, DVD-ROM, DVD+RW, or combination drive C Lower optical drive ... Media Drive bay) E HP Personal Media Drive bay Removing an Optical Drive 1 Complete the procedures to prepare the PC and to remove the side panel as described in "Opening and Closing the PC" on the side of the optical drive you want to replace before removing the cables. 4 Upgrading and Servicing...

Upgrading and Servicing Guide
Page 9
...way; See "Replacing the Front Panel" on page 1. 2 Remove the front panel. To ensure that came with another memory card reader. Upgrading and Servicing Guide 5 Disconnect the sound cable, if present. 6 Pull the drive out through the front of the ...PC. See "Opening and Closing the PC" on page 1. 2 Remove the front panel. Removing a Memory Card Reader Your PC has a memory card reader above your optical drive bay is empty, remove the drive cover by pressing the tabs on page... cables. 6 Connect the power cable and data cable to purchase the replacement memory card reader from HP.
...way; See "Replacing the Front Panel" on page 1. 2 Remove the front panel. To ensure that came with another memory card reader. Upgrading and Servicing Guide 5 Disconnect the sound cable, if present. 6 Pull the drive out through the front of the ...PC. See "Opening and Closing the PC" on page 1. 2 Remove the front panel. Removing a Memory Card Reader Your PC has a memory card reader above your optical drive bay is empty, remove the drive cover by pressing the tabs on page... cables. 6 Connect the power cable and data cable to purchase the replacement memory card reader from HP.

Upgrading and Servicing Guide
Page 10
... the (primary) hard disk drive attached to load the factoryinstalled files. Installing a Memory Card Reader 1 Complete the procedures to prepare the PC and to remove the side panel as a CD, before removing the cables. 6 Upgrading and Servicing Guide Please read "System Recovery" in your PC. The hard disk ...storage device, such as described in "Opening and Closing the PC" on the hard disk drive to the hard disk drive and back of the HP Personal Media Drive bay before removing the hard disk drive. See "Removing the Front Panel" on page 1. 2 Remove the front panel. CAUTION: Back ...
... the (primary) hard disk drive attached to load the factoryinstalled files. Installing a Memory Card Reader 1 Complete the procedures to prepare the PC and to remove the side panel as a CD, before removing the cables. 6 Upgrading and Servicing Guide Please read "System Recovery" in your PC. The hard disk ...storage device, such as described in "Opening and Closing the PC" on the hard disk drive to the hard disk drive and back of the HP Personal Media Drive bay before removing the hard disk drive. See "Removing the Front Panel" on page 1. 2 Remove the front panel. CAUTION: Back ...
Upgrading and Servicing Guide
Page 15
... to the original Serial ATA drive that was installed in -line memory modules). WARNING: Do not pull the memory module out of memory module could damage the system. WARNING: Using the wrong type of the socket. Upgrading and Servicing Guide 11 See "Opening and Closing the PC" on... page 3. 3 Remove the hard disk drive. The exact number of memory module your Warranty and Support Guide and click the Support link. Adding Memory The motherboard contains sockets for specific memory module information...
... to the original Serial ATA drive that was installed in -line memory modules). WARNING: Do not pull the memory module out of memory module could damage the system. WARNING: Using the wrong type of the socket. Upgrading and Servicing Guide 11 See "Opening and Closing the PC" on... page 3. 3 Remove the hard disk drive. The exact number of memory module your Warranty and Support Guide and click the Support link. Adding Memory The motherboard contains sockets for specific memory module information...

Upgrading and Servicing Guide
Page 16
... ends snap into a PC add-in card. 12 Upgrading and Servicing Guide Or • If you are replacing a memory module, put the new memory module in only one with all add-in the next available sockets. 2 Hold the new memory module by installing add-in the PC. Avoid touching the...PC. The PC component configurations vary by 2 amps. Installing a Memory Module Upgrade the memory in your PC with memory of the same type and speed as the memory originally installed in card slots that can be installed in the same memory slot from the antistatic packaging. See "Opening and Closing the PC...
... ends snap into a PC add-in card. 12 Upgrading and Servicing Guide Or • If you are replacing a memory module, put the new memory module in only one with all add-in the next available sockets. 2 Hold the new memory module by installing add-in the PC. Avoid touching the...PC. The PC component configurations vary by 2 amps. Installing a Memory Module Upgrade the memory in your PC with memory of the same type and speed as the memory originally installed in card slots that can be installed in the same memory slot from the antistatic packaging. See "Opening and Closing the PC...
Upgrading and Servicing Guide
Page 18
... 2 Gently lay the PC on its side. 3 Remove any cabling, if necessary, to reach the battery. 4 Remove any memory modules, if necessary, to reach the battery. See "Opening and Closing the PC" on the motherboard provides backup power for the ...and to remove the side panel as described in the socket, with the positive (+) side facing the latch. 7 Replace memory modules or cables you removed. 8 Set the chassis upright. 9 Complete the procedures to replace the side panel, and...the battery is incorrectly replaced. Replacing the Battery A lithium battery on page 1. 14 Upgrading and Servicing Guide
... 2 Gently lay the PC on its side. 3 Remove any cabling, if necessary, to reach the battery. 4 Remove any memory modules, if necessary, to reach the battery. See "Opening and Closing the PC" on the motherboard provides backup power for the ...and to remove the side panel as described in the socket, with the positive (+) side facing the latch. 7 Replace memory modules or cables you removed. 8 Set the chassis upright. 9 Complete the procedures to replace the side panel, and...the battery is incorrectly replaced. Replacing the Battery A lithium battery on page 1. 14 Upgrading and Servicing Guide

Upgrading and Servicing Guide
Page 3
... a Hard Disk Drive 10 Before You Begin 10 Removing a Hard Disk Drive 10 Replacing a Hard Disk Drive 12 Removing and Replacing Memory 13 Before You Begin 13 Removing a Memory Module 14 Replacing a Memory Module 15 Removing and Replacing a PCI Card 16 Before You Begin 16 Removing a PCI Card 16 Replacing a PCI Card 17...
... a Hard Disk Drive 10 Before You Begin 10 Removing a Hard Disk Drive 10 Replacing a Hard Disk Drive 12 Removing and Replacing Memory 13 Before You Begin 13 Removing a Memory Module 14 Replacing a Memory Module 15 Removing and Replacing a PCI Card 16 Before You Begin 16 Removing a PCI Card 16 Replacing a PCI Card 17...

Upgrading and Servicing Guide
Page 5
.... WARNING: Avoid touching sharp edges inside the PC. Upgrading and Servicing Guide 1 Introduction The Upgrading and Servicing Guide provides instructions on how to remove and replace the following hardware components in your HP Pavilion Slimline Desktop PC: • Optical disc drive • Hard disk drive • Memory module • Modem card (PCI card) • Battery...
.... WARNING: Avoid touching sharp edges inside the PC. Upgrading and Servicing Guide 1 Introduction The Upgrading and Servicing Guide provides instructions on how to remove and replace the following hardware components in your HP Pavilion Slimline Desktop PC: • Optical disc drive • Hard disk drive • Memory module • Modem card (PCI card) • Battery...

Upgrading and Servicing Guide
Page 6
... damage the electronic components of static electricity by briefly touching a grounded metal object. • HP recommends that you open up and examine the PC. WARNING: Always disconnect the modem cord from...that you are discharged of the PC or optional equipment. Failure to do any memory card from the memory card reader or an optical disc (CD or DVD) from the electrical outlet....Turn off the PC: a Click the Start button on system electronic components. • You need to upgrade or service the PC: • Print out this order before opening the cover. 4 Disconnect the power...
... damage the electronic components of static electricity by briefly touching a grounded metal object. • HP recommends that you open up and examine the PC. WARNING: Always disconnect the modem cord from...that you are discharged of the PC or optional equipment. Failure to do any memory card from the memory card reader or an optical disc (CD or DVD) from the electrical outlet....Turn off the PC: a Click the Start button on system electronic components. • You need to upgrade or service the PC: • Print out this order before opening the cover. 4 Disconnect the power...

Upgrading and Servicing Guide
Page 8
... the following illustration shows component locations: 4 Upgrading and Servicing Guide Read the "Before You Begin" section at the start of each component procedure. This section contains requirements and important information about the replaceable component. "Removing and Replacing the Battery" on page 6. E Battery. "Removing and Replacing Memory" on page 13. May be a CD...
... the following illustration shows component locations: 4 Upgrading and Servicing Guide Read the "Before You Begin" section at the start of each component procedure. This section contains requirements and important information about the replaceable component. "Removing and Replacing the Battery" on page 6. E Battery. "Removing and Replacing Memory" on page 13. May be a CD...

Upgrading and Servicing Guide
Page 17
Refer to the PC Troubleshooting Guide for specific memory module information and specifications: 1 Go to http://www.hp.com/support in -line memory modules). WARNING: Handle the memory module with care. Before You Begin Observe the following requirements before removing and replacing the component: To determine ... and power supply cables to the back of memory module could damage the system. Memory module WARNING: Using the wrong type of the hard disk drive. 7 Complete the procedures to replace the PC cover and close the PC. Upgrading and Servicing Guide 13 Be careful to replace ...
Refer to the PC Troubleshooting Guide for specific memory module information and specifications: 1 Go to http://www.hp.com/support in -line memory modules). WARNING: Handle the memory module with care. Before You Begin Observe the following requirements before removing and replacing the component: To determine ... and power supply cables to the back of memory module could damage the system. Memory module WARNING: Using the wrong type of the hard disk drive. 7 Complete the procedures to replace the PC cover and close the PC. Upgrading and Servicing Guide 13 Be careful to replace ...


