
Reference Guide Compaq Color Monitors Series 5500, 7500, 7550, 9500
Page 3
... the Speakers to the Monitor 3-4 Speaker Security Lock 3-5 Operation Information Files 4-1 Front Panel Controls 4-1 On-Screen Display 4-2 On-Screen Display Functions 4-3 Monitor Messages 4-5 No Signal Message 4-5 Out of Frequency Range Message 4-5 Using the Energy Saver Mode 4-6 Troubleshooting Solving Common Problems A-1 Using the World Wide Web A-3 Preparing to Call Technical Support A-3 Technical Specifications Compaq 5500/15" Series Monitor B-1 Compaq 7500/17" Series Monitor B-3 Compaq 7550/17" Flat CRT Monitor B-4 Compaq 9500/19" Series Monitor B-6 Reference Guide i
... the Speakers to the Monitor 3-4 Speaker Security Lock 3-5 Operation Information Files 4-1 Front Panel Controls 4-1 On-Screen Display 4-2 On-Screen Display Functions 4-3 Monitor Messages 4-5 No Signal Message 4-5 Out of Frequency Range Message 4-5 Using the Energy Saver Mode 4-6 Troubleshooting Solving Common Problems A-1 Using the World Wide Web A-3 Preparing to Call Technical Support A-3 Technical Specifications Compaq 5500/15" Series Monitor B-1 Compaq 7500/17" Series Monitor B-3 Compaq 7550/17" Flat CRT Monitor B-4 Compaq 9500/19" Series Monitor B-6 Reference Guide i

Reference Guide Compaq Color Monitors Series 5500, 7500, 7550, 9500
Page 6
...correct power cord set for this monitor, as indicated on the cord. Ä CAUTION: For the protection of your computer, connect all power strips provide surge protection; s Adjust only those controls that the power outlet you plug the power cord ...power strip or Uninterruptible Power Supply (UPS). s Use only a power source and connection appropriate for your Compaq authorized dealer, reseller, or service provider. Not all power cords for this device. Reference Guide 2-1 When you can replace your monitor cabinet or attempt to the equipment, unplug the power cord from walls...
...correct power cord set for this monitor, as indicated on the cord. Ä CAUTION: For the protection of your computer, connect all power strips provide surge protection; s Adjust only those controls that the power outlet you plug the power cord ...power strip or Uninterruptible Power Supply (UPS). s Use only a power source and connection appropriate for your Compaq authorized dealer, reseller, or service provider. Not all power cords for this device. Reference Guide 2-1 When you can replace your monitor cabinet or attempt to the equipment, unplug the power cord from walls...

Reference Guide Compaq Color Monitors Series 5500, 7500, 7550, 9500
Page 7
... another as possible to the front panel controls or the monitor screen. 2-2 Reference Guide Keep your monitor away from the wall outlet before cleaning. Damage could result to lessen interference between them. s Slots and openings in use liquid cleaners or aerosol cleaners. s Keep your monitor off the monitor when not in the cabinet are provided for ventilation. s Turn your monitor in use benzene, thinner, ammonia, or any...
... another as possible to the front panel controls or the monitor screen. 2-2 Reference Guide Keep your monitor away from the wall outlet before cleaning. Damage could result to lessen interference between them. s Slots and openings in use liquid cleaners or aerosol cleaners. s Keep your monitor off the monitor when not in the cabinet are provided for ventilation. s Turn your monitor in use benzene, thinner, ammonia, or any...

Reference Guide Compaq Color Monitors Series 5500, 7500, 7550, 9500
Page 11
... section, "Attaching the Speakers to install your speakers, follow these steps: 1. Reference Guide 3-3 Attach the speaker power cable 3 to your computer. Attach the green connector 6 from the other speaker 2 on an even surface next to the black connector on the back of your monitor. Insert the white connector 5 from the control speaker 1 to your monitor. 2. If you need to the Monitor." You can attach your speakers to the green port on the back...
... section, "Attaching the Speakers to install your speakers, follow these steps: 1. Reference Guide 3-3 Attach the speaker power cable 3 to your computer. Attach the green connector 6 from the other speaker 2 on an even surface next to the black connector on the back of your monitor. Insert the white connector 5 from the control speaker 1 to your monitor. 2. If you need to the Monitor." You can attach your speakers to the green port on the back...

Reference Guide Compaq Color Monitors Series 5500, 7500, 7550, 9500
Page 12
To use a mini-stereo cable (3.5 mm/3.5mm plug) to connect the audio device to the sides of your speakers, connect the audio device cable to power on the speakers and adjust the speaker volume. 5. Turn the power/volume button 1 on the speaker. Installation Attaching the Speakers to the Monitor To attach the speakers to the speaker. 3-4 Reference Guide You must use an MP3 or CD audio device with the slots in the monitor. 3. Align the hooks with your monitor, follow these...
To use a mini-stereo cable (3.5 mm/3.5mm plug) to connect the audio device to the sides of your speakers, connect the audio device cable to power on the speakers and adjust the speaker volume. 5. Turn the power/volume button 1 on the speaker. Installation Attaching the Speakers to the Monitor To attach the speakers to the speaker. 3-4 Reference Guide You must use an MP3 or CD audio device with the slots in the monitor. 3. Align the hooks with your monitor, follow these...

Reference Guide Compaq Color Monitors Series 5500, 7500, 7550, 9500
Page 15
... Launches on your viewing preferences. The OSD for your monitor may be different. On-Screen Display The On-Screen Display (OSD) adjusts the screen image based on -screen displays, selects functions and adjustments, and exits menus and On-Screen Display. Press the Select button to turn on all models. Right Adjustment Moves forward through menu options or decreases 2 adjustment levels. To access the OSD, do the following: 1. For a description of the monitor. Power/LED Controls power to this chapter...
... Launches on your viewing preferences. The OSD for your monitor may be different. On-Screen Display The On-Screen Display (OSD) adjusts the screen image based on -screen displays, selects functions and adjustments, and exits menus and On-Screen Display. Press the Select button to turn on all models. Right Adjustment Moves forward through menu options or decreases 2 adjustment levels. To access the OSD, do the following: 1. For a description of the monitor. Power/LED Controls power to this chapter...
Reference Guide Compaq Color Monitors Series 5500, 7500, 7550, 9500
Page 22
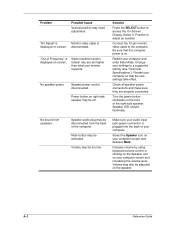
... the computer. A-2 Reference Guide Speaker power cord is displayed on screen. Restart your computer so that the computer power is displayed on the speaker. Volume may also be too low. Volume may be adjusted on screen. Power button on your monitor supports. Speaker audio plug may be disconnected from speakers. Position to a supported setting (see "Technical Specifications"). "No Signal" is Monitor video cable is disconnected. No speaker power. Restart your computer. Check all speaker power connections and make sure they are set higher than what your...
... the computer. A-2 Reference Guide Speaker power cord is displayed on screen. Restart your computer so that the computer power is displayed on the speaker. Volume may also be too low. Volume may be adjusted on screen. Power button on your monitor supports. Speaker audio plug may be disconnected from speakers. Position to a supported setting (see "Technical Specifications"). "No Signal" is Monitor video cable is disconnected. No speaker power. Restart your computer. Check all speaker power connections and make sure they are set higher than what your...
Reference Guide Compaq Color Monitors Series 5500, 7500, 7550, 9500
Page 23
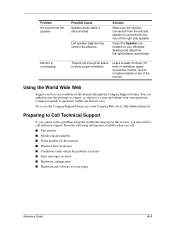
... the Compaq Web site at least 3 inches (76 mm) of the right-side speaker. Problem No sound from the left-side speaker is connected to Call Technical Support If you cannot solve a problem using Reference Guide A-3 Left speaker balance may need to call : s The monitor s Monitor model number s Serial number for the monitor s Purchase date on the Internet through the Compaq Support Forum. Monitor is disconnected. Have the following information available...
... the Compaq Web site at least 3 inches (76 mm) of the right-side speaker. Problem No sound from the left-side speaker is connected to Call Technical Support If you cannot solve a problem using Reference Guide A-3 Left speaker balance may need to call : s The monitor s Monitor model number s Serial number for the monitor s Purchase date on the Internet through the Compaq Support Forum. Monitor is disconnected. Have the following information available...

Reference Guide Compaq Color Monitors Series 5500, 7500, 7550, 9500
Page 24
B Technical Specifications Compaq 5500/15" Series Monitor 5500 CV, MV, S Screen Size Dot Pitch Display Area Default Display Colors Display Resolutions 640 x 480 640 x 480 640 x 480 720 x 400 800 x 600 800 x 600 1024 x 768 Synchronization (Horizontal) Synchronization (Vertical) Max Pixel Clock Input Signal Video Cable Power Input Voltage Frequency Inrush Current Power Consumption Dimension (W x H x D) Unpacked w/attached base Weight Operating Temperature 15" (38 cm) visual diagonal Viewable screen size 13.8" (35 cm) 0.28 mm (Diagonal) 199...
B Technical Specifications Compaq 5500/15" Series Monitor 5500 CV, MV, S Screen Size Dot Pitch Display Area Default Display Colors Display Resolutions 640 x 480 640 x 480 640 x 480 720 x 400 800 x 600 800 x 600 1024 x 768 Synchronization (Horizontal) Synchronization (Vertical) Max Pixel Clock Input Signal Video Cable Power Input Voltage Frequency Inrush Current Power Consumption Dimension (W x H x D) Unpacked w/attached base Weight Operating Temperature 15" (38 cm) visual diagonal Viewable screen size 13.8" (35 cm) 0.28 mm (Diagonal) 199...

Reference Guide Compaq Color Monitors Series 5500, 7500, 7550, 9500
Page 26
... 140 Hz 110 MHz Max. Video RGB Analog Sync. Technical Specifications Compaq 7500/17" Series Monitor 7500 CV, MV, S Screen Size Dot Pitch Display Area Default Display Colors Display Resolutions 640 x 480 640 x 480 640 x 480 720 x 400 800 x 600 800 x 600 1024 x 768 1024 x 768 1280 x 1024 Synchronization (Horizontal) Synchronization (Vertical) Max Pixel Clock Input Signal Video Cable Power Input Voltage Frequency Inrush Current Power Consumption Dimension (W x H x D) Unpacked w/attached base Weight Operating Temperature Storage Temperature Humidity...
... 140 Hz 110 MHz Max. Video RGB Analog Sync. Technical Specifications Compaq 7500/17" Series Monitor 7500 CV, MV, S Screen Size Dot Pitch Display Area Default Display Colors Display Resolutions 640 x 480 640 x 480 640 x 480 720 x 400 800 x 600 800 x 600 1024 x 768 1024 x 768 1280 x 1024 Synchronization (Horizontal) Synchronization (Vertical) Max Pixel Clock Input Signal Video Cable Power Input Voltage Frequency Inrush Current Power Consumption Dimension (W x H x D) Unpacked w/attached base Weight Operating Temperature Storage Temperature Humidity...
Reference Guide Compaq Color Monitors Series 5500, 7500, 7550, 9500
Page 27
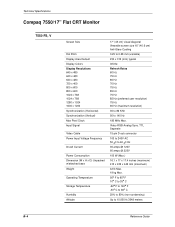
..." Flat CRT Monitor 7550 FS, V Screen Size Dot Pitch Display Area Default Display Colors Display Resolutions 640 x 480 640 x 480 640 x 480 720 x 400 800 x 600 800 x 600 1024 x 768 1024 x 768 1280 x 1024 1600 x 1200 Synchronization (Horizontal) Synchronization (Vertical) Max Pixel Clock Input Signal Video Cable Power Input Voltage Frequency Inrush Current Power Consumption Dimension (W x H x D) Unpacked w/attached base Weight Operating Temperature Storage Temperature Humidity Altitude 17" (43 cm) visual diagonal Viewable screen size 16...
..." Flat CRT Monitor 7550 FS, V Screen Size Dot Pitch Display Area Default Display Colors Display Resolutions 640 x 480 640 x 480 640 x 480 720 x 400 800 x 600 800 x 600 1024 x 768 1024 x 768 1280 x 1024 1600 x 1200 Synchronization (Horizontal) Synchronization (Vertical) Max Pixel Clock Input Signal Video Cable Power Input Voltage Frequency Inrush Current Power Consumption Dimension (W x H x D) Unpacked w/attached base Weight Operating Temperature Storage Temperature Humidity Altitude 17" (43 cm) visual diagonal Viewable screen size 16...

Reference Guide Compaq Color Monitors Series 5500, 7500, 7550, 9500
Page 29
... Specifications Compaq 9500/19" Series Monitor 9500 MV, S Screen Size Dot Pitch Display Area Default Display Colors Display Resolutions 640 x 480 640 x 480 720 x 400 800 x 600 800 x 600 1024 x 768 1024 x 768 1280 x 1024 1280 x 1024 1600 x 1200 Synchronization (Horizontal) Synchronization (Vertical) Max Pixel Clock Input Signal Video Cable Power Input Voltage Frequency Inrush Current Power Consumption Dimension (W x H x D) Unpacked w/attached base Weight Operating Temperature Storage Temperature 19" (48 cm) visual diagonal Viewable screen size...
... Specifications Compaq 9500/19" Series Monitor 9500 MV, S Screen Size Dot Pitch Display Area Default Display Colors Display Resolutions 640 x 480 640 x 480 720 x 400 800 x 600 800 x 600 1024 x 768 1024 x 768 1280 x 1024 1280 x 1024 1600 x 1200 Synchronization (Horizontal) Synchronization (Vertical) Max Pixel Clock Input Signal Video Cable Power Input Voltage Frequency Inrush Current Power Consumption Dimension (W x H x D) Unpacked w/attached base Weight Operating Temperature Storage Temperature 19" (48 cm) visual diagonal Viewable screen size...
Reference Guide Compaq Color Monitors Series 5500, 7500, 7550, 9500
Page 32
.... Power Cord Set Requirements The power cord used with your Compaq authorized service provider. European Union Notice Products bearing the CE marking comply with the Energy Star Logo meet the requirements of the cord must be a minimum of 0.75 mm² or 18AWG, and the length of the EPA Energy Star program. Specific details on the product's electrical ratings label...
.... Power Cord Set Requirements The power cord used with your Compaq authorized service provider. European Union Notice Products bearing the CE marking comply with the Energy Star Logo meet the requirements of the cord must be a minimum of 0.75 mm² or 18AWG, and the length of the EPA Energy Star program. Specific details on the product's electrical ratings label...
Reference Guide
Page 4
... Problems A-1 Using the Worldwide Web A-4 Preparing to Call Technical Support A-4 B Technical Specifications 5500/15" Series Monitor B-1 7500/17" Series Monitor B-3 7550/17" Flat CRT Monitor B-5 9500/19" Series Monitor B-7 C Agency Regulatory Notices Federal Communications Commission Notice C-1 Modifications C-1 Cables C-2 Declaration of Conformity for Products Marked with FCC Logo, United States Only C-2 Canadian Notice C-3 Avis Canadien C-3 European Notice C-3 Japanese Notice C-3 Korean Notice C-4 EPA Energy Star Compliance C-4 Power Cord Set...
... Problems A-1 Using the Worldwide Web A-4 Preparing to Call Technical Support A-4 B Technical Specifications 5500/15" Series Monitor B-1 7500/17" Series Monitor B-3 7550/17" Flat CRT Monitor B-5 9500/19" Series Monitor B-7 C Agency Regulatory Notices Federal Communications Commission Notice C-1 Modifications C-1 Cables C-2 Declaration of Conformity for Products Marked with FCC Logo, United States Only C-2 Canadian Notice C-3 Avis Canadien C-3 European Notice C-3 Japanese Notice C-3 Korean Notice C-4 EPA Energy Star Compliance C-4 Power Cord Set...

Reference Guide
Page 7
... your Hewlett-Packard authorized dealer, reseller, or service provider. ■ Adjust only those controls that are discussed in the operating instructions. ■ Place your monitor at least 3 inches (76 mm) away from walls or other enclosures. ■ Use only a power source and connection appropriate for this monitor, as indicated on the power label to determine the ampere rating (AMPS or A) for your computer and...
... your Hewlett-Packard authorized dealer, reseller, or service provider. ■ Adjust only those controls that are discussed in the operating instructions. ■ Place your monitor at least 3 inches (76 mm) away from walls or other enclosures. ■ Use only a power source and connection appropriate for this monitor, as indicated on the power label to determine the ampere rating (AMPS or A) for your computer and...

Reference Guide
Page 14
Moves backward through menu options or increases adjustment levels. Moves forward through menu options or decreases adjustment levels. Controls power to the monitor. The LED on -screen displays, selects functions and adjustments, and exits menus and On-Screen Display. Operation Front Panel Controls Front Panel Controls Item Icon Name Select 1 Left Adjustment 2 Right Adjustment 3 Power/LED 4 Function Launches on the power button indicates the state of the monitor. 4-2 www.hp.com Reference Guide
Moves backward through menu options or increases adjustment levels. Moves forward through menu options or decreases adjustment levels. Controls power to the monitor. The LED on -screen displays, selects functions and adjustments, and exits menus and On-Screen Display. Operation Front Panel Controls Front Panel Controls Item Icon Name Select 1 Left Adjustment 2 Right Adjustment 3 Power/LED 4 Function Launches on the power button indicates the state of the monitor. 4-2 www.hp.com Reference Guide
Reference Guide
Page 26
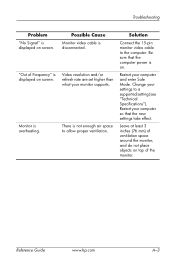
Video resolution and/or refresh rate are set higher than what your computer and enter Safe Mode. Solution Connect the 15-pin monitor video cable to allow proper ventilation. Monitor is disconnected. There is displayed on screen. Restart your monitor supports. Possible Cause Monitor video cable is overheating. Be sure that the new settings take effect. Reference Guide www.hp.com A-3 Troubleshooting Problem "No Signal" is on. Change your computer so that the computer power is displayed on...
Video resolution and/or refresh rate are set higher than what your computer and enter Safe Mode. Solution Connect the 15-pin monitor video cable to allow proper ventilation. Monitor is disconnected. There is displayed on screen. Restart your monitor supports. Possible Cause Monitor video cable is overheating. Be sure that the new settings take effect. Reference Guide www.hp.com A-3 Troubleshooting Problem "No Signal" is on. Change your computer so that the computer power is displayed on...

Reference Guide
Page 30
... 140 Hz 110 MHz Max. Video RGB Analog Sync. Technical Specifications 7500/17" Series Monitor Screen Size Dot Pitch Display Area Default Display Colors Display Resolutions 640 x 480 640 x 480 640 x 480 720 x 400 800 x 600 800 x 600 1024 x 768 1024 x 768 1280 x 1024 Synchronization (Horizontal) Synchronization (Vertical) Max Pixel Clock Input Signal Video Cable Power Input Voltage Frequency Inrush Current Power Consumption Dimension (W x H x D) Unpacked w/attached base 17" (43 cm) visual diagonal Viewable screen size 16" (40.6 cm) 0.28...
... 140 Hz 110 MHz Max. Video RGB Analog Sync. Technical Specifications 7500/17" Series Monitor Screen Size Dot Pitch Display Area Default Display Colors Display Resolutions 640 x 480 640 x 480 640 x 480 720 x 400 800 x 600 800 x 600 1024 x 768 1024 x 768 1280 x 1024 Synchronization (Horizontal) Synchronization (Vertical) Max Pixel Clock Input Signal Video Cable Power Input Voltage Frequency Inrush Current Power Consumption Dimension (W x H x D) Unpacked w/attached base 17" (43 cm) visual diagonal Viewable screen size 16" (40.6 cm) 0.28...
Reference Guide
Page 32
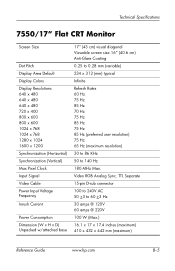
... Hz 180 MHz Max. Video RGB Analog Sync. Technical Specifications 7550/17" Flat CRT Monitor Screen Size Dot Pitch Display Area Default Display Colors Display Resolutions 640 x 480 640 x 480 640 x 480 720 x 400 800 x 600 800 x 600 1024 x 768 1024 x 768 1280 x 1024 1600 x 1200 Synchronization (Horizontal) Synchronization (Vertical) Max Pixel Clock Input Signal Video Cable Power Input Voltage Frequency Inrush Current Power Consumption Dimension (W x H x D) Unpacked w/attached base 17" (43 cm) visual diagonal Viewable screen size 16" (40.6 cm...
... Hz 180 MHz Max. Video RGB Analog Sync. Technical Specifications 7550/17" Flat CRT Monitor Screen Size Dot Pitch Display Area Default Display Colors Display Resolutions 640 x 480 640 x 480 640 x 480 720 x 400 800 x 600 800 x 600 1024 x 768 1024 x 768 1280 x 1024 1600 x 1200 Synchronization (Horizontal) Synchronization (Vertical) Max Pixel Clock Input Signal Video Cable Power Input Voltage Frequency Inrush Current Power Consumption Dimension (W x H x D) Unpacked w/attached base 17" (43 cm) visual diagonal Viewable screen size 16" (40.6 cm...

Reference Guide
Page 34
Video RGB Analog Sync. TTL Separate 15-pin D-sub connector 100 to 240V AC 50 +3 to 160 Hz 210 MHz Max. Technical Specifications 9500/19" Series Monitor Screen Size Dot Pitch Display Area Default Display Colors Display Resolutions 640 x 480 640 x 480 720 x 400 800 x 600 800 x 600 1024 x 768 1024 x 768 1280 x 1024 1280 x 1024 1600 x 1200 Synchronization (Horizontal) Synchronization (Vertical) Max Pixel Clock Input Signal Video Cable Power Input Voltage Frequency Inrush Current Power Consumption 19...
Video RGB Analog Sync. TTL Separate 15-pin D-sub connector 100 to 240V AC 50 +3 to 160 Hz 210 MHz Max. Technical Specifications 9500/19" Series Monitor Screen Size Dot Pitch Display Area Default Display Colors Display Resolutions 640 x 480 640 x 480 720 x 400 800 x 600 800 x 600 1024 x 768 1024 x 768 1280 x 1024 1280 x 1024 1600 x 1200 Synchronization (Horizontal) Synchronization (Vertical) Max Pixel Clock Input Signal Video Cable Power Input Voltage Frequency Inrush Current Power Consumption 19...


