Upgrading and Servicing Guide
Page 14
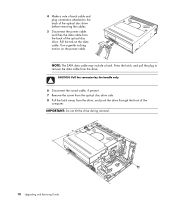
... during removal. 10 Upgrading and Servicing Guide NOTE: The SATA data cable may include a latch. CAUTION: Pull the connector by the handle only. 6 Disconnect the sound cable, if present. 7 Remove the screw from the optical disc drive side. 8 Pull the latch away from the drive. Press the latch, and pull the...
... during removal. 10 Upgrading and Servicing Guide NOTE: The SATA data cable may include a latch. CAUTION: Pull the connector by the handle only. 6 Disconnect the sound cable, if present. 7 Remove the screw from the optical disc drive side. 8 Pull the latch away from the drive. Press the latch, and pull the...
Upgrading and Servicing Guide
Page 15
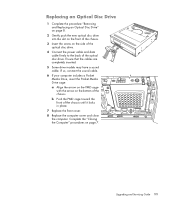
...the Computer" procedures on the bottom of the chassis. b Push the PMD cage toward the front of the optical disc drive. If so, connect the sound cable. 6 If your computer includes a Pocket Media Drive, insert the Pocket Media Drive cage: a Align the arrow on the PMD cage with the ...arrow on page 7. Upgrading and Servicing Guide 11 Ensure that the cables are completely inserted. 5 Some drive models may have a sound cable. Replacing an Optical Disc Drive 1 Complete the procedure "Removing and Replacing an Optical Disc Drive" on page 8. 2 Gently push the new optical ...
...the Computer" procedures on the bottom of the chassis. b Push the PMD cage toward the front of the optical disc drive. If so, connect the sound cable. 6 If your computer includes a Pocket Media Drive, insert the Pocket Media Drive cage: a Align the arrow on the PMD cage with the ...arrow on page 7. Upgrading and Servicing Guide 11 Ensure that the cables are completely inserted. 5 Some drive models may have a sound cable. Replacing an Optical Disc Drive 1 Complete the procedure "Removing and Replacing an Optical Disc Drive" on page 8. 2 Gently push the new optical ...

Advanced Setup Guide
Page 4
Connecting Speakers or Microphone 17 Sound Connector Types 17 Connecting a Microphone 20 Speaker Configurations 21 Speaker types 22 Connecting 2/2.1 (Two speakers and a subwoofer) audio speakers 22 Connecting 4.1 (Four speakers and a... home audio installation procedure 31 7.1 home audio installation 33 7.1 home audio installation procedure 34 Connecting digital audio 35 Connecting Speakers Using the Creative Sound Blaster X-Fi Sound Card 37 Connecting the speakers 37 Connecting the FlexiJack connector 38 Connecting the Television Signal and Video Cables 39 Using TV Cables 39 Audio...
Connecting Speakers or Microphone 17 Sound Connector Types 17 Connecting a Microphone 20 Speaker Configurations 21 Speaker types 22 Connecting 2/2.1 (Two speakers and a subwoofer) audio speakers 22 Connecting 4.1 (Four speakers and a... home audio installation procedure 31 7.1 home audio installation 33 7.1 home audio installation procedure 34 Connecting digital audio 35 Connecting Speakers Using the Creative Sound Blaster X-Fi Sound Card 37 Connecting the speakers 37 Connecting the FlexiJack connector 38 Connecting the Television Signal and Video Cables 39 Using TV Cables 39 Audio...

Advanced Setup Guide
Page 23
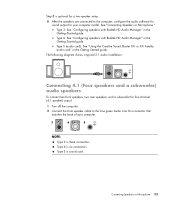
...the computer has multichannel audio speaker capacity (select models only), you can connect four channels for four-speaker output, or six channels for sound output. Connecting Speakers or Microphone 17 Connecting Speakers or Microphone Speakers are included with the monitor (select models only), or they are ...of the computer: Three connectors Six connectors Audio card The connectors are sold separately. Your system may include one of three analog sound connector types on the back of the computer to speakers and microphones. For details about connecting stereo speakers to the computer, ...
...the computer has multichannel audio speaker capacity (select models only), you can connect four channels for four-speaker output, or six channels for sound output. Connecting Speakers or Microphone 17 Connecting Speakers or Microphone Speakers are included with the monitor (select models only), or they are ...of the computer: Three connectors Six connectors Audio card The connectors are sold separately. Your system may include one of three analog sound connector types on the back of the computer to speakers and microphones. For details about connecting stereo speakers to the computer, ...

Advanced Setup Guide
Page 24
...steps. 18 Advanced Setup Guide (features vary by model) Type 6 has six connectors. Six connectors Your computer model may include six sound connectors on the computer. You can connect up to a 7.1 audio system to a illustrations. 5.1 audio system (7.1 audio system for... each connector type, as shown in the instructions. When installing cables, use the sound connectors that match your computer. Sound connector Illustration Three connectors Your computer model may include a audio See the following S connector card. You can connect up...
...steps. 18 Advanced Setup Guide (features vary by model) Type 6 has six connectors. Six connectors Your computer model may include six sound connectors on the computer. You can connect up to a 7.1 audio system to a illustrations. 5.1 audio system (7.1 audio system for... each connector type, as shown in the instructions. When installing cables, use the sound connectors that match your computer. Sound connector Illustration Three connectors Your computer model may include a audio See the following S connector card. You can connect up...

Advanced Setup Guide
Page 25
... to digital speakers (select models only). The FlexiJack supports two functions. Connecting Speakers or Microphone 19 The following table shows the sound connectors on the back panel of computer systems. Sound connector Type 3 Type 6 Type S Description Line Side (gray) connects to side left and right analog speakers in a multichannel audio configuration. Mic...
... to digital speakers (select models only). The FlexiJack supports two functions. Connecting Speakers or Microphone 19 The following table shows the sound connectors on the back panel of computer systems. Sound connector Type 3 Type 6 Type S Description Line Side (gray) connects to side left and right analog speakers in a multichannel audio configuration. Mic...

Advanced Setup Guide
Page 26
...speakers option, the microphone connector in the front of the computer. Some models have the multichannel audio speakers option. HP computers support many different audio options, sound connections, and speaker configurations. NOTE: Type 3 has three connectors. Only one microphone connector in the Creative Console.... 20 Advanced Setup Guide (features vary by model) You may set up your computer for two stereo speakers or for sound output. For more details about connecting stereo speakers to the computer, and then configure the audio software for multichannel audio speaker...
...speakers option, the microphone connector in the front of the computer. Some models have the multichannel audio speakers option. HP computers support many different audio options, sound connections, and speaker configurations. NOTE: Type 3 has three connectors. Only one microphone connector in the Creative Console.... 20 Advanced Setup Guide (features vary by model) You may set up your computer for two stereo speakers or for sound output. For more details about connecting stereo speakers to the computer, and then configure the audio software for multichannel audio speaker...

Advanced Setup Guide
Page 28
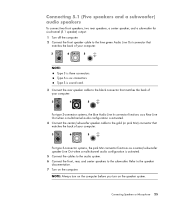
...system has a left-right front and left-right rear channel, and it may be included with your computer. 3 6 S NOTE: Type 3 is sound card. 3 Connect the cable to the subwoofer. 4 Connect the left -right, two-channel speaker system. Side speakers are sold separately. Speaker types Speakers...7.1 channels refers to the speaker documentation. 5 Turn on the speaker system. 6 Plug in more advanced systems. A subwoofer provides enhanced bass sounds. NOTE: Always turn on the computer before you turn on the computer. Your computer supports only an active (powered) speaker system. An active...
...system has a left-right front and left-right rear channel, and it may be included with your computer. 3 6 S NOTE: Type 3 is sound card. 3 Connect the cable to the subwoofer. 4 Connect the left -right, two-channel speaker system. Side speakers are sold separately. Speaker types Speakers...7.1 channels refers to the speaker documentation. 5 Turn on the speaker system. 6 Plug in more advanced systems. A subwoofer provides enhanced bass sounds. NOTE: Always turn on the computer before you turn on the computer. Your computer supports only an active (powered) speaker system. An active...
Advanced Setup Guide
Page 29
... 3 is three connectors. Step 8 is optional for a two-speaker setup. 8 After the speakers are connected to the computer, configure the audio software for sound output for four-channel (4.1 speaker) output: 1 Turn off the computer. 2 Connect the front speaker cable to the lime green Audio Line Out connector that ...matches the back of your computer model. Type S (audio card): See "Using the Creative Sound Blaster X-Fi or X-Fi Fatality audio card" in the Getting Started guide. Type S is six connectors. Connecting Speakers or Microphone 23 Type ...
... 3 is three connectors. Step 8 is optional for a two-speaker setup. 8 After the speakers are connected to the computer, configure the audio software for sound output for four-channel (4.1 speaker) output: 1 Turn off the computer. 2 Connect the front speaker cable to the lime green Audio Line Out connector that ...matches the back of your computer model. Type S (audio card): See "Using the Creative Sound Blaster X-Fi or X-Fi Fatality audio card" in the Getting Started guide. Type S is six connectors. Connecting Speakers or Microphone 23 Type ...

Advanced Setup Guide
Page 30
... (features vary by model) Type 6: See "Configuring speakers with Realtek HD Audio Manager" in the Getting Started guide. Type S (audio card): See "Using the Creative Sound Blaster X-Fi or X-Fi Fatality audio card" in the Getting Started guide. Type 3: See "Configuring speakers with Realtek HD Audio Manager" in the speaker system... audio configuration is activated. 4 Connect the cables to the audio system. 5 Connect the front and rear speakers to the computer, configure the audio software for sound output for your computer model. See "Configuring Speaker and...
... (features vary by model) Type 6: See "Configuring speakers with Realtek HD Audio Manager" in the Getting Started guide. Type S (audio card): See "Using the Creative Sound Blaster X-Fi or X-Fi Fatality audio card" in the Getting Started guide. Type 3: See "Configuring speakers with Realtek HD Audio Manager" in the speaker system... audio configuration is activated. 4 Connect the cables to the audio system. 5 Connect the front and rear speakers to the computer, configure the audio software for sound output for your computer model. See "Configuring Speaker and...
Advanced Setup Guide
Page 31
... front, rear, and center speakers to the subwoofer. Connecting Speakers or Microphone 25 Refer to the speaker documentation. 7 Turn on the speaker system. Type S is sound card. 3 Connect the rear speaker cable to the black connector that matches the back of your computer. 3 6 S For type 3-connector systems, the blue Audio Line...
... front, rear, and center speakers to the subwoofer. Connecting Speakers or Microphone 25 Refer to the speaker documentation. 7 Turn on the speaker system. Type S is sound card. 3 Connect the rear speaker cable to the black connector that matches the back of your computer. 3 6 S For type 3-connector systems, the blue Audio Line...

Advanced Setup Guide
Page 32
... green Audio Line Out connector on the speaker system. 10 After the speakers are connected to the computer, configure the audio software for sound output for your computer. 26 Advanced Setup Guide (features vary by model) See "Configuring Speaker and... Sound Options" in the Getting Started guide. Type S (audio card): See "Using the Creative Sound Blaster X-Fi or X-Fi Fatality audio card" in the Getting Started guide. Type 3: See "Configuring speakers with Realtek HD Audio Manager...
... green Audio Line Out connector on the speaker system. 10 After the speakers are connected to the computer, configure the audio software for sound output for your computer. 26 Advanced Setup Guide (features vary by model) See "Configuring Speaker and... Sound Options" in the Getting Started guide. Type S (audio card): See "Using the Creative Sound Blaster X-Fi or X-Fi Fatality audio card" in the Getting Started guide. Type 3: See "Configuring speakers with Realtek HD Audio Manager...

Advanced Setup Guide
Page 33
... model. Refer to the speaker documentation. 8 Turn on the speaker system. 11 After the speakers are connected to the computer, configure the audio software for sound output for your computer. 6 Connect the cables to the audio system. 7 Connect the front, rear, side, and center speakers to the power. 10 Turn on...
... model. Refer to the speaker documentation. 8 Turn on the speaker system. 11 After the speakers are connected to the computer, configure the audio software for sound output for your computer. 6 Connect the cables to the audio system. 7 Connect the front, rear, side, and center speakers to the power. 10 Turn on...

Advanced Setup Guide
Page 36
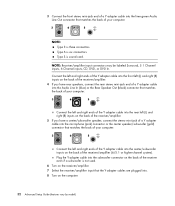
Your system may be different. This is only a suggested configuration. A B C E C DE Computer to 2.1 multichannel audio system connection A Computer back-panel connectors (type 3, type 6, or sound card) B Y adapter cables C Receiver/amplifier (audio input jacks) D Subwoofer E Front speakers (left and right input. 2.1 home stereo installation The following diagram shows a typical two-channel (2.1 speaker) installation that uses passive stereo speakers and plugs into a home stereo standard left and right) 30 Advanced Setup Guide (features vary by model)
Your system may be different. This is only a suggested configuration. A B C E C DE Computer to 2.1 multichannel audio system connection A Computer back-panel connectors (type 3, type 6, or sound card) B Y adapter cables C Receiver/amplifier (audio input jacks) D Subwoofer E Front speakers (left and right input. 2.1 home stereo installation The following diagram shows a typical two-channel (2.1 speaker) installation that uses passive stereo speakers and plugs into a home stereo standard left and right) 30 Advanced Setup Guide (features vary by model)
Advanced Setup Guide
Page 37
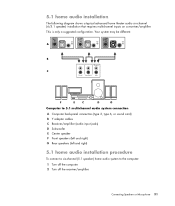
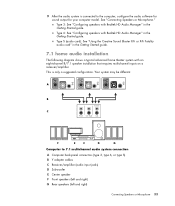
... audio six-channel (6/5.1 speaker) installation that requires multichannel inputs on a receiver/amplifier. A B C F E C D G Computer to 5.1 multichannel audio system connection A Computer back-panel connectors (type 3, type 6, or sound card) B Y adapter cables C Receiver/amplifier (audio input jacks) D Subwoofer E Center speaker F Front speakers (left and right) G Rear speakers (left and right) 5.1 home audio installation procedure...
... audio six-channel (6/5.1 speaker) installation that requires multichannel inputs on a receiver/amplifier. A B C F E C D G Computer to 5.1 multichannel audio system connection A Computer back-panel connectors (type 3, type 6, or sound card) B Y adapter cables C Receiver/amplifier (audio input jacks) D Subwoofer E Center speaker F Front speakers (left and right) G Rear speakers (left and right) 5.1 home audio installation procedure...
Advanced Setup Guide
Page 38
... stereo mini-jack end of a Y adapter cable into the lime green Audio Line Out connector that matches the back of your computer. 3 6 S NOTE: Type 3 is sound card. NOTE: Receiver/amplifier input connectors may be labeled Surround, 5.1 Channel inputs, 6 Channel inputs, CD, DVD, or DVD In. Type S is three connectors. Connect the...
... stereo mini-jack end of a Y adapter cable into the lime green Audio Line Out connector that matches the back of your computer. 3 6 S NOTE: Type 3 is sound card. NOTE: Receiver/amplifier input connectors may be labeled Surround, 5.1 Channel inputs, 6 Channel inputs, CD, DVD, or DVD In. Type S is three connectors. Connect the...
Advanced Setup Guide
Page 39
... with Realtek HD Audio Manager" in the Getting Started guide. A B C F E C D G Computer to the computer, configure the audio software for sound output for your computer model. Type S (audio card): See "Using the Creative Sound Blaster X-Fi or X-Fi Fatality audio card" in the Getting Started guide. Your system may be different. 9 After the...
... with Realtek HD Audio Manager" in the Getting Started guide. A B C F E C D G Computer to the computer, configure the audio software for sound output for your computer model. Type S (audio card): See "Using the Creative Sound Blaster X-Fi or X-Fi Fatality audio card" in the Getting Started guide. Your system may be different. 9 After the...
Advanced Setup Guide
Page 41
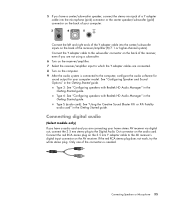
... See "Configuring speakers with Realtek HD Audio Manager" in the Getting Started guide. Connecting Speakers or Microphone 35 See "Configuring Speaker and Sound Options" in the Getting Started guide. Type 3: See "Configuring speakers with Realtek HD Audio Manager" in the Getting Started guide. Connect... the receiver/amplifier (8/7.1 or higher-channel system). Only one of the connectors is connected to the computer, configure the audio software for sound output for your computer model. If the red RCA stereo plug does not work, try the white stereo plug. Connecting digital audio ...
... See "Configuring speakers with Realtek HD Audio Manager" in the Getting Started guide. Connecting Speakers or Microphone 35 See "Configuring Speaker and Sound Options" in the Getting Started guide. Type 3: See "Configuring speakers with Realtek HD Audio Manager" in the Getting Started guide. Connect... the receiver/amplifier (8/7.1 or higher-channel system). Only one of the connectors is connected to the computer, configure the audio software for sound output for your computer model. If the red RCA stereo plug does not work, try the white stereo plug. Connecting digital audio ...

Advanced Setup Guide
Page 42
...type 3 connectors: See "Configuring speakers with Realtek HD Audio Manager" in the Getting Started guide. Audio card: See "Using the Creative Sound Blaster X-Fi or X-Fi Fatality audio card" in the Getting Started guide. Follow the instructions to enable digital audio output. 36 Advanced ... Out connector on either the audio card or the back panel. By default, digital audio output is already enabled. See "Configuring Speaker and Sound Options" in the Getting Started guide. To connect digital audio, your computer model. To connect digital audio speakers: 1 Turn off the computer...
...type 3 connectors: See "Configuring speakers with Realtek HD Audio Manager" in the Getting Started guide. Audio card: See "Using the Creative Sound Blaster X-Fi or X-Fi Fatality audio card" in the Getting Started guide. Follow the instructions to enable digital audio output. 36 Advanced ... Out connector on either the audio card or the back panel. By default, digital audio output is already enabled. See "Configuring Speaker and Sound Options" in the Getting Started guide. To connect digital audio, your computer model. To connect digital audio speakers: 1 Turn off the computer...
Advanced Setup Guide
Page 43
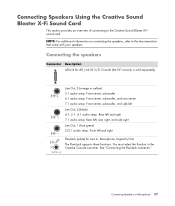
... your speakers. You must select the function in the Creative Console Launcher. NOTE: For additional information on connecting the speakers, refer to the Creative Sound Blaster X-Fi sound card. Connecting Speakers or Microphone 37 Connecting the speakers Connector Description AD-Link for AD_Link X-Fi I/O Console (the X-Fi console is sold separately) Line...
... your speakers. You must select the function in the Creative Console Launcher. NOTE: For additional information on connecting the speakers, refer to the Creative Sound Blaster X-Fi sound card. Connecting Speakers or Microphone 37 Connecting the speakers Connector Description AD-Link for AD_Link X-Fi I/O Console (the X-Fi console is sold separately) Line...


