Limited Warranty and Technical Support
Page 1
...serial number label 1 Year Non-HP accessories Not warranted by HP Intelligent Manageability software as "HP") with "1 YR," "2 YR," or "3 YR" marked on the serial number label located on the back of the unit Included HP accessories, digital writing pen, and batteries Duration of Warranty Period 1 year,... 2 years, or 3 years, according to manufacturer's warranty. LIMITED WARRANTY AND TECHNICAL SUPPORT Your HP Limited Warranty consists of the repair or ...
...serial number label 1 Year Non-HP accessories Not warranted by HP Intelligent Manageability software as "HP") with "1 YR," "2 YR," or "3 YR" marked on the serial number label located on the back of the unit Included HP accessories, digital writing pen, and batteries Duration of Warranty Period 1 year,... 2 years, or 3 years, according to manufacturer's warranty. LIMITED WARRANTY AND TECHNICAL SUPPORT Your HP Limited Warranty consists of the repair or ...

Reference Guide
Page 1
The last chapter provides additional reference material on battery pack and power management, external device connections, and modem and network connections. It also provides information on modem commands, safety, and regulatory information. Reference Guide HP Notebook Series Document Part Number: 370697-001 June 2004 This guide explains how to set up, operate, maintain, and troubleshoot your notebook.
The last chapter provides additional reference material on battery pack and power management, external device connections, and modem and network connections. It also provides information on modem commands, safety, and regulatory information. Reference Guide HP Notebook Series Document Part Number: 370697-001 June 2004 This guide explains how to set up, operate, maintain, and troubleshoot your notebook.
Reference Guide
Page 3
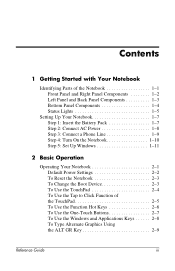
... Components 1-3 Bottom Panel Components 1-4 Status Lights 1-5 Setting Up Your Notebook 1-7 Step 1: Insert the Battery Pack 1-7 Step 2: Connect AC Power 1-8 Step 3: Connect a Phone Line 1-9 Step 4: Turn On the Notebook 1-10 Step 5: Set Up Windows 1-11 2 Basic Operation Operating Your Notebook 2-1 Default Power Settings 2-2 To Reset the Notebook 2-3 To Change the Boot Device 2-3 To Use the TouchPad...
... Components 1-3 Bottom Panel Components 1-4 Status Lights 1-5 Setting Up Your Notebook 1-7 Step 1: Insert the Battery Pack 1-7 Step 2: Connect AC Power 1-8 Step 3: Connect a Phone Line 1-9 Step 4: Turn On the Notebook 1-10 Step 5: Set Up Windows 1-11 2 Basic Operation Operating Your Notebook 2-1 Default Power Settings 2-2 To Reset the Notebook 2-3 To Change the Boot Device 2-3 To Use the TouchPad...
Reference Guide
Page 4
...Drive 2-15 Taking Care of Your Notebook 2-15 To Protect Your Hard Drive 2-15 To Maintain Your Notebook 2-16 To Safeguard Your Data 2-16 To Extend the Life of the Display 2-17 To Clean Your Notebook 2-17 3 Battery Packs and Power Management Managing Power ...Consumption 3-1 How the Notebook Manages Power Automatically 3-2 To Change Timeout Settings and Create Power Schemes 3-3 Using Battery Power 3-3 To Check Battery Status 3-3 To Respond to a Low-Battery Warning 3-4 To Recharge the Battery Pack 3-5 To ...
...Drive 2-15 Taking Care of Your Notebook 2-15 To Protect Your Hard Drive 2-15 To Maintain Your Notebook 2-16 To Safeguard Your Data 2-16 To Extend the Life of the Display 2-17 To Clean Your Notebook 2-17 3 Battery Packs and Power Management Managing Power ...Consumption 3-1 How the Notebook Manages Power Automatically 3-2 To Change Timeout Settings and Create Power Schemes 3-3 Using Battery Power 3-3 To Check Battery Status 3-3 To Respond to a Low-Battery Warning 3-4 To Recharge the Battery Pack 3-5 To ...
Reference Guide
Page 6
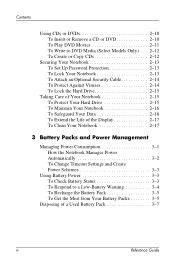
... 6-7 Local Area Network (LAN) Problems 6-8 Memory Problems 6-9 Modem Problems 6-10 PC Card (PCMCIA) Problems 6-13 Performance Problems 6-14 Power and Battery Pack Problems 6-15 Printing Problems 6-18 Serial, Parallel and USB Problems 6-19 Startup Problems 6-20 Wireless Problems 6-21 Configuring Your Notebook 6-23 To Run the BIOS Setup Utility 6-23 Updating Software and...
... 6-7 Local Area Network (LAN) Problems 6-8 Memory Problems 6-9 Modem Problems 6-10 PC Card (PCMCIA) Problems 6-13 Performance Problems 6-14 Power and Battery Pack Problems 6-15 Printing Problems 6-18 Serial, Parallel and USB Problems 6-19 Startup Problems 6-20 Wireless Problems 6-21 Configuring Your Notebook 6-23 To Run the BIOS Setup Utility 6-23 Updating Software and...
Reference Guide
Page 8
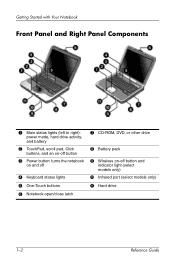
Getting Started with Your Notebook Front Panel and Right Panel Components 1 Main status lights (left to right): power mode, hard drive activity, and battery 2 TouchPad, scroll pad, Click buttons, and an on-off button 3 Power button: turns the notebook on and off 4 Keyboard status lights 5 One-Touch buttons 6 Notebook open/close latch 7 CD-ROM, DVD, or other drive 8 Battery pack 9 Wireless on-off button and indicator light (select models only) - Infrared port (select models only) q Hard drive 1-2 Reference Guide
Getting Started with Your Notebook Front Panel and Right Panel Components 1 Main status lights (left to right): power mode, hard drive activity, and battery 2 TouchPad, scroll pad, Click buttons, and an on-off button 3 Power button: turns the notebook on and off 4 Keyboard status lights 5 One-Touch buttons 6 Notebook open/close latch 7 CD-ROM, DVD, or other drive 8 Battery pack 9 Wireless on-off button and indicator light (select models only) - Infrared port (select models only) q Hard drive 1-2 Reference Guide
Reference Guide
Page 10
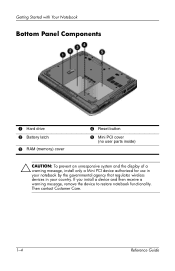
Getting Started with Your Notebook Bottom Panel Components 1 Hard drive 2 Battery latch 3 RAM (memory) cover 4 Reset button 5 Mini PCI cover (no user parts inside) Ä CAUTION: To prevent an unresponsive system and the display of a warning message, install only a Mini PCI device authorized for use in your notebook by the governmental agency that regulates wireless devices in your country. Then contact Customer Care. 1-4 Reference Guide If you install a device and then receive a warning message, remove the device to restore notebook functionality.
Getting Started with Your Notebook Bottom Panel Components 1 Hard drive 2 Battery latch 3 RAM (memory) cover 4 Reset button 5 Mini PCI cover (no user parts inside) Ä CAUTION: To prevent an unresponsive system and the display of a warning message, install only a Mini PCI device authorized for use in your notebook by the governmental agency that regulates wireless devices in your country. Then contact Customer Care. 1-4 Reference Guide If you install a device and then receive a warning message, remove the device to restore notebook functionality.
Reference Guide
Page 11
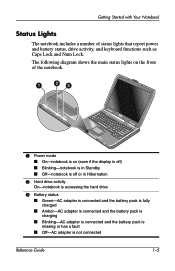
...even if the display is off) ■ Blinking-notebook is in Standby ■ Off-notebook is off or in Hibernation 2 Hard drive activity On-notebook is accessing the hard drive 3 Battery status ■ Green-AC adapter is connected and the battery pack is fully charged ■ Amber-AC adapter is... connected and the battery pack is charging ■ Blinking-AC adapter is connected and the battery pack is missing or has...
...even if the display is off) ■ Blinking-notebook is in Standby ■ Off-notebook is off or in Hibernation 2 Hard drive activity On-notebook is accessing the hard drive 3 Battery status ■ Green-AC adapter is connected and the battery pack is fully charged ■ Amber-AC adapter is... connected and the battery pack is charging ■ Blinking-AC adapter is connected and the battery pack is missing or has...
Reference Guide
Page 13
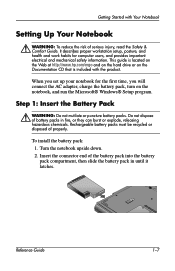
... Started with the product. When you will connect the AC adapter, charge the battery pack, turn on the Documentation CD that is located on the Web at http://www.hp.com/ergo and on the hard drive or on the notebook, and run the Microsoft® Windows® Setup program. This guide is... included with Your Notebook Setting Up Your Notebook Å WARNING: To reduce the risk of battery packs in until it latches. Do not...
... Started with the product. When you will connect the AC adapter, charge the battery pack, turn on the Documentation CD that is located on the Web at http://www.hp.com/ergo and on the hard drive or on the notebook, and run the Microsoft® Windows® Setup program. This guide is... included with Your Notebook Setting Up Your Notebook Å WARNING: To reduce the risk of battery packs in until it latches. Do not...
Reference Guide
Page 14
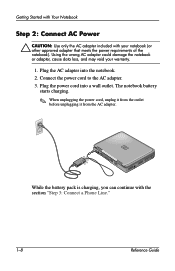
...the AC adapter into a wall outlet. While the battery pack is charging, you can continue with your warranty. 1. Connect the power cord to the AC adapter. 3. Plug the power cord into the notebook. 2. Getting Started with Your Notebook Step 2: Connect AC Power Ä CAUTION: Use... only the AC adapter included with the section "Step 3: Connect a Phone Line." 1-8 Reference Guide The notebook battery starts charging. ✎ When unplugging the power cord...
...the AC adapter into a wall outlet. While the battery pack is charging, you can continue with your warranty. 1. Connect the power cord to the AC adapter. 3. Plug the power cord into the notebook. 2. Getting Started with Your Notebook Step 2: Connect AC Power Ä CAUTION: Use... only the AC adapter included with the section "Step 3: Connect a Phone Line." 1-8 Reference Guide The notebook battery starts charging. ✎ When unplugging the power cord...
Reference Guide
Page 16
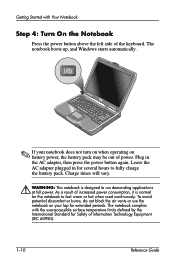
...then press the power button again. Charge times will vary. Å WARNING: This notebook is normal for the notebook to fully charge the battery pack. The notebook complies with Your Notebook Step 4: Turn On the Notebook Press the power button above the left side of the keyboard. Plug in for several... or hot when used continuously. To avoid potential discomfort or burns, do not block the air vents or use the notebook on battery power, the battery pack may be out of power. Getting Started with the user-accessible surface temperature limits defined by the International Standard for...
...then press the power button again. Charge times will vary. Å WARNING: This notebook is normal for the notebook to fully charge the battery pack. The notebook complies with Your Notebook Step 4: Turn On the Notebook Press the power button above the left side of the keyboard. Plug in for several... or hot when used continuously. To avoid potential discomfort or burns, do not block the air vents or use the notebook on battery power, the battery pack may be out of power. Getting Started with the user-accessible surface temperature limits defined by the International Standard for...
Reference Guide
Page 19
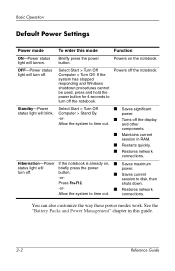
...guide. 2-2 Reference Guide Powers on , ■ Saves maximum status light will turn off the notebook. power. -or- ■ Turns off the display Allow the system to turn off .... status light will turnon. Select Start > Turn Off Computer > Turn Off. turn off the notebook. If the system has stopped responding and Windows shutdown procedures cannot be used, press and hold ... can also customize the way these power modes work. Hibernation-Power If the notebook is already on the notebook. Briefly press the power button. Computer > Stand By. and other components...
...guide. 2-2 Reference Guide Powers on , ■ Saves maximum status light will turn off the notebook. power. -or- ■ Turns off the display Allow the system to turn off .... status light will turnon. Select Start > Turn Off Computer > Turn Off. turn off the notebook. If the system has stopped responding and Windows shutdown procedures cannot be used, press and hold ... can also customize the way these power modes work. Hibernation-Power If the notebook is already on the notebook. Briefly press the power button. Computer > Stand By. and other components...
Reference Guide
Page 28
... best performance while playing movies on the DVD drive and will be permanent. When you change to the region code will be hard-coded on battery power, set the Control Panel Power Scheme to Portable/Laptop. ✎ DVDs can have regional codes embedded in which they are trying to the Help... setting region codes. Your warranty does not cover the expense of the world in the disc data. Basic Operation To Play DVD Movies If your notebook is equipped with a DVD or other DVD readable drive, it also includes DVD player software that lets you are sold. Most DVD drives let you...
... best performance while playing movies on the DVD drive and will be permanent. When you change to the region code will be hard-coded on battery power, set the Control Panel Power Scheme to Portable/Laptop. ✎ DVDs can have regional codes embedded in which they are trying to the Help... setting region codes. Your warranty does not cover the expense of the world in the disc data. Basic Operation To Play DVD Movies If your notebook is equipped with a DVD or other DVD readable drive, it also includes DVD player software that lets you are sold. Most DVD drives let you...
Reference Guide
Page 33
...■ Use a virus-scanning program (such as the Norton AntiVirus program included with your notebook) to check your files and operating system. ■ Check your battery pack for best performance. Always set the notebook on a flat surface, so that interrupts operation while the system is starting or stopping.... ■ Back up or carry the notebook by its display. ■ Do not use the notebook outside in the rain or...
...■ Use a virus-scanning program (such as the Norton AntiVirus program included with your notebook) to check your files and operating system. ■ Check your battery pack for best performance. Always set the notebook on a flat surface, so that interrupts operation while the system is starting or stopping.... ■ Back up or carry the notebook by its display. ■ Do not use the notebook outside in the rain or...

Reference Guide
Page 34
..., connect an external monitor and turn off or Standby timeouts. ■ If you are not using a screen saver or other software that prevents the notebook from changing to a soft cloth, then gently wipe the display. Instead, apply the cleaner to Display-off monitor timeouts (for both AC and... battery pack operation) to the shortest comfortable interval. ■ Avoid using an external monitor, set the Turn off or Standby mode after a time delay. ■ ...
..., connect an external monitor and turn off or Standby timeouts. ■ If you are not using a screen saver or other software that prevents the notebook from changing to a soft cloth, then gently wipe the display. Instead, apply the cleaner to Display-off monitor timeouts (for both AC and... battery pack operation) to the shortest comfortable interval. ■ Avoid using an external monitor, set the Turn off or Standby mode after a time delay. ■ ...
Reference Guide
Page 35
Your notebook is designed to help you can adjust these timeouts to suit your working habits. Reference Guide 3-1 During idle periods, the notebook automatically enters power-saving modes after specified timeout periods. 3 Battery Packs and Power Management Managing Power Consumption When you are running your notebook on battery power, you reduce power consumption and extend battery life. You can maximize operating time without compromising performance.
Your notebook is designed to help you can adjust these timeouts to suit your working habits. Reference Guide 3-1 During idle periods, the notebook automatically enters power-saving modes after specified timeout periods. 3 Battery Packs and Power Management Managing Power Consumption When you are running your notebook on battery power, you reduce power consumption and extend battery life. You can maximize operating time without compromising performance.

Reference Guide
Page 36
... this happens, you will find on resuming that was not saved will be disabled. The hard drive is turned off. Maintains your notebook to conserve battery power. If this occurs The result is To resume No keyboard, pointing device, or other components to enter Standby. Turns off the...the specified interval Hibernation is in Standby, any key or move a pointing device to the hard drive, your current session. The notebook can also enter Hibernation if battery power reaches a critically low level. Briefly press the power button to return to your previous and turns off the...
... this happens, you will find on resuming that was not saved will be disabled. The hard drive is turned off. Maintains your notebook to conserve battery power. If this occurs The result is To resume No keyboard, pointing device, or other components to enter Standby. Turns off the...the specified interval Hibernation is in Standby, any key or move a pointing device to the hard drive, your current session. The notebook can also enter Hibernation if battery power reaches a critically low level. Briefly press the power button to return to your previous and turns off the...
Reference Guide
Page 37
...as a power scheme, select Save As and enter a name for details. Using Battery Power To Check Battery Status From the battery status light » Check the battery status light on the notebook. This value is the notebook's sole source of power. ■ Place the pointer over the power icon to... open the Battery Meter window. See Windows Help for the scheme. Ä CAUTION: ...
...as a power scheme, select Save As and enter a name for details. Using Battery Power To Check Battery Status From the battery status light » Check the battery status light on the notebook. This value is the notebook's sole source of power. ■ Place the pointer over the power icon to... open the Battery Meter window. See Windows Help for the scheme. Ä CAUTION: ...

Reference Guide
Page 38
... Replace the battery pack with Your Notebook" chapter in this guide. 2. After the notebook enters Hibernation in this way, you can continue to a Low-Battery Warning The notebook automatically alerts you do not restore power within a short time, the notebook goes into Hibernation. Battery Packs and ...tab to a critically low level. The notebook first emits a high-pitched beep or displays a warning message. The Alarms and Advanced tabs provide additional power information options. Remove the battery pack from the notebook. On the battery pack 1. The number of lights that turn...
... Replace the battery pack with Your Notebook" chapter in this guide. 2. After the notebook enters Hibernation in this way, you can continue to a Low-Battery Warning The notebook automatically alerts you do not restore power within a short time, the notebook goes into Hibernation. Battery Packs and ...tab to a critically low level. The notebook first emits a high-pitched beep or displays a warning message. The Alarms and Advanced tabs provide additional power information options. Remove the battery pack from the notebook. On the battery pack 1. The number of lights that turn...
Reference Guide
Page 39
... CD-ROM or DVD-ROM drive, or any external connections such as a PC Card or a modem. ■ Set the display brightness to make your notebook has a multispeed processor, use the lower speed on the notebook model, power management settings, and level of use. If you want to ... automatic timeout settings to save your current session but will not be using the notebook for a fully charged battery pack depends on battery power (the default settings conserve battery power). To Get the Most from Your Battery Packs Follow these suggestions to the lowest comfortable level (Fn+F1). ■ Put...
... CD-ROM or DVD-ROM drive, or any external connections such as a PC Card or a modem. ■ Set the display brightness to make your notebook has a multispeed processor, use the lower speed on the notebook model, power management settings, and level of use. If you want to ... automatic timeout settings to save your current session but will not be using the notebook for a fully charged battery pack depends on battery power (the default settings conserve battery power). To Get the Most from Your Battery Packs Follow these suggestions to the lowest comfortable level (Fn+F1). ■ Put...


