Reference Guide
Page 2
Notice This manual and any examples contained herein are provided "as allowed under the copyright laws. Reproduction, adaptation, or translation of this product may also be copyrighted by method claims of merchantability and fitness for a particular ... Intel Corporation. Use of Adobe Systems Incorporated. Adobe® and Acrobat® are subject to , the implied warranties of certain U.S. Reproduction, adaptation, or translation of those programs without prior written permission of Microsoft Corporation. is prohibited. Pentium® and the Intel Inside logo are U.S. shall...
Notice This manual and any examples contained herein are provided "as allowed under the copyright laws. Reproduction, adaptation, or translation of this product may also be copyrighted by method claims of merchantability and fitness for a particular ... Intel Corporation. Use of Adobe Systems Incorporated. Adobe® and Acrobat® are subject to , the implied warranties of certain U.S. Reproduction, adaptation, or translation of those programs without prior written permission of Microsoft Corporation. is prohibited. Pentium® and the Intel Inside logo are U.S. shall...
Reference Guide
Page 4
... contact your license rights are used in the Microsoft documentation or displayed on your PC. The following License Terms govern the use it on any one HP product. Customer may make copies or adaptations of the HP software: USE. Customer may not network the software or otherwise use of the ...software (a) for details. If the COA label does not correspond to you start the PC and accept the Microsoft End-user License Agreement ("EULA"), your HP reseller for archival purposes or (b) when copying or adaptation is an essential step in the use the software on more than one...
... contact your license rights are used in the Microsoft documentation or displayed on your PC. The following License Terms govern the use it on any one HP product. Customer may make copies or adaptations of the HP software: USE. Customer may not network the software or otherwise use of the ...software (a) for details. If the COA label does not correspond to you start the PC and accept the Microsoft End-user License Agreement ("EULA"), your HP reseller for archival purposes or (b) when copying or adaptation is an essential step in the use the software on more than one...
Reference Guide
Page 5
...regulation. Hewlett-Packard may terminate this software license for restoring the hard disk of the HP product with which may not lease, sublicense the software, or distribute copies or adaptations of the software to comply with the software, who shall be bound by telecommunication without... terms of HewlettPackard. OWNERSHIP. EXPORT CLAUSE. Customer acknowledges and agrees that he /she will either destroy his /her copies and adaptations or deliver them to export or re-export the software or any copyright infringement or violation of this License Agreement. Reference Guide ...
...regulation. Hewlett-Packard may terminate this software license for restoring the hard disk of the HP product with which may not lease, sublicense the software, or distribute copies or adaptations of the software to comply with the software, who shall be bound by telecommunication without... terms of HewlettPackard. OWNERSHIP. EXPORT CLAUSE. Customer acknowledges and agrees that he /she will either destroy his /her copies and adaptations or deliver them to export or re-export the software or any copyright infringement or violation of this License Agreement. Reference Guide ...
Reference Guide
Page 14
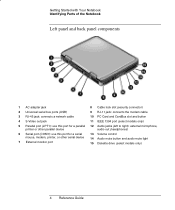
Getting Started with Your Notebook Identifying Parts of the Notebook Left panel and back panel components 1 AC adapter jack 8 Cable lock slot (security connector) 2 Universal serial bus ports (USB) 9 RJ-11 jack: connects the modem cable 3 RJ-45 jack: connects a network cable 10 PC Card and CardBus slot and button 4 S-Video out jack 11 IEEE...
Getting Started with Your Notebook Identifying Parts of the Notebook Left panel and back panel components 1 AC adapter jack 8 Cable lock slot (security connector) 2 Universal serial bus ports (USB) 9 RJ-11 jack: connects the modem cable 3 RJ-45 jack: connects a network cable 10 PC Card and CardBus slot and button 4 S-Video out jack 11 IEEE...
Reference Guide
Page 15
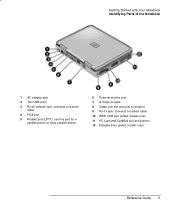
Getting Started with Your Notebook Identifying Parts of the Notebook 1 AC adapter jack 2 Two USB ports 3 RJ-45 network jack: connects a network cable 4 PS/2 port 5 Parallel port (LPT1): use this port for a parallel printer or other parallel device 6 External monitor port 7 S-Video out jack 8 Cable lock slot (security connector) 9 RJ-11 jack: connects a modem cable 10 IEEE 1394 port (select models only) 11 PC Card and CardBus slot and buttons 12 Diskette drive (select models only) Reference Guide 5
Getting Started with Your Notebook Identifying Parts of the Notebook 1 AC adapter jack 2 Two USB ports 3 RJ-45 network jack: connects a network cable 4 PS/2 port 5 Parallel port (LPT1): use this port for a parallel printer or other parallel device 6 External monitor port 7 S-Video out jack 8 Cable lock slot (security connector) 9 RJ-11 jack: connects a modem cable 10 IEEE 1394 port (select models only) 11 PC Card and CardBus slot and buttons 12 Diskette drive (select models only) Reference Guide 5
Reference Guide
Page 18
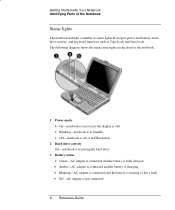
... lights on (even if the display is off) • Blinking-notebook is in Standby • Off-notebook is off or in Hibernation 2 Hard drive activity On-notebook is accessing the hard drive 3 Battery status • Green-AC adapter is connected and the battery is fully charged • Amber-AC... adapter is connected and the battery is charging • Blinking-AC adapter is connected and the battery is missing or ...
... lights on (even if the display is off) • Blinking-notebook is in Standby • Off-notebook is off or in Hibernation 2 Hard drive activity On-notebook is accessing the hard drive 3 Battery status • Green-AC adapter is connected and the battery is fully charged • Amber-AC... adapter is connected and the battery is charging • Blinking-AC adapter is connected and the battery is missing or ...
Reference Guide
Page 20
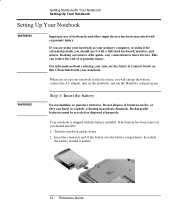
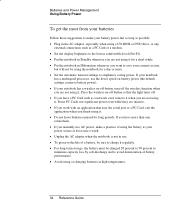
... run the Windows setup program. If the battery has been removed, you should use of ergonomic injury. Turn the notebook upside down. 2. If you are using it with a full-sized keyboard, monitor, and mouse. Rechargeable batteries must be recycled or disposed of the... Step 1: Insert the battery Do not mutilate or puncture batteries. Getting Started with Your Notebook Setting Up Your Notebook Setting Up Your Notebook WARNING Improper use it for the first time, you will charge the battery, connect the AC adapter, turn on this CD included with your primary computer, or using your...
... run the Windows setup program. If the battery has been removed, you should use of ergonomic injury. Turn the notebook upside down. 2. If you are using it with a full-sized keyboard, monitor, and mouse. Rechargeable batteries must be recycled or disposed of the... Step 1: Insert the battery Do not mutilate or puncture batteries. Getting Started with Your Notebook Setting Up Your Notebook Setting Up Your Notebook WARNING Improper use it for the first time, you will charge the battery, connect the AC adapter, turn on this CD included with your primary computer, or using your...
Reference Guide
Page 21
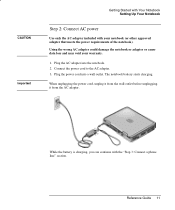
..., you can continue with your warranty. 1. Using the wrong AC adapter could damage the notebook or adapter or cause data loss and may void your notebook (or other approved adapter that meets the power requirements of the notebook). Plug the AC adapter into a wall outlet. The notebook battery starts charging. Reference Guide 11 Plug the power cord into...
..., you can continue with your warranty. 1. Using the wrong AC adapter could damage the notebook or adapter or cause data loss and may void your notebook (or other approved adapter that meets the power requirements of the notebook). Plug the AC adapter into a wall outlet. The notebook battery starts charging. Reference Guide 11 Plug the power cord into...
Reference Guide
Page 23
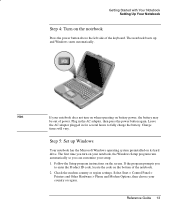
... on battery power, the battery may be out of the keyboard. Leave the AC adapter plugged in the AC adapter, then press the power button again. Getting Started with Your Notebook Setting Up Your Notebook Step 4: Turn on the notebook Press the power button above the left side of power. Charge times will vary. Plug...
... on battery power, the battery may be out of the keyboard. Leave the AC adapter plugged in the AC adapter, then press the power button again. Getting Started with Your Notebook Setting Up Your Notebook Step 4: Turn on the notebook Press the power button above the left side of power. Charge times will vary. Plug...
Reference Guide
Page 40
...enter a name for details. Reference Guide 31 If you do not want to Never. CAUTION Batteries and Power Management Managing Power Consumption The notebook can also save the settings as a power scheme. 1. Changing timeout settings and creating power schemes You can adjust the length of timeouts... functions may be disabled. See Windows Help for the scheme. To resume normal operation, restore power by connecting an AC adapter or installing a charged battery, then shut the notebook off and restart it. Select Start > Control Panel > Performance and Maintenance > Power Options. 2.
...enter a name for details. Reference Guide 31 If you do not want to Never. CAUTION Batteries and Power Management Managing Power Consumption The notebook can also save the settings as a power scheme. 1. Changing timeout settings and creating power schemes You can adjust the length of timeouts... functions may be disabled. See Windows Help for the scheme. To resume normal operation, restore power by connecting an AC adapter or installing a charged battery, then shut the notebook off and restart it. Select Start > Control Panel > Performance and Maintenance > Power Options. 2.
Reference Guide
Page 42
...working while the battery charges, the charging time may increase. Plug the AC adapter into an AC outlet. If you do not restore power within a short time, the notebook enters Hibernation. After the notebook enters Hibernation in this way, you will not be able to turn it fully...recharges. Note CAUTION Batteries and Power Management Using Battery Power To respond to a low-battery warning The notebook automatically alerts you plug in the AC adapter. Do not recharge the notebook in a briefcase or other confined space, or the battery could overheat. To get the longest operating ...
...working while the battery charges, the charging time may increase. Plug the AC adapter into an AC outlet. If you do not restore power within a short time, the notebook enters Hibernation. After the notebook enters Hibernation in this way, you will not be able to turn it fully...recharges. Note CAUTION Batteries and Power Management Using Battery Power To respond to a low-battery warning The notebook automatically alerts you plug in the AC adapter. Do not recharge the notebook in a briefcase or other confined space, or the battery could overheat. To get the longest operating ...
Reference Guide
Page 43
... as a network card, remove it when you are not using it . If you have a PC Card such as your power source at least once a week. • Unplug the AC adapter when the notebook is not in Hibernation whenever you want to avoid deterioration of battery performance. • Avoid using... or charging batteries at high temperatures. 34 Reference Guide Some PC Cards use the lower speed on battery power (the default...
... as a network card, remove it when you are not using it . If you have a PC Card such as your power source at least once a week. • Unplug the AC adapter when the notebook is not in Hibernation whenever you want to avoid deterioration of battery performance. • Avoid using... or charging batteries at high temperatures. 34 Reference Guide Some PC Cards use the lower speed on battery power (the default...
Reference Guide
Page 63
... > Close. If you have problems making this port. That is not enabled, so you must first enable it before you can purchase a simple adapter if the device is a 4-wire port. Select Start > Control Panel > Performance and Maintenance > System. 2. See the Windows online Help for the... capability. Using the infrared port • Make sure the infrared port of your applications as printers or other printer. Noise from your notebook and the infrared port of communications, open Wireless Link by using Wireless Link. 54 Reference Guide Then close all open dialog boxes. ...
... > Close. If you have problems making this port. That is not enabled, so you must first enable it before you can purchase a simple adapter if the device is a 4-wire port. Select Start > Control Panel > Performance and Maintenance > System. 2. See the Windows online Help for the... capability. Using the infrared port • Make sure the infrared port of your applications as printers or other printer. Noise from your notebook and the infrared port of communications, open Wireless Link by using Wireless Link. 54 Reference Guide Then close all open dialog boxes. ...
Reference Guide
Page 64
... peripheral devices, you dock or undock, or the notebook could damage the notebook or adapter and cause data loss, and may void your desk. You can dock or undock the notebook in place whenever you remove the notebook from Standby or Hibernation when you can leave in... any applications associated with external connections that the notebook is not entering into or resuming from your warranty. Before docking or undocking your notebook, save your notebook (or other approved adapter that might be affected. Using the wrong AC adapter could lock up. Do this as a precaution...
... peripheral devices, you dock or undock, or the notebook could damage the notebook or adapter and cause data loss, and may void your desk. You can dock or undock the notebook in place whenever you remove the notebook from Standby or Hibernation when you can leave in... any applications associated with external connections that the notebook is not entering into or resuming from your warranty. Before docking or undocking your notebook, save your notebook (or other approved adapter that might be affected. Using the wrong AC adapter could lock up. Do this as a precaution...
Reference Guide
Page 65
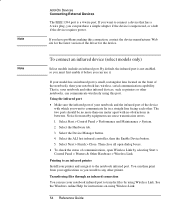
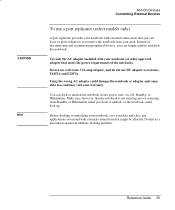
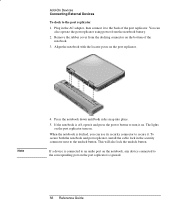
...to secure it to the undock button. This will also lock the undock button. If a device is connected to an audio port on the notebook, any device connected to the port replicator 1. The lights on the port replicator turn it and press the power button to turn on. ...the port replicator using power from the docking connector on the port replicator. Press the notebook down until both the notebook and port replicator, install the cable lock in the AC adapter, then connect it . Align the notebook with the locator posts on the bottom of the port replicator. Note 4. Plug in...
...to secure it to the undock button. This will also lock the undock button. If a device is connected to an audio port on the notebook, any device connected to the port replicator 1. The lights on the port replicator turn it and press the power button to turn on. ...the port replicator using power from the docking connector on the port replicator. Press the notebook down until both the notebook and port replicator, install the cable lock in the AC adapter, then connect it . Align the notebook with the locator posts on the bottom of the port replicator. Note 4. Plug in...
Reference Guide
Page 67
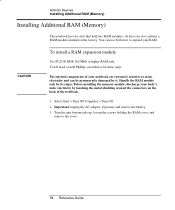
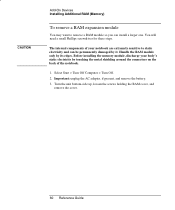
... the metal shielding around the connectors on the back of your notebook are extremely sensitive to static electricity and can use both slots to expand your body's static electricity by its edges. Important: unplug the AC adapter, if present, and remove the battery. 3. Turn the unit...Turn Off. 2. Before installing the memory module, discharge your RAM. Add-On Devices Installing Additional RAM (Memory) Installing Additional RAM (Memory) The notebook has two slots that hold two RAM modules. At least one slot contains a RAM module installed at the factory. CAUTION To install a RAM ...
... the metal shielding around the connectors on the back of your notebook are extremely sensitive to static electricity and can use both slots to expand your body's static electricity by its edges. Important: unplug the AC adapter, if present, and remove the battery. 3. Turn the unit...Turn Off. 2. Before installing the memory module, discharge your RAM. Add-On Devices Installing Additional RAM (Memory) Installing Additional RAM (Memory) The notebook has two slots that hold two RAM modules. At least one slot contains a RAM module installed at the factory. CAUTION To install a RAM ...
Reference Guide
Page 69
... to static electricity and can install a larger one. Select Start > Turn Off Computer > Turn Off. 2. Important: unplug the AC adapter, if present, and remove the battery. 3. The internal components of the notebook. 1. Turn the unit bottom-side up, loosen the screws holding the RAM cover, and remove the cover. 60 Reference Guide...
... to static electricity and can install a larger one. Select Start > Turn Off Computer > Turn Off. 2. Important: unplug the AC adapter, if present, and remove the battery. 3. The internal components of the notebook. 1. Turn the unit bottom-side up, loosen the screws holding the RAM cover, and remove the cover. 60 Reference Guide...
Reference Guide
Page 71
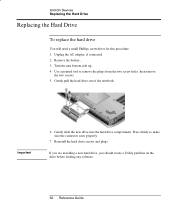
... slide the new drive into the hard drive compartment. Reinstall the hard drive screws and plugs. Turn the unit bottom side up. 4. Unplug the AC adapter, if connected. 2. Important 6. If you are installing a new hard drive, you should create a Utility partition on the drive before loading any software. ...Press firmly to remove the plugs from the two screw holes, then remove the two screws. 5. Gently pull the hard drive out of the notebook. Add-On Devices Replacing the Hard Drive Replacing the Hard Drive To replace the hard drive You will need a small Phillips screwdriver for this ...
... slide the new drive into the hard drive compartment. Reinstall the hard drive screws and plugs. Turn the unit bottom side up. 4. Unplug the AC adapter, if connected. 2. Important 6. If you are installing a new hard drive, you should create a Utility partition on the drive before loading any software. ...Press firmly to remove the plugs from the two screw holes, then remove the two screws. 5. Gently pull the hard drive out of the notebook. Add-On Devices Replacing the Hard Drive Replacing the Hard Drive To replace the hard drive You will need a small Phillips screwdriver for this ...

Reference Guide
Page 78
...box under the Error-checking section of the notebook. • Remove and reinsert the hard drive. If necessary, connect the AC adapter, then make sure it is coming from elsewhere, such as from the fan or a PC Card drive. Hard drive problems If the notebook hard drive doesn't spin • Make sure... the notebook has power. In the BIOS Setup utility, try setting ...
...box under the Error-checking section of the notebook. • Remove and reinsert the hard drive. If necessary, connect the AC adapter, then make sure it is coming from elsewhere, such as from the fan or a PC Card drive. Hard drive problems If the notebook hard drive doesn't spin • Make sure... the notebook has power. In the BIOS Setup utility, try setting ...
Reference Guide
Page 81
... 't log in to Netware servers If a Netware server is disabled, try to the LAN • Check all cables and connections. Troubleshooting and Maintenance Troubleshooting Your Notebook Local area network (LAN) problems If the built-in network adapter doesn't connect to enable it has a conflict, try disabling another device.
... 't log in to Netware servers If a Netware server is disabled, try to the LAN • Check all cables and connections. Troubleshooting and Maintenance Troubleshooting Your Notebook Local area network (LAN) problems If the built-in network adapter doesn't connect to enable it has a conflict, try disabling another device.


