ProtectTools (Select Models Only) - Windows Vista
Page 46
... unless ● The computer has a TPM security chip installed and initialized. Managing Computer Setup passwords You can protect your notebook from unauthorized use BIOS Configuration to set through the "Passwords" page in BIOS Configuration are saved immediately upon clicking the Apply... prompt, and then click OK. 4. The Computer Setup setup password protects the configuration settings and system identification information in the HP ProtectTools window to undo a password setting without supplying the previous password. NOTE The automatically generated passwords will not be set ,...
... unless ● The computer has a TPM security chip installed and initialized. Managing Computer Setup passwords You can protect your notebook from unauthorized use BIOS Configuration to set through the "Passwords" page in BIOS Configuration are saved immediately upon clicking the Apply... prompt, and then click OK. 4. The Computer Setup setup password protects the configuration settings and system identification information in the HP ProtectTools window to undo a password setting without supplying the previous password. NOTE The automatically generated passwords will not be set ,...
Software Update, Backup and Recovery - Windows Vista
Page 6
..., you are provided on the service tag. Some BIOS updates may be displayed by pressing fn+esc (if you need to enter Setup" message is Notebook. ● The product family name, series number, and serial number (S/N) are already in Windows®) or by turning on or restarting the computer, ...and then pressing f10 while the "Press to know the version of the disc, visit the HP Web site at http://www.hp.com. Then follow the instructions on the screen. 2 Chapter 1 Software updates ENWW To purchase the current Support Software disc or a ...
..., you are provided on the service tag. Some BIOS updates may be displayed by pressing fn+esc (if you need to enter Setup" message is Notebook. ● The product family name, series number, and serial number (S/N) are already in Windows®) or by turning on or restarting the computer, ...and then pressing f10 while the "Press to know the version of the disc, visit the HP Web site at http://www.hp.com. Then follow the instructions on the screen. 2 Chapter 1 Software updates ENWW To purchase the current Support Software disc or a ...

Notebook Tour
Page 2
Contents 1 Components Top components 1-2 Lights 1-2 Pointing devices 1-6 Buttons, switches and readers 1-8 Keys 1-11 Hotkey quick reference 1-12 Front components 1-13 Rear components 1-15 Right-side components 1-17 Left-side components 1-19 Bottom components 1-21 WLAN antennae 1-25 WWAN antennae (select models only 1-26 Additional hardware components 1-27 Labels 1-28 2 Specifications Operating environment 2-1 Rated input power 2-2 Index Notebook Tour ii
Contents 1 Components Top components 1-2 Lights 1-2 Pointing devices 1-6 Buttons, switches and readers 1-8 Keys 1-11 Hotkey quick reference 1-12 Front components 1-13 Rear components 1-15 Right-side components 1-17 Left-side components 1-19 Bottom components 1-21 WLAN antennae 1-25 WWAN antennae (select models only 1-26 Additional hardware components 1-27 Labels 1-28 2 Specifications Operating environment 2-1 Rated input power 2-2 Index Notebook Tour ii

Notebook Tour
Page 3
In the left pane of the computer. The illustrations in this chapter identify the standard external features included in the computer: 1. Notebook Tour 1-1 Select Hardware tab > Device Manager. Select Start > My Computer. 2. You can also add hardware or modify your device configurations using Device Manager. ✎ Components included with the computer may vary by region and by model. To see a list of hardware installed in most computer models. 1 Components This chapter explains the hardware features of the System Tasks window, select View system information. 3.
In the left pane of the computer. The illustrations in this chapter identify the standard external features included in the computer: 1. Notebook Tour 1-1 Select Hardware tab > Device Manager. Select Start > My Computer. 2. You can also add hardware or modify your device configurations using Device Manager. ✎ Components included with the computer may vary by region and by model. To see a list of hardware installed in most computer models. 1 Components This chapter explains the hardware features of the System Tasks window, select View system information. 3.
Notebook Tour
Page 4
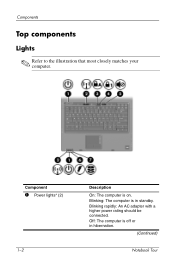
Components Top components Lights ✎ Refer to the illustration that most closely matches your computer. Component 1 Power lights* (2) 1-2 Description On: The computer is in hibernation. (Continued) Notebook Tour Off: The computer is off or in standby. Blinking rapidly: An AC adapter with a higher power rating should be connected. Blinking: The computer is on.
Components Top components Lights ✎ Refer to the illustration that most closely matches your computer. Component 1 Power lights* (2) 1-2 Description On: The computer is in hibernation. (Continued) Notebook Tour Off: The computer is off or in standby. Blinking rapidly: An AC adapter with a higher power rating should be connected. Blinking: The computer is on.

Notebook Tour
Page 5
... begins blinking rapidly. The light on the front of the computer. Green: A battery pack is the only available power source has reached a low-battery condition. Notebook Tour 1-3 Components Component 2 Wireless lights† (2) Description On: An integrated wireless device, such as a wireless local area network (WLAN) device, a wireless wide-area network (WWAN...
... begins blinking rapidly. The light on the front of the computer. Green: A battery pack is the only available power source has reached a low-battery condition. Notebook Tour 1-3 Components Component 2 Wireless lights† (2) Description On: An integrated wireless device, such as a wireless local area network (WLAN) device, a wireless wide-area network (WWAN...

Notebook Tour
Page 6
Blinking rapidly: An AC adapter with a higher power rating should be connected. On: Caps lock is on . Components Component 1 Power lights* (2) 2 Wireless lights† (2) 3 Caps lock light Description On: The computer is on . (Continued) 1-4 Notebook Tour Off: The computer is off or in standby. On: An integrated wireless device, such as a wireless local area network (WLAN) device, a wireless wide-area network (WWAN), and/or a Bluetooth device, is in hibernation. Blinking: The computer is turned on.
Blinking rapidly: An AC adapter with a higher power rating should be connected. On: Caps lock is on . Components Component 1 Power lights* (2) 2 Wireless lights† (2) 3 Caps lock light Description On: The computer is on . (Continued) 1-4 Notebook Tour Off: The computer is off or in standby. On: An integrated wireless device, such as a wireless local area network (WLAN) device, a wireless wide-area network (WWAN), and/or a Bluetooth device, is in hibernation. Blinking: The computer is turned on.

Notebook Tour
Page 7
.... 6 Drive light Blinking: The hard drive or optical drive is charging. Blinking amber: A battery pack that is always visible on the front of the computer. Notebook Tour 1-5 When the battery reaches a critical low-battery condition, the battery light begins blinking rapidly. Green: A battery pack is close to full charge capacity. Both...
.... 6 Drive light Blinking: The hard drive or optical drive is charging. Blinking amber: A battery pack that is always visible on the front of the computer. Notebook Tour 1-5 When the battery reaches a critical low-battery condition, the battery light begins blinking rapidly. Green: A battery pack is close to full charge capacity. Both...

Notebook Tour
Page 8
... TouchPad button* Functions like the right button on the screen. To view and change TouchPad preferences, select Start > Control Panel > Printers and Other Hardware > Mouse. 1-6 Notebook Tour Components Pointing devices TouchPad (select models only) Component Description 1 TouchPad* Moves the pointer and selects or activates items on an external mouse. *This table...
... TouchPad button* Functions like the right button on the screen. To view and change TouchPad preferences, select Start > Control Panel > Printers and Other Hardware > Mouse. 1-6 Notebook Tour Components Pointing devices TouchPad (select models only) Component Description 1 TouchPad* Moves the pointer and selects or activates items on an external mouse. *This table...

Notebook Tour
Page 9
Functions like the left button on an external mouse. Pointing stick (select models only) Components Component 1 Pointing stick 2 Left pointing stick button 3 Right pointing stick button Description Moves the pointer and selects or activates items on an external mouse. Functions like the right button on the screen. Notebook Tour 1-7
Functions like the left button on an external mouse. Pointing stick (select models only) Components Component 1 Pointing stick 2 Left pointing stick button 3 Right pointing stick button Description Moves the pointer and selects or activates items on an external mouse. Functions like the right button on the screen. Notebook Tour 1-7

Notebook Tour
Page 10
Components Buttons, switches and readers ✎ Refer to the illustration that most closely matches your computer. 1-8 Notebook Tour
Components Buttons, switches and readers ✎ Refer to the illustration that most closely matches your computer. 1-8 Notebook Tour

Notebook Tour
Page 11
Notebook Tour 1-9 For information about changing default settings, refer to Windows, instead of a password logon. *This table describes default settings. Components Component Description 1 Power button When ...
Notebook Tour 1-9 For information about changing default settings, refer to Windows, instead of a password logon. *This table describes default settings. Components Component Description 1 Power button When ...

Notebook Tour
Page 12
.... ■ In standby, briefly press to exit standby. ■ In hibernation, briefly press to the user guides located in the Help and Support Center. 1-10 Notebook Tour For information about changing default settings, refer to exit hibernation. If the computer has stopped responding and Windows shutdown procedures cannot be set up...
.... ■ In standby, briefly press to exit standby. ■ In hibernation, briefly press to the user guides located in the Help and Support Center. 1-10 Notebook Tour For information about changing default settings, refer to exit hibernation. If the computer has stopped responding and Windows shutdown procedures cannot be set up...

Notebook Tour
Page 13
Component 1 esc key 2 fn key 3 Windows logo key 4 Windows applications key Description Displays system information when pressed in combination with the fn key. Displays a shortcut menu for items beneath the pointer. (Continued) Notebook Tour 1-11 Displays the Windows Start menu. Executes frequently used system functions when pressed in combination with a function key or the esc key. Components Keys ✎ Your computer may look slightly different from the illustration in this chapter.
Component 1 esc key 2 fn key 3 Windows logo key 4 Windows applications key Description Displays system information when pressed in combination with the fn key. Displays a shortcut menu for items beneath the pointer. (Continued) Notebook Tour 1-11 Displays the Windows Start menu. Executes frequently used system functions when pressed in combination with a function key or the esc key. Components Keys ✎ Your computer may look slightly different from the illustration in this chapter.
Notebook Tour
Page 14
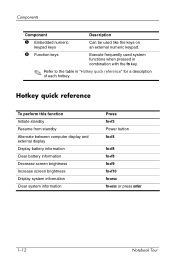
... system information Press fn+f3 Power button fn+f4 fn+f8 fn+f8 fn+f9 fn+f10 fn+esc fn+esc or press enter 1-12 Notebook Tour
... system information Press fn+f3 Power button fn+f4 fn+f8 fn+f8 fn+f9 fn+f10 fn+esc fn+esc or press enter 1-12 Notebook Tour
Notebook Tour
Page 15
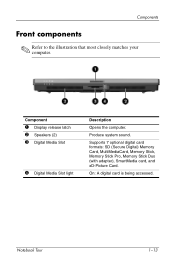
Supports 7 optional digital card formats: SD (Secure Digital) Memory Card, MultiMediaCard, Memory Stick, Memory Stick Pro, Memory Stick Duo (with adapter), SmartMedia card, and xD-Picture Card. Produce system sound. On: A digital card is being accessed. Notebook Tour 1-13 Components Front components ✎ Refer to the illustration that most closely matches your computer. Component 1 Display release latch 2 Speakers (2) 3 Digital Media Slot 4 Digital Media Slot light Description Opens the computer.
Supports 7 optional digital card formats: SD (Secure Digital) Memory Card, MultiMediaCard, Memory Stick, Memory Stick Pro, Memory Stick Duo (with adapter), SmartMedia card, and xD-Picture Card. Produce system sound. On: A digital card is being accessed. Notebook Tour 1-13 Components Front components ✎ Refer to the illustration that most closely matches your computer. Component 1 Display release latch 2 Speakers (2) 3 Digital Media Slot 4 Digital Media Slot light Description Opens the computer.

Notebook Tour
Page 16
Components Component 1 Display release latch 2 Speakers (2) Description Opens the computer. Produce system sound. 1-14 Notebook Tour
Components Component 1 Display release latch 2 Speakers (2) Description Opens the computer. Produce system sound. 1-14 Notebook Tour
Notebook Tour
Page 17
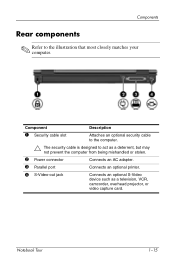
Components Rear components ✎ Refer to act as a deterrent, but may not prevent the computer from being mishandled or stolen. 2 Power connector Connects an AC adapter. 3 Parallel port Connects an optional printer. 4 S-Video-out jack Connects an optional S-Video device such as a television, VCR, camcorder, overhead projector, or video capture card. Notebook Tour 1-15 Component Description 1 Security cable slot Attaches an optional security cable to the computer. Ä The security cable is designed to the illustration that most closely matches your computer.
Components Rear components ✎ Refer to act as a deterrent, but may not prevent the computer from being mishandled or stolen. 2 Power connector Connects an AC adapter. 3 Parallel port Connects an optional printer. 4 S-Video-out jack Connects an optional S-Video device such as a television, VCR, camcorder, overhead projector, or video capture card. Notebook Tour 1-15 Component Description 1 Security cable slot Attaches an optional security cable to the computer. Ä The security cable is designed to the illustration that most closely matches your computer.
Notebook Tour
Page 18
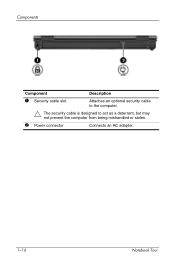
Components Component Description 1 Security cable slot Attaches an optional security cable to the computer. Ä The security cable is designed to act as a deterrent, but may not prevent the computer from being mishandled or stolen. 2 Power connector Connects an AC adapter. 1-16 Notebook Tour
Components Component Description 1 Security cable slot Attaches an optional security cable to the computer. Ä The security cable is designed to act as a deterrent, but may not prevent the computer from being mishandled or stolen. 2 Power connector Connects an AC adapter. 1-16 Notebook Tour

Notebook Tour
Page 19
Releases the media tray. Connects an optional IEEE 1394 device, such as a camcorder. Component 1 USB ports (2) 2 1394 port 3 RJ-11 (modem) jack 4 Optical drive 5 Optical drive button 6 Serial port Description Connect optional USB devices. Notebook Tour 1-17 Connects a modem cable. Components Right-side components ✎ Refer to the illustration that most closely matches your computer. Reads an optical disc. Connects an optional serial device.
Releases the media tray. Connects an optional IEEE 1394 device, such as a camcorder. Component 1 USB ports (2) 2 1394 port 3 RJ-11 (modem) jack 4 Optical drive 5 Optical drive button 6 Serial port Description Connect optional USB devices. Notebook Tour 1-17 Connects a modem cable. Components Right-side components ✎ Refer to the illustration that most closely matches your computer. Reads an optical disc. Connects an optional serial device.


