ProtectTools (Select Models Only) - Windows Vista
Page 6
Denying access to a user or group 66 Allowing access to a device class for one user of a group 66 Allowing access to a specific device for one user of a group 67 Glossary ...68 Index ...70 vi ENWW
Denying access to a user or group 66 Allowing access to a device class for one user of a group 66 Allowing access to a specific device for one user of a group 67 Glossary ...68 Index ...70 vi ENWW
ProtectTools (Select Models Only) - Windows Vista
Page 11
... include special characters and punctuation marks. ● Substitute special characters or numbers for letters in a key word. ENWW Managing HP ProtectTools passwords 5 Creating a secure password When creating passwords, you must first follow any specifications that would appear in a dictionary. ● Do not use your name for the password, or any other personal...
... include special characters and punctuation marks. ● Substitute special characters or numbers for letters in a key word. ENWW Managing HP ProtectTools passwords 5 Creating a secure password When creating passwords, you must first follow any specifications that would appear in a dictionary. ● Do not use your name for the password, or any other personal...
ProtectTools (Select Models Only) - Windows Vista
Page 72
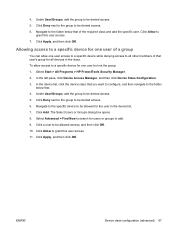
... to add. 6. Allowing access to a device class for users or groups to remove, and then click Remove. 5. Select Start > All Programs > HP ProtectTools Security Manager. 2. Adding a user or a group 1. Denying access to be denied access. 5. Under User/Groups, add the user or group...group you want to types of devices. Select Start > All Programs > HP ProtectTools Security Manager. 2. The Select Users or Groups dialog box opens. 5. Device class configuration (advanced) More selections are available to allow specific users or groups of users to be granted or denied access to configure...
... to add. 6. Allowing access to a device class for users or groups to remove, and then click Remove. 5. Select Start > All Programs > HP ProtectTools Security Manager. 2. Adding a user or a group 1. Denying access to be denied access. 5. Under User/Groups, add the user or group...group you want to types of devices. Select Start > All Programs > HP ProtectTools Security Manager. 2. The Select Users or Groups dialog box opens. 5. Device class configuration (advanced) More selections are available to allow specific users or groups of users to be granted or denied access to configure...
ProtectTools (Select Models Only) - Windows Vista
Page 73
... dialog box opens. 8. Select Advanced > Find Now to a specific device for all other members of the required class and add the specific user. To allow one user but not the group: 1. Select Start > All Programs > HP ProtectTools Security Manager. 2. Navigate to the folder below that you ...want to configure, and then navigate to be denied access. 5. Navigate to the specific device to be denied access. 5. Under User/Groups, add the group...
... dialog box opens. 8. Select Advanced > Find Now to a specific device for all other members of the required class and add the specific user. To allow one user but not the group: 1. Select Start > All Programs > HP ProtectTools Security Manager. 2. Navigate to the folder below that you ...want to configure, and then navigate to be denied access. 5. Navigate to the specific device to be denied access. 5. Under User/Groups, add the group...

ProtectTools (Select Models Only) - Windows Vista
Page 74
... an individual or a company by binding the identity of the digital certificate owner to a pair of electronic keys that can be generated and protected by specific individuals. BIOS profile Group of BIOS configuration settings that are uniquely named, and each has a set of common rules and procedures. Biometric Category of authentication...
... an individual or a company by binding the identity of the digital certificate owner to a pair of electronic keys that can be generated and protected by specific individuals. BIOS profile Group of BIOS configuration settings that are uniquely named, and each has a set of common rules and procedures. Biometric Category of authentication...
ProtectTools (Select Models Only) - Windows Vista
Page 75
.... Virtual token Security feature that works very much like an account or profile for identification at startup or restart. Identity In the HP ProtectTools Credential Manager, a group of credentials and settings that is turned on. Windows user account Profile for the power-on and ... a computer. It is used to authenticate the owner to an individual computer. USB token Security device that meets the Trusted Computing Group (TCG) specifications. The token is saved either on a local computer, in a workgroup, or on the computer hard drive or in Computer Setup for a user...
.... Virtual token Security feature that works very much like an account or profile for identification at startup or restart. Identity In the HP ProtectTools Credential Manager, a group of credentials and settings that is turned on. Windows user account Profile for the power-on and ... a computer. It is used to authenticate the owner to an individual computer. USB token Security device that meets the Trusted Computing Group (TCG) specifications. The token is saved either on a local computer, in a workgroup, or on the computer hard drive or in Computer Setup for a user...
ProtectTools (Select Models Only) - Windows Vista
Page 76
...Computer Setup administrator password 3 Computer Setup passwords, managing 40 Computer Setup setup password changing 42 setting 41 Credential Manager for HP ProtectTools account, adding 53 account, removing 53 administrator tasks 59 application protection 57 70 Index application protection, removing 57 changing... 51 identity, removing 51 identity, restoring 51 Java Card, registering 47 locking 52 logging on 45 logon password 4 logon specifications 59 logon wizard 45 new account, creating 46 recovery file password 4 registering fingerprints 46 registering other credentials 48 registering smart ...
...Computer Setup administrator password 3 Computer Setup passwords, managing 40 Computer Setup setup password changing 42 setting 41 Credential Manager for HP ProtectTools account, adding 53 account, removing 53 administrator tasks 59 application protection 57 70 Index application protection, removing 57 changing... 51 identity, removing 51 identity, restoring 51 Java Card, registering 47 locking 52 logging on 45 logon password 4 logon specifications 59 logon wizard 45 new account, creating 46 recovery file password 4 registering fingerprints 46 registering other credentials 48 registering smart ...
Software Update, Backup and Recovery - Windows Vista
Page 3
Table of contents 1 Software updates Updating the software ...1 Downloading software updates from the HP Web site 2 Accessing computer information 2 Downloading a BIOS update 3 Installing a BIOS update ...4 Downloading and installing other software 5 2 Backup Safeguarding your data ...6 Backing up the system ...7 Backing up specific files or folders 7 Backing up the entire hard drive 8 Backing up modifications...
Table of contents 1 Software updates Updating the software ...1 Downloading software updates from the HP Web site 2 Accessing computer information 2 Downloading a BIOS update 3 Installing a BIOS update ...4 Downloading and installing other software 5 2 Backup Safeguarding your data ...6 Backing up the system ...7 Backing up specific files or folders 7 Backing up the entire hard drive 8 Backing up modifications...
Software Update, Backup and Recovery - Windows Vista
Page 11
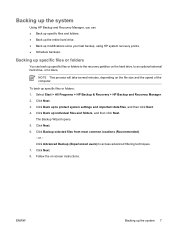
...Click Next. 6. Backing up the system Using HP Backup and Recovery Manager, you can back up modifications since your last backup, using HP system recovery points. ● Schedule backups. Backing up specific files or folders You can ● Back up specific files and folders. ● Back up the... entire hard drive. ● Back up specific files or folders to the recovery partition...
...Click Next. 6. Backing up the system Using HP Backup and Recovery Manager, you can back up modifications since your last backup, using HP system recovery points. ● Schedule backups. Backing up specific files or folders You can ● Back up specific files and folders. ● Back up the... entire hard drive. ● Back up specific files or folders to the recovery partition...

Software Update, Backup and Recovery - Windows Vista
Page 13
.... Scheduling backups To schedule backups: 1. Follow the on -screen instructions. You can schedule recovery points for a specific time or event in time. NOTE The first system recovery point, a snapshot of the entire image, is performing optimally. ...HP Backup Scheduler. Follow the on -screen instructions. Backing up modifications made to the system When you back up modifications since that time. To create and schedule a system recovery point: 1. Schedule system recovery points at specific intervals (now, daily, weekly, or monthly) or at specific events, such as at a specific...
.... Scheduling backups To schedule backups: 1. Follow the on -screen instructions. You can schedule recovery points for a specific time or event in time. NOTE The first system recovery point, a snapshot of the entire image, is performing optimally. ...HP Backup Scheduler. Follow the on -screen instructions. Backing up modifications made to the system When you back up modifications since that time. To create and schedule a system recovery point: 1. Schedule system recovery points at specific intervals (now, daily, weekly, or monthly) or at specific events, such as at a specific...

External Devices
Page 5
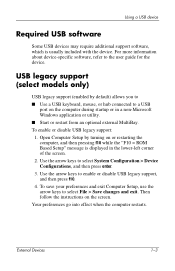
... your preferences and exit Computer Setup, use the arrow keys to select System Configuration > Device Configurations, and then press enter. 3. For more information about device-specific software, refer to enable or disable USB legacy support. 4. Open Computer Setup by default) allows you to ■ Use a USB keyboard, mouse, or hub connected...
... your preferences and exit Computer Setup, use the arrow keys to select System Configuration > Device Configurations, and then press enter. 3. For more information about device-specific software, refer to enable or disable USB legacy support. 4. Open Computer Setup by default) allows you to ■ Use a USB keyboard, mouse, or hub connected...
External Devices
Page 7
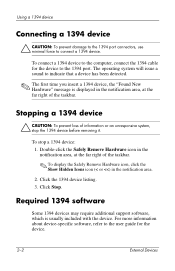
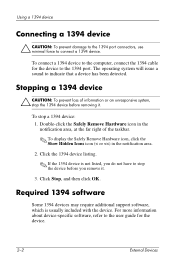
Using a 1394 device Connecting a 1394 device Ä CAUTION: To prevent damage to the 1394 port connectors, use minimal force to the 1394 port. The operating system will issue a sound to indicate that a device has been detected. ✎ The first time you insert a 1394 device, the "Found New Hardware" message is displayed in the notification area, at the far right of the taskbar. Stopping a 1394 device Ä CAUTION: To prevent loss of the taskbar. ✎ To display the Safely Remove Hardware icon, click the Show Hidden Icons icon (< or To stop the 1394 device before removing it. ...
Using a 1394 device Connecting a 1394 device Ä CAUTION: To prevent damage to the 1394 port connectors, use minimal force to the 1394 port. The operating system will issue a sound to indicate that a device has been detected. ✎ The first time you insert a 1394 device, the "Found New Hardware" message is displayed in the notification area, at the far right of the taskbar. Stopping a 1394 device Ä CAUTION: To prevent loss of the taskbar. ✎ To display the Safely Remove Hardware icon, click the Show Hidden Icons icon (< or To stop the 1394 device before removing it. ...
External Devices - Windows Vista
Page 5
... from an optional external MultiBay. USB legacy support (select models only) USB legacy support (enabled by turning on the screen. For more information about device-specific software, refer to select File > Save changes and exit. To enable or disable USB legacy support: 1.
... from an optional external MultiBay. USB legacy support (select models only) USB legacy support (enabled by turning on the screen. For more information about device-specific software, refer to select File > Save changes and exit. To enable or disable USB legacy support: 1.
External Devices - Windows Vista
Page 7
Using a 1394 device Connecting a 1394 device Ä CAUTION: To prevent damage to the 1394 port connectors, use minimal force to indicate that a device has been detected. The operating system will issue a sound to connect a 1394 device. To stop the 1394 device before removing it. To connect a 1394 device to the computer, connect the 1394 cable for the device to the 1394 port. Stopping a 1394 device Ä CAUTION: To prevent loss of the taskbar. ✎ To display the Safely Remove Hardware icon, click the Show Hidden Icons icon (< or Double-click the Safely Remove Hardware icon ...
Using a 1394 device Connecting a 1394 device Ä CAUTION: To prevent damage to the 1394 port connectors, use minimal force to indicate that a device has been detected. The operating system will issue a sound to connect a 1394 device. To stop the 1394 device before removing it. To connect a 1394 device to the computer, connect the 1394 cable for the device to the 1394 port. Stopping a 1394 device Ä CAUTION: To prevent loss of the taskbar. ✎ To display the Safely Remove Hardware icon, click the Show Hidden Icons icon (< or Double-click the Safely Remove Hardware icon ...
External Media Cards
Page 7
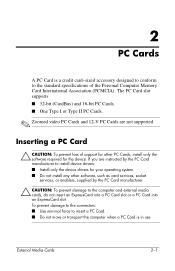
... prevent damage to the connectors: ■ Use minimal force to insert a PC Card. ■ Do not move or transport the computer when a PC Card is a credit card-sized accessory designed to conform to the standard specifications of support for the device. Inserting a PC Card Ä CAUTION: To prevent loss of the Personal Computer Memory...
... prevent damage to the connectors: ■ Use minimal force to insert a PC Card. ■ Do not move or transport the computer when a PC Card is a credit card-sized accessory designed to conform to the standard specifications of support for the device. Inserting a PC Card Ä CAUTION: To prevent loss of the Personal Computer Memory...

External Media Cards
Page 15
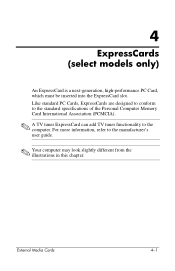
For more information, refer to the computer. Like standard PC Cards, ExpressCards are designed to conform to the standard specifications of the Personal Computer Memory Card International Association (PCMCIA). ✎ A TV tuner ExpressCard can add TV tuner functionality to the manufacturer's user guide. ✎ Your computer may look slightly different from the illustrations in this chapter. External Media Cards 4-1 4 ExpressCards (select models only) An ExpressCard is a next-generation, high-performance PC Card, which must be inserted into the ExpressCard slot.
For more information, refer to the computer. Like standard PC Cards, ExpressCards are designed to conform to the standard specifications of the Personal Computer Memory Card International Association (PCMCIA). ✎ A TV tuner ExpressCard can add TV tuner functionality to the manufacturer's user guide. ✎ Your computer may look slightly different from the illustrations in this chapter. External Media Cards 4-1 4 ExpressCards (select models only) An ExpressCard is a next-generation, high-performance PC Card, which must be inserted into the ExpressCard slot.

External Media Cards - Windows Vista
Page 7
...minimal force to the standard specifications of support for the device. The PC Card slot supports ■ 32-bit (CardBus) and 16-bit PC Cards. ■ One Type I or Type II PC Cards. ✎ Zoomed video PC Cards and 12-V PC Cards are instructed by the PC Card manufacturer to install ..., do not insert an ExpressCard into a PC Card slot or a PC Card into an ExpressCard slot. Inserting a PC Card Ä CAUTION: To prevent loss of the Personal Computer Memory Card International Association (PCMCIA). External Media Cards 2-1 2 PC Cards A PC Card is a credit card-sized accessory designed...
...minimal force to the standard specifications of support for the device. The PC Card slot supports ■ 32-bit (CardBus) and 16-bit PC Cards. ■ One Type I or Type II PC Cards. ✎ Zoomed video PC Cards and 12-V PC Cards are instructed by the PC Card manufacturer to install ..., do not insert an ExpressCard into a PC Card slot or a PC Card into an ExpressCard slot. Inserting a PC Card Ä CAUTION: To prevent loss of the Personal Computer Memory Card International Association (PCMCIA). External Media Cards 2-1 2 PC Cards A PC Card is a credit card-sized accessory designed...
External Media Cards - Windows Vista
Page 15
External Media Cards 4-1 4 ExpressCards (select models only) An ExpressCard is a next-generation, high-performance PC Card, which must be inserted into the ExpressCard slot. For more information, refer to the computer. Like standard PC Cards, ExpressCards are designed to conform to the standard specifications of the Personal Computer Memory Card International Association (PCMCIA). ✎ A TV tuner ExpressCard can add TV tuner functionality to the manufacturer's user guide. ✎ Your computer may look slightly different from the illustrations in this chapter.
External Media Cards 4-1 4 ExpressCards (select models only) An ExpressCard is a next-generation, high-performance PC Card, which must be inserted into the ExpressCard slot. For more information, refer to the computer. Like standard PC Cards, ExpressCards are designed to conform to the standard specifications of the Personal Computer Memory Card International Association (PCMCIA). ✎ A TV tuner ExpressCard can add TV tuner functionality to the manufacturer's user guide. ✎ Your computer may look slightly different from the illustrations in this chapter.
Multimedia
Page 16
... to a DVD or video CD ✎ For details about using software included with additional multimedia software on CD or as online Help files within the specific application. These guides may be provided on an optical disc. Some models may be shipped with the computer, refer to the software user guides. Multimedia...
... to a DVD or video CD ✎ For details about using software included with additional multimedia software on CD or as online Help files within the specific application. These guides may be provided on an optical disc. Some models may be shipped with the computer, refer to the software user guides. Multimedia...

Notebook Tour
Page 2
Contents 1 Components Top components 1-2 Lights 1-2 Pointing devices 1-6 Buttons, switches and readers 1-8 Keys 1-11 Hotkey quick reference 1-12 Front components 1-13 Rear components 1-15 Right-side components 1-17 Left-side components 1-19 Bottom components 1-21 WLAN antennae 1-25 WWAN antennae (select models only 1-26 Additional hardware components 1-27 Labels 1-28 2 Specifications Operating environment 2-1 Rated input power 2-2 Index Notebook Tour ii
Contents 1 Components Top components 1-2 Lights 1-2 Pointing devices 1-6 Buttons, switches and readers 1-8 Keys 1-11 Hotkey quick reference 1-12 Front components 1-13 Rear components 1-15 Right-side components 1-17 Left-side components 1-19 Bottom components 1-21 WLAN antennae 1-25 WWAN antennae (select models only 1-26 Additional hardware components 1-27 Labels 1-28 2 Specifications Operating environment 2-1 Rated input power 2-2 Index Notebook Tour ii


